A Little Tipsy

Creative Tips & Ideas

  • home
  • About Me
  • the tipsy top
  • press
  • projects
  • contact me
[print_thumbnail_slider]

Make Fabric Necklace

January 3, 2012 By Michelle Barneck 7 Comments

With the New Year Clean up and Organize fest I have been doing a bit of stash busting. I’m not sure who’s happier about it, me or my husband. I had a bit of a collection starting of things I had plans for. You guys know all about that, right? Tell me I’m not the only one. Anyway, I’ve seen so many cute fabric necklaces and decided to give it a go with my stash.
I like to call her Annabelle.
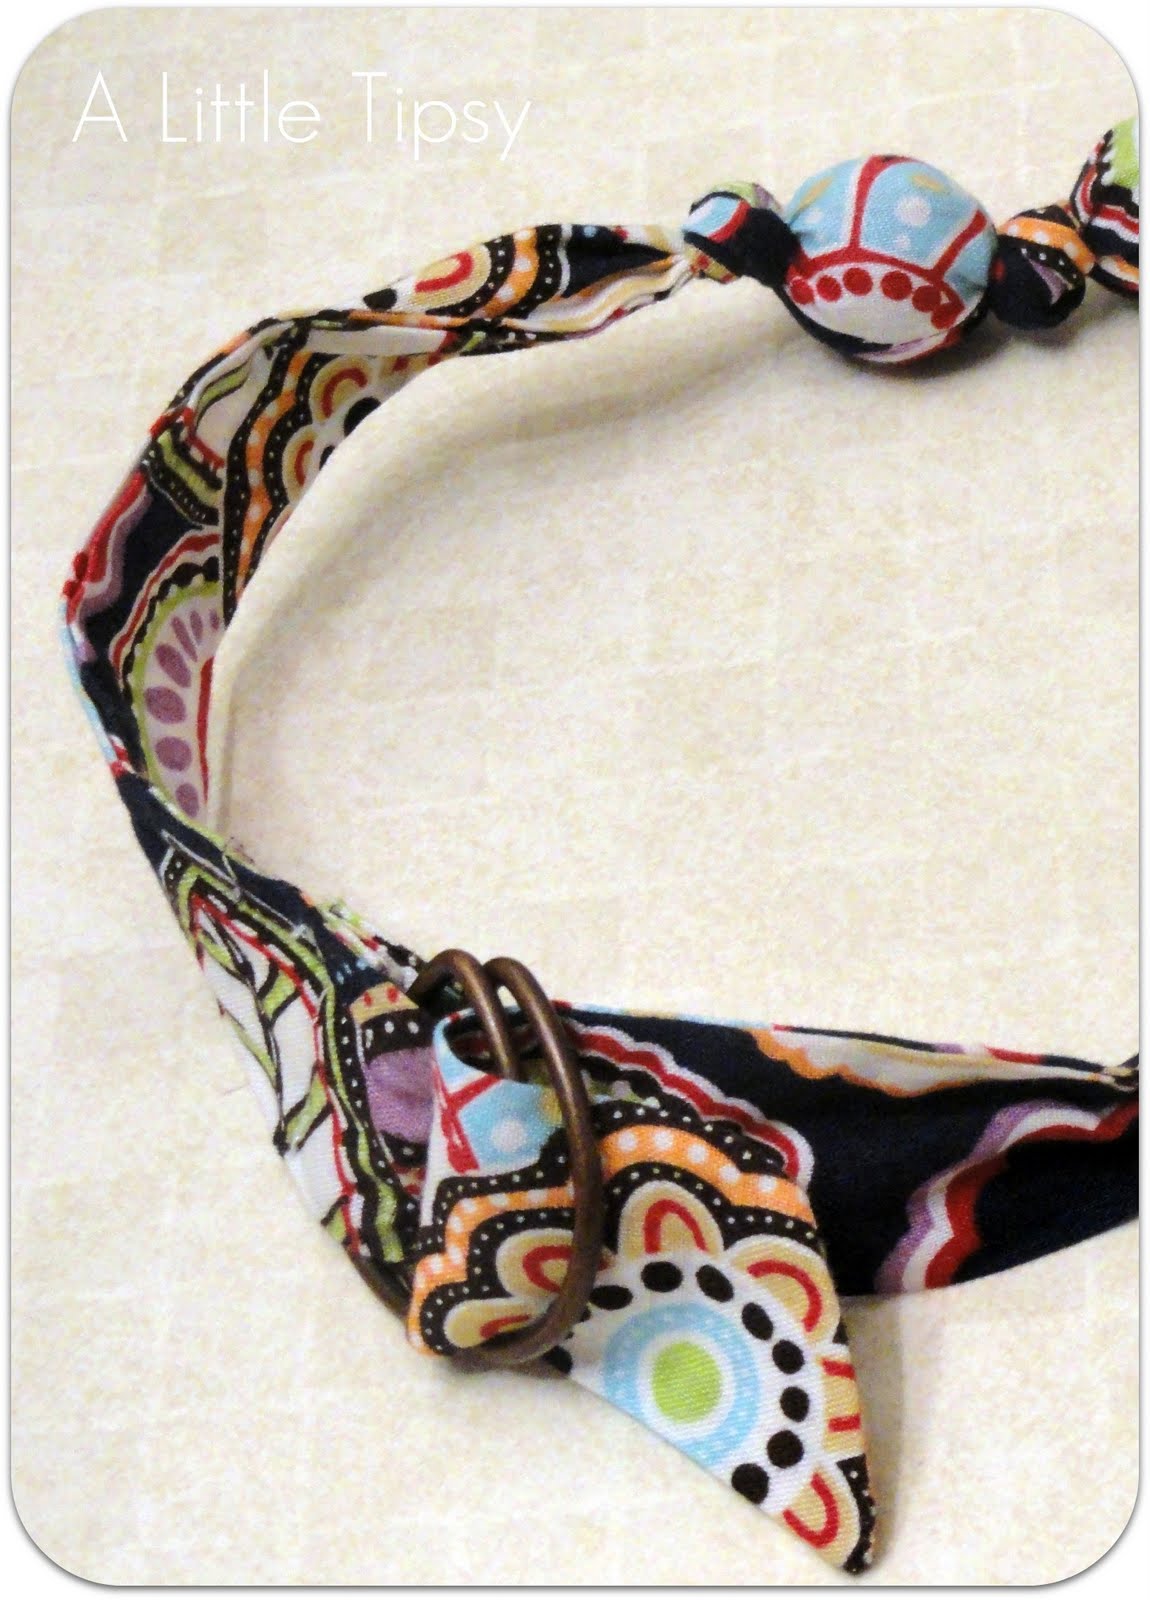
Isn’t she fun?! Chunkiness, bold colors/pattern and hardware all in one necklace. Ya, you’re pretty much going to die when you see how easy it is!
Make Fabric Necklace
Supplies:
Fabric D ring belt
(don’t have one, skip down to the bottom to make one)
Big Wooden Beads
Scissors
Cut a slit through the back side of the fabric on the belt jut below the d ring seam. Tie a knot in the opposite end of the belt where you want the beads to stop. Slide a bead in to the fabric tube through the slit all the way down to the knot. Twist your fabric and tie a knot after the bead. Add another bead and tie another knot. Continue until you have your desired look.

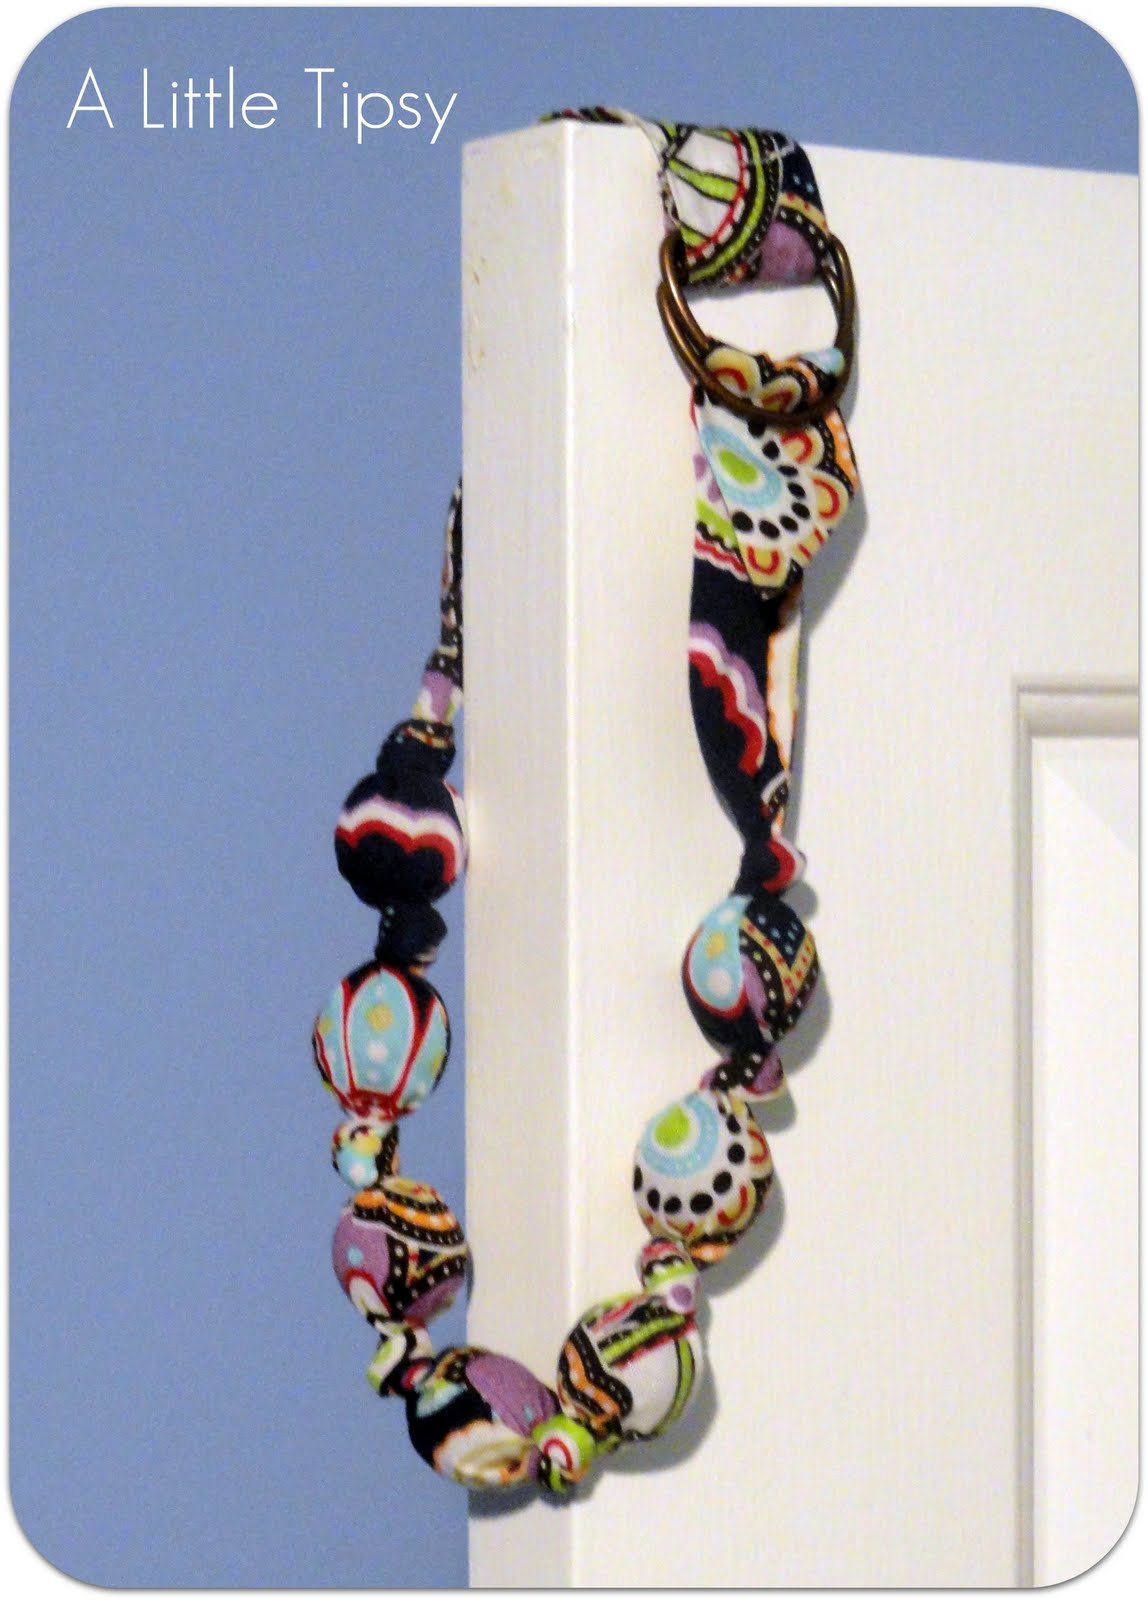
Fasten around your neck with the D rings. It is adjustable so you can make it the length you need with your current outfit.

Did you ever think it could be so easy to make a fabric necklace?!

No belt?
Just sew a fabric tube about 1.5 inches wide. Sew one end shut and fold the other end over a pair of D rings and sew. If you put the beads in before you sew one of the ends you won’t have to cut a slit.
I would love to see if you make one!

If you like this necklace, you might also like our Tie Dye Accessories, Tshirt DIY Necklace, or our Quite a Spectacle Anthro Knock off.

Linking up with:
Free for All Friday
Frugal Fridays
I’m Lovin’ It
Weekend Wrap Up
Whatcha Got Weekend

P.S. Don’t forget to sign up for free Tipsy updates via RSS or email.

We have decided to truncate our feed to help protect against stolen content. I apologize for any inconvenience. Please love us anyway. 🙂

Organize It

December 31, 2011 By Michelle Barneck 6 Comments

It’s that time. Decide on a goal and give it a go for a month or so. 😉 Anyone else picking organizing this time around? Getting the clutter under control is a big task here are a bunch of cool ways to organize it. If you follow me on Pinterest you may recognize these. 😉

1. Cleaning Supplies
Tension rod under the sink {source}
Shoe caddy on the back of the door {source}
2. Jewelry

Hardware Handles {Liz Marie Blog}
Rake {Ilovemyapartment.com}
Peg Board {Button Bird Designs}
Ice Cube Trays {Bead Up}
Cutlery Tray {MiniManor}
Shower Curtain Hooks {This Bird Can Sing}
3. Shoes

Crown Molding {pinterest source}
Ladder {Home Made Simple}
Crates {The Berry}
Trash Cans {Minor Details}
Cardboard tubes (fabric holding or cement molding tubes?) {Reino Selvagem}
Wire hangers for flip flops or flats {Epbot}
Skirt hangers for boots{Organizing Made Fun}
Alternating direction to make more fit {Cupcakes and Cashmere}
4. Gift Wrap
Ceiling {Flickr}
Ikea Grocery Bag Holders {GALL-ERRY}
Back of Door with Ikea products {Brooklyn Limestone}
5. Makeup & Hair
Magnetic Organizers {Martha Stewart}
Make-up Magnet Board {Laura Thoughts}
PVC Curling Iron Holsters {The Family Handyman}
Magnet Strips for bobby pins, tweezers, clippers, etc.{Superwoman}

For more amazing organizing ideas visit my “Organize It!” board on pinterest or some of our other organization posts:

–DIY Jewelry Organizer for the back of a door

–Earring Holder

–Paper Organization
–8 ways to Organize for $1 or less
–Purse Organization
-Upcycled Window Task Board
–Key Hanger
–How to Freeze Meat to stack nicely and defrost quickly
Happy New Year and good luck with you organization projects!

P.S. Don’t forget to sign up for free Tipsy updates via RSS or email.

We have decided to truncate our feed to help protect against stolen content. I apologize for any inconvenience. Please love us anyway. 🙂

Top 11 Posts of 2011

December 29, 2011 By Michelle Barneck 2 Comments

I thought it would be fun to re-cap the year with the top 11 posts of 2011 according to your views and comments. Here they are!

1. Ruching Refashion

2. Frosted Mirror

3. Once there was a Snowman, Snowman, Snowman…
4. Popcorn Popping on the Apricot Tree

5. Book Shelves

6. Make Earring Holder
7. Dominos {Giant Style}

8. Making Fabric Flowers

9. Smores Recipe
10. Phone Book Wreath
11. Paper Mache Eggs
Thanks for making 2011 a great year! I look forward to sharing more with you in 2012!
And a big shout out to our top five blog referrers! All great sites, check them out!
Sugardoodle
Sister’s Stuff
Ucreate
Tip Junkie
I Share Crafts
Linking up with:
Tatertots & Jello
Top Projects of 2011 Party at Southern Hospitality
Top Ten Linky Party at Someday Crafts
Favorite post of 2011 at Home Stories A2Z

P.S. Don’t forget to sign up for free Tipsy updates via RSS or email.
We have decided to truncate our feed to help protect against stolen content. I apologize for any inconvenience. Please love us anyway. 🙂

New Years Eve

December 27, 2011 By Michelle Barneck 12 Comments

Hi everyone, I’m Angie and I’m really excited to be guest posting for Michelle!

I blog over at Burton Avenue where I love to share simple and inexpensive craft projects. I especially love all things vinyl! I have been blogging almost 4 years, but never really liked sharing craft projects on our family blog. So, earlier this year, Burton Avenue began.

I have been married for 10 years and we have 6 cute little kiddies (9 years and under). They keep me busy! I love blogging because it gives me a chance to take a break from the day to day tasks of being a mom and keeps my creative juices flowing.

With only a week between Christmas and the new year, there isn’t much time left to decorate for a New Year’s Eve bash. No worries, because I’ve got a project that’s quick and easy and is sure to add some pizazz to your party.

I’m going to show you how to make this cute balloon topiary.

Here is what you will need:

12 – Small Balloons (I used 5″ balloons)

16″ Dowel (painted to match your color scheme)

Styrofoam

Small Vase

Marbles, Shreds, or other Filler for the Vase

Foil Sheets (optional)

Star Sprays (optional)

First, inflate the balloons (try to make them the same size). Tie the necks of two balloons together and repeat until you have six groups.

Next, place one group over another group. Lock the two together by twisting the necks around each other.

Repeat with a third group, there should now be six balloons in this cluster. Do the same with remaining groups, so you end up with two big clusters (each with 6 balloons).

Now, put the two clusters together and twist the necks of a couple balloons around each other. You will end up with a ball that looks like this. You can move the balloons around until the colors and shape look good. I hope that all made sense (it’s way easier than it sounds).

Set that aside for a bit and let’s start on the base. Stick your dowel into a piece of styrofoam and place it in the bottom of your vase. You may need to glue it down to keep it from tipping. Add marbles or other decorative items to fill the vase.

Place the top of the dowel in the center of your balloon cluster. You don’t need to glue it, just twist a couple of balloons around it to keep it in place.

It’s cute and simple like this, but I like to dress it up a bit more. Tuck some ribbon into the center of the cluster and wrap it loosely around the dowel a few times. Tie down the other end with another piece of ribbon and then make a bow.

Cut 5-6″ squares from foil sheets or tissue paper and stick between the balloons. Repeat all over the ball and fluff until it looks good.

Finally, for some more color, add a cute star spray to the base.

Isn’t it fun and festive?

And, since balloons come in so many different colors, you can make a topiary to match any party decor!

Thanks, Michelle for inviting me! I hope you all enjoyed this tutorial and will come over and visit me at Burton Avenue.

———————————————————————-
Isn’t Angie great?! This is a totally fun idea for a New Year’s celebration. You could even disassemble it at the end of the party and let the kids pop the balloons as party to ring in the New Year! Thanks Angie for such a cute idea!

P.S. Don’t forget to sign up for free Tipsy updates via RSS or email.

We have decided to truncate our feed to help protect against stolen content. I apologize for any inconvenience. Please love us anyway. 🙂
« Previous Page
Next Page »

  • Bloglovin
  • Facebook
  • Google+
  • Instagram
  • Pinterest
  • RSS
  • Twitter

Hi there! I'm Michelle. Mother of three little boys and one little princess. Welcome to A Little Tipsy, a place for exploring creativity and sharing inspiration.

Follow on Bloglovin


Visit Michelle Barneck {A Little Tipsy}'s profile on Pinterest.

Tutorials by Category


15 Family Reunion Games

Family Reunion Games Collage

15 Sprinkle Party Ideas

Sprinkle Birthday Party
Creative Commons License

© Copyright 2014 A Little Tipsy · Site Designed by The Fairy Blogmother · Web Hosting by RFE Hosting

This website uses cookies to improve your experience. We'll assume you're ok with this, but you can opt-out if you wish.Accept Read More
Privacy & Cookies Policy