A Little Tipsy

Creative Tips & Ideas

  • home
  • About Me
  • the tipsy top
  • press
  • projects
  • contact me
[print_thumbnail_slider]

Canvas Art Personalized for Your Home

July 17, 2013 By Michelle Barneck Leave a Comment

I was invited to participate in the Pins to Projects series on Studio 5 and inspired by this canvas art from Southern Belle Soul, Mountain Bride Heart created some one of a kind wall art for my master bedroom. You can see the TV segment below.


So here’s the low down on how I made the first canvas, since seeing as how that segment was filmed a few hours ago, the second canvas is not completed yet. 
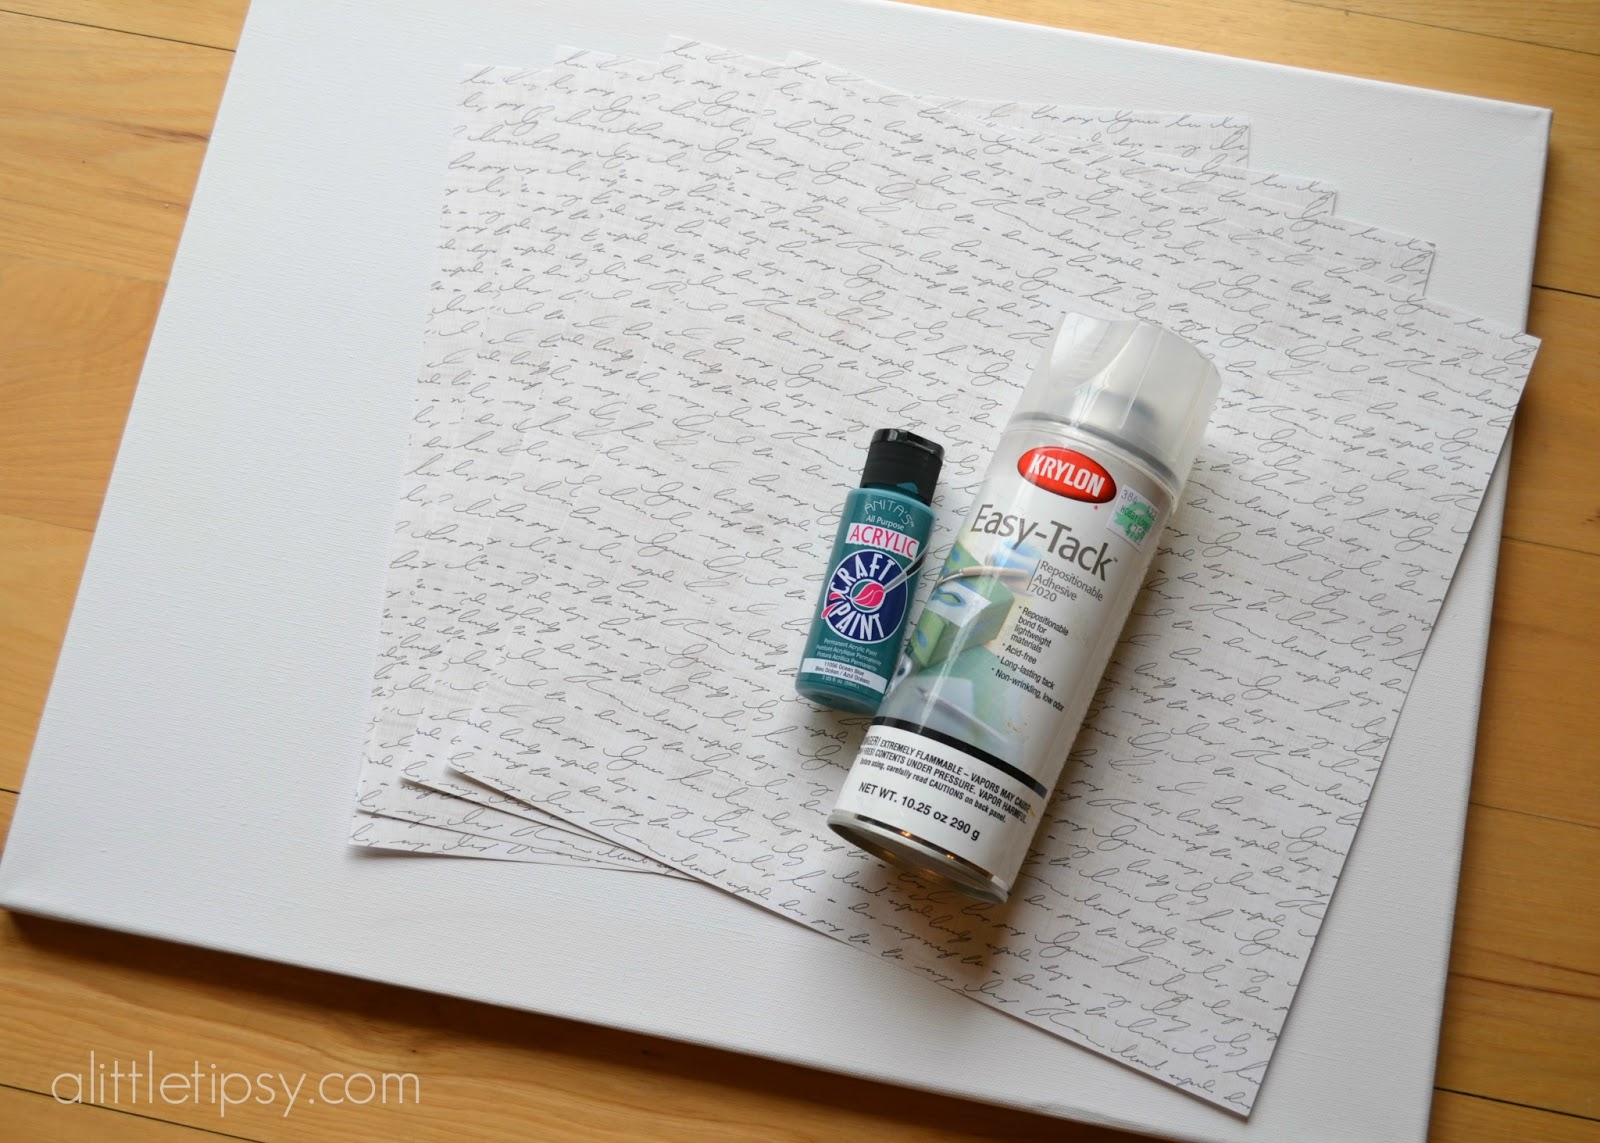
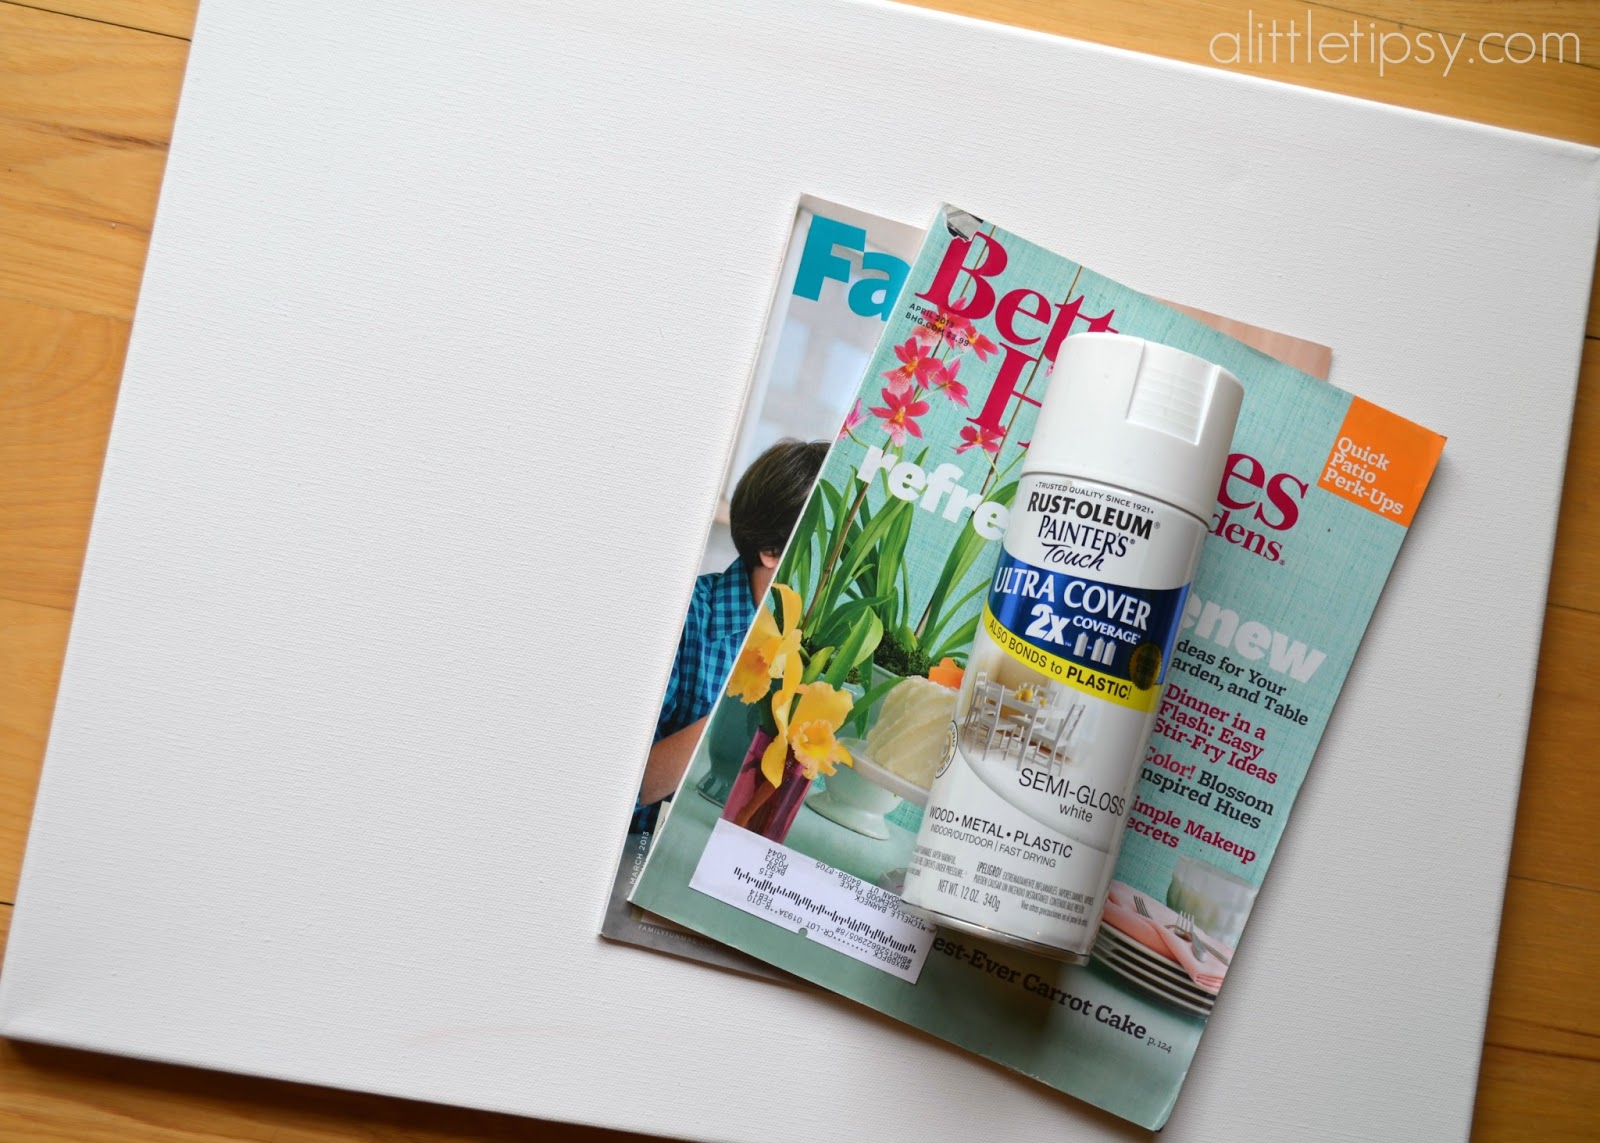
SUPPLIES:
  • Canvas
  • Scrapbook Paper
  • Permanent Spray Adhesive
  • Vinyl & Cricut (or purchase letter stickers)
  • Acrylic Paint
  • Foam Brush

The best part about this canvas art besides it being completely personalized is it is super affordable canvas art. 16×20 Canvases are 2 for $8 at Hobby Lobby. You can even use a 40% off coupon.

First off, choose what you want it to say. I love the pieces in my home to hold special meaning. I was making art for our master bedroom so I chose lyrics from a song from our wedding video that both my husband and I love. I also chose paper that looks like love letters because my husband loves to write and wrote many poems for me.

If you want it wrinkly with seams and lots of texture and character:

-Experiment on the computer with fonts and the placement of the words on your canvas size so you know the exact design you want and size of letters you will need. (I experimented with an 8×10 area since my canvas was 16×20. Then I just made the letters twice as big)  
-Cut your words out of vinyl using a craft cutting machine. (If you want to save some money you can also use contact paper from the dollar store. Just be sure to adjust the cutting pressure accordingly.)
-Coat the canvas with spray adhesive. Use full sheets of scrapbook paper and lay them on the canvas perfectly lining up the seams. 

-Use transfer tape to keep the vinyl words straight and place on the canvas.

-Squirt swirls of paint directly on the canvas. Spread over the whole surface with a foam brush. Use one coat if you want your paper design to show through slightly. If you want solid color, use two coats. 


-The paint causes the paper to wrinkle and shrink up slightly to expose seams. You will need to touch up seams and edges with paint once it dries unless you want them white.

-Carefully remove the vinyl words to expose the design. If you try to do it too fast, the paper will rip.


-You can coat it with Mod Podge for protection.

I am an advertising nerd and love that this reminds me of old billboards or subway ads starting to wrinkle and peel to expose what is underneath.
I decided to do a second version too add more color to our space. You can see a bit of it in the tv segment above.

Spray paint collage canvas art:

For more of a patchy look…

-Use all the same steps as above with the vinyl words, but alter the paper and painting steps.


-Rip out colorful pieces of magazine pages and use a glue stick to glue overlapping the pieces collage style to your canvas. The amount of texture you want will determine how tightly you want to secure the edges of each piece. 

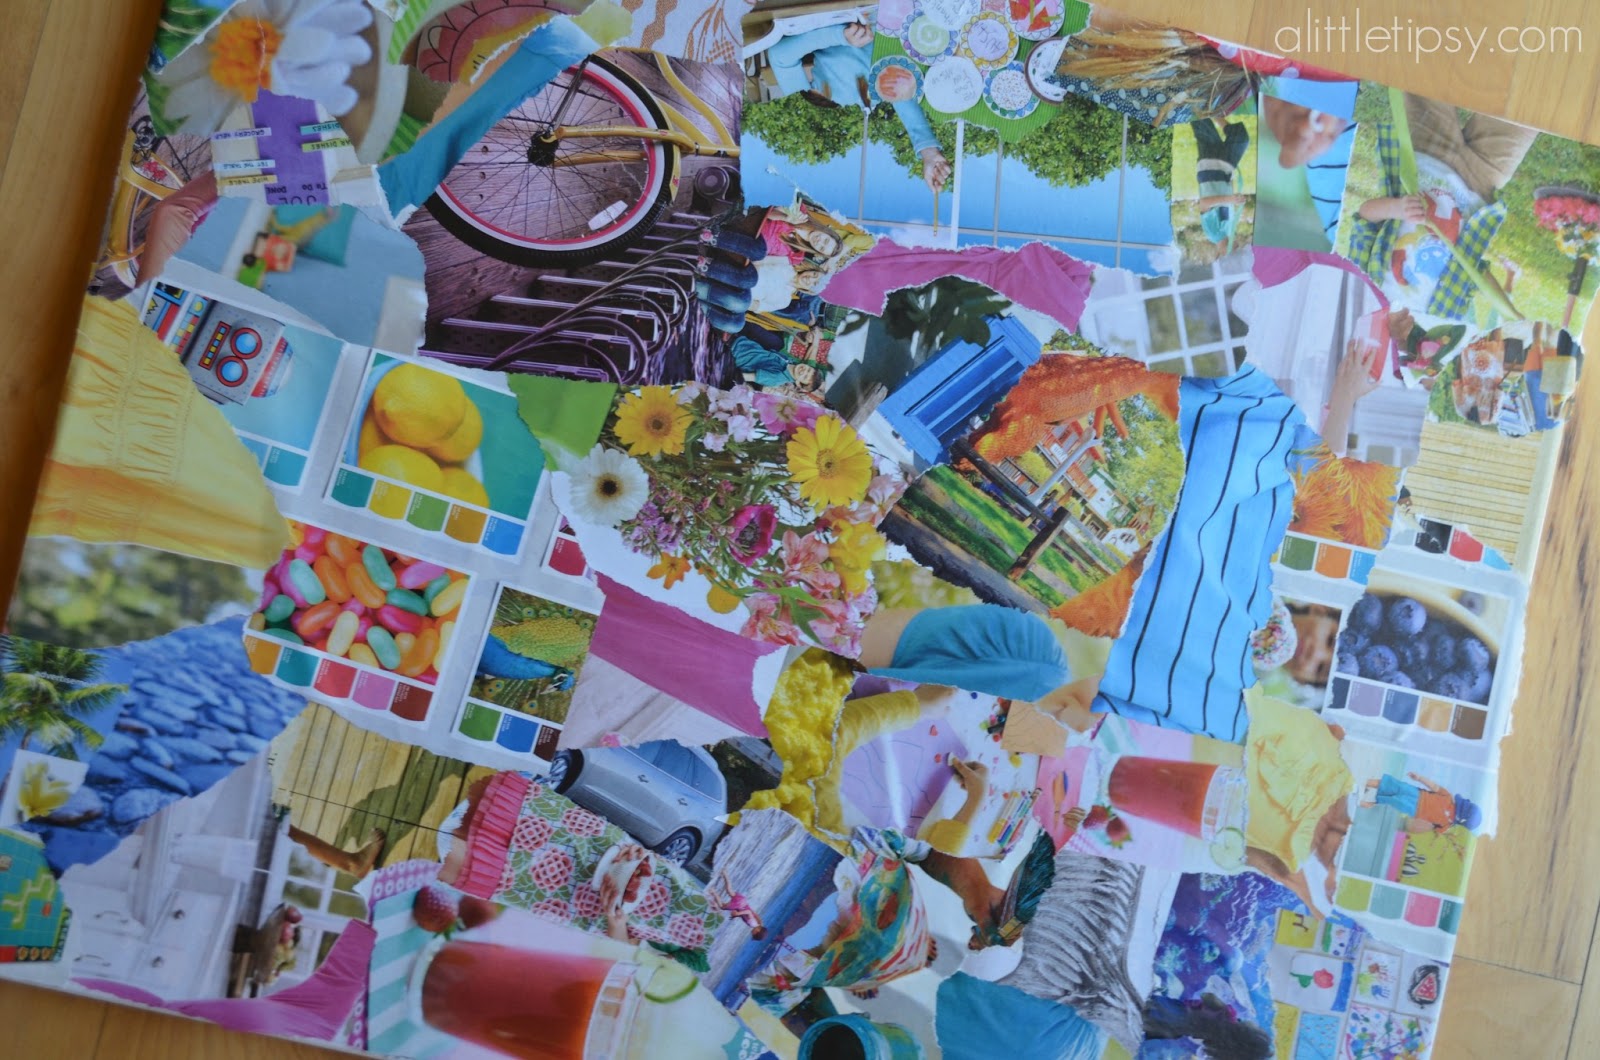
-In a well ventilated area free from wind or moisture, spray paint using thin coats and a slow even back and forth motion. Go off of the edges of the canvas when changing direction so the paint remains even and doesn’t puddle near the edges. 

I love how they turned out and can’t wait to hang them in my bedroom!
We have decided to truncate our feed to help protect against stolen content. I apologize for any inconvenience. Please love us anyway. 🙂

America the Beautiful

July 4, 2013 By Michelle Barneck Leave a Comment

Just wanted to pop in and wish you all a Happy 4th! We are so blessed to have the freedoms we do and so thankful to those who keep our country safe! God bless you all!
If you follow on instagram you already know about these fun letter my sis and I made last minute. I may just leave them up through the end of July. I think we have the best colors. Seriously, what’s better than red, white and blue?
Anyway, enjoy your parades, BBQs, and fireworks and we’ll be back with more fun projects soon! If you just can’t wait, here are a few fun patriotic projects from the past!
    
American Stars & Stripes Pillow – Patriotic Ribbon Topiary – Burlap Ruffle Table Runner

Flag Canvas – 4th of July Kids Craft
There ain’t no doubt I love this land, God Bless the U.S.A!

We have decided to truncate our feed to help protect against stolen content. I apologize for any inconvenience. Please love us anyway. 🙂

DIY Envelope Pillow Cover

July 2, 2013 By Michelle Barneck Leave a Comment

Hey guys, I’m super excited to be back over here at A Little Tipsy today to share a fun sewing tutorial. I am a self taught sewer, so I’m not technical or detailed. I usually figure out all of my projects on my own (with a little trial and error!) and I share them in non-sewing terms because I really don’t know much!

  Envelope Pillow Tutorial from OurThriftyIdeas.com

I am currently re-doing my master bedroom color scheme and decor, and in the process I am making new pillows for my bed, because you can never have too many pillows on your bed! Today’s pillow tutorial is super simple. I got it done in less than 30 minutes, and it makes such a great impact for being so simple.

{Read More of this Awesome Tutorial}

Envelope Pillow Tutorial from OurThriftyIdeas.com

I found this cute fabric at my local Bennion Crafts store. I love that it’s not just a typical chevron, but has the accents with the dots. This is for an 18 inch pillow, but if you are doing a different size, just adjust the measurements accordingly.  Cut your fabric to 19×19 and 19×24 inches. This will allow for seams and also give your pillow a snug fit. Then cut your 24 inch piece in half, making two 19×12 inch pieces. From there you are going to hem one side of the 12 inch pieces (pictured below)
  Envelope Pillow Tutorial from OurThriftyIdeas.com  

After your 2 sides are hemmed, lay your 19×19 piece on the ground facing up. Lay each 12 inch section on top, right sides facing down, with the seam in the middle. They will overlap creating the “envelope” fold of your pillow.

  Envelope Pillow Tutorial from OurThriftyIdeas.com

Then sew around all 4 edges with with a straight stitch and a 1/2 inch seam allowance. Once it is all sewn, trim off the excess fabric from all sides. Now all you need to do is turn the pillow case right side out and stuff
with your pillow!

  Envelope Pillow Tutorial from OurThriftyIdeas.com   

 Thanks for letting me stop by and share a sneak peak into my new master bedroom. Make sure to check out the full reveal on my site later this month (after my big move to Sunny St. George!)

———————————————————————–
Thanks Vanessa! I love a sewing tutorial that looks easy enough for me to follow and chevron + polka dots = cuteness!

We have decided to truncate our feed to help protect against stolen content. I apologize for any inconvenience. Please love us anyway. 🙂

4th of July Decorations: Flag Canvas

June 20, 2013 By Michelle Barneck 30 Comments

Disclosure: I am a Cricut affiliate and received vinyl to use as I pleased. Here’s what I did with it.
Being in scouts I get to recite the Pledge of Allegiance once a week so when I was thinking of patriotic decor for the 4th my mind naturally gravitated towards it. I had a picture in my mind of what I wanted, to create the American flag out of the words of the pledge. I love how it turned out!

I designed the typography flag using Cricut Craft Room and cut it out of Cricut Vinyl using my Cricut Mini. I used transfer tape to place the vinyl on a canvas to create one of a kind 4th of July decor.

I like to be a good friend, so if you would like to make one for yourself here’s the template…
Download the free Pledge of Allegiance Flag Cricut template

I am a sucker for 4th of July crafts. See my American Stars and Stripes Pillow, 4th of July kids craft, and Patriotic Burlap Ruffle Table Runner.

What’s your favorite patriotic design, stars or stripes?

We have decided to truncate our feed to help protect against stolen content. I apologize for any inconvenience. Please love us anyway. 🙂
« Previous Page
Next Page »

  • Bloglovin
  • Facebook
  • Google+
  • Instagram
  • Pinterest
  • RSS
  • Twitter

Hi there! I'm Michelle. Mother of three little boys and one little princess. Welcome to A Little Tipsy, a place for exploring creativity and sharing inspiration.

Follow on Bloglovin


Visit Michelle Barneck {A Little Tipsy}'s profile on Pinterest.

Tutorials by Category


15 Family Reunion Games

Family Reunion Games Collage

15 Sprinkle Party Ideas

Sprinkle Birthday Party
Creative Commons License

© Copyright 2014 A Little Tipsy · Site Designed by The Fairy Blogmother · Web Hosting by RFE Hosting

This website uses cookies to improve your experience. We'll assume you're ok with this, but you can opt-out if you wish.Accept Read More
Privacy & Cookies Policy