A Little Tipsy

Creative Tips & Ideas

  • home
  • About Me
  • the tipsy top
  • press
  • projects
  • contact me
[print_thumbnail_slider]

Framed Feather Art

August 20, 2013 By Michelle Barneck Leave a Comment

Vanessa from OurThriftyIdeas.com 

 Hey guys, Vanessa from Our Thrifty Ideas popping over again today. I’ve been super busy lately, as we found out with less than 30 days notice that we were moving down to St George Utah, and made the big move middle of last month. It was super duper quick, and we are now just settling into life in the hot land, and our new fun house! It’s been crazy trying to decorate a whole new house, as it took over 2 years to get things how I liked them in the last place. But already there’s little details I have incorporated in this new place, that I love so much. Today I am sharing how I livened up my bedside table. When we moved, one of the big decor pieces from this table broke (enter sad meltdown, a slight argument with the hubby, and maybe even a cold shoulder to those helping us move). But I
quicklyslowly got over it, and decided that I needed to just find something new and fun to replace it.

Framed Feather Decor from OurThriftyIdeas.com 

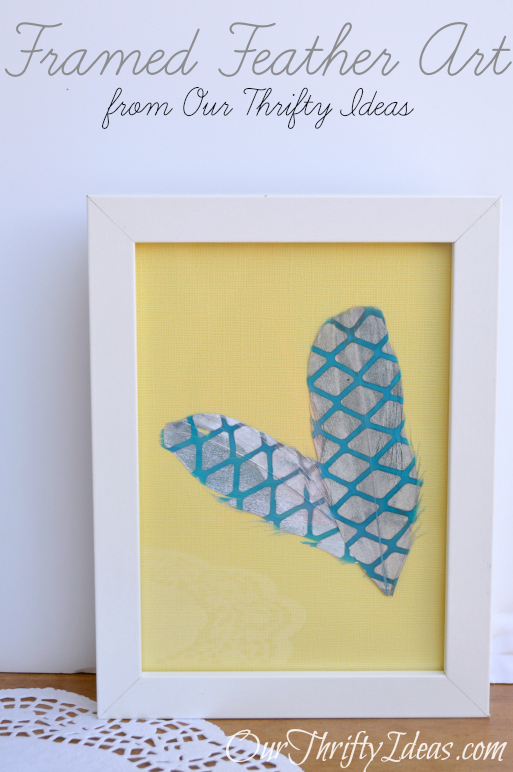
 I had this inexpensive frame from IKEA, and when I saw the feathers for just $1 (after coupon, of course!) at Michaels I knew immediately that they would look fantastic with the new yellow, blue and grey color scheme of our Master Bedroom. I cut a background piece of paper to the size of the frame opening. Then first laid the feathers on the glass in the position I wanted them, layered the background paper, and then closed up the back. It really was that super simple and looks so cute sitting with my other items atop my bedside table!

  Framed Feather Decor from OurThriftyIdeas.com

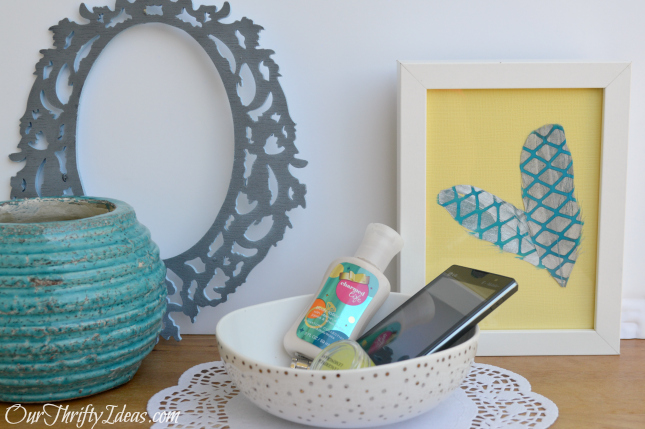
It is such a simple way to decorate, but makes a great POP for a small space. Hope you liked the little (and quick) piece of decor. I can’t wait to share more with you again soon!

——————————————————-
Thanks Vanessa! It’s always nice to have a quick decor idea up your sleeve!
We have decided to truncate our feed to help protect against stolen content. I apologize for any inconvenience. Please love us anyway. 🙂

Inspired Living the Kitchen Edition #deltafaucetinspired

August 19, 2013 By Michelle Barneck Leave a Comment

This post is sponsored by Delta via Glam Media.

Do you ever have trouble committing to changes around your home? You want a kitchen update that you love, but don’t want to commit to something that might go out of style next year? I have been dying to make some changes in my kitchen, but admittedly have been a little chicken.

Though I have found a great way to discover what you truly love and how it can all work together. Create an inspiration board full of beautiful inspiring images and then translate that into something that fits in to your time allotment and budget. I’ve created one for the kitchen of my dreams called Inspired Living. Here’s a little sneak peek…

If you like this style, be sure to follow my Inpired Living Pinterest board where you can find the links and original posts for all the images above plus more fabulous kitchen ideas.

The whole plan started with my soon to be installed traditional style Cassidy Touch20 Technology faucet and grew from there. I found that I love the look of the stainless and chrome, gray, aqua, and white. I recently toured our local Parade of Homes and that inspired some of the items that would take my space to a new level like clean white cabinets and stainless steel tile backsplashes. If only I could snap my fingers and have it transformed. Instead, I’ll take it one step at a time and slowly, but surely create the kitchen I adore.

I’ll be sure to keep you up to date as we work on the kitchen, starting with a beautiful new faucet and a few other little changes I have up my sleeves. Do you have any tricks for planning out a room makeover? Do you do make a master plan and bite off a little at a time or go gung ho and change everything all at once?

Delta Touch2O Technology for your kitchen and bathroom is precisely in tune with your every touch. Take the quiz to learn which faucet style best describes you at deltafaucet.com
Disclosure: Compensation was provided by Delta via Glam Media.  The opinions expressed herein are those of the author and are not indicative of the opinions or positions of Delta.
We have decided to truncate our feed to help protect against stolen content. I apologize for any inconvenience. Please love us anyway. 🙂

Easy Painted Notebook Paper Frames

July 31, 2013 By Michelle Barneck 8 Comments

This post is sponsored by Michael’s and their Back to School Challenge.
I have a thing for back to school. Something about fresh notebooks and backpack shopping gives me a big grin. I am a nerd. I loved school and want my kids to love it too. There is something fun about capturing those first day excitement and end of year celebrations which brings me to my project…School Picture Frames. I joined up with Michael’s to participate in their First Day of School Challenge and I think you’ll like what I came up with. This is not my first rodeo, see my ruler frame and back to school frame, this year I went with paper.


The notebook paper frames are hand painted, but sooo easy! I made two versions one frame with college rule paper for the older kids and one frame with the “learn to write” paper for little kids (see picture on left).

They are perfect for your first day of school pictures and I love that they can preserve your little person’s adorable handwriting.


SUPPLIES:

Wood Frames ($1 each)
White Craft Paint
Foam Brush
Ruler
Pencil
Red Fine Tip Paint Pen
Blue Fine Tip Paint Pen
Mod Podge or Clear Spray Paint

*all available at Michael’s*


DIRECTIONS: 

1. Paint the frame white. I used three coats. Let dry.

2. Using your ruler make marks on each side of the frame where you want the lines to go. I spaced my lines one centimeter for both versions, you just alter the colors of the lines for the learn to write paper.

3. Using your ruler add the red lines with your paint pen. One line going down vertically about an inch from the left side for the college ruled or every 3rd pencil mark for the learn to write. Let dry.

4. Using your ruler add the blue lines with your paint pen. For the college ruled on each pencil mark. For the learn to write, one under each red line. After the blue lines are dry, go back and add the blue dashed lines after your blue lines are dry.

5. To personalize, have your child add their name with a pencil or add the teacher’s name and use for a gift.

6. Cover with protective clear coat.

Not bad for buying all the supplies (most of which you may have on hand) for about $10 right?

Speaking of gifts for teachers, Michael’s offers a 15% off discount for teachers everyday! Talk to a store associate for more info. Also, be sure to download the Michael’s app so you always have their deals and coupons at your fingertips! I love just pulling out my smartphone and getting a discount!

Last, but not least, here is how I put it all together. I still can’t believe my little guy is starting Kindergarten. Tear.

Disclosure: I was provided a Michael’s gift card to pick up supplies for this challenge.

We have decided to truncate our feed to help protect against stolen content. I apologize for any inconvenience. Please love us anyway. 🙂

Design my Kitchen!

July 22, 2013 By Michelle Barneck 4 Comments

I was compensated for this post, but all opinions and requests for ideas are my own.

A few months after we moved in to our house our kitchen flooded. Darn that refrigerator ice line. It was such a nightmare at the time, but a blessing in disguise as we got new hickory wood floors, which inspired us to also install granite, a new faucet, and paint our kitchen/great room. Since then, our kitchen has been sitting unchanged and has been hinting at me that something must be done.

Click to read on…

Our faucet decided to help the cause by being oh so willing to pull down, but putting up a fight when it’s time to go back in to place. I knew it was time for a change, but I have a hard time deciding on something I will hopefully keep for years. I want it to be just right.

Luckily, I recently found the Delta Inspired Living site. It is awesome! They have a style quiz to help you determine what type of faucet will fit your design aesthetic best. It was right on too. It said I was traditional which is right on the mark.

Then, I found the Touch2O Kitchen Faucet and my world was rocked. With a simple tap anywhere on the faucet spout, hub or handle the flow of water is activated. And get this, it doesn’t even have to be from your hand. If you are wrist deep in chicken trimming, just tap it with your forearm to turn it on. Mind blown. This is a need people. I am a cross contamination freak. Touch20 technology is also water conservation smart. It will automatically turn off after four minutes.

I found the Cassidy with an Arctic Stainless finish that combines the traditional look with the Touch20 technology and was sold. I loved it the minute I saw it and knew it would fit in seamlessly. I cannot wait to have it in my kitchen! (The picture below is the Cassidy in Chrome finish so mine will be slightly less shiny, but you get the idea.)

I have been collecting ideas for my kitchen for a while now, but would love to hear you’re opinion! 
If this was your kitchen, what would you do? 

Paint cabinets, add backsplash, change up window treatments? Help inspire me with your vision! With a beautiful new faucet on its way, my space could use a refresh!

Delta Touch2O Technology for your kitchen and bathroom is precisely in tune with your every touch. Take the quiz to learn which faucet style best describes you at deltafaucet.com

Disclosure: Compensation was provided by Delta via Glam Media.  The opinions expressed herein are those of the author and are not indicative of the opinions or positions of Delta.

We have decided to truncate our feed to help protect against stolen content. I apologize for any inconvenience. Please love us anyway. 🙂
« Previous Page
Next Page »

  • Bloglovin
  • Facebook
  • Google+
  • Instagram
  • Pinterest
  • RSS
  • Twitter

Hi there! I'm Michelle. Mother of three little boys and one little princess. Welcome to A Little Tipsy, a place for exploring creativity and sharing inspiration.

Follow on Bloglovin


Visit Michelle Barneck {A Little Tipsy}'s profile on Pinterest.

Tutorials by Category


15 Family Reunion Games

Family Reunion Games Collage

15 Sprinkle Party Ideas

Sprinkle Birthday Party
Creative Commons License

© Copyright 2014 A Little Tipsy · Site Designed by The Fairy Blogmother · Web Hosting by RFE Hosting

This website uses cookies to improve your experience. We'll assume you're ok with this, but you can opt-out if you wish.Accept Read More
Privacy & Cookies Policy