A Little Tipsy

Creative Tips & Ideas

  • home
  • About Me
  • the tipsy top
  • press
  • projects
  • contact me
[print_thumbnail_slider]

Water Spigot Coat Rack

May 21, 2013 By Michelle Barneck 3 Comments

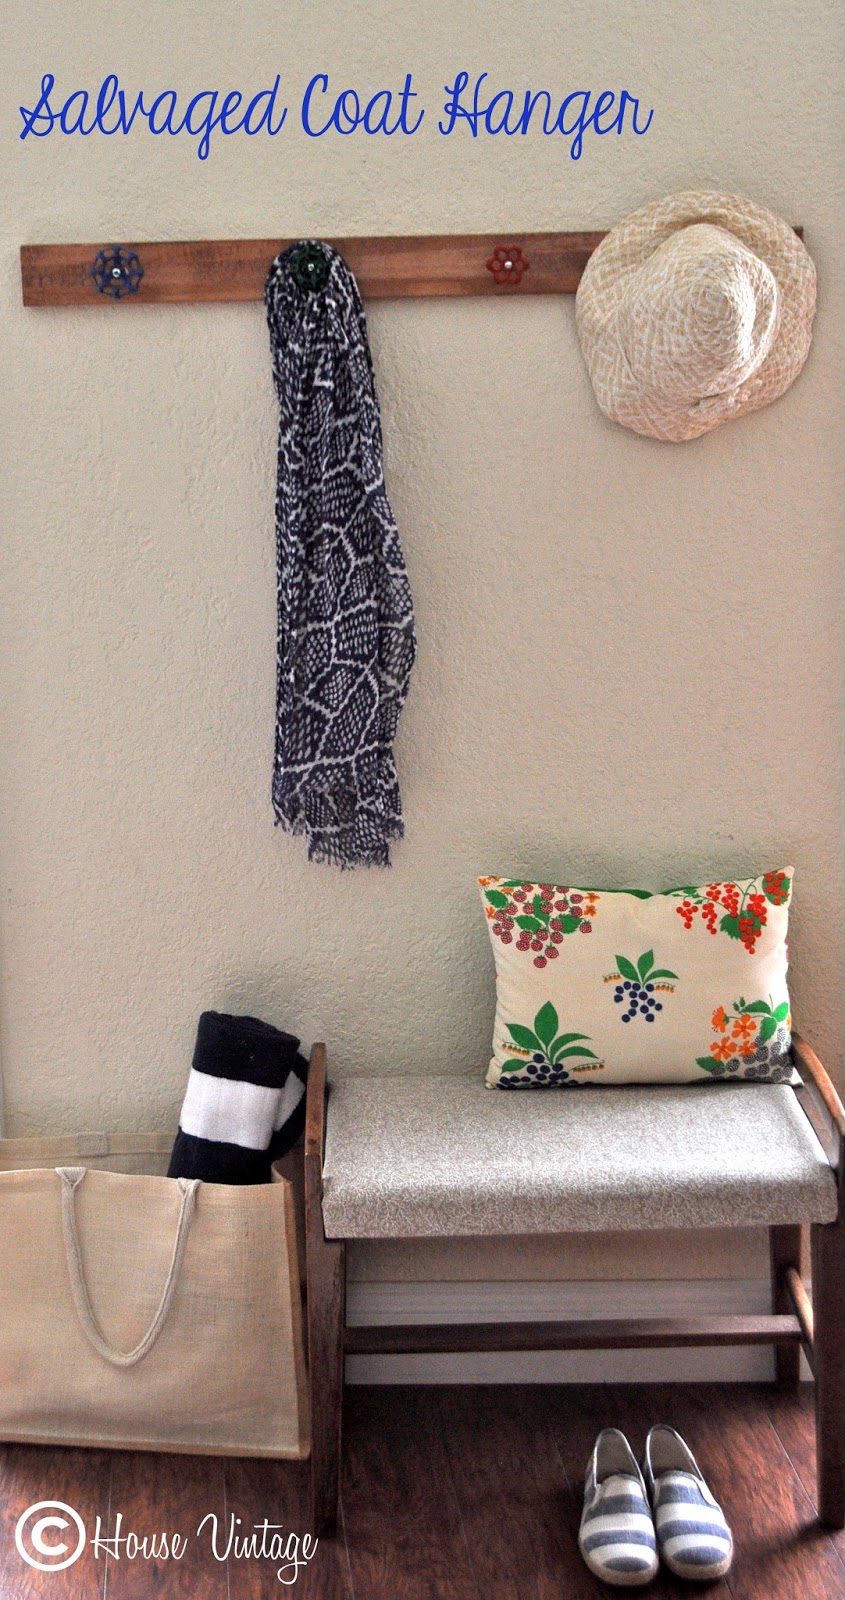
Hello…it’s Ali from House Vintage back again with another fun DIY project.  This project only takes a few hours and shouldn’t cost much money.  By utilizing salvaged materials, you can make a coat rack.

The supplies you will need are:

Click here to see the full tutorial.

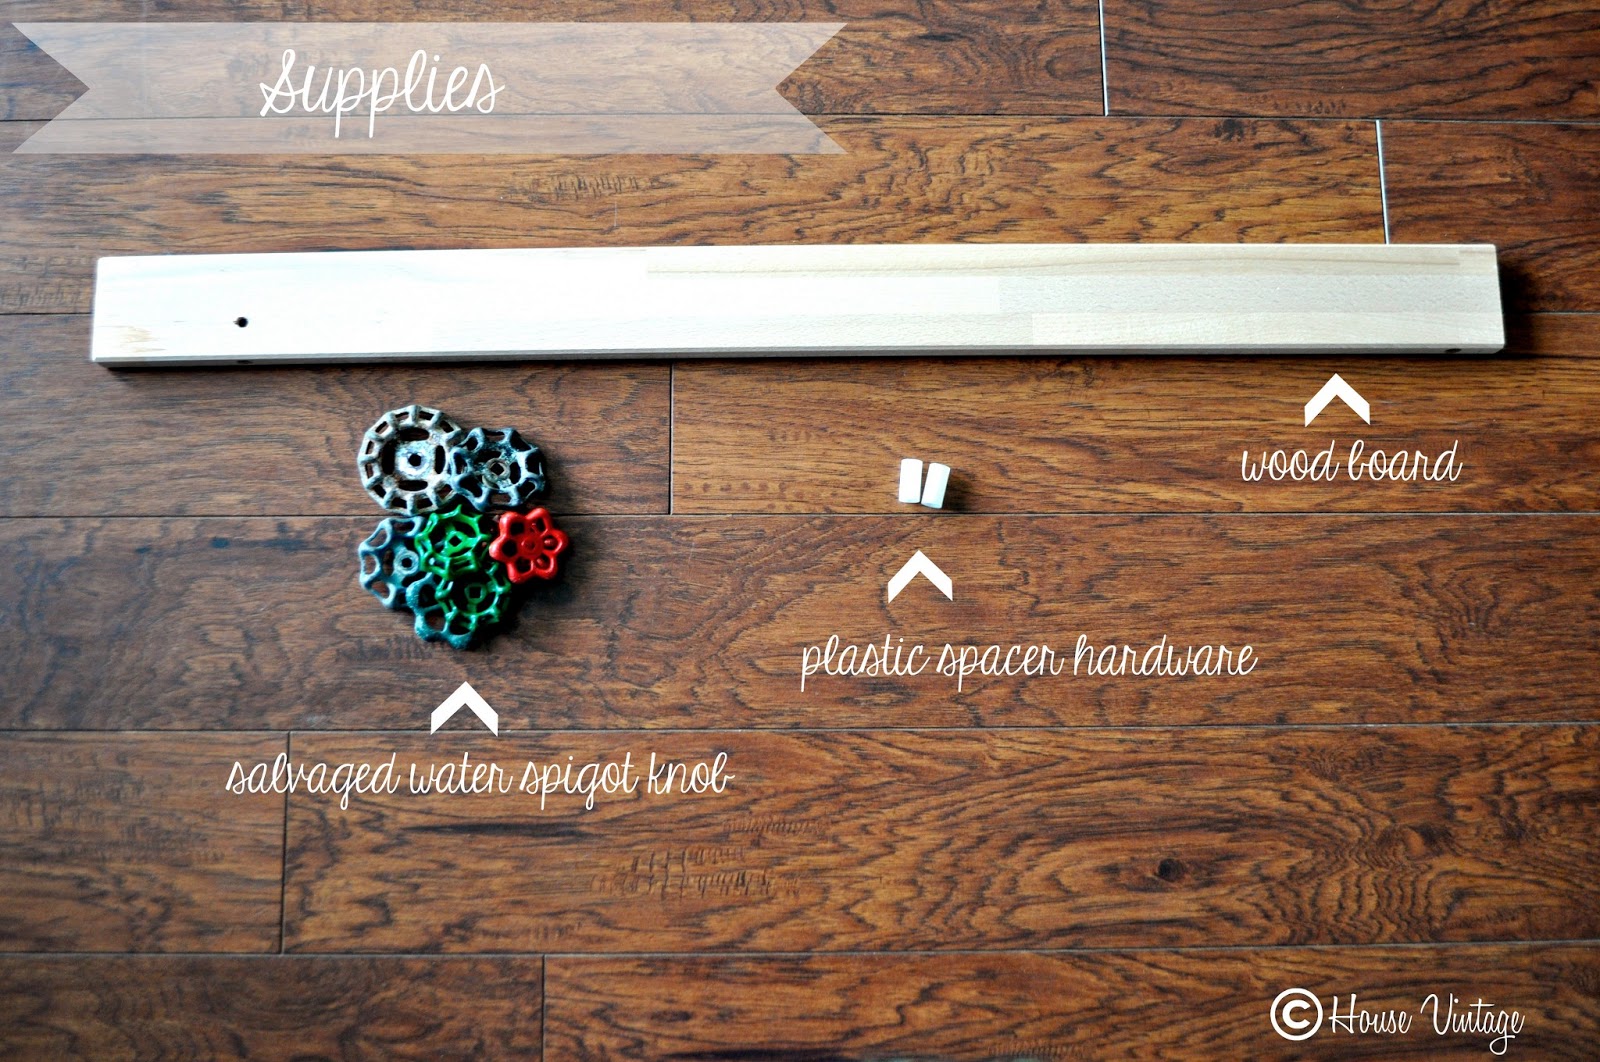
Water spigot knobs are easy to find at flea markets and usually cost a few dollars.  They can also be found on Etsy.  My pile has been collected over time, as I would find them out thrifting.  The wood board was a leftover scrap.  If you don’t have any scrap wood around, you can buy this already precut at the hardware store.  They come in a variety of lengths.  Pick the right size for your space.

Rusty knobs were painted with several thin coats of spray paint.  I also added some stain to enhance the tone of the wooden board. Remember to always paint and stain in a well ventilated area.

Decide how many knobs you would like your coat rack to have.  Four worked well on my board.  I used a yard stick to make sure they were evenly spaced.   The knobs are then screwed into the board, from the front.  The thickness of the board and the knob will determine the size of screw to use.  I also added a plastic spacer and/or washer to allow for space behind the knob where items can hang.  Each of my knobs had a different depth, so you may have to use a different configuration on each.  I also didn’t pre-drill my holes, but if you are using a wood that splits easily, you may opt to do that.

Find a place that could use some extra organization or storage, and hang it up.  Your salvaged coat rack is done!

————————————————————-
Thanks Ali! I love the color and character of this coat rack! It would be great as a towel rack in a bathroom too! 
We have decided to truncate our feed to help protect against stolen content. I apologize for any inconvenience. Please love us anyway. 🙂

Decorating with Succulents

May 20, 2013 By Michelle Barneck 10 Comments

Attribution Statement: Brought to you by The Home Depot, click here to learn more.

I was excited to be invited by Home Depot to attend one of their Do-it Herself Workshops. This one was on succulents and they demonstrated how to plant them in containers for indoors. I was shocked at how easy it was! I collected the supplies in store, went on the hunt for the perfect out of the box containers, and created this…

I am in LOVE with it! I always say I should have lived in simpler times and this takes me back to the time of fresh cream on the farm and homemade gravy for Sunday dinners.
Now going back to the workshop, she demonstrated how to create a pot of succulents like in the picture below. 
This is actually one of the ones she created, I was lucky enough to be one of the winners and got to take it home. Isn’t it happy in my living room? I love the modern day terra cotta! They have some adorable pots at Home Depot.

So how to make a succulent arrangement of your own?


SUPPLIES:

  • Miracle Gro Cactus, Palm and Citrus Soil
  • Container of Your Choice
  • Succulent Plants
  • Water
  • Small Bristle Brush (like a paint brush)

INSTRUCTIONS:
1. Fill your container most of the way full packing the soil tight and leaving about an inch at the top. 
2.  Break up the roots of your succulents and add to container using a variety of heights and colors to add interest. Press them in firmly and add additional soil where needed.
3. Use the bristle brush to brush off any stray soil bits lodged in the succulents or around the rim of your container.
4. Water them generously as you would any newly moved plant. 

5. Succulents hold water in their leaves. They rarely need to be watered, probably only once every 2-3 weeks. So ignore them for the most part and when they start to dry out a bit and that is when you should water them. 

I can’t wait to try out more succulent arrangements! They are so easy and low maintenance which is perfect for me!
I’m looking forward to more Do-It Herself Workshops as well! The next two on the agenda are build your own Adirondack chair and learn to install bathroom faucets and vanities. So awesome right?! And free! Love it.
We have decided to truncate our feed to help protect against stolen content. I apologize for any inconvenience. Please love us anyway. 🙂

Pinwheel Chalkboard Frame

May 14, 2013 By Michelle Barneck 1 Comment

What? You didn’t know that “chalkboard” was in? JK, I know it is all over the place. But I got some fun clear chalkboard paint and I had to try it out. Because a lime green chalkboard frame is AWESOME!! So today I am sharing how I made this bright and fun frame that is a chalkboard making it so that you can switch out your picture AND the saying surrounding it! Or even let your kiddos doodle around it to make it their own and match the picture you put inside.

Read more…

  Lime Green Chalkboard Frame
 I had a blank frame that I got for really cheap because it was missing it’s glass. It had been sitting around for a while just collecting dust, so I knew it was perfect for this project. The rest of the frame was all from “stuff laying around” my house. You bet my hubby was excited to see this stuff actually go to use for once!! I collected a bunch of fabric scraps, my hot glue gun, and some other accessories to bling up my frame. More on that in a minute. So I painted the frame bright lime green, and LOVE it. But once it was dry, I put on 2 coats of the Americana Clear Coat chalkboard paint. Make sure one coat is horizontal and then an hour later, paint the second coat vertical. Then don’t touch it for 24 hours. I know, it’s HARD. But if I can do it, you can too!
  Lime Green Chalkboard Frame
 After the 24 hours of dry time, you will want to condition your frame. To do this, take a piece of chalk and hold it on the side. then cover the entire frame with it until fully covered. Then wipe it off and your chalkboard is ready to go!
  Lime Green Chalkboard Frame
 Ok, now onto embellishing it. I decided to do pinwheels because, well, their awesome!! So I cut 4 4-inch squares out of different coordinating fabrics. 2 of them will go back to back. On 2 of the sheets I ironed on some fabric stabilizer and then glued them to the back of their matching other half. Then trim any fabric that is peeking out thru the other side.
  Lime Green Chalkboard Frame
 Then cut from each corner into the center, about 3/4 inch from the middle.
  corners
 Now you will use your hot glue gun to pull one corner from each cut section into the center. Fold one at a time and hold in place until the glue cools (using the back end of a pencil will save your fingers from being burned!) Then move onto the next corner! Once they are all folded in, I covered the corners and glue with a coordinating button!
  Lime Green Chalkboard Frame
 Now I glued a matching paper straw onto the back of the pinwheel and again using the hot glue gun I put it on the front of the frame.
  Lime Green Chalkboard Frame
 Write on your frame with chalk and display for everyone to see!!
   chalkboard frame

We have decided to truncate our feed to help protect against stolen content. I apologize for any inconvenience. Please love us anyway. 🙂

Ride Into Spring: Free Bike Printable

April 16, 2013 By Michelle Barneck 3 Comments

Hi Friends, it’s Aly from Entirely Eventful Day.  I am so excited to share this fun bike printable with y’all.  I mounted these prints in my little boy’s room but they would look great anywhere really.  These are so bright and fun.  They get me all giddy for Summer!

I am more than happy to share these designs with you… but please remember that they are for personal use only.  ðŸ™‚
Download the bike printables here.
For this project, I used four, $2 Ikea frames and these cute bike printables, designed by yours truly.  The color palette was inspired by this Riley Blake Fabric because my son has a similar print fabric in his room.
All you need to do is print the image. I printed it on card stock and put it in the frame.
It’s always a good idea to lay your grouping out on the floor first.  You could arrange the bikes facing each other or going away from each other.
In the end, I decided I like them going away from each other.  Don’t you just love the vibrant colors?  I am working on updating my son’s room.  He’s ready for a “big boy” room and I think these prints are the perfect addition.  
If you use them I would love to see what you do!  
Don’t forget to stop by Entirely Eventful Day and see what other fab projects I’ve been working on.

We have decided to truncate our feed to help protect against stolen content. I apologize for any inconvenience. Please love us anyway. 🙂
« Previous Page
Next Page »

  • Bloglovin
  • Facebook
  • Google+
  • Instagram
  • Pinterest
  • RSS
  • Twitter

Hi there! I'm Michelle. Mother of three little boys and one little princess. Welcome to A Little Tipsy, a place for exploring creativity and sharing inspiration.

Follow on Bloglovin


Visit Michelle Barneck {A Little Tipsy}'s profile on Pinterest.

Tutorials by Category


15 Family Reunion Games

Family Reunion Games Collage

15 Sprinkle Party Ideas

Sprinkle Birthday Party
Creative Commons License

© Copyright 2014 A Little Tipsy · Site Designed by The Fairy Blogmother · Web Hosting by RFE Hosting

This website uses cookies to improve your experience. We'll assume you're ok with this, but you can opt-out if you wish.Accept Read More
Privacy & Cookies Policy