A Little Tipsy

Creative Tips & Ideas

  • home
  • About Me
  • the tipsy top
  • press
  • projects
  • contact me
[print_thumbnail_slider]

Downtown Tape Giveaway

November 29, 2012 By Michelle Barneck 45 Comments

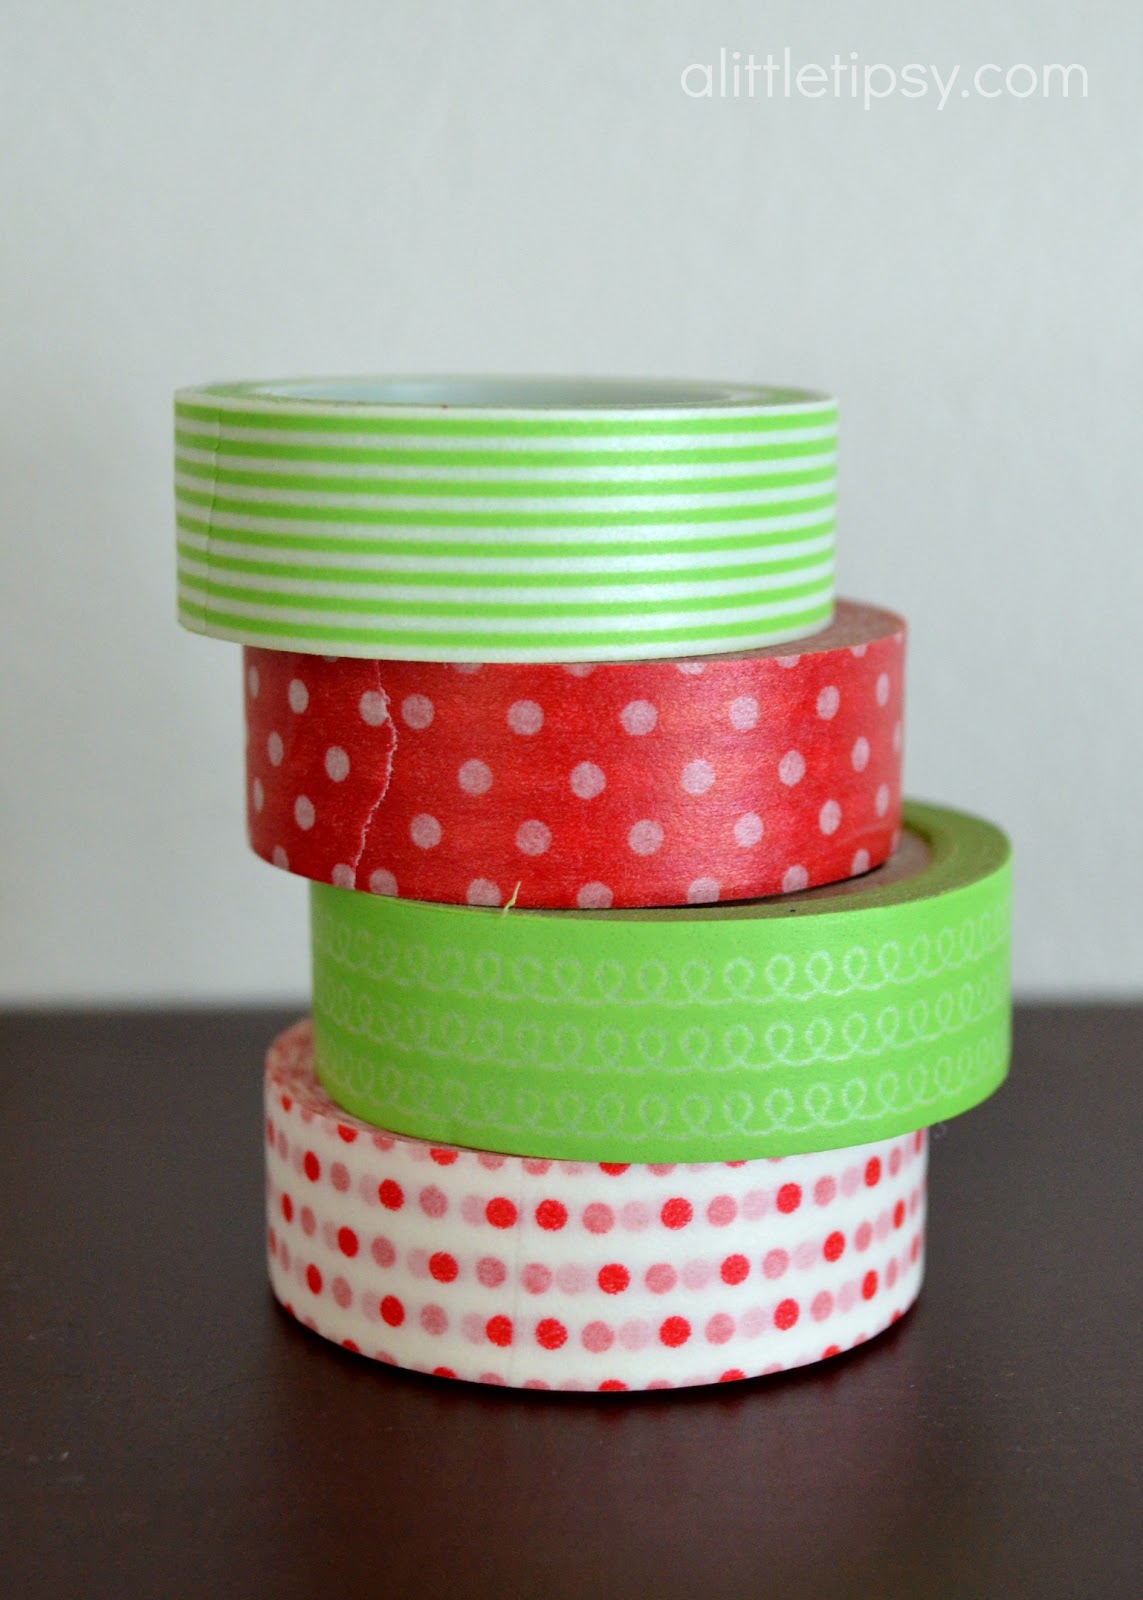
I am super excited to share today’s giveaway! Washi tape is all the rage right now and is such an easy way to dress up anything and everything. From gift wrap to decor to electronics washi tape is a fun was to give it a pop of color.

Downtown Tape sent me a few rolls to try out and they are so much fun! I love combining the patterns and colors with my Christmas decor!

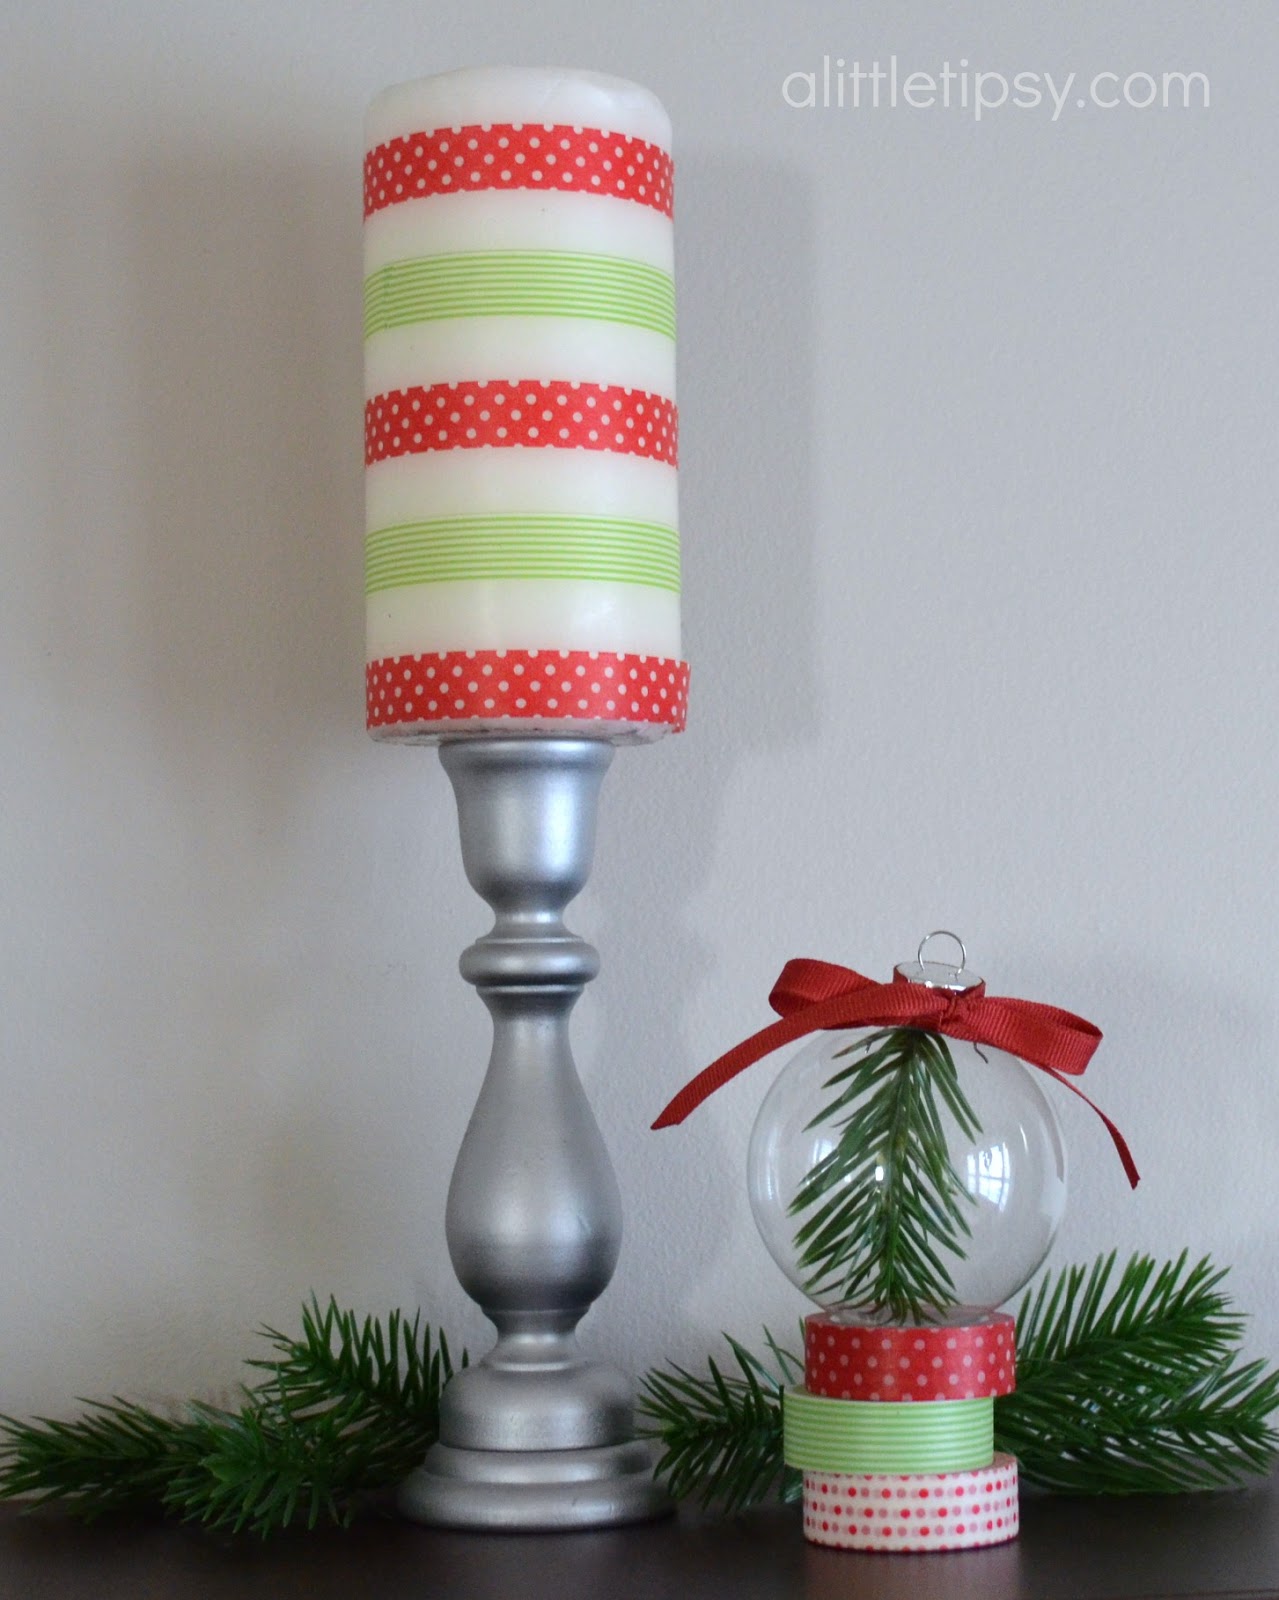
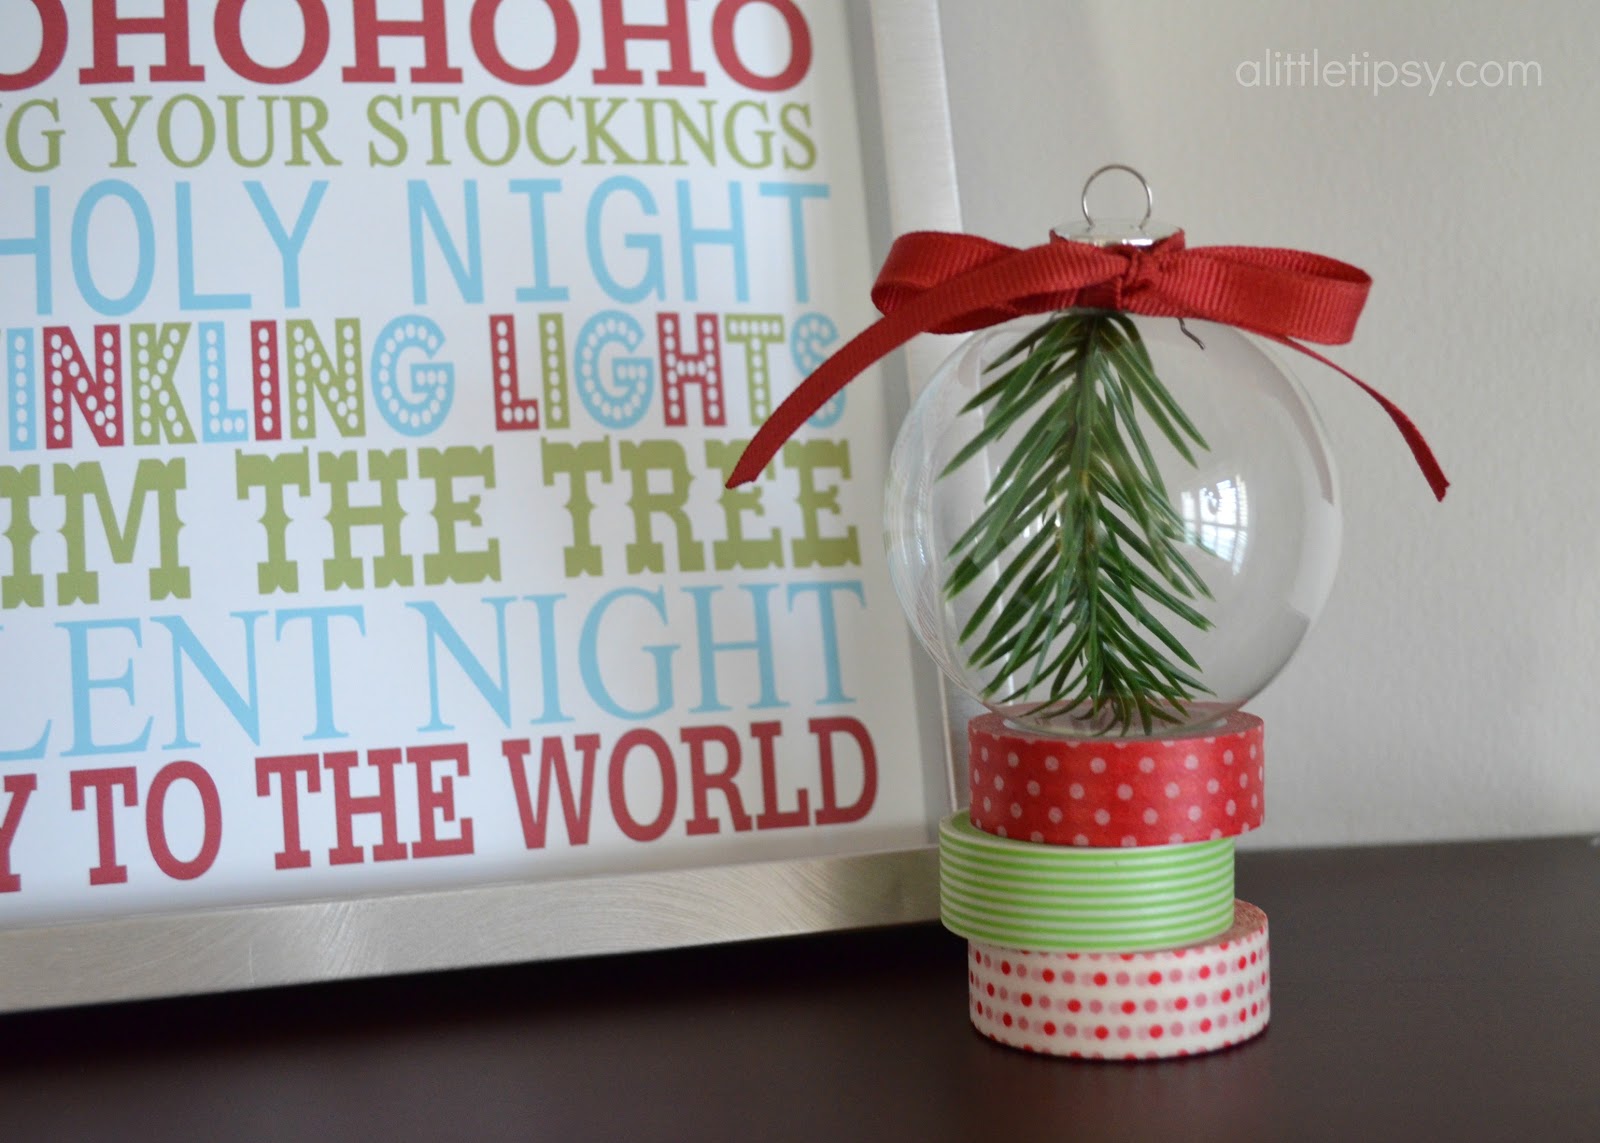
They are the perfect little holders for an ornament display!

The best part is they are just $1.99 a roll so snatch up all your favorites and mix and match to your hearts content!

tag2.png
Now what kind of friend would I be if I didn’t share my fun new find? 
Downtown Tape is giving TWO lucky winners 10 rolls of tape and 25 tags!

a Rafflecopter giveaway

P.S. Don’t forget to sign up for free Tipsy updates via RSS or email.

We have decided to truncate our feed to help protect against stolen content. I apologize for any inconvenience. Please love us anyway. 🙂

Disney Ad Shirts

November 28, 2012 By Michelle Barneck 2 Comments

If you have been following me for a while you know that I have a thing for making Disney shirts for my kiddos. There is just something about going to Disneyland knowing that no other kids will have the same shirts. I saw these fun vintage looking ads and knew they had to be part of our Disneyland ensemble.

SUPPLIES:
  • T-shirt
  • Cardboard
  • Silhouette
  • Contact Paper
  • Transfer Tape
  • Silhouette Fabric Ink
  • Iron
INSTRUCTIONS:

They are actually quite simple to make. Follow the tutorial here to create a stencil of the image in the silhouette software. Since you are creating a stencil and not using heat transfer do not flip it horizontally. Just cut the image as is once it is traced to your liking.
I wanted to save some money and decided to try using contact paper for the stencil rather than the stencil vinyl. It totally worked! Just be careful because the contact paper is very thin, even thinner than regular vinyl so cut accordingly.
Once you have the stencil cut, transfer to your shirt using transfer tape to keep everything aligned correctly. Place a piece of cardboard inside the shirt to prevent bleeding. Then, with a foam brush blot over the stencil with black fabric ink. 

 Once the ink dries, remove the stencil and bask in your success.

Iron the design to set the ink and now it’s ready to wear!
You’re kids are one of a kind, why shouldn’t their shirts be?

These have been washed several times and are holding up wonderfully!
Wednesdays through January
If you liked this project you may also be a fan of our DIY Disney Tattoos for Kids, Mickey Shirts, or Disney Countdown.

P.S. Don’t forget to sign up for free Tipsy updates via RSS or email.

We have decided to truncate our feed to help protect against stolen content. I apologize for any inconvenience. Please love us anyway. 🙂

DIY Christmas Decorations & Wal-Mart Card GIVEAWAY

November 26, 2012 By Michelle Barneck 33 Comments

I always enjoy having DIY Christmas decorations in my holiday decor. It adds a personal touch and I love displaying things I have created. This year I saw the cutest 3D polka dot presents at Tai Pan Trading and instantly fell in love until I saw the price tag at $40. Granted they are a good 3 feet high, but $40 for foam core?! I knew then and there what my DIY Christmas decorations would be.
Our Version $10 <------------------------> Tai Pan Trading’s Version $40

SUPPLIES:
  • 2 sheets foam core (Do not buy at the dollar store! It has a paper finish and will bubble.)
  • X-ACTO Z series blade (This baby was awesome! It cut like a charm.)
  • Pencil
  • X-ACTO Self Healing Cutting Mat
  • Painter’s tape
  • Red Satin Craft Paint
  • Foam Brush
  • Foam Pouncer (for polka dots)
  • Clear Glitter Finish (Martha Stewart’s is indoor/outdoor if you want to put them on the porch)
DIY Christmas Decorations

INSTRUCTIONS:
1. Lay the foam core on the cutting mat and using your pencil hand sketch the shapes from the template below. Cut along the pencil lines with the Xacto Z-series.

2. Using your pencil, draw the ribbon tails as illustrated below on both sides of the present.

3. Tape around the ribbon tails and paint the ribbon area red. 

4. While that is drying, paint red dots with the foam pouncer. Once the paint is dry turn the present over and paint the ribbon area and dots on the opposite side. Let that dry and repeat painting the ribbon area and dots with a second coat on each side. 

5. Once all the paint is dry paint the whole thing with the glitter finish. I did two coats. If you squint with all your might you may see the shimmer on the ribbon loop. It is sparkly in person I promise.

6. Once dry, slide the two pieces together and stand up. The best part is when you are one with it take it apart and it stores flat! Gotta love big impact but space smart DIY Christmas Decorations!
I also love that this can double as birthday decor, especially since my son’s birthday is in December. With a 3 foot present on the porch, people are bound to know it is the birthday party house.

OOOh, and guess what?! 

X-ACTO is giving away TWO $25 Wal-Mart Gift Cards so you can try out their new blade and pick up supplies you need for your own DIY Christmas decorations!

Enter via Rafflecopter form below.

a Rafflecopter giveaway


Disclosure: Xacto provided product to use, but the project and thoughts are all mine.
We have decided to truncate our feed to help protect against stolen content. I apologize for any inconvenience. Please love us anyway. 🙂

Make a Mickey Shirt

November 21, 2012 By Michelle Barneck 2 Comments

This Mickey shirt literally took me a few minutes and was so easy! I used Silhouette heat transfer and used my craft cutter to make a Mickey using a free image I found online. Then just iron it on and you are good to go!

Make a Mickey Shirt


 I got the t-shirts at the dollar store and here’s the comical part they only had size 3T in this color, but it fit both my four year old and my two year old. We lovingly refer to them as stick and brick.

I did find that the gray heat transfer was a bit more temper mental than the black and white. I had to go over it with the iron several times especially on the edges to get it to adhere properly.

Sorry for the less than optimal phone pic.

I love the simplicity and had multiple tourists at Disneyland ask where we got them. It was one of our most popular shirts from the trip (we made 13 shirts), second only to the Tangled shirts that will be debuting next month.

For more fun Disney projects, be sure to visit others in our Disney DIY series including Disney countdown with activity ideas, DIY Disney tattoos, Mike Wazowski shirt and more.

Wednesdays through January

P.S. Don’t forget to sign up for free Tipsy updates via RSS or email.

We have decided to truncate our feed to help protect against stolen content. I apologize for any inconvenience. Please love us anyway. 🙂
« Previous Page
Next Page »

  • Bloglovin
  • Facebook
  • Google+
  • Instagram
  • Pinterest
  • RSS
  • Twitter

Hi there! I'm Michelle. Mother of three little boys and one little princess. Welcome to A Little Tipsy, a place for exploring creativity and sharing inspiration.

Follow on Bloglovin


Visit Michelle Barneck {A Little Tipsy}'s profile on Pinterest.

Tutorials by Category


15 Family Reunion Games

Family Reunion Games Collage

15 Sprinkle Party Ideas

Sprinkle Birthday Party
Creative Commons License

© Copyright 2014 A Little Tipsy · Site Designed by The Fairy Blogmother · Web Hosting by RFE Hosting

This website uses cookies to improve your experience. We'll assume you're ok with this, but you can opt-out if you wish.Accept Read More
Privacy & Cookies Policy