A Little Tipsy

Creative Tips & Ideas

  • home
  • About Me
  • the tipsy top
  • press
  • projects
  • contact me
[print_thumbnail_slider]

How to Stencil Patterns {Cutting Edge Stencil Giveaway!}

January 12, 2012 By Michelle Barneck 96 Comments

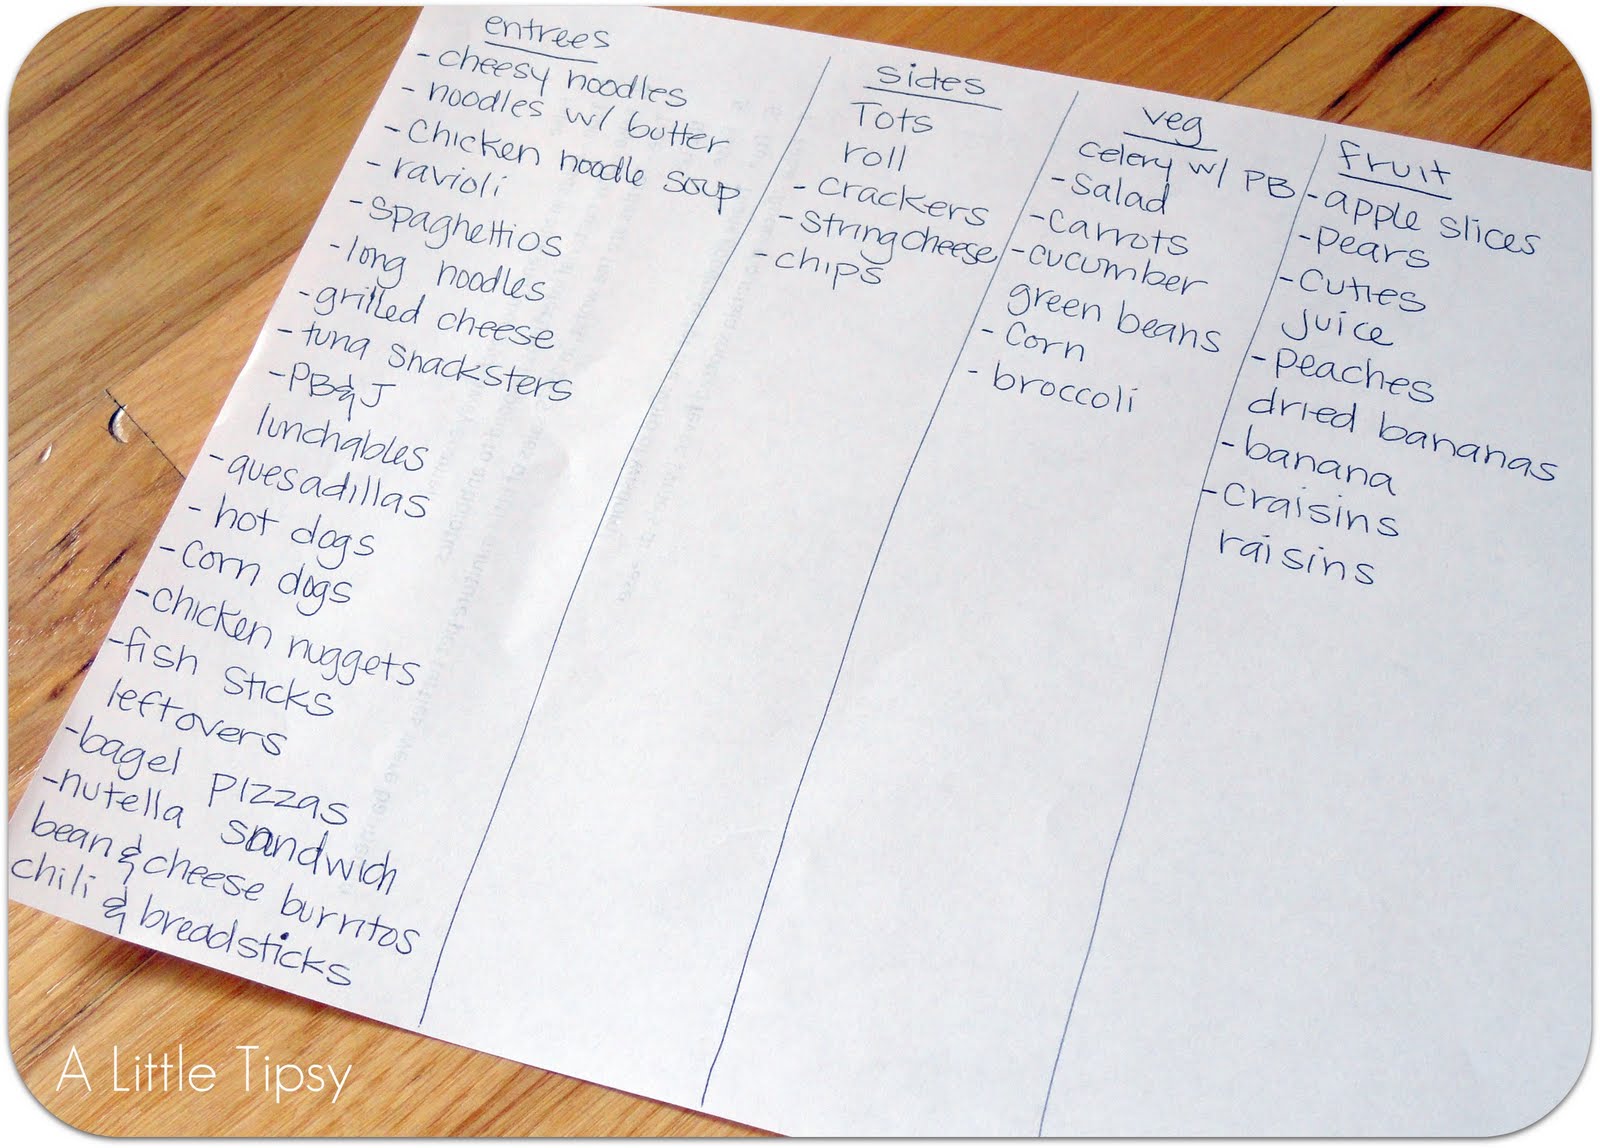
I am in love…with stencils. I’m sure you’ve seen the big beautiful stencil patterns done by Stacy and Jamielyn. I have done stenciling on a small scale (remember my stencil frosted mirror), but never a wall. When Cutting Edge Stencils contacted me, I knew just where I wanted to try it. I have been dying to re-do my laundry room and I knew a stencil pattern would be perfection! I totally have a crush on my new wall.
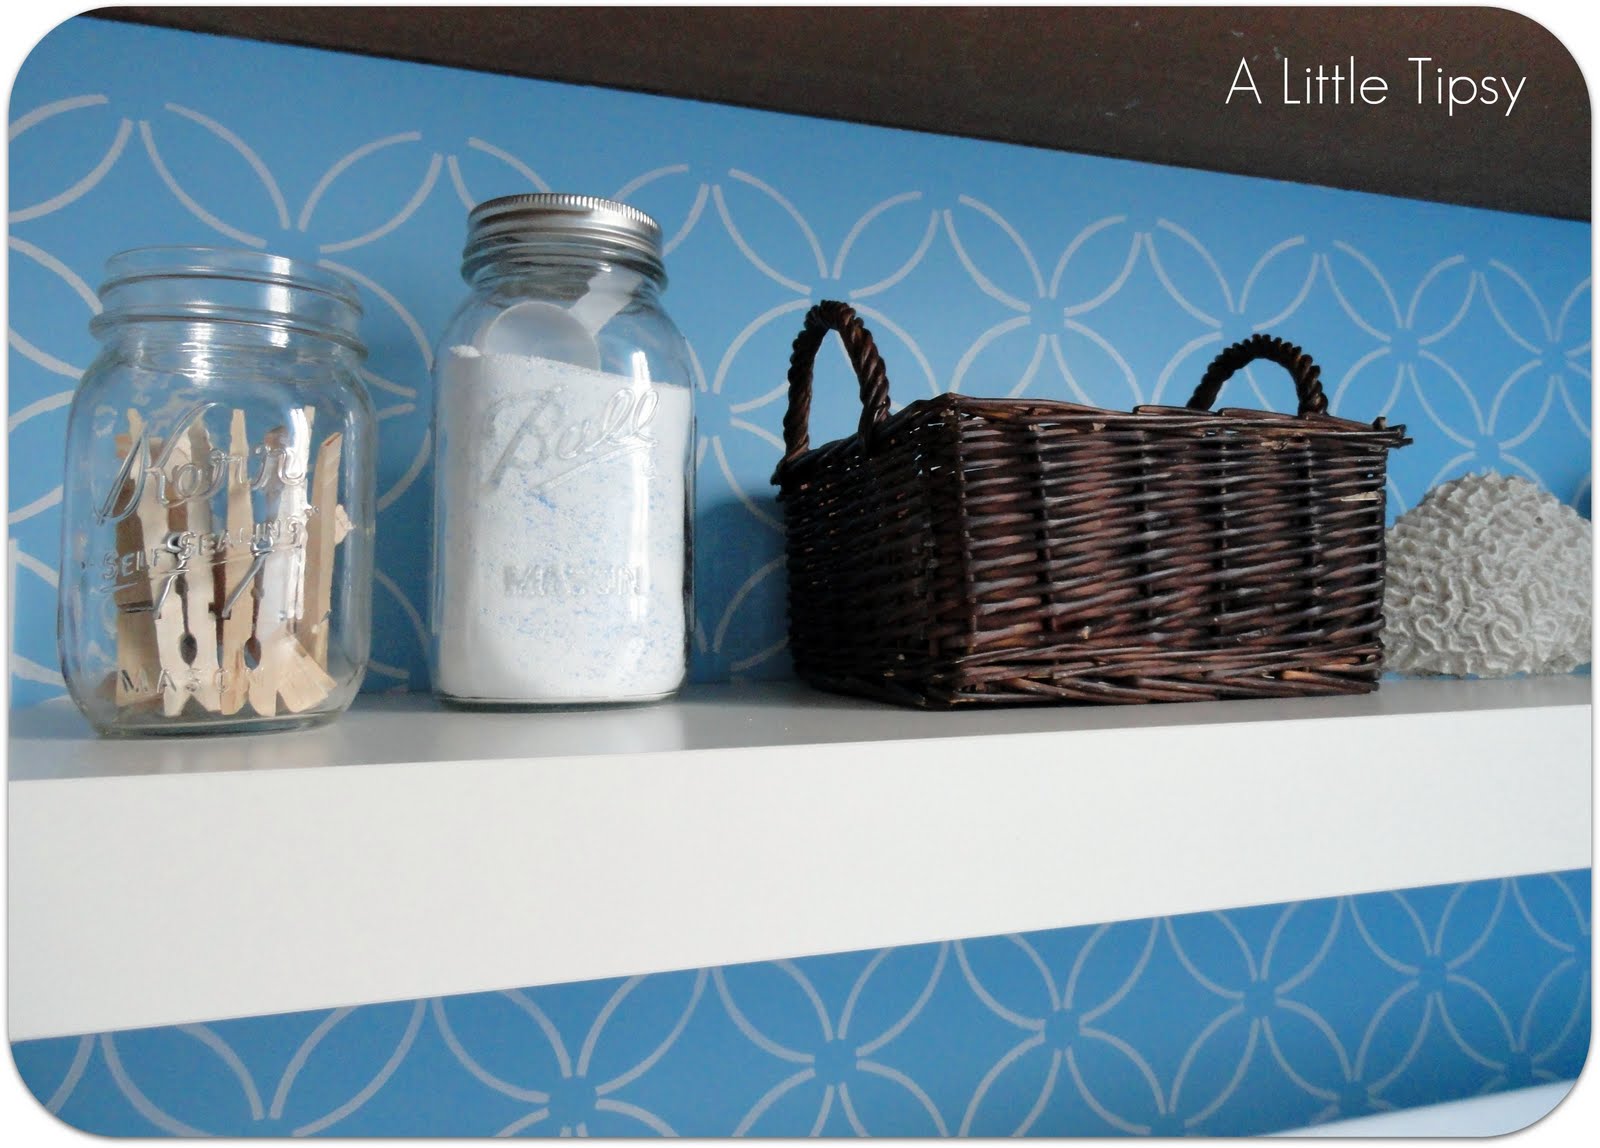
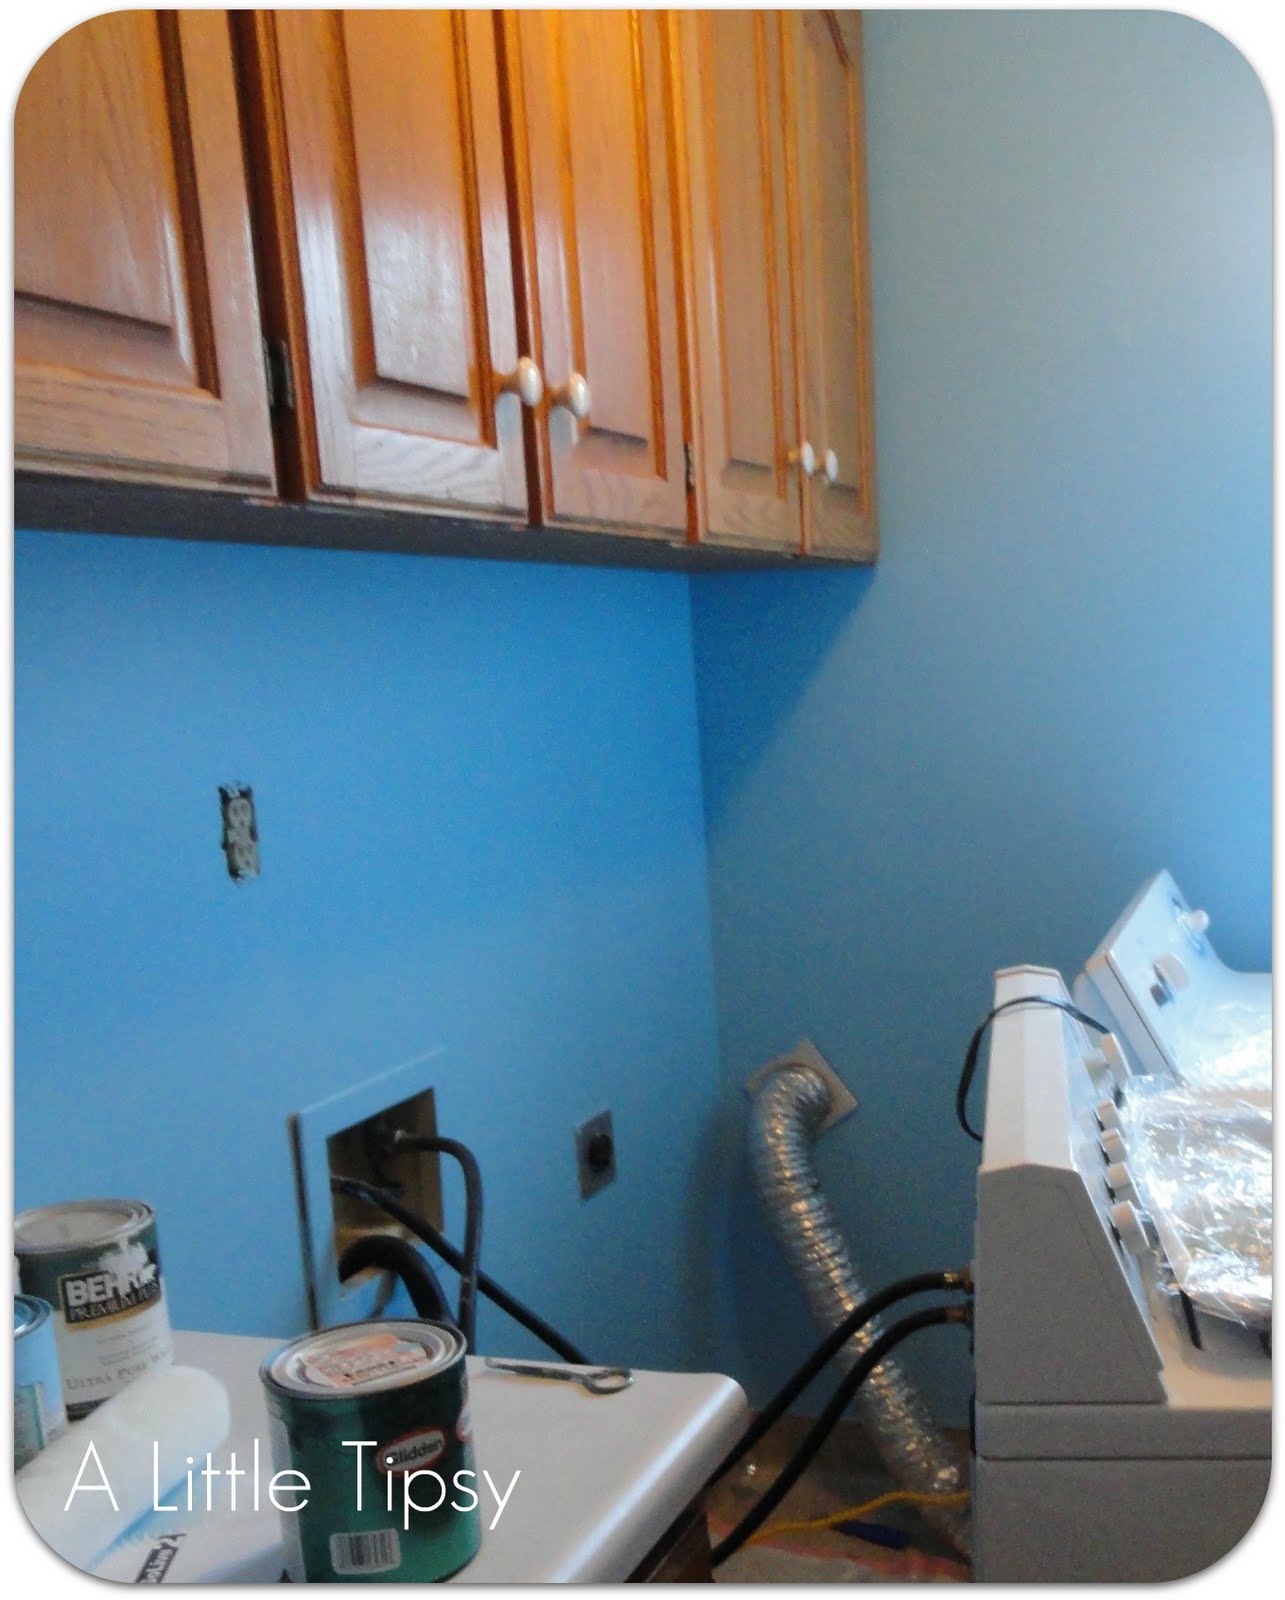
To see the full impact you must see the before…

I know the bare white wall with wallpaper glue and dryer lint is highly desired, but I was ready for a change. I gave the walls a good scrub down with DIF to get the adhesive off and then wiped it down once more with water to make sure it was clean and would not make the paint crackle.
Then, they got a couple of coats of Pool Blue Glidden Paint. I had a free trial quart can and just had to buy a titch more. Be prepared to move the washer and dryer back and forth a gazillion times! Let the base coat dry at least 24 hours before stenciling on it.
How to Stencil Patterns
Supplies:
  • Stencil (mine was the Fuji Allover)
  • Latex or acrylic paints
  • Small Dense Foam Roller with rounded ends, stencil brushes
  • Large styrofoam plates
  • Paper Towels
  • Low tack painter’s tape, spray adhesive (optional)
  • Cutting Edge Stencil Level (optional)
  • Baby Wipes
  • Q-tips
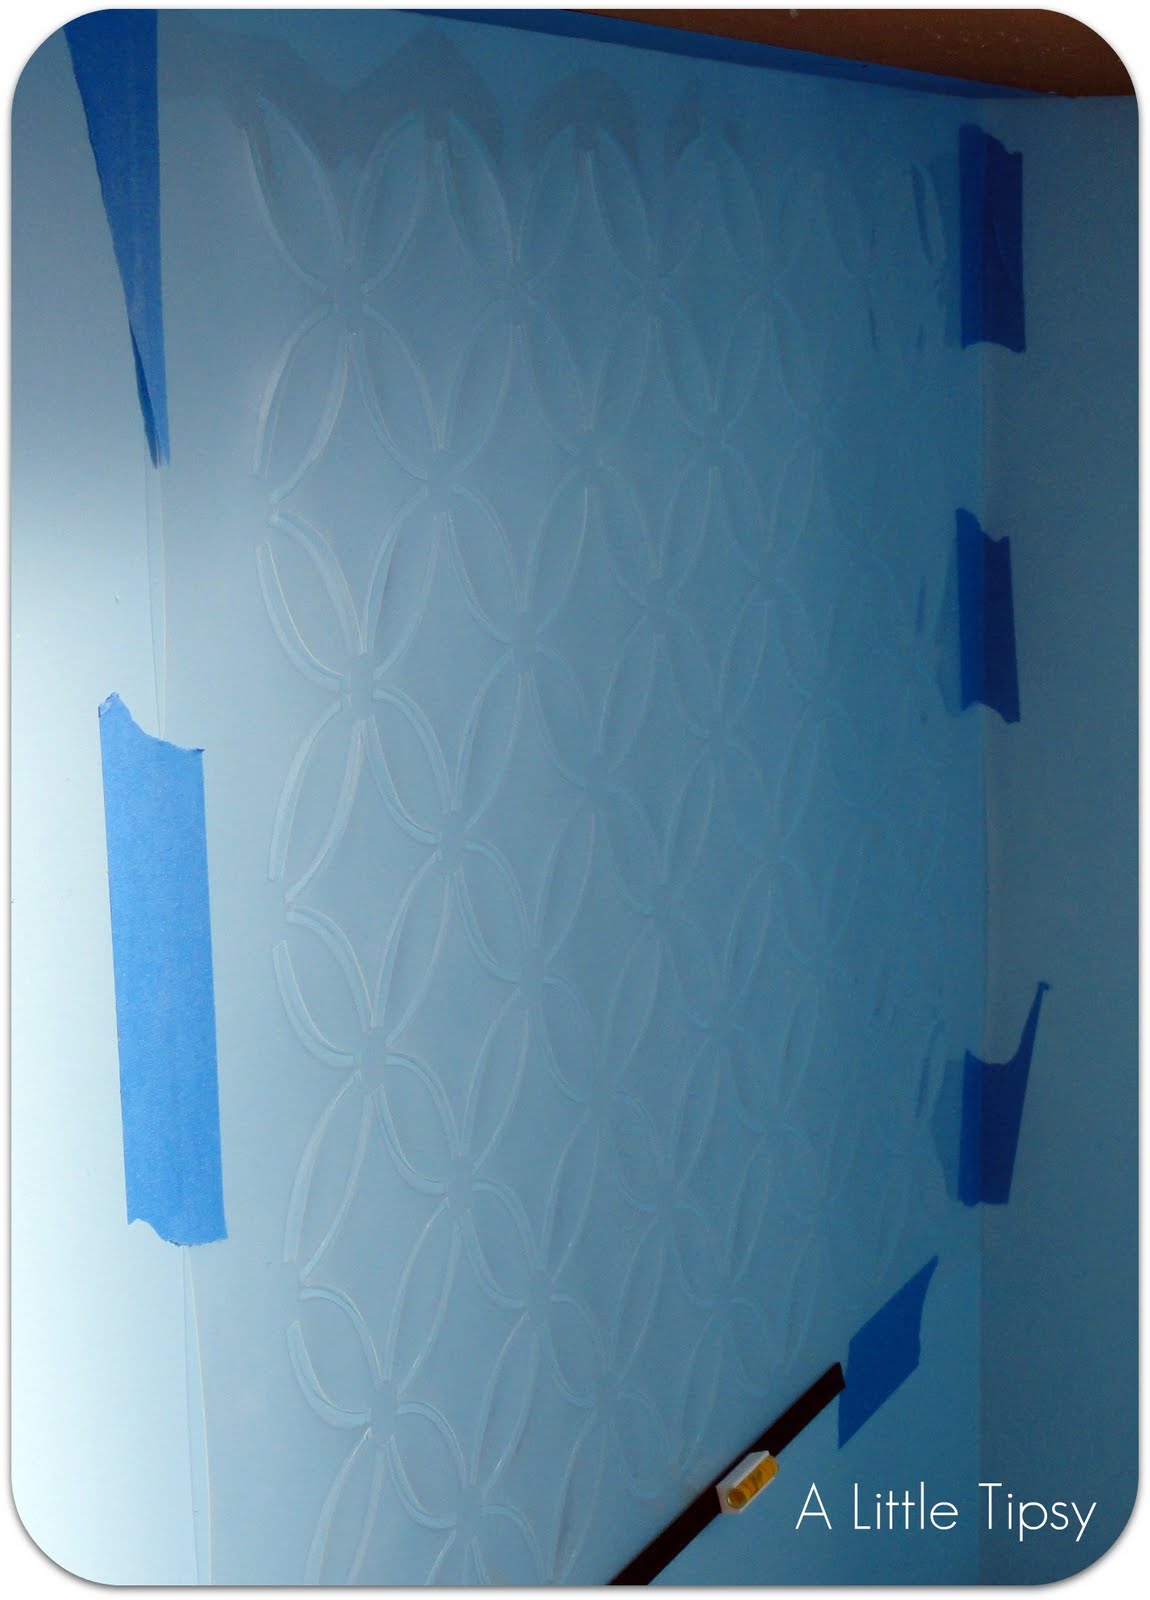
It’s a good idea to practice your stencil to make sure you like your color combo and have the technique down before you start on the actual wall.
Be sure to tape off any outlets, ceiling or cupboards you want to protect.
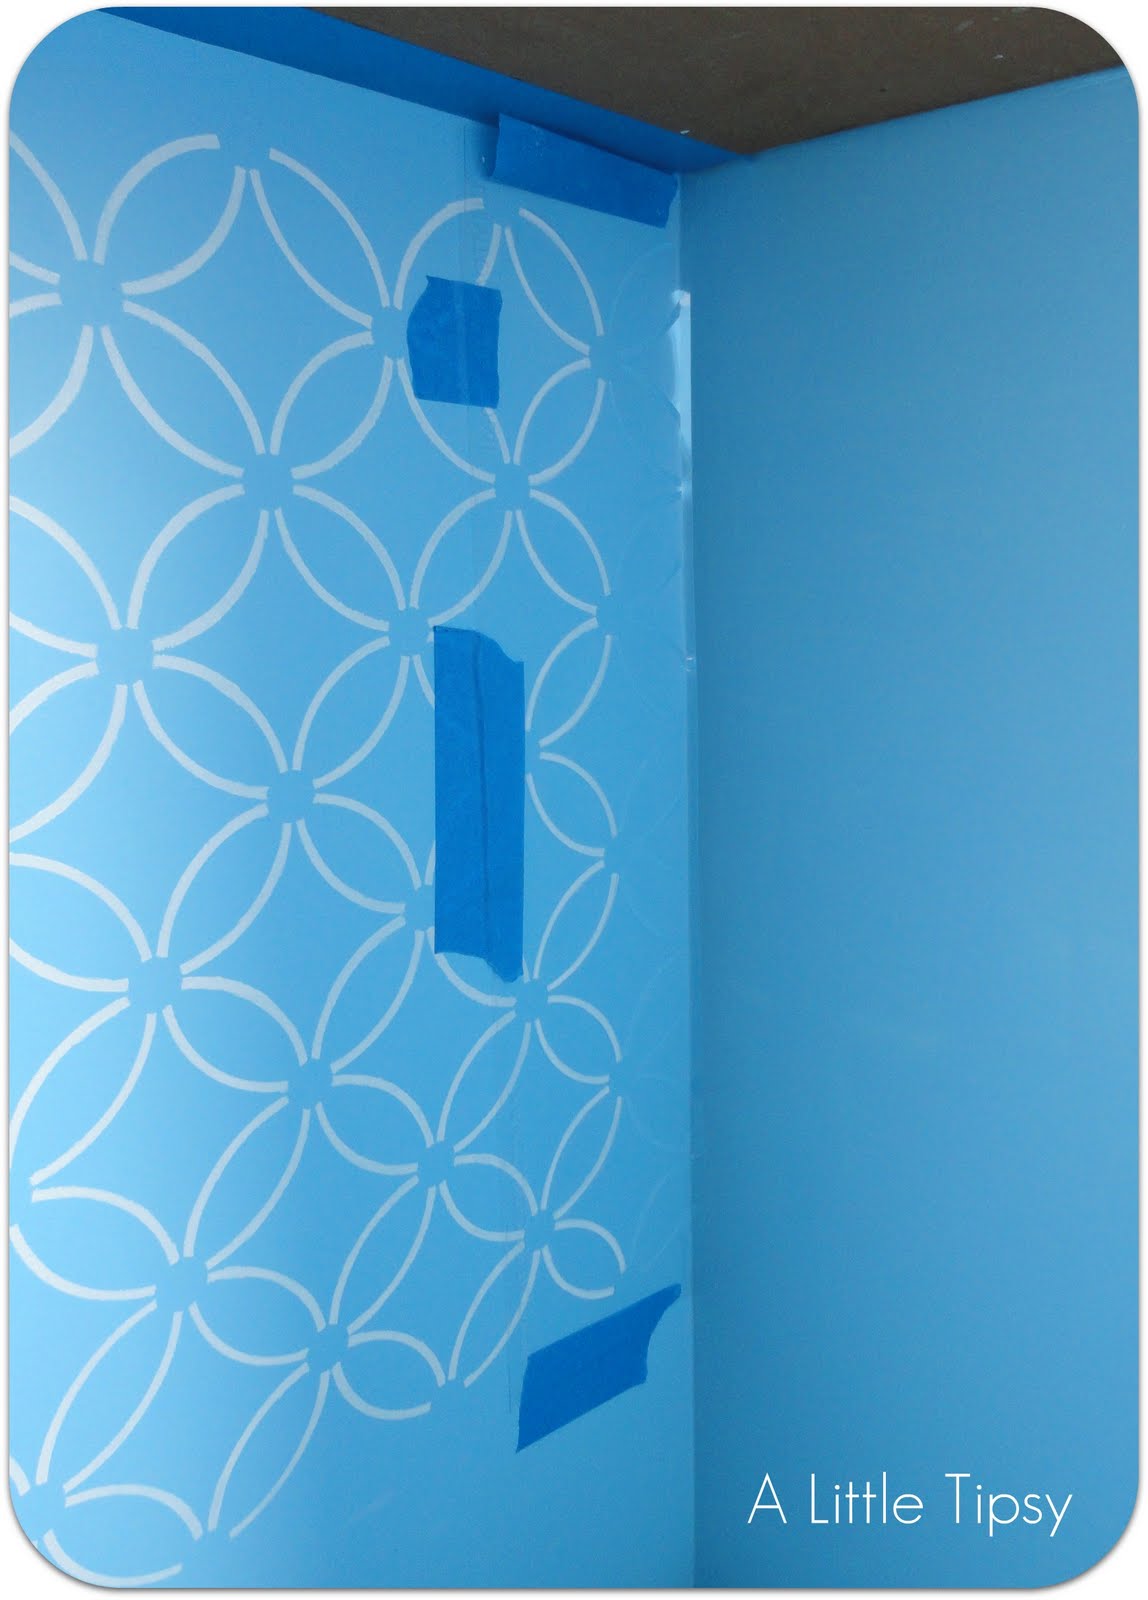
Tape your stencil in place using painters tape making sure it is level (Cutting Edge Stencils come with a cool level that clips right on to the stencil. You can use spray adhesive as well if you like.
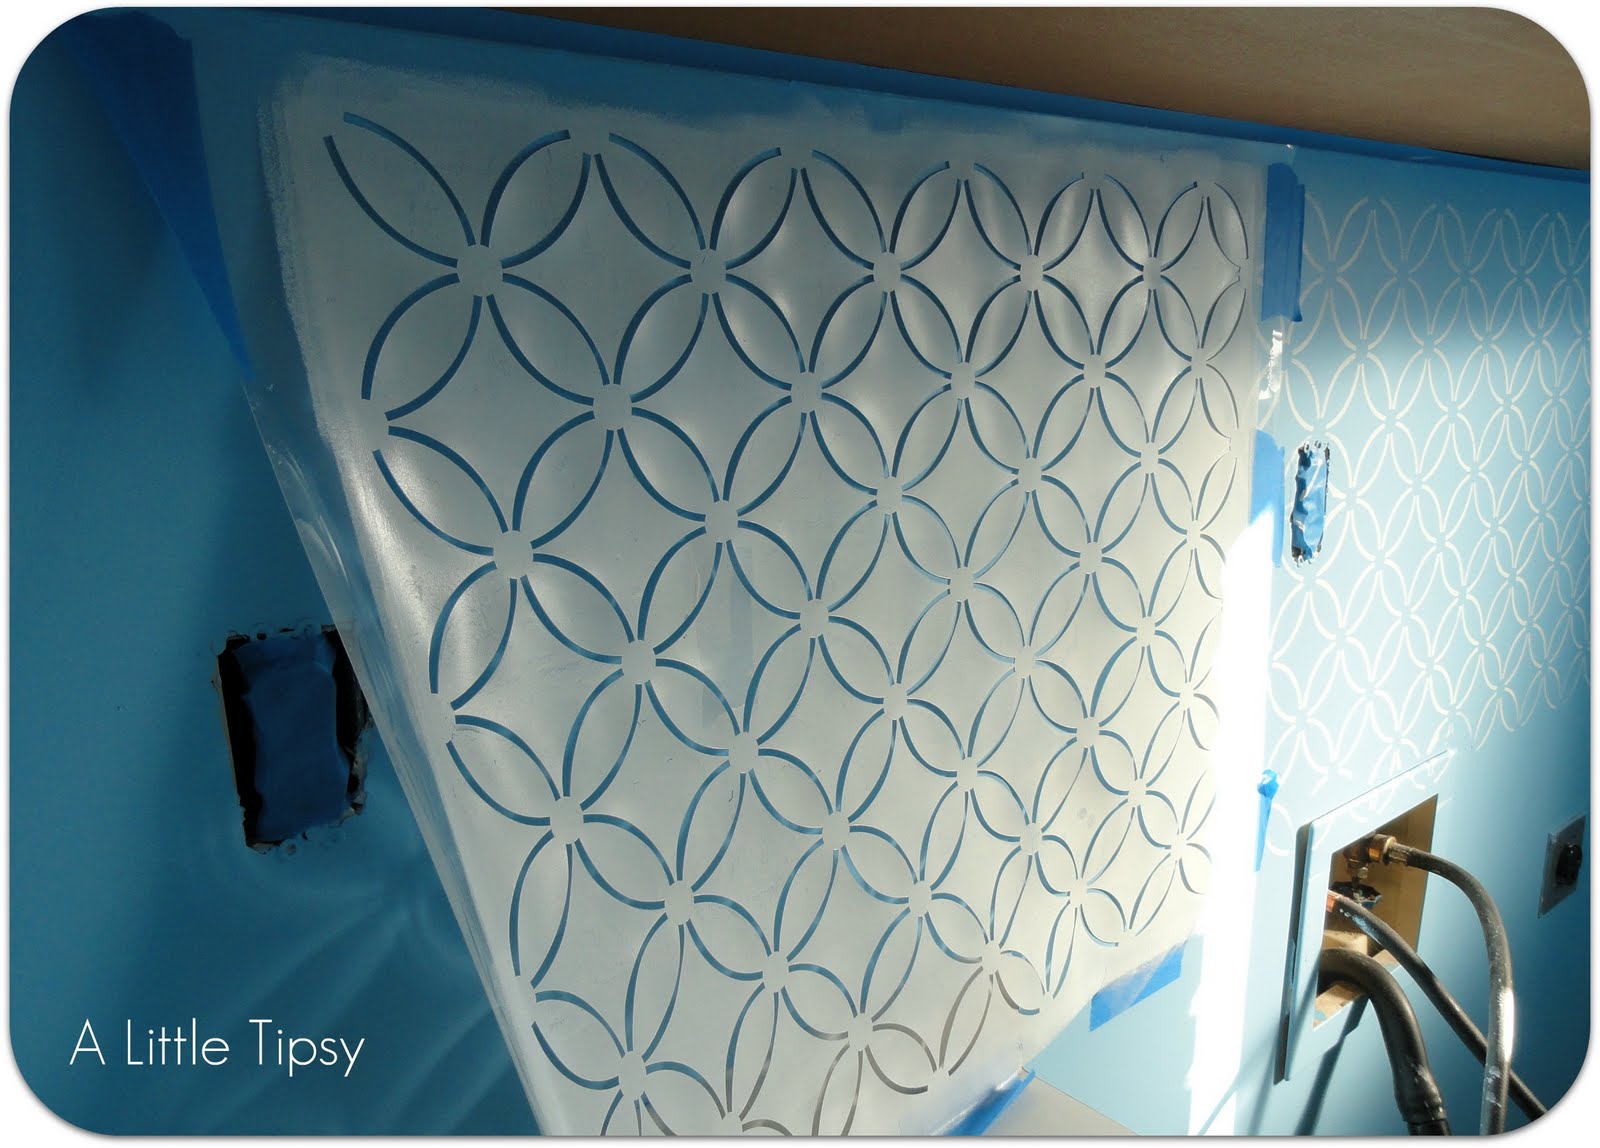
Pour some paint on your plate, coat the roller evenly and roll on the paper towels to get most of the paint off so it almost looks dry. Roll lightly over the stencil until you reach the desired effect. If you push too hard the paint will leak under the edges more. Be careful not to roll over the outside edges of the stencil.
Carefully remove the stencil and line it up with the previous pattern to go again. I had some obstacles like outlets and counter corners to work around. Sometimes you can’t get the stencil perfectly flat, but just do your best to hold it flat in small sections for these tricky areas.
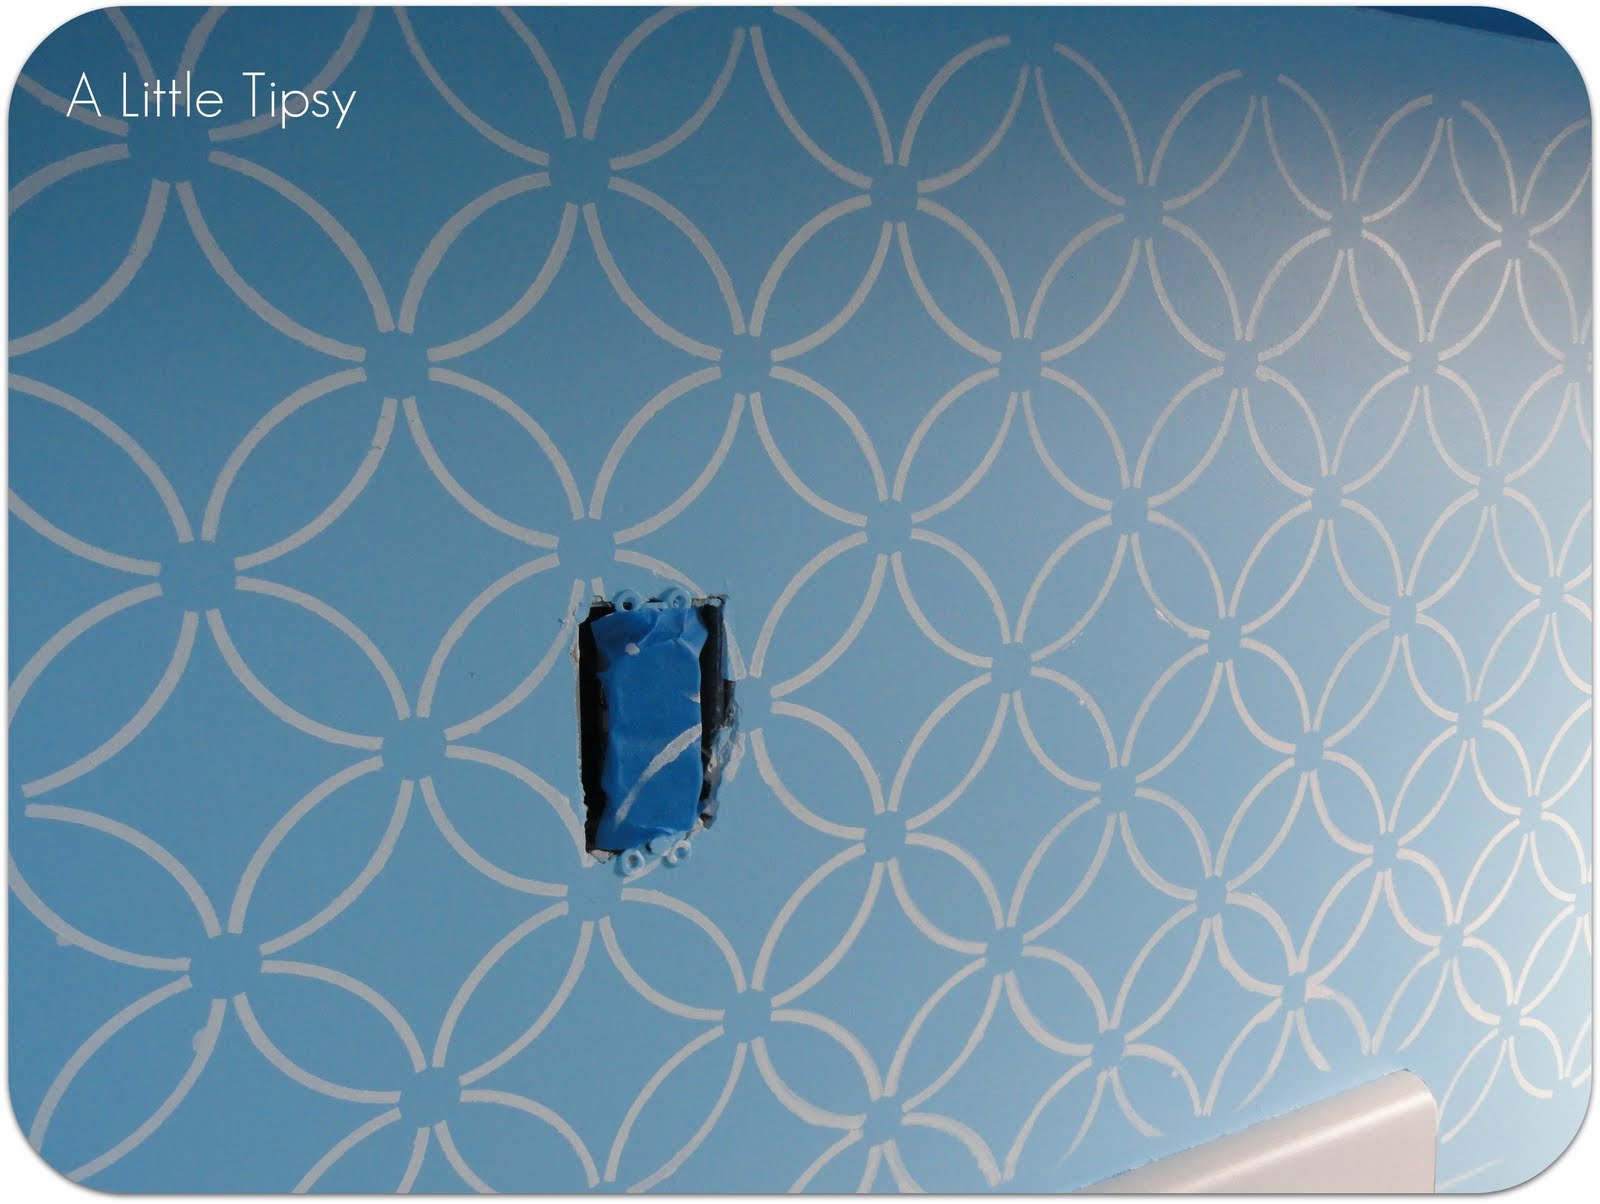
Once you have the whole thing tackled you can go back around the edges with the smaller stencil provided to get closer to the edges.

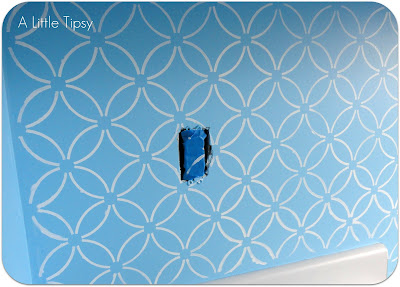
Mine got a little messy around the edges in parts. You can wipe big oops with baby wipes to clean up quickly. For smaller clean up I used q-tips and both white and blue paint for touch ups.
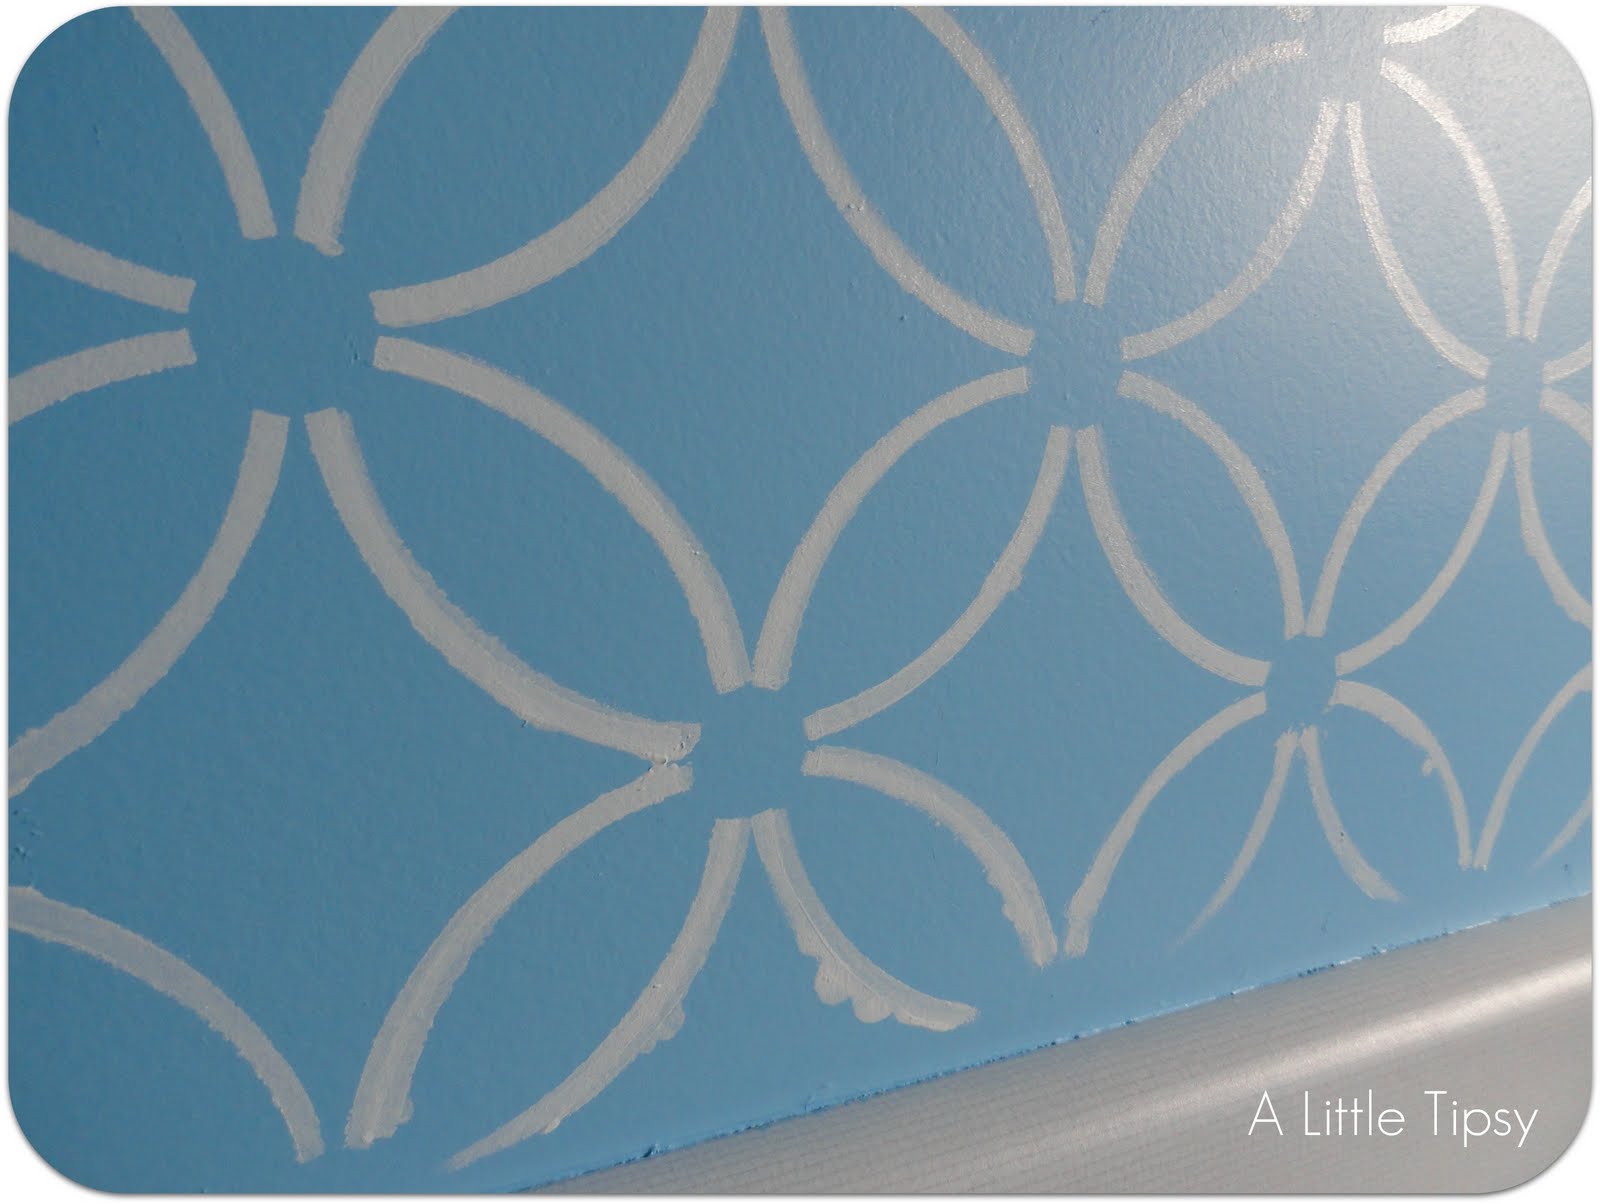
I am thrilled with my first stenciled wall! My mind is going crazy thinking of all the other things I can stencil! You can see a sneak peek in the photo below. Stay tuned for the Laundry room reveal in its entirety next week!
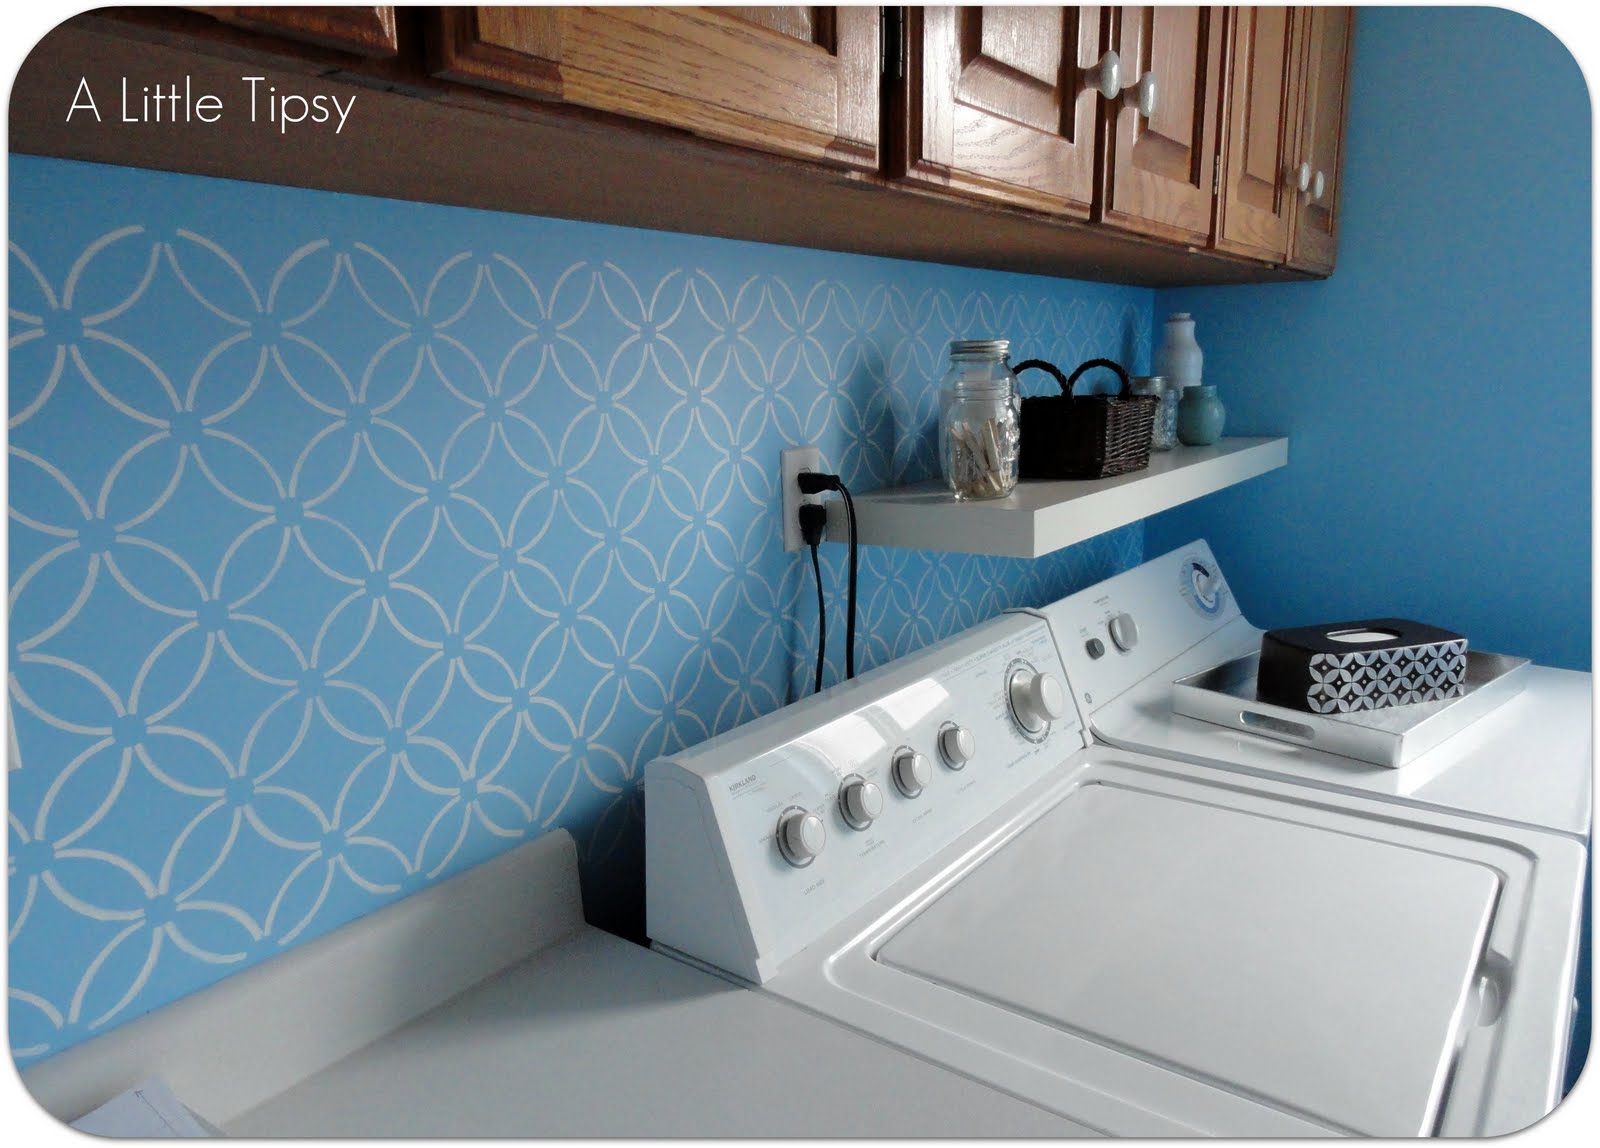
Click to see the details and tour the DIY laundry room.

I am really excited to be able to give you the chance to stencil your own wall! Cutting Edge Stencils is giving away $50 toward any of their products!

To enter:
  • Visit Cutting Edge Stencils and tell me what you would choose
Additional Entries:
  • Follow A Little Tipsy
  • Like Cutting Edge on Facebook and say hi from us!
  • Facebook or tweet this giveaway and leave us the link. (Ex: I’m hoping to win the $50 Cutting Edge Stencils {GIVEAWAY} from @littletipsyblog! http://tinyurl.com/6ms8fun)
Giveaway will close Thursday, January 19th. Good luck!
Linking up with:
Get Your Craft On

P.S. Don’t forget to sign up for free Tipsy updates via RSS or email.

We have decided to truncate our feed to help protect against stolen content. I apologize for any inconvenience. Please love us anyway. 🙂

DIY Under $5

January 11, 2012 By Michelle Barneck 4 Comments

This week I came up with a lunch menu so mealtime would be a snap. It will help me not have to banter with the kids about what to eat and our meals will have more variety.


What have you been up to?


I enjoy so much your $5 projects that I decided to add an addition link section for anything under $15! That’s right. It will open up a place to show additional projects that can’t be purchased with an Abe Lincoln, but are still totally affordable! I can’t wait to see more from you!

Please remember:

  • Only link to your own projects that cost you $5 or less (price does not have to include items you had on hand) or $15 or less in the 2nd section.
  • You can link past projects that fit the dollar limit, but please only link each project one time to one DIY Under $5 party. Do not link the same project week after week.
  • No linking giveaways or items for sale
  • Please link back so others can join the party and so you have the opportunity to be featured on Saturday!


DIY under $5


Projects under $5


Projects under $15


P.S. Don’t forget to sign up for free Tipsy updates via RSS or email.

We have decided to truncate our feed to help protect against stolen content. I apologize for any inconvenience. Please love us anyway. 🙂

Lunch Menu

January 10, 2012 By Michelle Barneck 5 Comments

As a continued organization effort, I decided to make a monthly lunch menu. I was sick of standing in front of the fridge wondering what to serve up to the munchkins or worse asking what they wanted for a response full of “no, no, no thanks, no.” I decided that to cut out the guess work, have a more balanced diet, and prep the kiddos for having a set menu at school having a monthly menu would be a great idea.
We’ve only done it for three days, but so far it is a total success. I know exactly what to make and the kids don’t argue.

I just wrote down all the things I could think of in four categories: entree, side, vegetable, and fruit. If I thought of something we did not have at the time, I wrote it on the grocery list.

Once I had our list, I printed out a calendar and got to work filling it with a menu. If the entree had tomato sauce or something vegetable like I would pair it with a fruit. I made sure that each day we had at least one fruit or vegetable. I realize it is not the healthiest menu on the planet, but I’m feeding a 4 year old and a one year old. They aren’t going to happily eat swiss chard.
I had just gone grocery shopping, so I just put the things on the shopping list at the end of the month. Easy peasy, I had most everything on hand and we aren’t eating the same thing twice!
edit*: Just heard about this adorable free printable lunch menu on Anything But Perfect and it is so perfect!
What’s your lunch routine? Any ideas to share?

P.S. Don’t forget to sign up for free Tipsy updates via RSS or email.

We have decided to truncate our feed to help protect against stolen content. I apologize for any inconvenience. Please love us anyway. 🙂

Football Field Dip

January 8, 2012 By Michelle Barneck 2 Comments

This is a Sponsored post written by me on behalf of Avocados from Mexico for SocialSpark. All opinions are 100% mine.

There are two things I love about the super bowl: the commercials and the party food. Mmmm, I love me some guacamole, salami roll ups, cheese ball, you name it. A few years back I decided to combine our love of seven layer dip with the sport of the season and came up with this Football Field Dip.

Football Field Dip Picture

Football Field Chip Dip

3 Avocados from Mexico
Onion Powder
Garlic Salt
1 can Taco Bell Fat Free refried beans 
1/2 Taco Seasoning Packet 
1 Small Tub Sour Cream 

Spread beans in the bottom of a small rectangular pyrex dish (2.75 qt about 7 in x 9in). Take a scoop of sour cream and put it in a ziploc bag for later. Mix the remaining sour cream with the 1/2 packet of taco seasoning. Spread this over the beans. Next peel the avocados into a bowl and smash with 3 dashes of garlic salt and 3 dashes of onion powder. Spread this over the sour cream layer covering completely. This is your football field.

Now, take the sour cream you put in the ziploc and snip a little hole in the corner of the bag. Grab like a frosting bag and line the field.

 Super glue toothpicks together to make goal posts.


Oh and guess what, we love this dip so much I entered it in a contest. I know right? I am not usually the recipe contest type, but I had a good feeling about this one…

Avocados from Mexico Guac Off Recipe Contest!

GuacOff_logo

Here is my humble (but complete awesome sauce) entry…sad with no comments.

   Guac Off Football Field Dip Entry   


I am hoping to win one of these fabulous prizes…

  • •(3) Grand Prizes- iPad 2 and autographed cookbook signed by Celebrity Chef Roberto Santibañez   
  •  (7) Runners Up- A $200 grocery gift card and autographed cookbook signed by Celebrity Chef Roberto Santibañez 

Plus, all entrants are automatically entered into a separate sweepstakes for a chance to win one of ten $100 grocery gift cards.

You can find complete details and enter here: Avocados from Mexico on Facebook. So, head on over before January 15th!


I like a little healthy competition!


Visit Sponsor's Site

We have decided to truncate our feed to help protect against stolen content. I apologize for any inconvenience. Please love us anyway. 🙂
« Previous Page
Next Page »

  • Bloglovin
  • Facebook
  • Google+
  • Instagram
  • Pinterest
  • RSS
  • Twitter

Hi there! I'm Michelle. Mother of three little boys and one little princess. Welcome to A Little Tipsy, a place for exploring creativity and sharing inspiration.

Follow on Bloglovin


Visit Michelle Barneck {A Little Tipsy}'s profile on Pinterest.

Tutorials by Category


15 Family Reunion Games

Family Reunion Games Collage

15 Sprinkle Party Ideas

Sprinkle Birthday Party
Creative Commons License

© Copyright 2014 A Little Tipsy · Site Designed by The Fairy Blogmother · Web Hosting by RFE Hosting

This website uses cookies to improve your experience. We'll assume you're ok with this, but you can opt-out if you wish.Accept Read More
Privacy & Cookies Policy