A Little Tipsy

Creative Tips & Ideas

  • home
  • About Me
  • the tipsy top
  • press
  • projects
  • contact me
[print_thumbnail_slider]

Paper Organization & “Get Organized for the Holidays” Workshop Giveaway

October 20, 2011 By Michelle Barneck 40 Comments

{If my blog’s font is showing up oddly huge, try the fixes in this post.}
I have a problem with paper. There is so much pouring in each each day that it feels like before I know it I am buried under a mountain. Junk mail, to do lists, school papers, church notices. You name it I stack it. I thought I was doing well having one place to collect it all until the stack began to constantly topple. Ug. Then the heaven’s parted and I found Aby’s online Paper Organization workshop.

  • Online=spend a few minutes whenever I find them.
  • If there is a class on this, I am obviously missing something.
  • From a company name Simplify 101 means it won’t be overly complicated

I am still in the midst of this workshop, but I can tell you it has already done wonders for my paper organization skills. They break it down in to lessons and help you figure out where it comes from, why it is piling up, and how to make a few alterations that work for your personal style to keep it all at bay. I know we are picture people, so here are a few of the changes I have made so far.


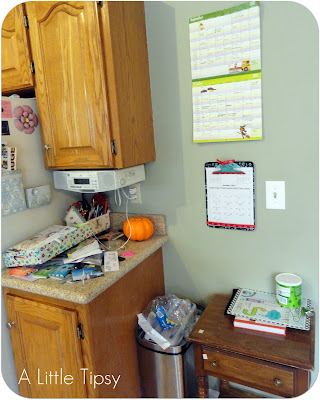
{Before}……………………………………………{After}


{Before}


{After}

I hate to say it, but I had already gone through a lot of the paper when I took the before pic. I realized that one place for everything was making one big mess so I broke things down in to several systems:

1. Inbox{green flowery number}: for the daily influx. I go through this nightly.
2. School clipboard: for preschool calenders & papers
3. Magazine holder {turquoise on small table}: holds the magazines and catalogs I want to go through. I take one at a time up to my nightstand.
4. Grocery System: one for ads and one for coupons on the side of the fridge made from snack boxes and scrapbook paper. Inspiration by…

5. Magnet board: for little notes that need to be in plain sight or will be around less than a week.

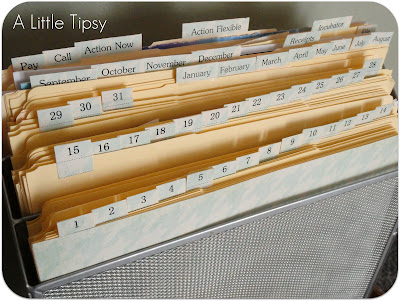
6. Tickler file: A folder for each day of the month and each month of the year. To file things with a due date or inspiration for certain times of the year. I also added pay, call, action now, action flexible, receipts, file and incubator (need time to decide if I need to keep ie. kids artwork) folders.
I am totally loving this class and can’t wait for these things to become second nature. I would totally recommend this workshop, but unfortunately it is only offered at certain times of the year. But, guess what is on the docket next, “Get Organized for the Holidays.” Sounds great right?!

My friends at Simplify 101 are offering one lucky reader a free spot in the Get Organized for the Holidays online workshop {$67 value}.

This online workshop is the ultimate holiday planning workshop. Start making your plans for a joyful (and stress-free!) holiday season in early November.

We’ll create a holiday planning binder loaded with holiday planning forms, checklists, and best of all, a customized holiday plan that focuses on what’s most important to you and your family. Then, learn how to weed-out and simplify your less meaningful holiday tasks, freeing-up time to truly enjoy and savor those activities that make the holidays most special to you.


How to enter (up to four chances to win):

  1. Leave a comment on this post telling me what you are most looking forward to this holiday season.

  2. Follow A Little Tipsy
  3. Mention this giveaway on Facebook or Twitter, then leave a comment letting me know you did.

  4. Sign up to receive the free Mini Guide for creating a command central binder, then leave a comment letting me know you did.

Giveaway closes Thursday, October 27th. Good luck!

Bonus: simplify 101 is offering my readers 15% off enrollment in this workshop! To take advantage of this offer, enter ALT15 during checkout. This coupon is good through Thursday, October 27, 2011 and may not be combined with any other offers.


If you’d like more tips on organizing your home or office top to bottom, sign up for Simplify 101’s organizing newsletter right here ! You can also follow the blog and get even more daily tips.

——————————————————————

The winner of the $50 gift card from Groopdealz is…

jen said… I love groopdealz! i love the vinyl decals

Congrats!

P.S. Don’t forget to sign up for free Tipsy updates via RSS or email.
We have decided to truncate our feed to help protect against stolen content. I apologize for any inconvenience. Please love us anyway. 🙂

Make a Coat Rack from a Pallet

September 26, 2011 By Michelle Barneck 2 Comments


Hey all you A Little Tipsy readers! My name is Stephanie and I blog at My Li’l Pumpkin Patch. I am thrilled to be guest blogging here today! I just love Michelle’s blog and all of her frugal ideas!


I am also a frugal gal and I love to make projects with things I already have around the house. (I get a high from saving money.)


Today I am going to show you how to make this coat rack out of a pallet!


But, before I get ahead of myself, let me introduce myself. I am a wife and a mother (to a sweet two-year old, Isaac). I enjoy creating things for my home, family, and others. Here are a few of my favorite projects so far:


Tohoku Tote DIY Hat Hangers Doily Shirt


When I’m not crafting, I enjoy spending time with my family. Some of our favorite things to do are camping, four-wheeling, and watching Netflix (recent fav: American Pickers).

Come visit me at my blog, My Li’l Pumpkin Patch to see my crafts, DIY projects, sewing, scrapbooking, card making, and tutorials! If you have a big craft stash like me, you may also be interested in joining my new “Stache Party.” It is a party dedicated to depleting your stash, (AKA making room for more).


I actually only had to buy a couple of things for the Pallet Coat Rack. I spent a grand total of about $7. If you would like to make one, this is what you will need:


Pallet


Sander & Sand Paper


Hammer


Flat Head Screw Driver

Glue (I used Tacky, my fav!)


Mod Podge

Coat Hooks


Scrapbook Paper


Hanging Hardware

Sealant Spray


Drill and Drill Bits (opt.)


Decide which board you will remove. I tried hammering off the board, but only cracked it…oops. I discovered that it was much easier to wedge the screwdriver between the boards and hammer the end of the screwdriver. This way the wood separates without cracking. Remove nails.


I was about to try for a new board after cracking the first one, but then I decided the cracks added some character. To keep them from splitting more, I attached a few of these flat metal brackets. I found them at the hardware store. They come in handy with wood projects all the time!


Speaking of character, I just love the words printed onto the board!


I lightly sanded the board to smooth the rough edges and ends to prevent splintering. I didn’t want to sand too much, because I wanted the words to remain on the board.


See how much difference the sander makes?


To decorate the board, I used a paper pad that had coordinating papers. I cut the paper into squares and rectangles to create a pattern. I really like the look of bare wood showing through. (I also thought it would be fun to paint chevron stripes.)


After I figured out my layout, I glued everything on with Tacky glue (it works great on wood and paper). Then, I brushed a layer of mod podge on top.


I looked for coat hooks at the hardware store, but they were pretty pricey. (The joys of small town hardware stores…). I wasn’t going to spend $3 per hook, so I decided I would keep looking. I found these egg stands at the craft store in the wood section. When you turn them upside down, they make perfect hooks for hanging things!


I spray painted them white so they would stand out from the paper and the natural wood color.


To attach them, I drilled holes that were slightly smaller than my screws through the pallet. Then, I twisted the screws through until they were flush with the front of the board. Then, I put the hooks on top and carefully twisted the screw into the wood. (To make this easier, do this step before you glue on the paper – that’s what I did!)


Then, I unscrewed my attached knobs and filled the hole in the knob with tacky glue and also put a bunch of glue around the inner section to stop slipping.


Finish with a few layers of sealant spray, and then attach hanging hardware.

I hope you’ll come visit me at my blog!


Thanks for having me, Michelle!

——————————————————————————

Love that she used egg stands as hardware! Very inventive. A big thanks to Stephanie for sharing a super cool way to upgrade a pallet!

P.S. Don’t forget to sign up for free Tipsy updates via RSS or email.

We have decided to truncate our feed to help protect against stolen content. I apologize for any inconvenience. Please love us anyway. 🙂

DIY Under $5 {Organize It}

July 6, 2011 By Michelle Barneck 8 Comments

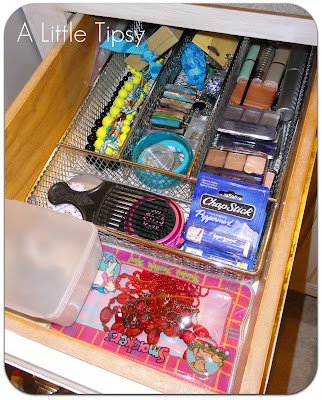
Lately, I feel like thing have been crazy and with us always on the go the house becomes a mess quickly. So what to do but organize it so everything has a place and it is easier to keep things in order. I decided to tackle our master bathroom vanity and found that there are so many great affordable options to help organize it.

Eight Ways to Organize it for a Dollar or Less


Top drawer:
1. Metal mesh silverware tray-holds chunky jewelry and extra make-up.
2. Face wipes container-holds other jewelry
3. Plastic zipper pouch (from chapstick)-holds my red beaded jewelry.
4. Week pill box (in the middle of silverware tray)-organizes rings with one in each day

Second drawer:
5. Dollar store plastic drawer organizers-organize hair accessories
6. Ovaltine container (to be covered in cute paper, I didn’t want to get distracted in the middle and not get the other drawers done)-holds stiff headbands on the outside and fabric headbands inside

Third drawer: more dollar store plastic organizers for pedicure and moisturizing supplies and face wipes container for nail polish

Under sink:
7. Wet wipes containers-for small items
8. Plastic shoe bins-for extra products like soap, toothpaste, deodorant, etc.

I hate running out of stuff, so I always have an extra of everything stored under my sink.

So far this has worked really well. Even the hubs is putting things away and our counter is staying clear! We’ve had it organized for about to two weeks now.

If you like these ideas, you may also like my DIY Jewelry Organizer for the back of a door.

Now it’s time to link up your $5 projects!

Please remember:

  • Only link to your own projects that cost you $5 or less (price does not have to include items you had on hand)
  • You can link past projects that fit the dollar limit, but please only link each project one time to one DIY Under $5 party. Do not link the same project week after week.
  • No linking giveaways or items for sale
  • Please link back so others can join the party and so you have the opportunity to be featured on Saturday!

DIY under $5

P.S. Don’t forget to sign up for free Tipsy updates via RSS or email.

We have decided to truncate our feed to help protect against stolen content. I apologize for any inconvenience. Please love us anyway. 🙂

DIY Under $5 and Point of View Features

July 2, 2011 By Michelle Barneck 5 Comments

I had so many projects I wanted to feature this week that I actually had to narrow it down by who linked back. You guys have so many great affordable ideas!


Link with the highest clicks:

DIY Glitter Toes from Artsy-Fartsy Mama

My Faves:

Stamped Americana Pillow from Mishmash Mom

Pillowcase Outfits from Grey Luster Girl


Ric Rac Pocket Bib from Just Another Hang Up

And here is a feature from our Point of View Shelves linky party.

Curbside Dresser Shell to Media Storage Center by Re-Create with L. Lane Designs

I can’t wait to see more fun projects from these parties!

Be sure to grab your A Little Tipsy or Point of View featured button here.
P.S. Don’t forget to sign up for free Tipsy updates via RSS or email.
We have decided to truncate our feed to help protect against stolen content. I apologize for any inconvenience. Please love us anyway. 🙂
« Previous Page
Next Page »

  • Bloglovin
  • Facebook
  • Google+
  • Instagram
  • Pinterest
  • RSS
  • Twitter

Hi there! I'm Michelle. Mother of three little boys and one little princess. Welcome to A Little Tipsy, a place for exploring creativity and sharing inspiration.

Follow on Bloglovin


Visit Michelle Barneck {A Little Tipsy}'s profile on Pinterest.

Tutorials by Category


15 Family Reunion Games

Family Reunion Games Collage

15 Sprinkle Party Ideas

Sprinkle Birthday Party
Creative Commons License

© Copyright 2014 A Little Tipsy · Site Designed by The Fairy Blogmother · Web Hosting by RFE Hosting

This website uses cookies to improve your experience. We'll assume you're ok with this, but you can opt-out if you wish.Accept Read More
Privacy & Cookies Policy