A Little Tipsy

Creative Tips & Ideas

  • home
  • About Me
  • the tipsy top
  • press
  • projects
  • contact me
[print_thumbnail_slider]

15 Creative Family Costumes

September 25, 2013 By Michelle Barneck Leave a Comment

It’s time to start thinking costumes and I love that my kids are still little enough that they don’t argue at the mention of family costumes. I think it is super fun to coordinate and went on a search for the best family costumes. There are so many creative families out there and I think you’re going to love what we stumbled upon!


Mario Bros.


Flinstones


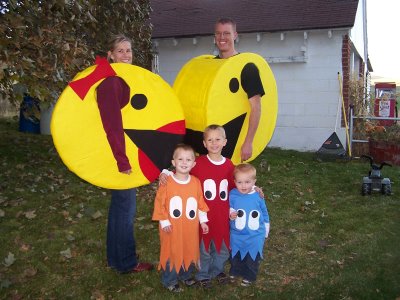
Pacman

DSC_0083.JPG

Plants vs. Zombies

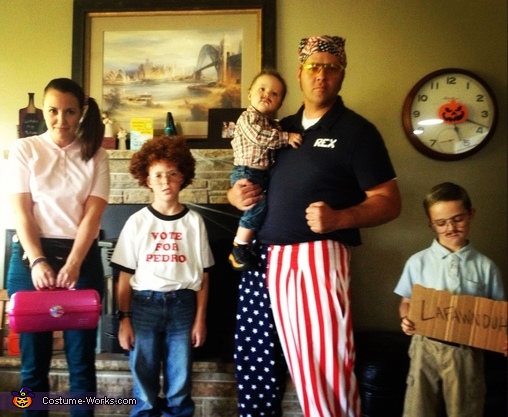
Napoleon Dynamite Family - Homemade costumes for families

Napoleon Dynamite

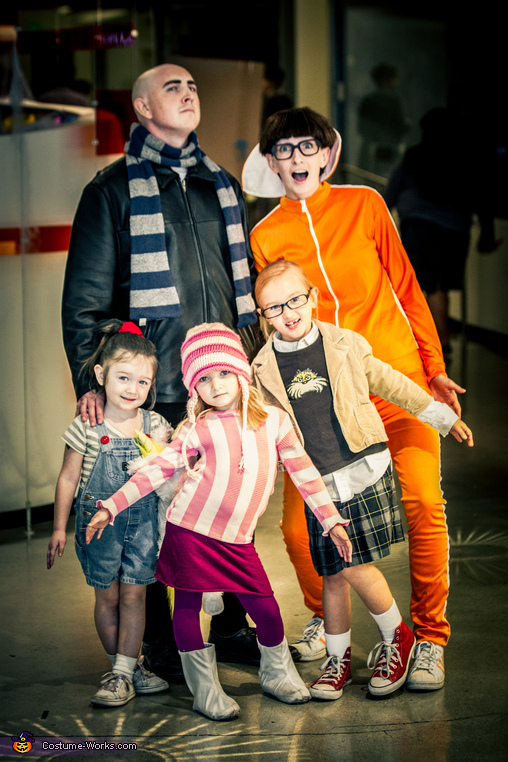
Despicable Me Family - Homemade costumes for families

Despicable Me Family


Scooby Doo 


Lions and Tigers and Bears…oh my


Superheroes
Family #StarWars Costumes. Saw the R2D2 costume IRL and it rocked!
Star Wars


Peter Pan


Where’s Waldo?


S’mores

Classic B.L.T.

B.L.T.


Cops and Robbers
There are so many adorable ideas, how can you choose just one? I’m hoping I have a few more years of having my kids think family costumes are fun so we can squeeze in as many as possible.

Have you done/do you do family costumes? What is the best family costume you’ve seen?
We have decided to truncate our feed to help protect against stolen content. I apologize for any inconvenience. Please love us anyway. 🙂
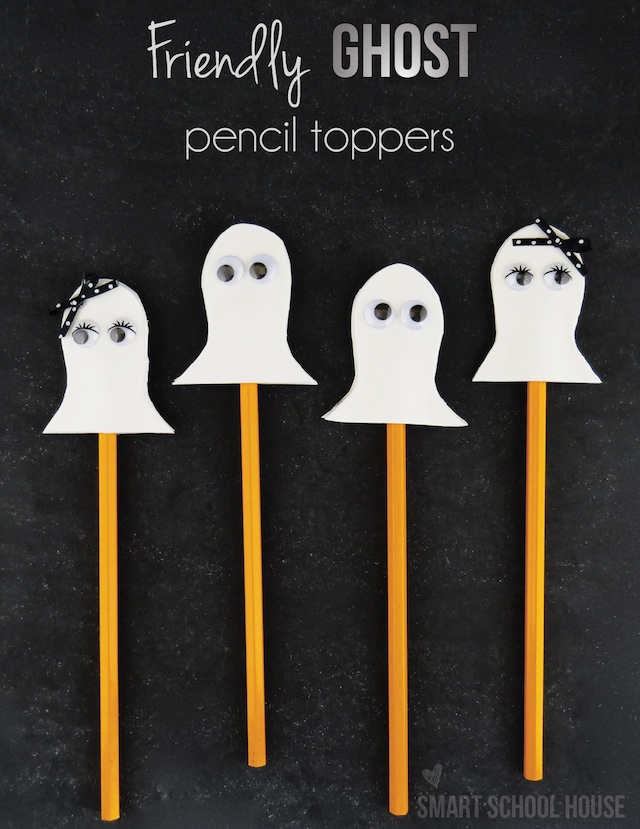
Friendly Ghost Pencil Toppers

September 17, 2013 By Michelle Barneck 1 Comment

Happy Halloween folks! I’m Kelly from Smart School House sharing a fun Halloween craft with you today! Ok, well, maybe it isn’t technically Halloween yet, but you know it will be here in the blink of an eye (or a googly eye in this case!). Do you have kiddos in your life that enjoy arts and crafts? Then this one is for you! 
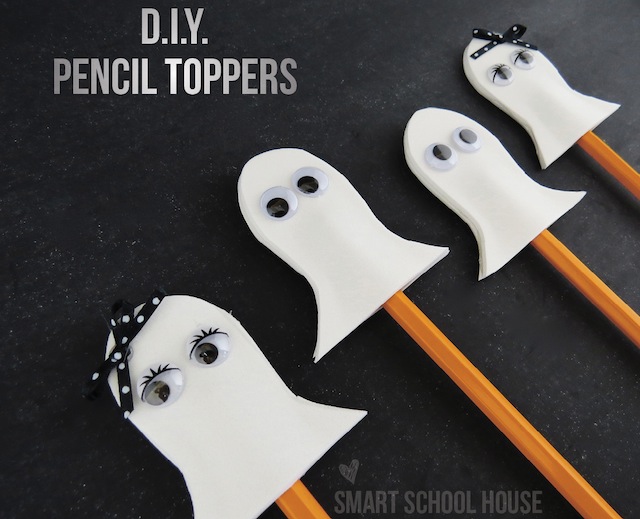
Ghost Pencil Toppers 
As a teacher, I love anything to do with pencils and crayons (as you can see in THIS fun post). I think these friendly ghost pencil toppers would be fun to make in the classroom OR at home, no? To get started, you only need some very, very basic (and cheap) materials:

  • pencils 
  • white craft foam 
  • googly eyes glue 
  • polka dot ribbon (optional) 

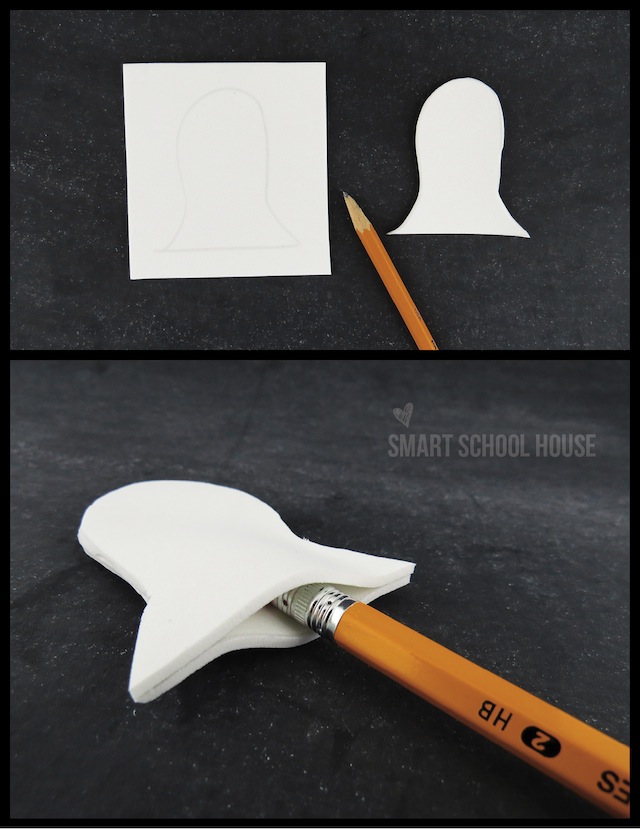
 I drew a ghost free hand, but this can be done with a stencil if you have one on hand. Each pencil topper has TWO foam ghosts, so cut out as many as you will need depending on how many pencil toppers you want to make. Psssst: here’s a tip, if you’re working with kids, make extra! There are bound top be craft mishaps, and that is all part of the learning process:)

Ghost Pencil Toppers4

Once you have cut out your ghosts, connect them together using glue. I used hot glue because it is quick! But again, if you’re working with kids, plain white glue will also work. Of course, it takes longer for white glue to dry. Only put a little glue around the top and sides of the ghost though! I like to say, “Dot, dot, not a lot!” when I’m working with kids. Simply show them to make small dots of white glue along the outer edges so that the pencil can be pushed inside.

Ghost Pencil Toppers2 

There you have it Halloween lovers! A cute and kid-friendly craft to celebrate the fun! It is always such a pleasure being here. I’d love for you to stop by my blog, Smart School House, and see the other festive crafts (and sweets) that I have up my sleeve these days!

——————————————————————
Thanks Kelly! I am dying over the googly eyes with the eyelashes! So fun!
We have decided to truncate our feed to help protect against stolen content. I apologize for any inconvenience. Please love us anyway. 🙂
Grandparent’s Day Heart Banner Letter

August 30, 2013 By Michelle Barneck 1 Comment

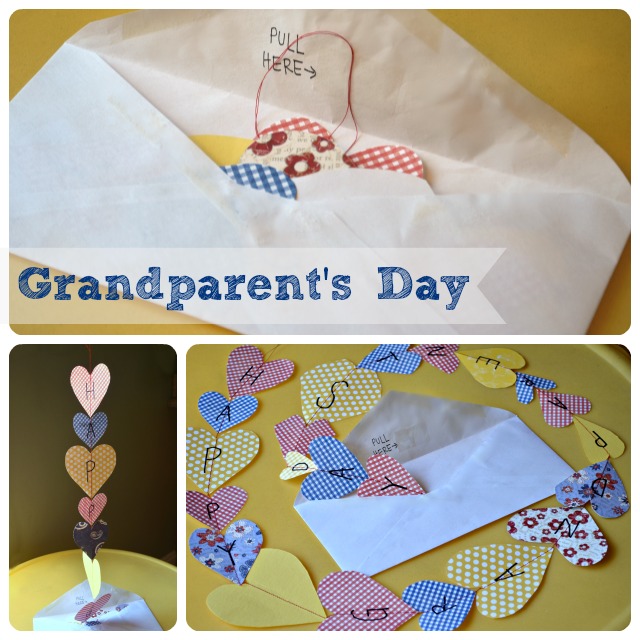
Grandparent’s Day is coming up Sunday, September 8th and with my parents temporarily living across the country on an LDS mission in Kirtland, we decided to make them a special letter to show them we are thinking of them! We love doing heart attacks (where you decorate people’s doors covered in hearts) so we decided it would be super fun to make a mailable heart attack.

I had the kiddos help me cut out a whole bunch of hearts and then I stitched them together with my sewing machine and added the letters to spell “Happy Grandparent’s Day!” Then, we just folded them in groups of about three hearts and stuffed them in the envelope with the string taped to the flap of the envelope. Instruct them to “pull here” and they will get a surprise as the hearts just keep coming and the message unfolds!

What fun things have you given or received for Grandparent’s Day?

We have decided to truncate our feed to help protect against stolen content. I apologize for any inconvenience. Please love us anyway. 🙂

Little Star: Highlighting a Child’s Special Day

August 26, 2013 By Michelle Barneck 1 Comment

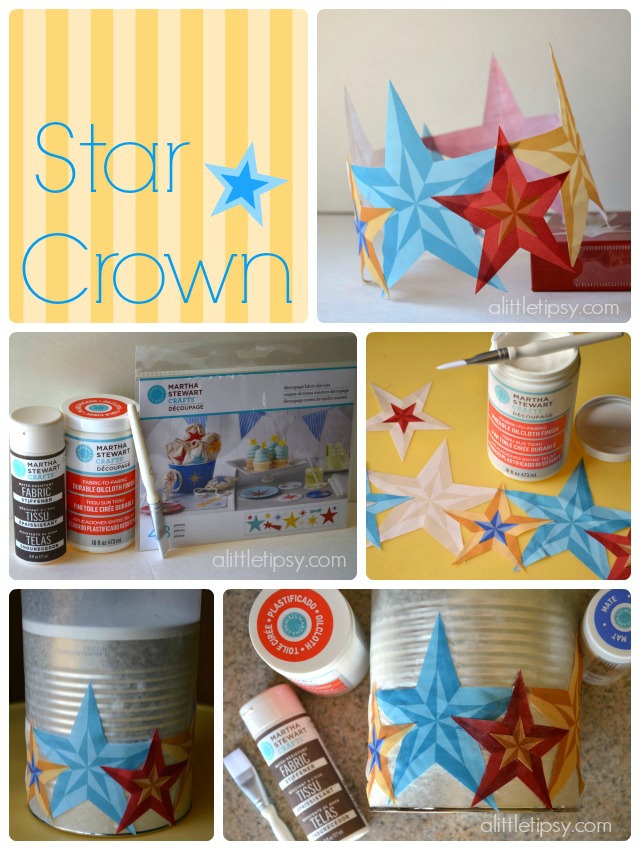
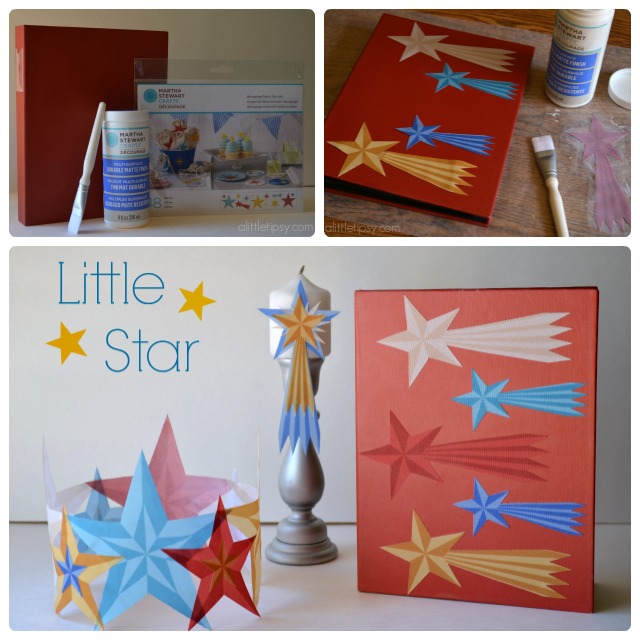
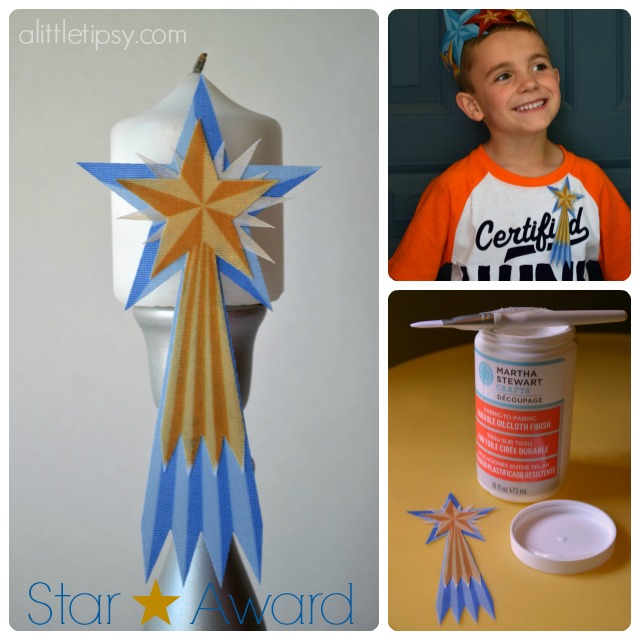
Whether soccer or art or singing, each child has their own special talent. I wanted to create a fun way to celebrate and make them feel special for their achievement whether it be a report card full of A’s, a successful dance performance, or being in the school play. I decided to create this Little Star crown, badge, and photo book to capture the shining moments of their lives.
They all coordinate and are easy to make with just a few supplies. I will share tutorials for each of items below.

SUPPLIES:
  • Martha Stewart Decoupage Fabric Die-Cuts
  • Martha Stewart Decoupage Durable Oilcloth Finish
  • Martha Stewart Decoupage Brush
  • Martha Stewart Fabric Stiffener
  • Martha Stewart Decoupage Durable Matte Finish
  • #10 Size Can
  • Wax Paper
  • Photo Book

Let’s start with the star crown.
1. Measure your child’s head and using the star fabric die cuts line them up overlapping until you get the correct length. I lined up the large stars overlapping the points about a half inch then layered the medium stars on top, then adding the small stars for embellishment. 
2. Using the oilcloth decoupage as adhesive, glue the small stars to the medium. Then, glue all of the star points that touch like the overlapping points of the large and the five points of the medium to secure. Let dry.
3. Cover a #10 size can with wax paper and lay your stars around it. Secure the last two ends of the stars together with the oilcloth decoupage to form the crown. Glue the top point of each large star to the wax paper to keep it vertical. Let dry. 
4. Using your decoupage brush, paint the stars with a thin layer of fabric stiffener. You want it thick enough to soak through the die-cuts, but thin enough that it will dry clear. Brush away from the points so it does not pool. Let dry.
5. Carefully slide the crown down the can to remove. 

Next up, the photo book. We hardly ever print pictures anymore, so my kids love to see photos of themselves in a book! 
1. Place the stars how you like them and decoupage using the matte finish decoupage and decoupage brush. Cover the back of the star with the medium, place it on the book and then paint over the top. Do a few coats, letting them dry between to make sure the stars are secure and protected.
Now for the cute little star award badge. Who doesn’t like getting  gold star?
1. Layer a yellow shooting star, cream colored burst and blue shooting star. Glue them all together using the oilcloth decoupage. Then, cover with two coats to protect and give it a durable shiny finish. I attached it with double sided sticky tape, but you could easily glue on a pin if you prefer.
Isn’t this little star collection adorable? I love having an extra special way to celebrate hard work and resulting achievements and with the school year starting up there will be more and more on their way!
The full line of of decoupage products is available at Michael’s.
ST_12_months_of_Martha_Logo-1
Disclaimer: Martha Stewart Crafts provided product for review.
We have decided to truncate our feed to help protect against stolen content. I apologize for any inconvenience. Please love us anyway. 🙂
« Previous Page
Next Page »

  • Bloglovin
  • Facebook
  • Google+
  • Instagram
  • Pinterest
  • RSS
  • Twitter

Hi there! I'm Michelle. Mother of three little boys and one little princess. Welcome to A Little Tipsy, a place for exploring creativity and sharing inspiration.

Follow on Bloglovin


Visit Michelle Barneck {A Little Tipsy}'s profile on Pinterest.

Tutorials by Category


15 Family Reunion Games

Family Reunion Games Collage

15 Sprinkle Party Ideas

Sprinkle Birthday Party
Creative Commons License

© Copyright 2014 A Little Tipsy · Site Designed by The Fairy Blogmother · Web Hosting by RFE Hosting

This website uses cookies to improve your experience. We'll assume you're ok with this, but you can opt-out if you wish.Accept Read More
Privacy & Cookies Policy