A Little Tipsy

Creative Tips & Ideas

  • home
  • About Me
  • the tipsy top
  • press
  • projects
  • contact me
[print_thumbnail_slider]

Pine Car Scout Awards

April 18, 2012 By Michelle Barneck 4 Comments

It’s derby time! We just had our Cub Scout Pine Wood Derby and as one of the leaders, I was asked to make the awards. I am still new to Cub Scouts, but here’s what I came up with.
Pine Car Scout Awards
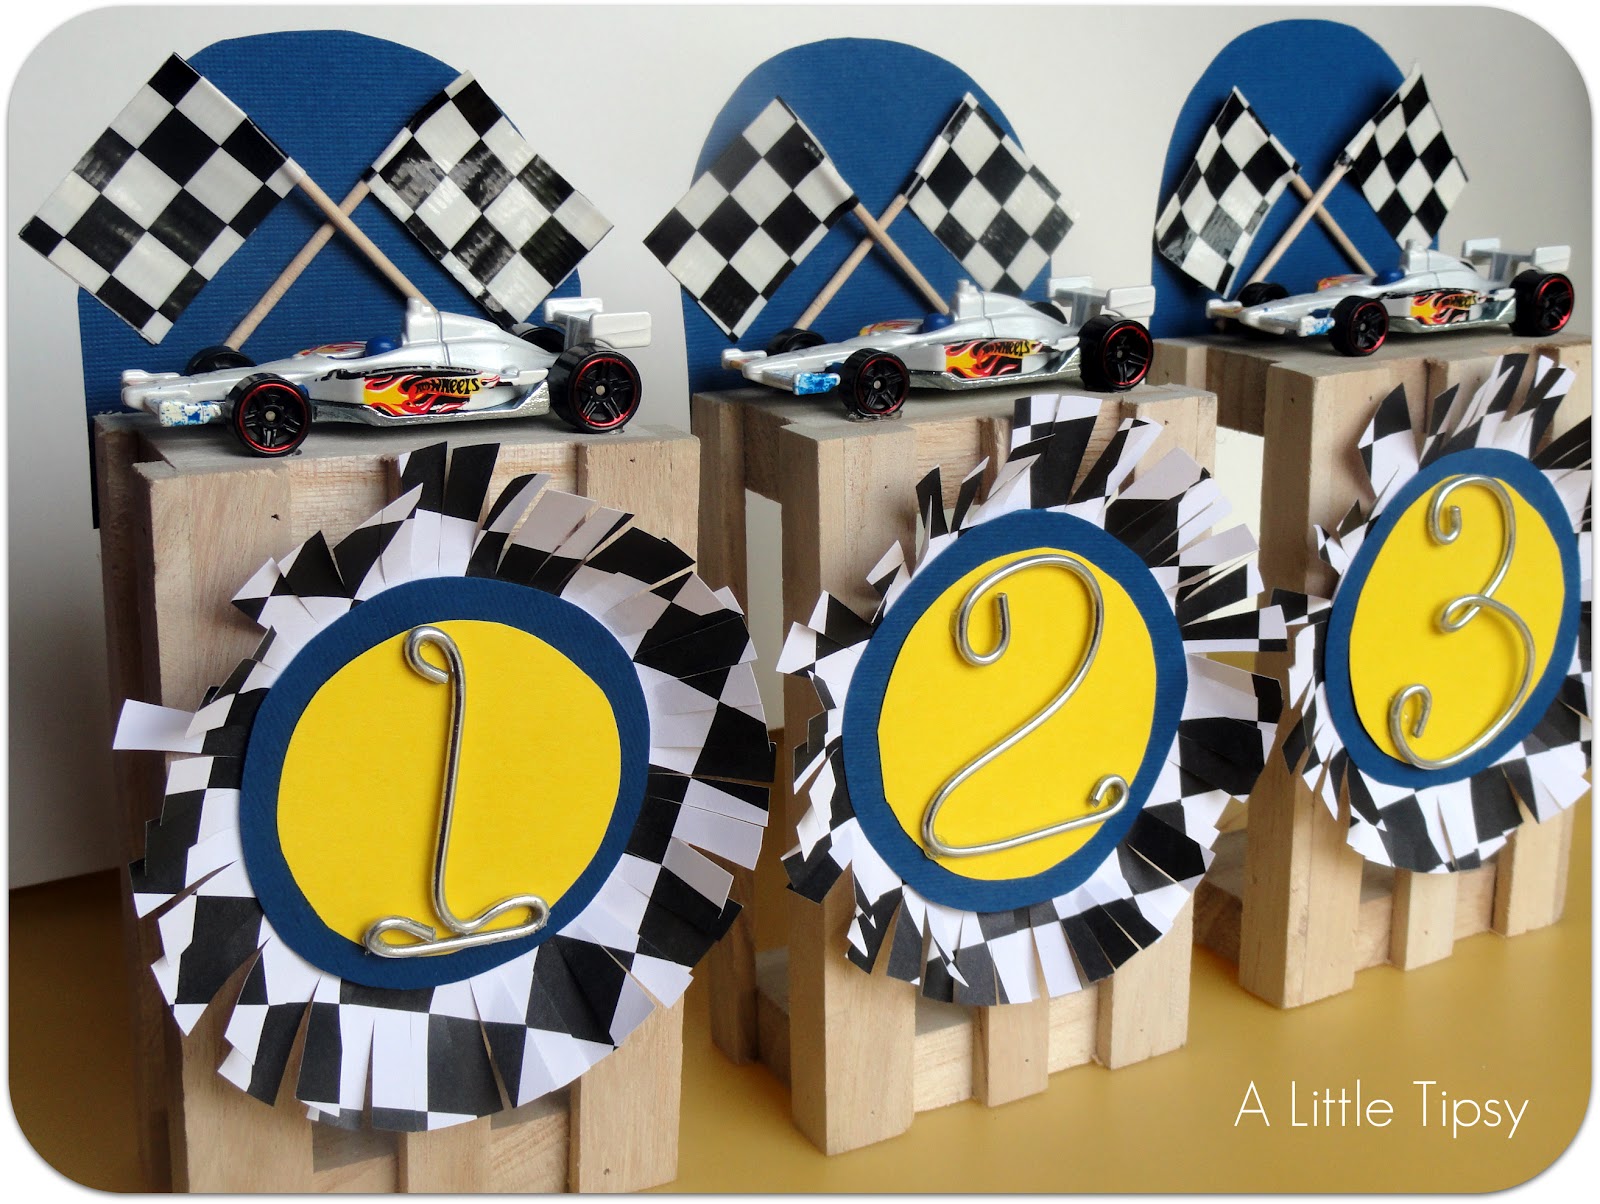
They turned out pretty cute and were quite simple to make!
Supplies:
Small Wooden Crate (Michael’s)
Sandpaper
Yellow Cardstock
Blue Cardstock
Checkered Paper
Double-sided Tape
14 Gauge Utility Wire (Lowe’s)
Pliers
Scissors

Toothpicks
Checkered Duck Tape
Elmer’s White Glue
Matchbox Cars
E-6000

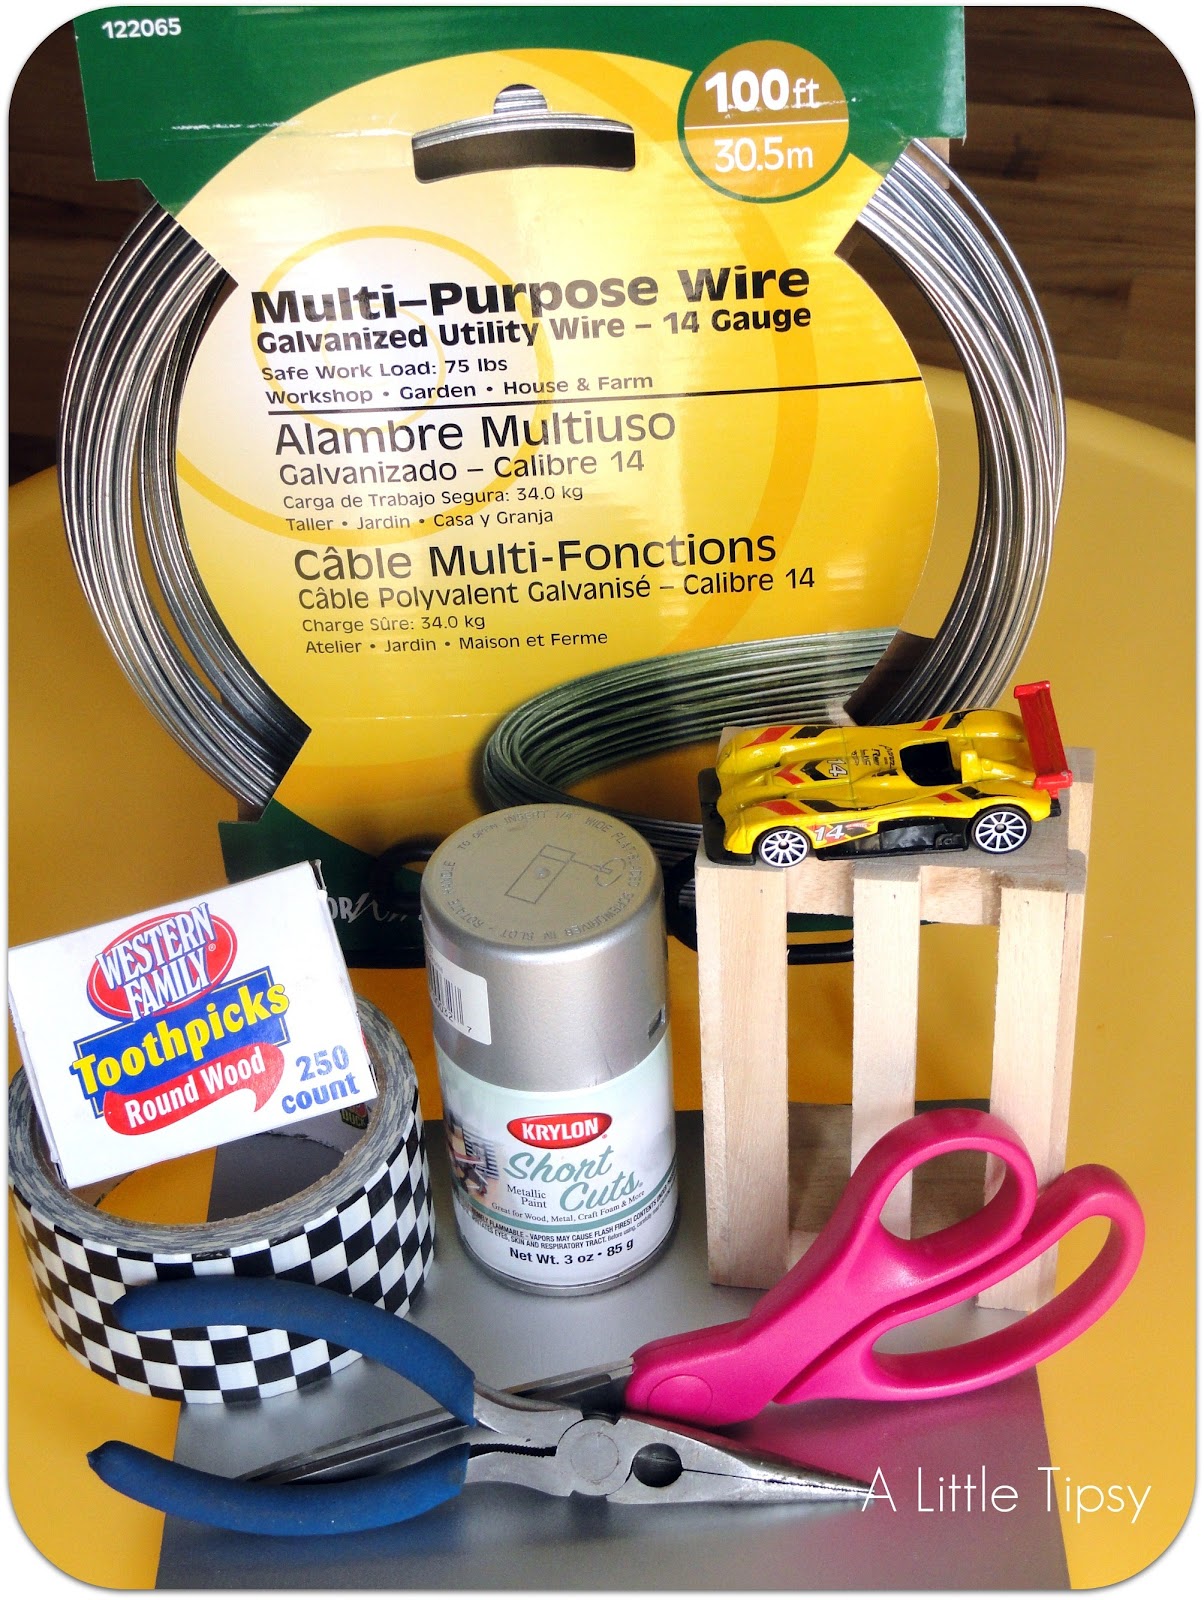
I was going to spray paint the cars silver, but the ones I got ended up matching really well.

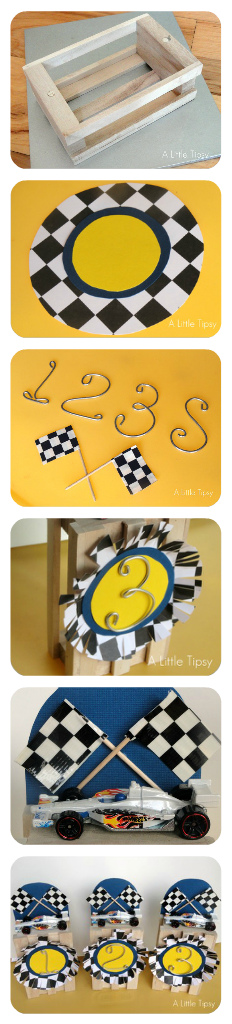
1. I got the “crates” which were more like little baskets with handles from Michael’s for $1 each. Break off the handles and sand flat. You can see the little circles where I broke the handles off. 
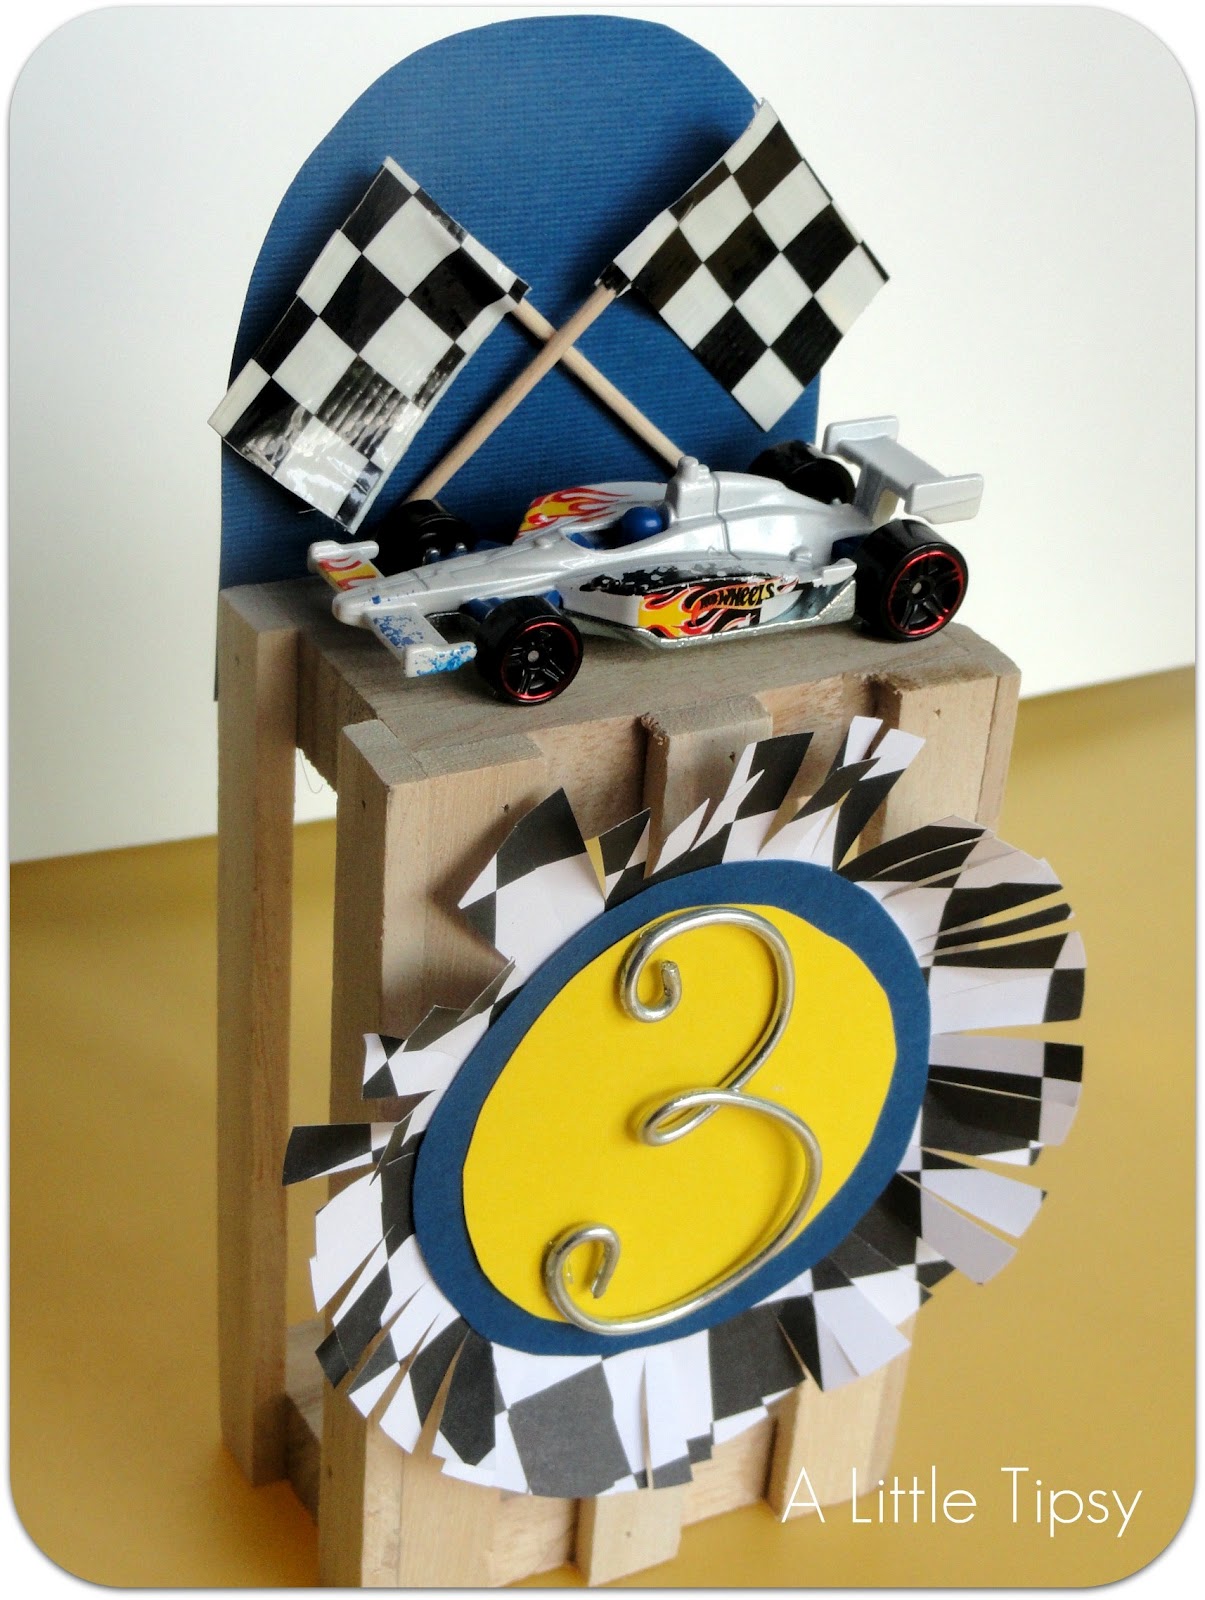
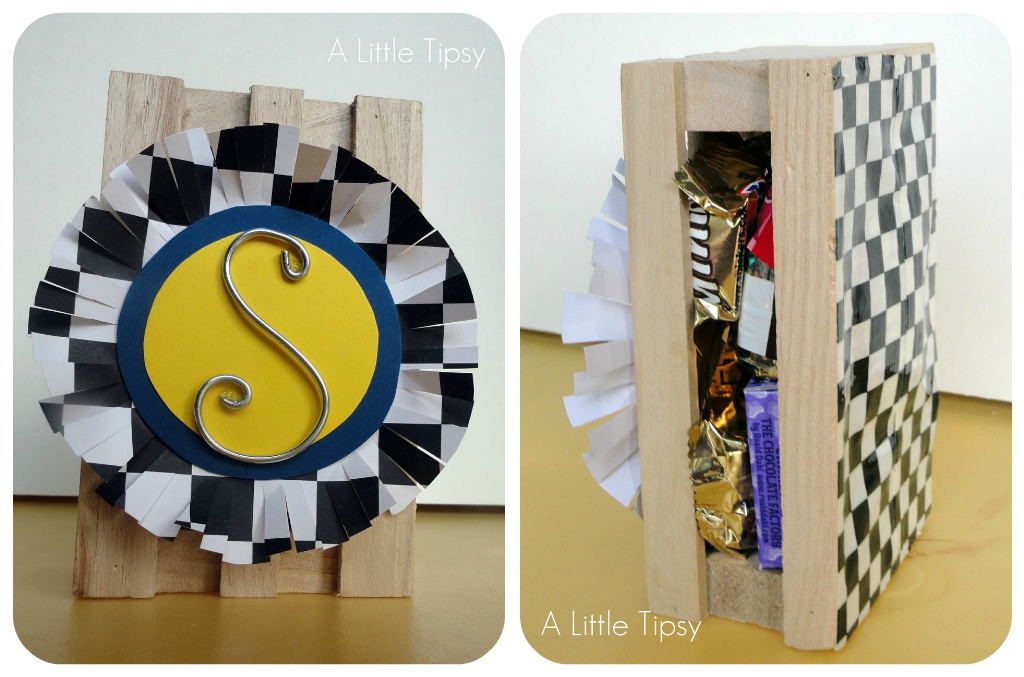
2. Make a circle from the yellow cardstock and a slightly larger circle from the blue cardstock. Make an even larger circle from the checkered paper (it will be about 4 inches across). Tape them all together.
3. Cut 1/4-1/8 inch slits all around the checkered paper to fringe. Give it a more 3D look by bending the fringe toward the circles having some strips bending ore than others.
4. Use your pliers and fingers to bend pieces of the utility wire in to 1, 2, 3, and S (for sportsmanship).
5. Snip one of the end of the toothpicks. Cover the other end by folding a strip of checkered duct tape around the toothpick to look like a flag.
6. Glue the wire numbers to the paper circles with little dots of E-6000.
7. Glue the paper circle badge to the crate with the Elmer’s white glue.
8. Cut a rectangle out of the blue cardstock and round one end.   Glue it to the crate as the backdrop for the car. Lay it down to dry and glue the flags on while the backdrop is laying horizontal.
9. Once dry, stand it up and glue the car on the top of the crate using dots of E-6000 on the wheels.

We did the sportsmanship slightly different. It get’s the paper badge, but then instead of a car on top, we filled the crate with the candy and closed it in with the checkered duck tape. Candy is a great motivator with boys this age.
Is anyone else involved with Cub Scouts? I’d love to share ideas!

P.S. Don’t forget to sign up for free Tipsy updates via RSS or email.


We have decided to truncate our feed to help protect against stolen content. I apologize for any inconvenience. Please love us anyway. 🙂

DIY Swim Suit Covers

March 27, 2012 By Michelle Barneck 10 Comments

I am that girl who buys the 5XL t-shirt from the dollar store because she likes the color. You know, you figure what the heck it’s $1, you’ll do something with it someday. Well my friends, today I am vindicated. Not only did I use that 5XL shirt from my stash, but I used a sewing machine without breaking something. 

For some reason the only swim suit covers I could find last month for our trip either didn’t cover much of anything, or they were long sleeved (which I honestly don’t understand). Those of you who are fair skinned and farmer tanned know that it doesn’t take long for our shoulders to completely sizzle, thus began (and ended) my search for cute swim suit covers that had sleeves, but also covered enough that when I bend down with my kids I’m not embarrassing myself.
How to Make Your Own Swim Suit Covers

Supplies:
5XL (or very large) shirt
Pins
Scissors
Sewing Machine
Thread
1. Turn the 5XL shirt inside out and lay your fitted t-shirt on top of it.

OPTIONAL: pin out about 3/4-1 inch on each side using safety pins. This makes it so you can turn it right side out and try it on to make sure it will fit right. Remember if you did not pre-wash the shirt it will probably shrink a bit.
2. Once you know where you want the seam pin with straight pins. I continued the flare of the fitted shirt all the way to the bottom so the skirt would be a short A line.
3. Trim off the excess material from the sides. 
4. My seams lined up with the shoulder seams on the large shirt so if I cut it off right on the seam it would have been a cap sleeve. I wanted the sleeves a tad longer so I just left about an inch outside the seam.
5. Sew along the pins and stop when you get to the sleeve seams to finish the sides for a plain t-shirt dress.
6. Use strips of the excess material to form your ruffle. I had 4 strips about 3 1/2-4 inches wide and 13 inches long. You can sew all four strips together for one long strip or do two at a time to make it easier. 
7. Sew a loose stitch all along one edge of the strip about 1/2 inch from the edge leaving strings on each end. Pull one of the strings, holding the other in place to gather the fabric. 
8. Pin the gathered strips on to the skirt. I ended up with seams on the right and left sides and in the middle of the front and the back, but they are not visible because of the gathering.
9. Sew a straight stitch right down the line where you gathered to attach the ruffle.
Congrats you made your very own swim suit cover! 
I wore this all day on the dive boat in Maui and it was so comfortable! I borrowed my mom’s sewing machine  (cause well I killed mine after 3 uses) and when I told her what I was doing she gave me the courtesy smile and nod like “this should be interesting.” When I told her in Maui that this was the one I made, couldn’t believe it.
I also made the matching ruffly headband from the shirt material, but this post was getting massive, so we’ll save that for another day.
I hope your having as much fun with the De-stash Bash as I am!
If you like this post you may like these projects made with t-shirts:
  • DIY Shoe
  • DIY Shirt to wear over your suit
  • DIY flip flops
  • T-shirt DIY Necklace

P.S. Don’t forget to sign up for free Tipsy updates via RSS or email.

We have decided to truncate our feed to help protect against stolen content. I apologize for any inconvenience. Please love us anyway. 🙂

DIY Shirt

March 26, 2012 By Michelle Barneck 4 Comments

Spring is here which means swim suit season is around the corner. My new swimming suit came with a skirt cover up, but I wanted a cute tank to pair with it. The hubs had lost some weight and I guess you could say his loss was my gain because I found the perfect shirt for this project in the donate pile. I do not claim to be a seamstress, but seriously this DIY shirt is easy enough for even the most beginner.
DIY shirt supplies:
Old shirt (really light jersey so it flows nicely)
Scissors
Pins
Sewing Machine
Ribbon
1. Start by cutting off the sleeves and the neckline at a diagonal.

2. Fold over diagonal sleeve area and pin. Sew to have a finished edge on your arm hole.
3. Cut the neckline straight across on the front and the back of the shirt. Fold over about 2 inches (far enough that you leave a place for the ribbon to go through), pin in place and sew.
4. Attach a safety pin to the end of your ribbon and thread it through the front and back of the shirt. 
5. Put it on and tie a bow to gather the fabric to your liking.
 
Mine also has the back higher than the front which I love because I can switch it around and wear it higher in the front or the back based on where I am getting too much sun. Freckles/fair skin + sun = burn.
I would love to see if you give this DIY shirt a whirl!
Hope you are enjoying the De-stash Bash!

If you like this post you may like these projects made with t-shirts:
  • DIY Shoe
  • DIY Swim Suit Covers
  • DIY flip flops
  • T-shirt DIY Necklace

P.S. Don’t forget to sign up for free Tipsy updates via RSS or email.

We have decided to truncate our feed to help protect against stolen content. I apologize for any inconvenience. Please love us anyway. 🙂

Paint a Rug

March 20, 2012 By Michelle Barneck 8 Comments

I am loving de-stash month! Not only is it a good form of spring cleaning craft style, but I am surprised at what can come from existing items. I can feel spring in the air and wanted a little something bright on my doorstep so this week I decided to paint a rug.
Wanna see what I started with? 

Sad, isn’t it. I found this at the dollar store a few months ago and thought it would come in handy at some future moment. Well, that future moment is now! 

Supplies to paint a rug:
Rug
Martha Stewart stencil
Martha Stewart High Gloss Acrylic Paint
Sponge brush
Scotchguard

1. Place stencil on one side of the rug and paint the rug dabbing directly up and down with your sponge brush. 
2. Continue aligning and moving the stencil down until you have that whole side done.  
3. Continue aligning the stencil and moving across your rug. The bigger your stencil, the easier it will be since you won’t have to align and move it as much. 
4. Let the paint dry.
5. Spray with a couple coats of Scotchguard to protect.
All in all it took me just over 2 hours. Longer than I anticipated for such a small rug, but I did have to move my stencil A LOT! Really I think it was worth it to put the poor rug out of its bland taupe misery.

 
A fun little springy doorstep for the first day of spring!
 
Are you enjoying The Great De-stash Bash? We have more coming up! I have two refashions: one from my hubs shirt and one from a 5XL shirt, so stay tuned! We’ll also have the guests from our de-stash giveaway with what they made with their prizes.

P.S. Don’t forget to sign up for free Tipsy updates via RSS or email.

We have decided to truncate our feed to help protect against stolen content. I apologize for any inconvenience. Please love us anyway. 🙂
« Previous Page
Next Page »

  • Bloglovin
  • Facebook
  • Google+
  • Instagram
  • Pinterest
  • RSS
  • Twitter

Hi there! I'm Michelle. Mother of three little boys and one little princess. Welcome to A Little Tipsy, a place for exploring creativity and sharing inspiration.

Follow on Bloglovin


Visit Michelle Barneck {A Little Tipsy}'s profile on Pinterest.

Tutorials by Category


15 Family Reunion Games

Family Reunion Games Collage

15 Sprinkle Party Ideas

Sprinkle Birthday Party
Creative Commons License

© Copyright 2014 A Little Tipsy · Site Designed by The Fairy Blogmother · Web Hosting by RFE Hosting

This website uses cookies to improve your experience. We'll assume you're ok with this, but you can opt-out if you wish.Accept Read More
Privacy & Cookies Policy