A Little Tipsy

Creative Tips & Ideas

  • home
  • About Me
  • the tipsy top
  • press
  • projects
  • contact me
[print_thumbnail_slider]

DIY Shirt

March 26, 2012 By Michelle Barneck 4 Comments

Spring is here which means swim suit season is around the corner. My new swimming suit came with a skirt cover up, but I wanted a cute tank to pair with it. The hubs had lost some weight and I guess you could say his loss was my gain because I found the perfect shirt for this project in the donate pile. I do not claim to be a seamstress, but seriously this DIY shirt is easy enough for even the most beginner.
DIY shirt supplies:
Old shirt (really light jersey so it flows nicely)
Scissors
Pins
Sewing Machine
Ribbon
1. Start by cutting off the sleeves and the neckline at a diagonal.

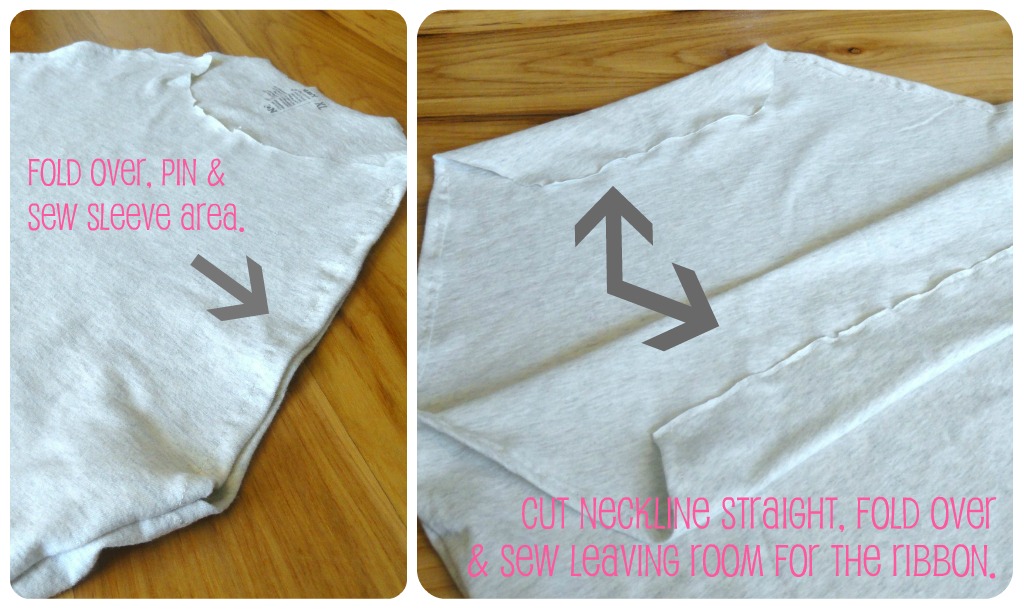
2. Fold over diagonal sleeve area and pin. Sew to have a finished edge on your arm hole.
3. Cut the neckline straight across on the front and the back of the shirt. Fold over about 2 inches (far enough that you leave a place for the ribbon to go through), pin in place and sew.
4. Attach a safety pin to the end of your ribbon and thread it through the front and back of the shirt. 
5. Put it on and tie a bow to gather the fabric to your liking.
 
Mine also has the back higher than the front which I love because I can switch it around and wear it higher in the front or the back based on where I am getting too much sun. Freckles/fair skin + sun = burn.
I would love to see if you give this DIY shirt a whirl!
Hope you are enjoying the De-stash Bash!

If you like this post you may like these projects made with t-shirts:
  • DIY Shoe
  • DIY Swim Suit Covers
  • DIY flip flops
  • T-shirt DIY Necklace

P.S. Don’t forget to sign up for free Tipsy updates via RSS or email.

We have decided to truncate our feed to help protect against stolen content. I apologize for any inconvenience. Please love us anyway. 🙂

Paint a Rug

March 20, 2012 By Michelle Barneck 8 Comments

I am loving de-stash month! Not only is it a good form of spring cleaning craft style, but I am surprised at what can come from existing items. I can feel spring in the air and wanted a little something bright on my doorstep so this week I decided to paint a rug.
Wanna see what I started with? 

Sad, isn’t it. I found this at the dollar store a few months ago and thought it would come in handy at some future moment. Well, that future moment is now! 

Supplies to paint a rug:
Rug
Martha Stewart stencil
Martha Stewart High Gloss Acrylic Paint
Sponge brush
Scotchguard

1. Place stencil on one side of the rug and paint the rug dabbing directly up and down with your sponge brush. 
2. Continue aligning and moving the stencil down until you have that whole side done.  
3. Continue aligning the stencil and moving across your rug. The bigger your stencil, the easier it will be since you won’t have to align and move it as much. 
4. Let the paint dry.
5. Spray with a couple coats of Scotchguard to protect.
All in all it took me just over 2 hours. Longer than I anticipated for such a small rug, but I did have to move my stencil A LOT! Really I think it was worth it to put the poor rug out of its bland taupe misery.

 
A fun little springy doorstep for the first day of spring!
 
Are you enjoying The Great De-stash Bash? We have more coming up! I have two refashions: one from my hubs shirt and one from a 5XL shirt, so stay tuned! We’ll also have the guests from our de-stash giveaway with what they made with their prizes.

P.S. Don’t forget to sign up for free Tipsy updates via RSS or email.

We have decided to truncate our feed to help protect against stolen content. I apologize for any inconvenience. Please love us anyway. 🙂

Chalkboard Refrigerator

March 19, 2012 By Michelle Barneck 14 Comments

My poor sweet refrigerator has been around the block. It was a hand me down from grandma and has worn the eye sore title in my kitchen for far too long. Don’t tell her, but I even went out looking for a new one. But, to my dismay found that they don’t even make those french doored beauties to fit my space. I didn’t realize how freakishly small my fridge space is. Alas, I decided that until I get the motivation to move two sets of cabinets to fit my dream fridge I may as well make the best of old Gerta and give her a makeover of sorts. Had I known how easy it would be I would have done this long ago! I present the chalkboard refrigerator.
 
I had seen a lot of refrigerator makeovers using epoxy or paint, etc. But, knowing that poor Gerta is on her last leg I did not want to spend hours moving her outside, doing multiple coats, and letting her dry for days. I needed something quick and this took me about 30 minutes. The secret ingredient? Vinyl.
Chalkboard Refrigerator

 
Here she is in her original almond colored glory. 
I used the 12 inch Silhouette Chalkboard Vinyl. It was the perfect size to go on the front and wrap around the side of my refrigerator door.

1. Measure how big your vinyl pieces need to be. Cut your vinyl accordingly leaving a little wiggle room. It’s better to trim a bit than have it be  too small.
2. Align the vinyl so it will reach the top and bottom, but also be flush to the door handle. Press it down by the handle first and work your way out smoothing out bubbles as you go. Wrap the vinyl around the side of the door by the hinges and trim off any excess.
At this point Gerta was a little reminiscent of Cruella, wouldn’t you say?

3. Grab a piece of patterned cardstock that will tie your two colors together. Cut it to the size of the ice panel, cover with clear contact paper to protect it and place with double sided sticky tape.
Ah, she’s already looking better!
 
4. Now finish it off priming the chalkboard by rubbing it all over with the side of a piece of chalk and erasing the excess. That way your first message won’t be everlasting. Now you’re ready to add your menu, message board, or whatever you want to say!
 

It’s amazing what you can do with 30 minutes and some vinyl!

Disclosure: Silhouette provided the vinyl for this post.

P.S. Don’t forget to sign up for free Tipsy updates via RSS or email.

We have decided to truncate our feed to help protect against stolen content. I apologize for any inconvenience. Please love us anyway. 🙂

DIY Shoe

March 13, 2012 By Michelle Barneck 13 Comments

I know what you might be thinking. DIY shoe, really? I know, sounds weird. But, they are really quite easy and turned out pretty darn cute. Ok, enough talk, let me show you. Espadrilles anyone?

Perfect for the weather that is right around the corner. It was 65 degrees here yesterday! We grilled for dinner! Granted there is probably more snow in my future, but I can pull out these babies on those sunshiny days. How do you make a DIY shoe of your very own?
Supplies:
  • flip flops with thick soles
  • scissors
  • t-shirt
  • xacto knife
  • gorilla glue
  • clamps

I started out with one of these. Yep, an old flip flop sole. I bought these years ago, but the straps rubbed so I only wore them like 5 times. They need to be the thicker ones so that you can slice the sole to place your fabric (aka old t-shirt). 
 
Follow the fabulous tutorial here.

The only thing I did differently for my DIY shoe was my strap hole did not go all the way through the flip flop so instead of securing the strings with knots through the sole, I inserted them in to slits on the sides and glued them like the thicker straps.
So what do you think? Totally free de-stash project #2. (See project #1 Tshirt Necklace) Stay tuned for more fun refashion and upcycle projects as we de-stash all though March!
 
If you like this post you may like these projects made with t-shirts:
  • DIY Swim Suit Covers
  • DIY Shirt to wear over your suit
  • DIY flip flops
  • T-shirt DIY Necklace

P.S. Don’t forget to sign up for free Tipsy updates via RSS or email.

We have decided to truncate our feed to help protect against stolen content. I apologize for any inconvenience. Please love us anyway. 🙂
« Previous Page
Next Page »

  • Bloglovin
  • Facebook
  • Google+
  • Instagram
  • Pinterest
  • RSS
  • Twitter

Hi there! I'm Michelle. Mother of three little boys and one little princess. Welcome to A Little Tipsy, a place for exploring creativity and sharing inspiration.

Follow on Bloglovin


Visit Michelle Barneck {A Little Tipsy}'s profile on Pinterest.

Tutorials by Category


15 Family Reunion Games

Family Reunion Games Collage

15 Sprinkle Party Ideas

Sprinkle Birthday Party
Creative Commons License

© Copyright 2014 A Little Tipsy · Site Designed by The Fairy Blogmother · Web Hosting by RFE Hosting

This website uses cookies to improve your experience. We'll assume you're ok with this, but you can opt-out if you wish.Accept Read More
Privacy & Cookies Policy