A Little Tipsy

Creative Tips & Ideas

  • home
  • About Me
  • the tipsy top
  • press
  • projects
  • contact me
[print_thumbnail_slider]

Your Reward is Here!

March 2, 2010 By Michelle Barneck 38 Comments

Remember when I promised you a special surprise if I got my wish of 500 public followers by my blogiversary. Well, here it is in all its glory! Ok, so whether it is actually a reward or punishment is TBD. Enjoy!

No shame. I guess that was my first vlog?! Hey, if April can do a toe touch (just saw that she did a music vid too) I can do a ridiculous lip sync right?! Here are the lyrics since I am so obviously not meant to be a musician.

All the married ladies (7x)

Now put your hands up
Up in the night, I just stayed up
I’m doing my own little thing
Mommy needed some time without your whine
Without nobody callin’ me
I see your socks, and dishes too
don’t pay them any attention
cuz I did my chores, cleaned all those floors
Ya can’t be mad at me

[Chorus]
Cuz you liked it and you went and put a ring on it
ya you liked it then you went and put a ring on it
Don’t be mad once you see that I bought it
Cuz you liked it then you went and put a ring on it

wo oh ooh oh oh ooh oh oh ooh oh oh oh x2

(Chorus)

I got gloss on my lips, a babe on my hips
now I’m tight in my very own jeans
acting up, milk in my cup
I can care less what dudes think
I need no permission, did I mention
Don’t pay him any attention
Cuz you have your turn
But now you’re gonna learn
What it feels like to only kiss me
(Chorus)
woo oh ooh oh oh ooh oh oh ooh oh oh oh

See how much I love you guys! I have had a few people ask, yes I did write the lyrics and yes I am the one singing.

Linking up:
Talented Tuesday on My frugal Family

P.S. Don’t forget to sign up for free Tipsy updates via RSS or email.

We have decided to truncate our feed to help protect against stolen content. I apologize for any inconvenience. Please love us anyway. 🙂

Scrappy St. Patrick’s Day Shamrock Wreath

March 1, 2010 By Michelle Barneck 25 Comments

I wanted to have a cute St. Patrick’s Shamrock wreath. I am part Irish for heaven’s sake. Did you know that my ancestor was the one who kidnapped St. Patrick?! Anyway, I saw this great idea for using hearts to make a shamrock shape, but I decided I am way too lazy to cut out that many felt circles. So, I combined that idea with this fabric scrap wreath idea and we had a winner!

Here’s my adorable Scrappy St. Patrick’s Shamrock Wreath…

Why scrappy? Well for one thing it uses fabric scraps, but I also used a scrap of styrofoam packaging to make my hearts. So, ya wanna know how I did it? Here ya go!

Supplies needed: (lots of supplies but you probably have most of them at home)

  • Styrofoam packaging (or 4 hearts from a craft store)
  • Serrated knife
  • Piece of paper for heart template
  • Marker or pen
  • Measuring device
  • Scissors
  • Two colors Green Fabric (I think I used about 1/2 yard total)
  • White Glue
  • Pen or pencil
  • Hot glue
  • Ribbon
  • Embellishments

1. Measure 4 equal parts of foam and cut in to pieces. Use paper template and trace edges on foam with marker lid. I just dented the foam with the lid around the template so marker would not show.

2. Cut the foam with your knife. Cut your fabric in to 2 inch squares.

3. Put some glue in a bowl. Put a fabric square over the tip of your pen and dip in the glue. Then, stab the pen in to the styrofoam. This will make a little “flower” out of the fabric square. Repeat, alternating colors to give it more dimension.

4. Once all your hearts are covered hot glue the edges together. I thought it looked kind of like a blob at this point, so I added a little stem.

5. I did not like the white edges showing, so I hot glued some ribbon around the edges. Then, I tied a bow and hot glued it to the back to hang the wreath from.

6. I added an embellishment from the scrapbook section that says “Lucky you” to break up the green blob.

I couldn’t let the St. Patty’s Day decor stop at the door. I made these adorable Lucky wood blocks at Amanda’s craft night. I’m so lucky to have awesome friends!


Happy March!

Linking up:
Made by You @ Skip to my Lou
Making the World Cuter
Crafaholics Anonymous St. Patty’s Day Party
Just Something I Whipped Up @ The Girl Creative
Market yourself Monday @ Sumo’s Sweet Stuff
Trash to Treasure @ Reinvented
Show and Tell @ Blue Cricket Design

P.S. Don’t forget to sign up for free Tipsy updates via RSS or email.

We have decided to truncate our feed to help protect against stolen content. I apologize for any inconvenience. Please love us anyway. 🙂

Baby Week: Friends & Readers Baby Project Feature

February 26, 2010 By Michelle Barneck 4 Comments

I can’t believe how many fabulous ideas there are out there. I can’t nearly keep up, so for Feature Friday here is a whirlwind tour of some of my baby project favorites from around the blogosphere.

Applique Onesies from Designing Moms

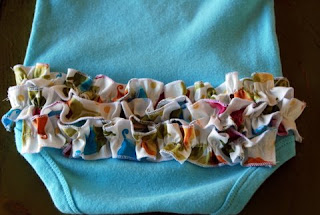
Ruffle Butt Onesie from Crap I’ve Made via Ucreate
Owl Onesie from Nannygoat

How to turn a regular bra in to a nursing bra from Mamas Worldwide

Nursing Covers from Every Crafty Endeavor
Nursing Covers

Teething Cuddler from Scraps n Strings

I guess that about wraps it up! If you have a fun baby project, please leave the link so we can all check it out! Happy Baby week!

P.S. Don’t forget to sign up for free Tipsy updates via RSS or email.

We have decided to truncate our feed to help protect against stolen content. I apologize for any inconvenience. Please love us anyway. 🙂

Baby Week: Cupcake Bow Tutorial

February 25, 2010 By Michelle Barneck 4 Comments

I am really excited about this! It really was the result of a craft fail. I was trying to make a rosette from the tutorial on Craft eNVy. When I finished it didn’t look much like a rose. It was pointy like a cupcake top. Then, an idea was born. I had not seen a cupcake bow and who can’t use a little more cupcake in their lives?! Here’s a tutorial for personal use only please!

1. Start by making a little rosette in your frosting color. Then take your “wrapper” ribbon and make a ruffle on your needle. Stitch the ends of the ruffle to make a little circle.

2. Pull the end of your ribbon through the hole and then go around the bottom of the rose (inside the “wrapper”)with hot glue. Squish it all together, being sure to ripple the wrapper ribbon all around.

3. I added it to a little figure 8 bow. What’s that dot on the side?

That’s velcro. Now it will stay in the finest of baby hair. I got the velcro idea from Dollar Store Crafts. Wouldn’t the ribbon cupcake be so cute on a headband?! You could put a dot of velcro on the headband and change out bows to match. Love it!

I have a thing for argyle. Yes, yes, I do. This is just a tiny button bow that is oh so fun for tiny heads and so very easy to make.

1. Get a small circle of ribbon. Squish the middle between your fingers and stitch. Then add your button on the front and your velcro on the back and stitch together.

2. I add a little circle of ribbon on the other side of the velcro so that is cute too. Singe the edges so it won’t fray.

I had to make a BYU bow. Her mommy is a Cougar! I just did a bunch of figure 8s and hot glued them together.

This one turned out a bit like a Christmas bow or a star, but I love the colors!

Here they are all together. My little Annie will have a fancy little head!

Linking up:
Fireflies & Jellybeans
Somewhat Simple

P.S. Don’t forget to sign up for free Tipsy updates via RSS or email.

We have decided to truncate our feed to help protect against stolen content. I apologize for any inconvenience. Please love us anyway. 🙂
« Previous Page
Next Page »

  • Bloglovin
  • Facebook
  • Google+
  • Instagram
  • Pinterest
  • RSS
  • Twitter

Hi there! I'm Michelle. Mother of three little boys and one little princess. Welcome to A Little Tipsy, a place for exploring creativity and sharing inspiration.

Follow on Bloglovin


Visit Michelle Barneck {A Little Tipsy}'s profile on Pinterest.

Tutorials by Category


15 Family Reunion Games

Family Reunion Games Collage

15 Sprinkle Party Ideas

Sprinkle Birthday Party
Creative Commons License

© Copyright 2014 A Little Tipsy · Site Designed by The Fairy Blogmother · Web Hosting by RFE Hosting

This website uses cookies to improve your experience. We'll assume you're ok with this, but you can opt-out if you wish.Accept Read More
Privacy & Cookies Policy