A Little Tipsy

Creative Tips & Ideas

  • home
  • About Me
  • the tipsy top
  • press
  • projects
  • contact me
[print_thumbnail_slider]

Nail Polish Glazed Washers

July 28, 2010 By Michelle Barneck 14 Comments

This is a nail polish glazed washer tutorial that I did for Ucreate a few weeks ago, so here is a recap if you missed it.

Nail Polish Washer Accessories

I love the glazed and stamped washers and decided to put a fun new twist on the washer. I “glazed” them using nail polish.

Supplies needed:

  • Washers
  • Nail Polish (color and clear)
  • Nails
  • Cereal Box
  • Accessory supplies: key ring, necklace, charms, clasps

(all the accessory supplies I used were 50% off at Hobby Lobby and cost $2 or less)

1. Poke the a few nails in the cereal box to hold up each washer so the paint can drip if needed.
2. Paint a light coat in the back of the washer so it will be the same color if it flips when you are wearing your necklace/bracelet.
3. Paint the edges of the washer.

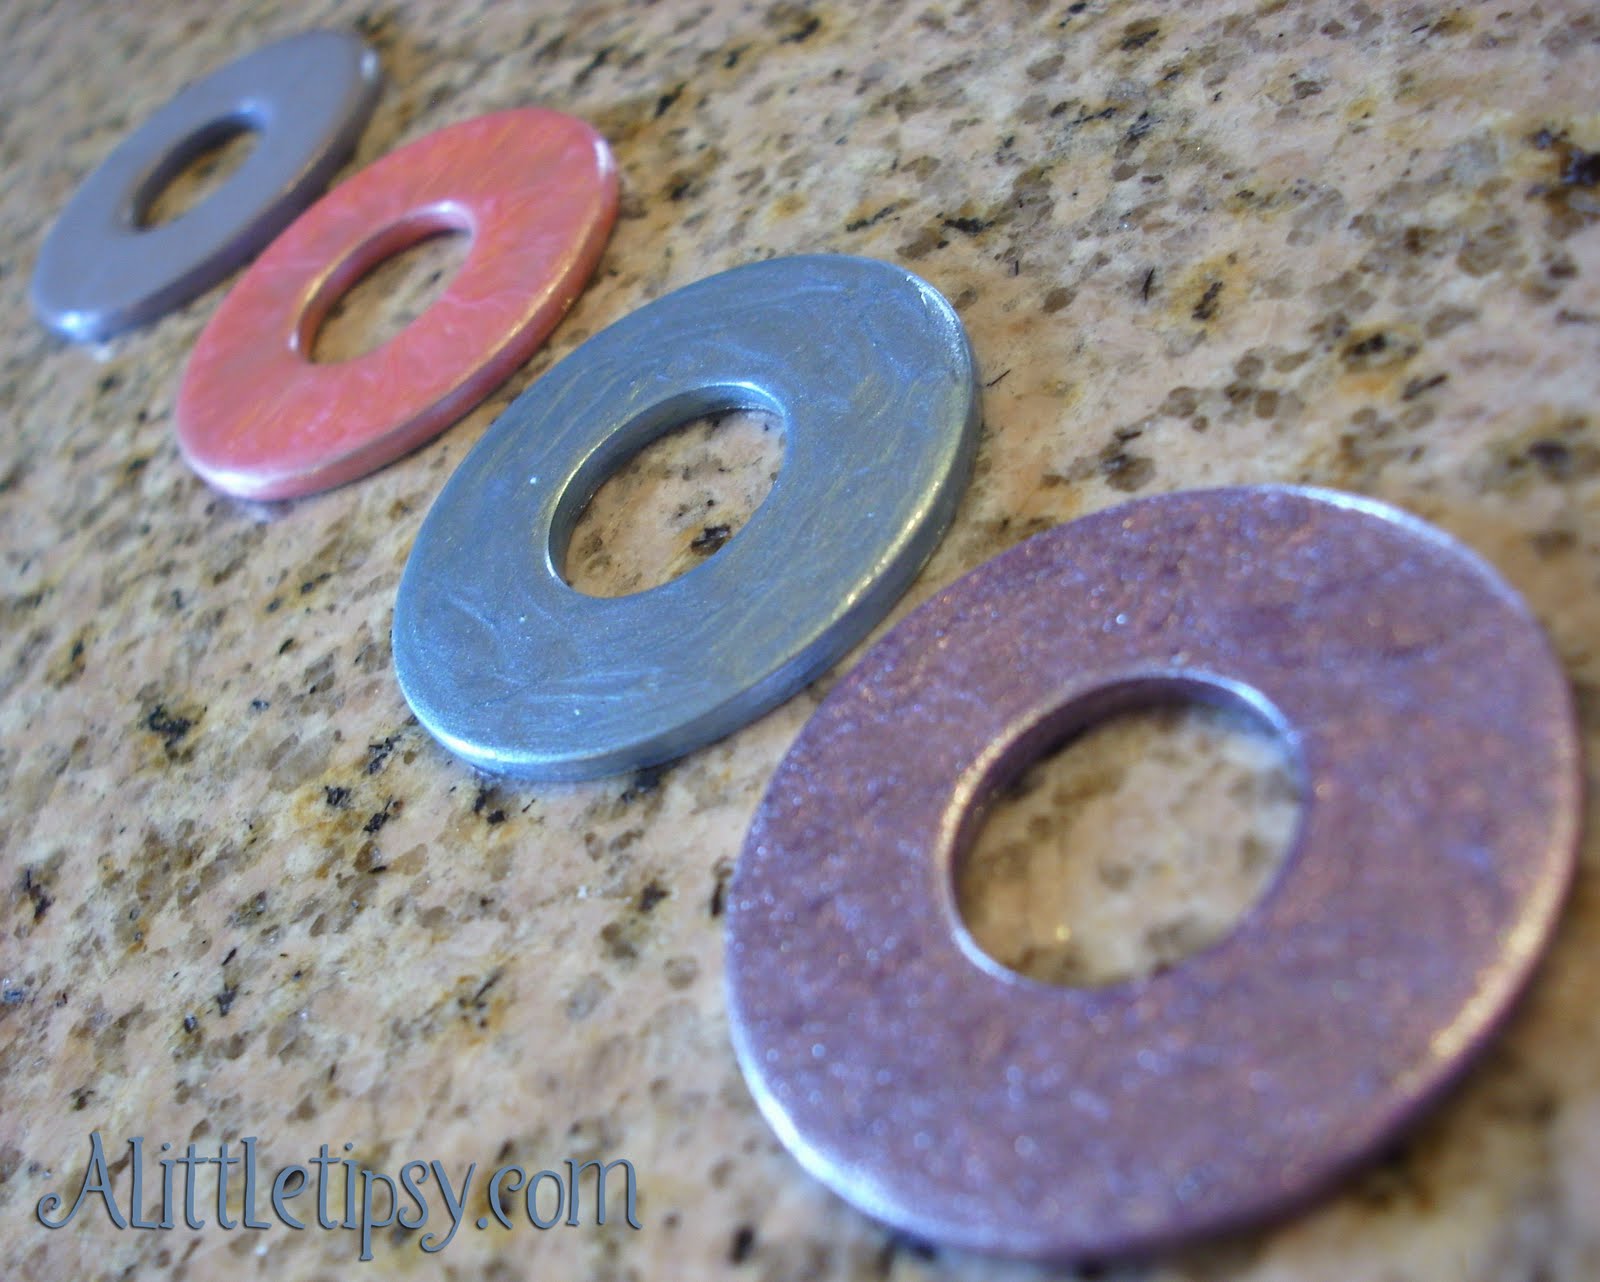
4. For the top, really glop it on. There are four different techniques I used.

A. Paint small circles (I did about 10) to get a spirally effect.
B. Drag your brush from the inside to the outside all the way around to make it look like the iris of an eye. Next time I would do this in blue or green. 🙂

C. Stipple with your brush to get a hammered type look.
D. Drag your brush in circles around the whole washer.

5. Let dry until hardened. Add a clear coat to protect and add shine.

Ta da!

Now embellish however you like.

Add a clasp and a charm for a fun key chain.

Play with chains (mine was a 60 in. that I wrapped), clasps, and charms for a super versatile necklace. Click any of the images to see them up close.

Or rock it as a bracelet.

The possibilities are truly endless!

Linking Up:
Whatever Goes Wednesday
Look What I Made
Sugar & Spice & Everything Nice
Show Off Your Stuff
Strut Your Stuff

We have decided to truncate our feed to help protect against stolen content. I apologize for any inconvenience. Please love us anyway. 🙂

Feature Friday-Blog Swap with Ucreate

June 25, 2010 By Michelle Barneck 2 Comments

I am so excited to be featured by Kari over on Ucreate today!! I was so lucky to spend some time with her at CBC and was thrilled when she asked me to be a guest on Ucreate. Be sure to run over and see the tutorial I did just for her. It involves washers, nail polish and lots of accessorizing…

Now on to the fun stuff. I asked Kari to answer some questions so we could all get to know her a little better.

U Create

What is your favorite crafting tool or secret weapon?

  • This depends on what type of craft I’m working on. Right now I would definitely say my new Silhouette machine! I’m having so much fun with it and will be showing my readers some really cool things to do with it soon!
If you were a candy bar what would you be?
  • Hands down Snickers…best candy bar on the planet! Just had one.

http://donstuff.files.wordpress.com/2008/10/snickers-bar.jpg

If you could only wear one outfit for the rest of your life what would it be?

  • I like stylish clothes, but I am so into comfort! I would pick my favorite jeans, a cool graphic tee, and flip flops for sure!! (At CBC, she had on a super cute Ucreate owl t-shirt she made!)
What is one of your favorite summer activities to do with your kids?

  • It’s hard to chose one, but I would have to say picnics at the park. We bring frisbees, balls, etc…feed the ducks…and eat a picnic lunch on a blanket.

Thanks to Kari for a fun Feature Friday!!

P.S. Don’t forget to sign up for free Tipsy updates via RSS or email.

We have decided to truncate our feed to help protect against stolen content. I apologize for any inconvenience. Please love us anyway. 🙂

Burlap Ruffle Table Runner

June 23, 2010 By Michelle Barneck 16 Comments

This is a fun patriotic table runner with a little burlap ruffle for added cuteness. I made it for the 4th of July, but it can easily be done with alternate fabric for any occasion.

Supplies needed:
Scissors
2 cotton towels or fabric
Denim (slightly more than 1 pant leg)
Burlap (at least 1 ft x 4 ft, preferably more)
Sewing Machine
Thread
Glue Gun
Hot Glue


My patriotic cotton towels are from Dollar Tree.

1. Cut towels in half. Measure how long your table is to see how much denim you will need to make the runner long enough. Alternate material.

2. Pin and sew the edges of the denim to match the towel width.
3. Put the bright sides of the fabric together. Pin and sew the edge together to connect the two fabrics. Continue until all the pieces are sewn together in a strip.

4. Cut burlap in to six 2 inch wide and about 4 foot long strips. Snip and pull out one of the burlap strands to make cutting straight a snap.
5.To make ruffles, hold on to the strand in the middle of the end a burlap strip and CAREFULLY push the material to gather. Do this from each end until the gathering meeting in the middle and you have a ruffle. Be extremely gentle with the strand. I broke mine multiple times. When you are happy with the amount of gathering, tie knots on the end of each strand to keep the ruffle in place.

6. Now hot glue your ruffles on each seam. Wrap the edges of the burlap around the runner and glue down for a finished look.

I was so proud to show off my Denim and burlap ruffle table runner to the hubs when he got home. Too bad he asked what it was and was confused. He claims he has never seen a table runner before. I know he has seen them tons of times at my moms house. Such a man.

Linking Up:
Patriotic Parade
Get Your Craft On
Transformation Thursday
Strut Your Stuff
Show Off Your Stuff
Show and Tell
Whatever Goes Wednesday
Look What I Made

P.S. Don’t forget to sign up for free Tipsy updates via RSS or email.

We have decided to truncate our feed to help protect against stolen content. I apologize for any inconvenience. Please love us anyway. 🙂

Flower Table Cloth Weights

June 21, 2010 By Michelle Barneck 19 Comments

I love those disposable plastic table cloths for birthday parties and summer BBQs, but they are pretty plain and annoying in the wind. I decided to make some Flower Table Cloth Weights to keep the table cloth in place and also add a bit of flair. It is so easy to make your own and they work really well!

Supplies needed:
Clips with a hole in the top
Flowers
Glue Gun
Glue sticks
*all my supplies were purchased at Dollar Tree. I know big surprise. 😉

Since I bought stems of white daisies at the dollar store, they were kinda sparse. I pulled them apart and combined the petals of two flowers to make them look nice and full.

Before putting the green back on again, I added some glue to the stem to make them stay together better.

Then just add glue to the green stem and stick it through the clip hole.

It’s as easy as that! Then just scrunch up the bottom of the table cloth and clip the flower on.

To store, place flower down flat in a gallon ziploc bag.

I made 8 flower table cloth weights which used 8 clips and 16 flowers. You could make 10 weights with 2 packs of clips and 3 bunches of flowers ($5).

Linking up:
Market Yourself Monday
Just Whipped Something Up
Making the World Cuter
It’s So Very Creative
Making Monday Marvelous
Motivate Me Monday
Mad Skills

P.S. Don’t forget to sign up for free Tipsy updates via RSS or email.

We have decided to truncate our feed to help protect against stolen content. I apologize for any inconvenience. Please love us anyway. 🙂
« Previous Page
Next Page »

  • Bloglovin
  • Facebook
  • Google+
  • Instagram
  • Pinterest
  • RSS
  • Twitter

Hi there! I'm Michelle. Mother of three little boys and one little princess. Welcome to A Little Tipsy, a place for exploring creativity and sharing inspiration.

Follow on Bloglovin


Visit Michelle Barneck {A Little Tipsy}'s profile on Pinterest.

Tutorials by Category


15 Family Reunion Games

Family Reunion Games Collage

15 Sprinkle Party Ideas

Sprinkle Birthday Party
Creative Commons License

© Copyright 2014 A Little Tipsy · Site Designed by The Fairy Blogmother · Web Hosting by RFE Hosting

This website uses cookies to improve your experience. We'll assume you're ok with this, but you can opt-out if you wish.Accept Read More
Privacy & Cookies Policy