A Little Tipsy

Creative Tips & Ideas

  • home
  • About Me
  • the tipsy top
  • press
  • projects
  • contact me
[print_thumbnail_slider]

New Years Eve

December 27, 2011 By Michelle Barneck 12 Comments

Hi everyone, I’m Angie and I’m really excited to be guest posting for Michelle!

I blog over at Burton Avenue where I love to share simple and inexpensive craft projects. I especially love all things vinyl! I have been blogging almost 4 years, but never really liked sharing craft projects on our family blog. So, earlier this year, Burton Avenue began.

I have been married for 10 years and we have 6 cute little kiddies (9 years and under). They keep me busy! I love blogging because it gives me a chance to take a break from the day to day tasks of being a mom and keeps my creative juices flowing.

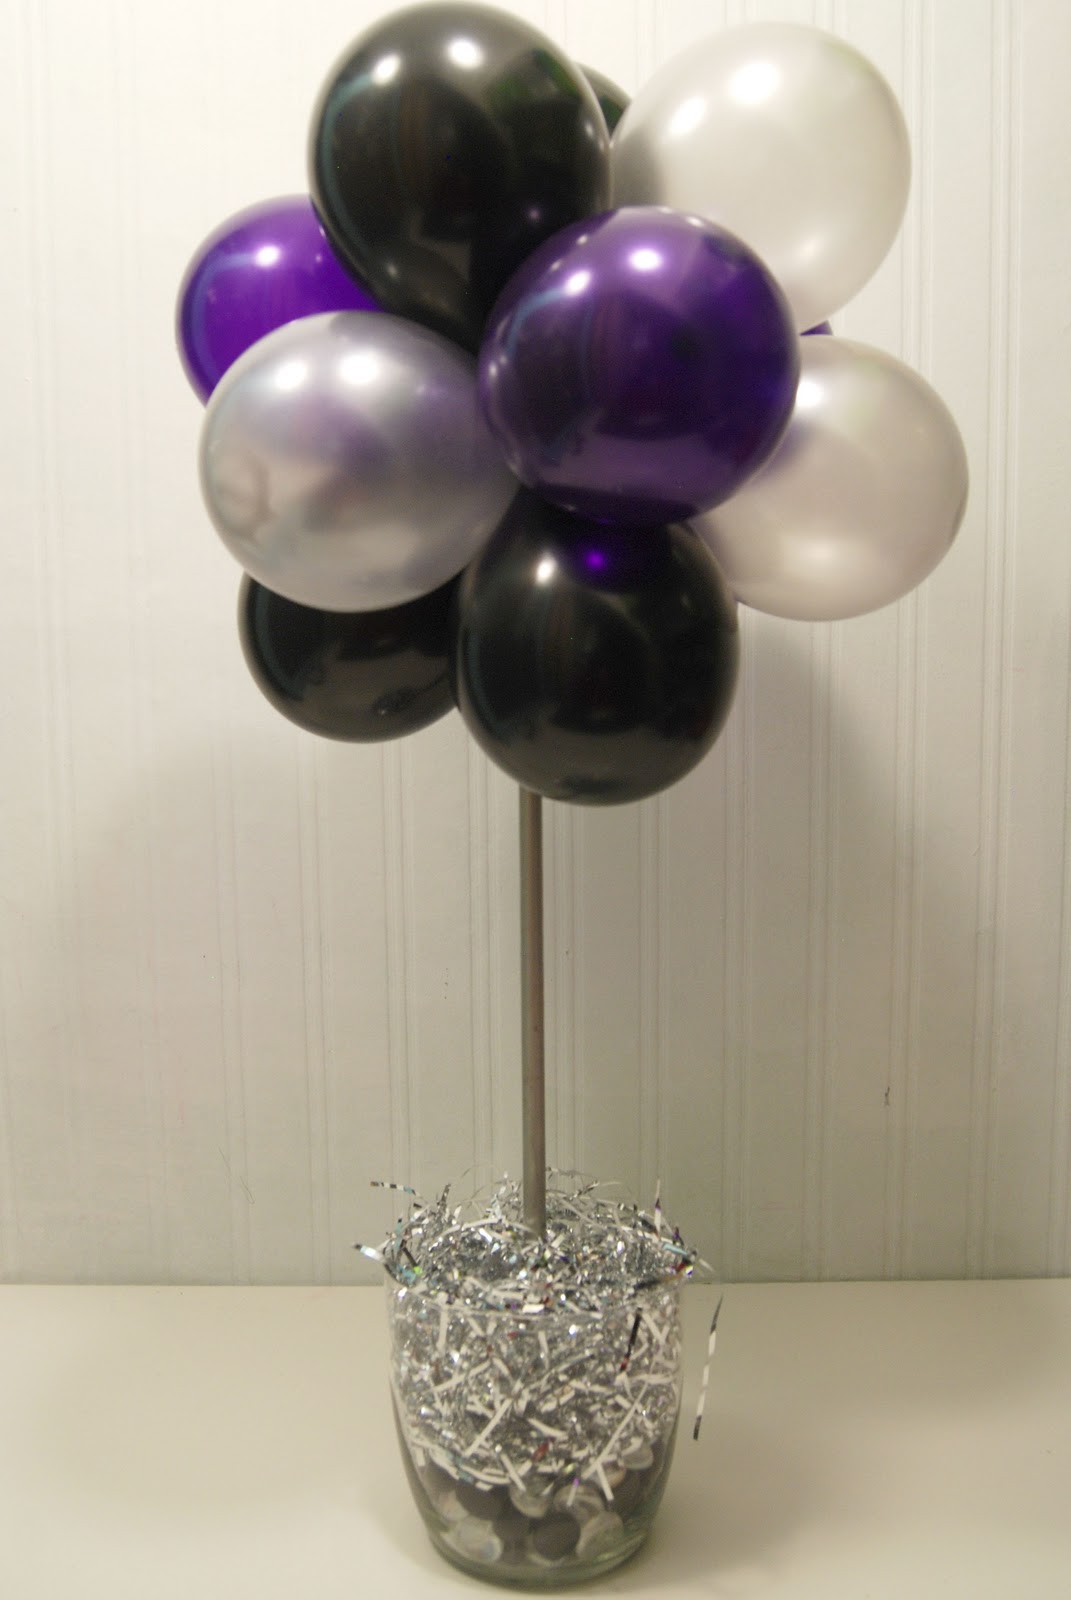
With only a week between Christmas and the new year, there isn’t much time left to decorate for a New Year’s Eve bash. No worries, because I’ve got a project that’s quick and easy and is sure to add some pizazz to your party.

I’m going to show you how to make this cute balloon topiary.

Here is what you will need:

12 – Small Balloons (I used 5″ balloons)

16″ Dowel (painted to match your color scheme)

Styrofoam

Small Vase

Marbles, Shreds, or other Filler for the Vase

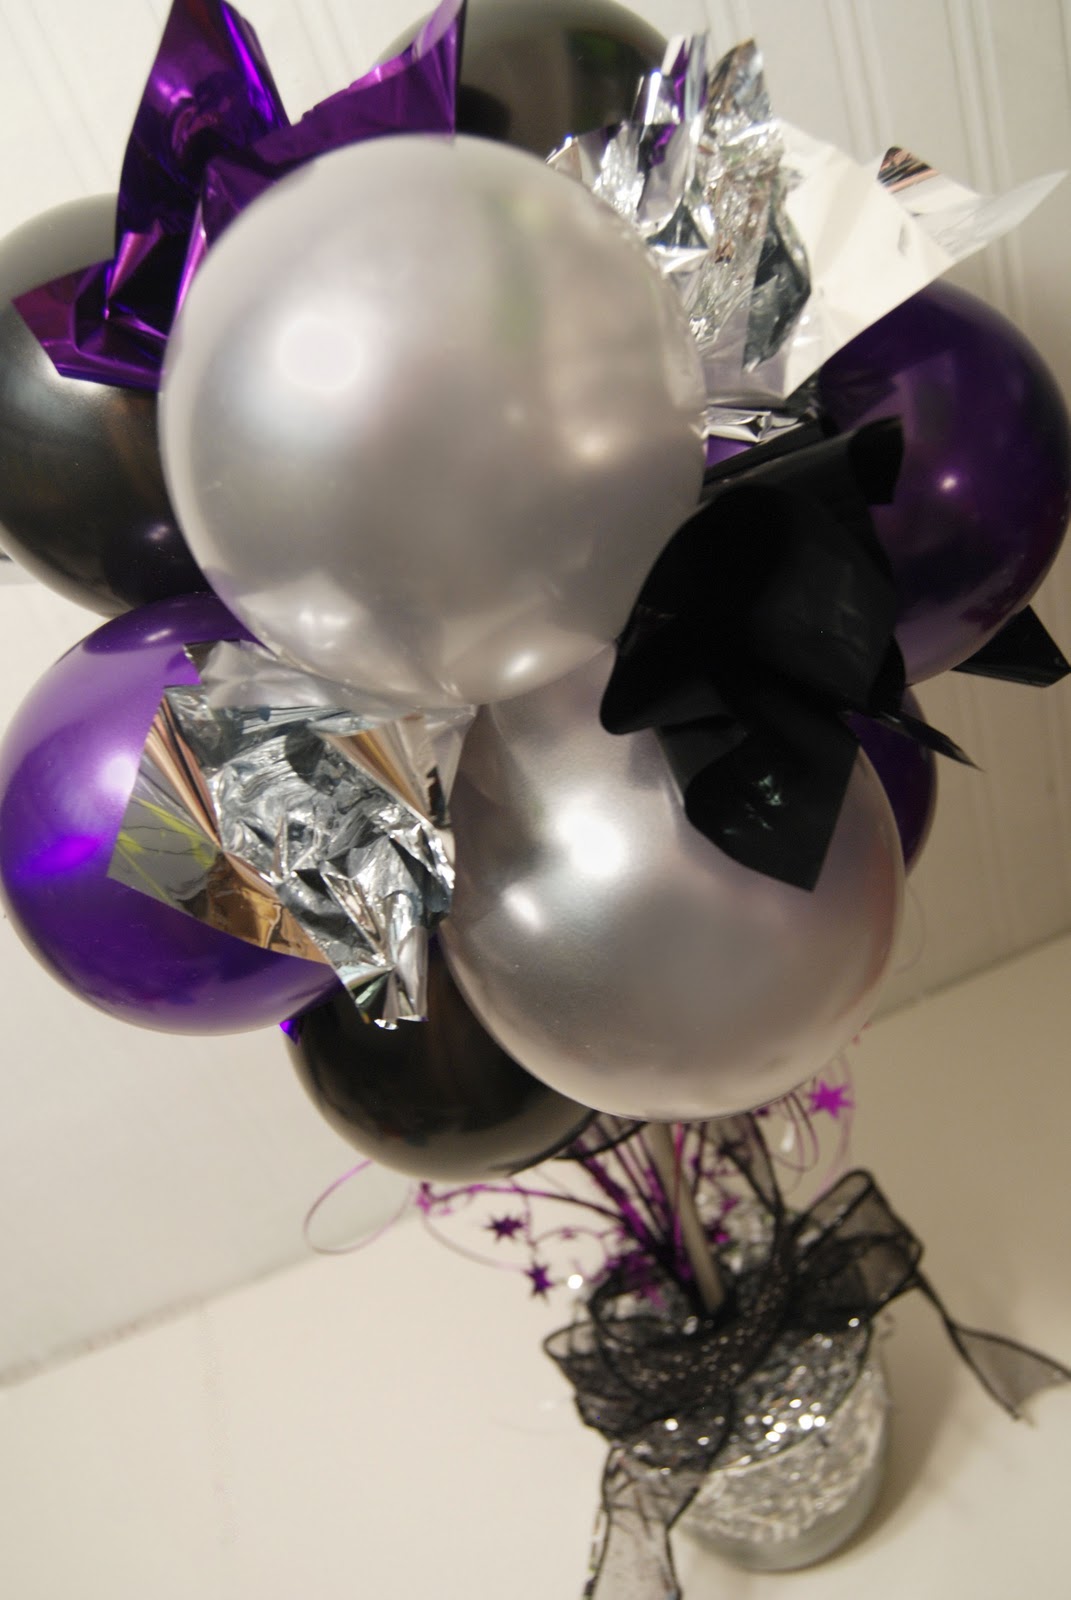
Foil Sheets (optional)

Star Sprays (optional)

First, inflate the balloons (try to make them the same size). Tie the necks of two balloons together and repeat until you have six groups.

Next, place one group over another group. Lock the two together by twisting the necks around each other.

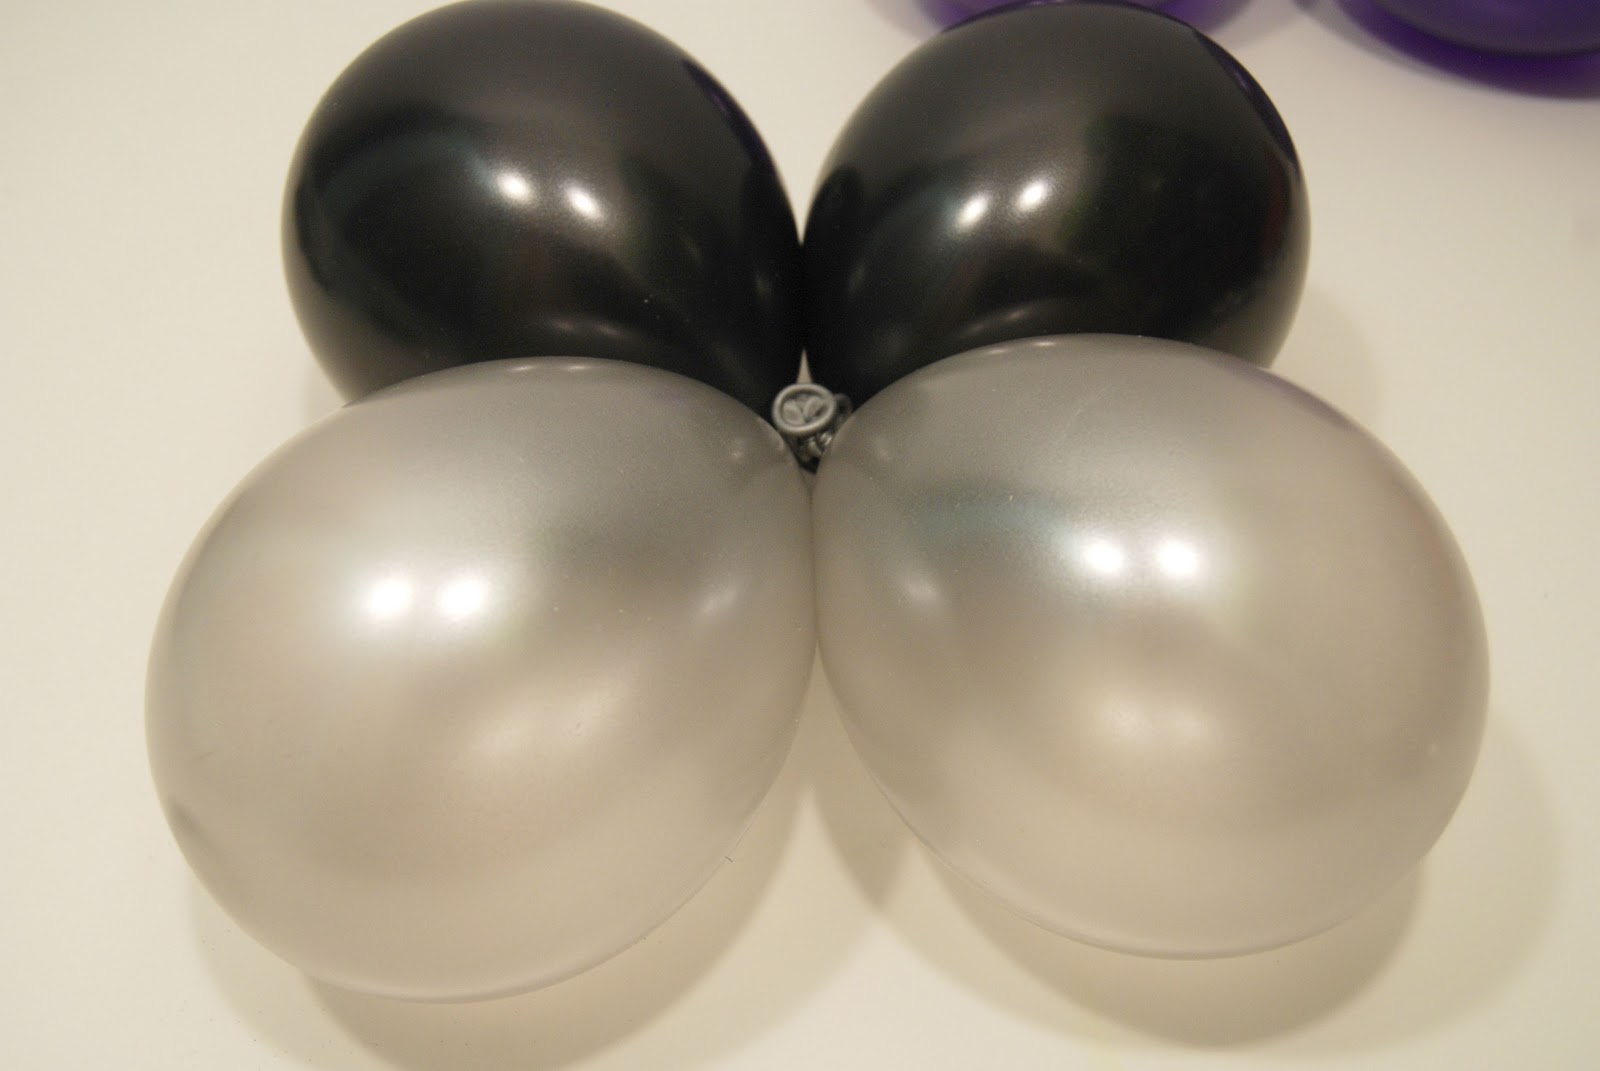
Repeat with a third group, there should now be six balloons in this cluster. Do the same with remaining groups, so you end up with two big clusters (each with 6 balloons).

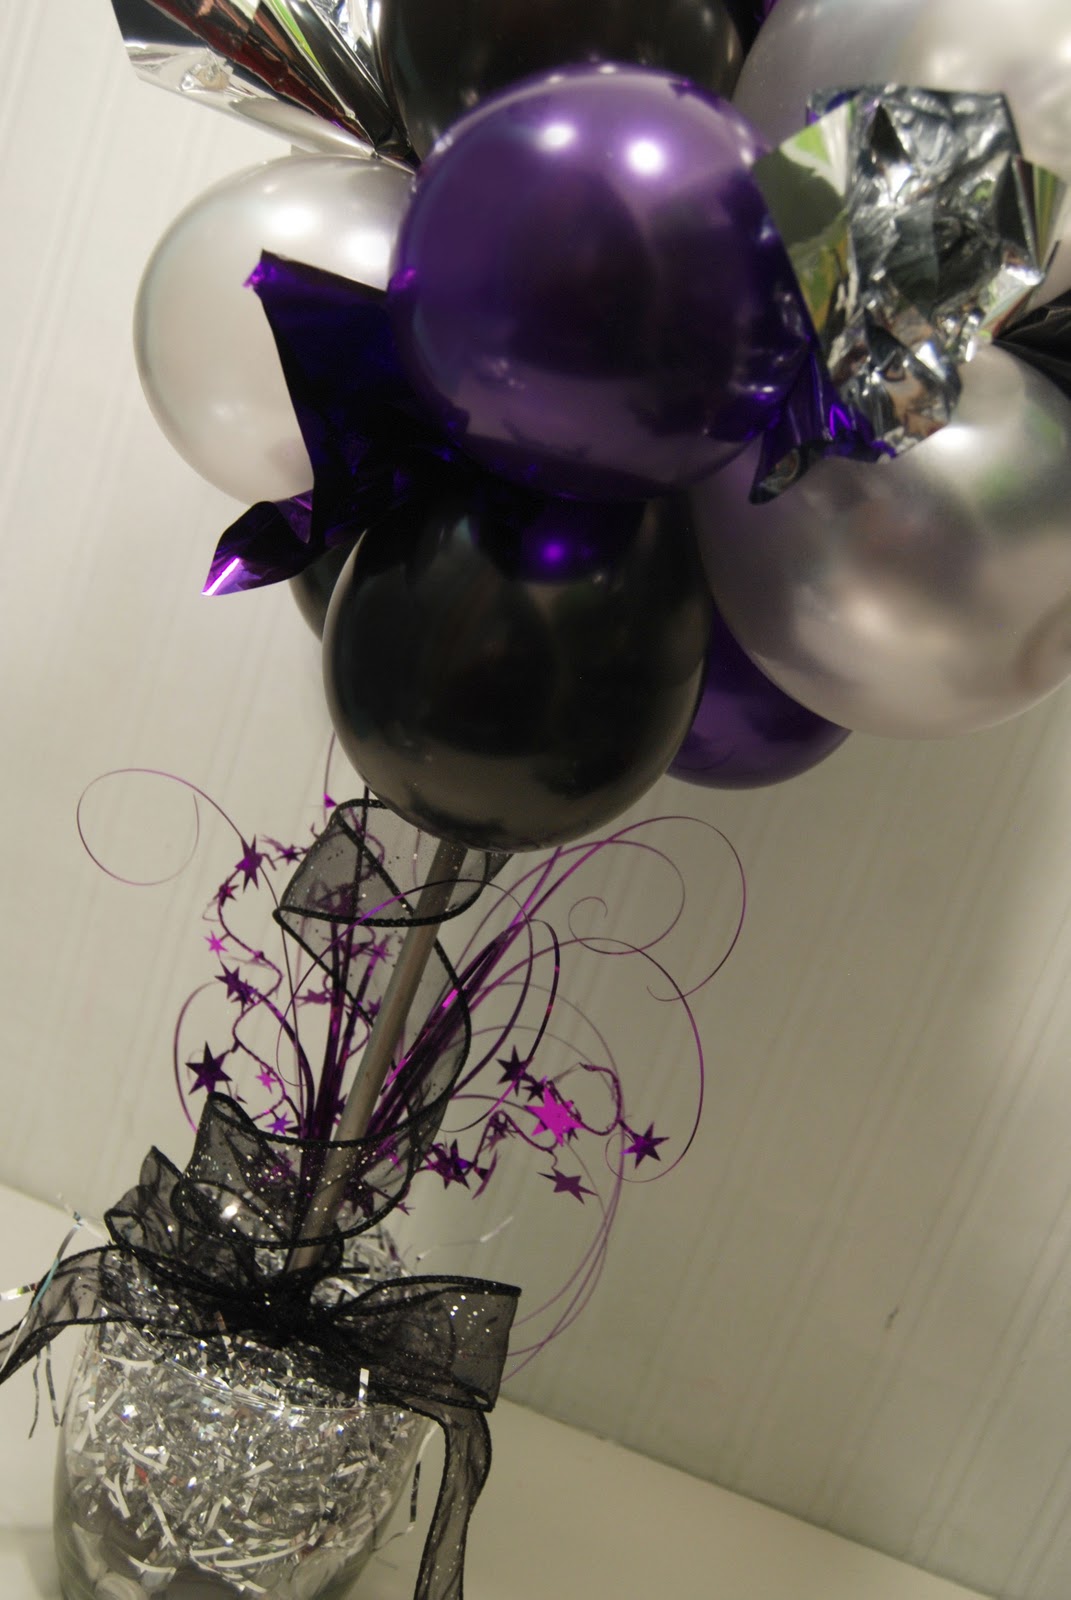
Now, put the two clusters together and twist the necks of a couple balloons around each other. You will end up with a ball that looks like this. You can move the balloons around until the colors and shape look good. I hope that all made sense (it’s way easier than it sounds).

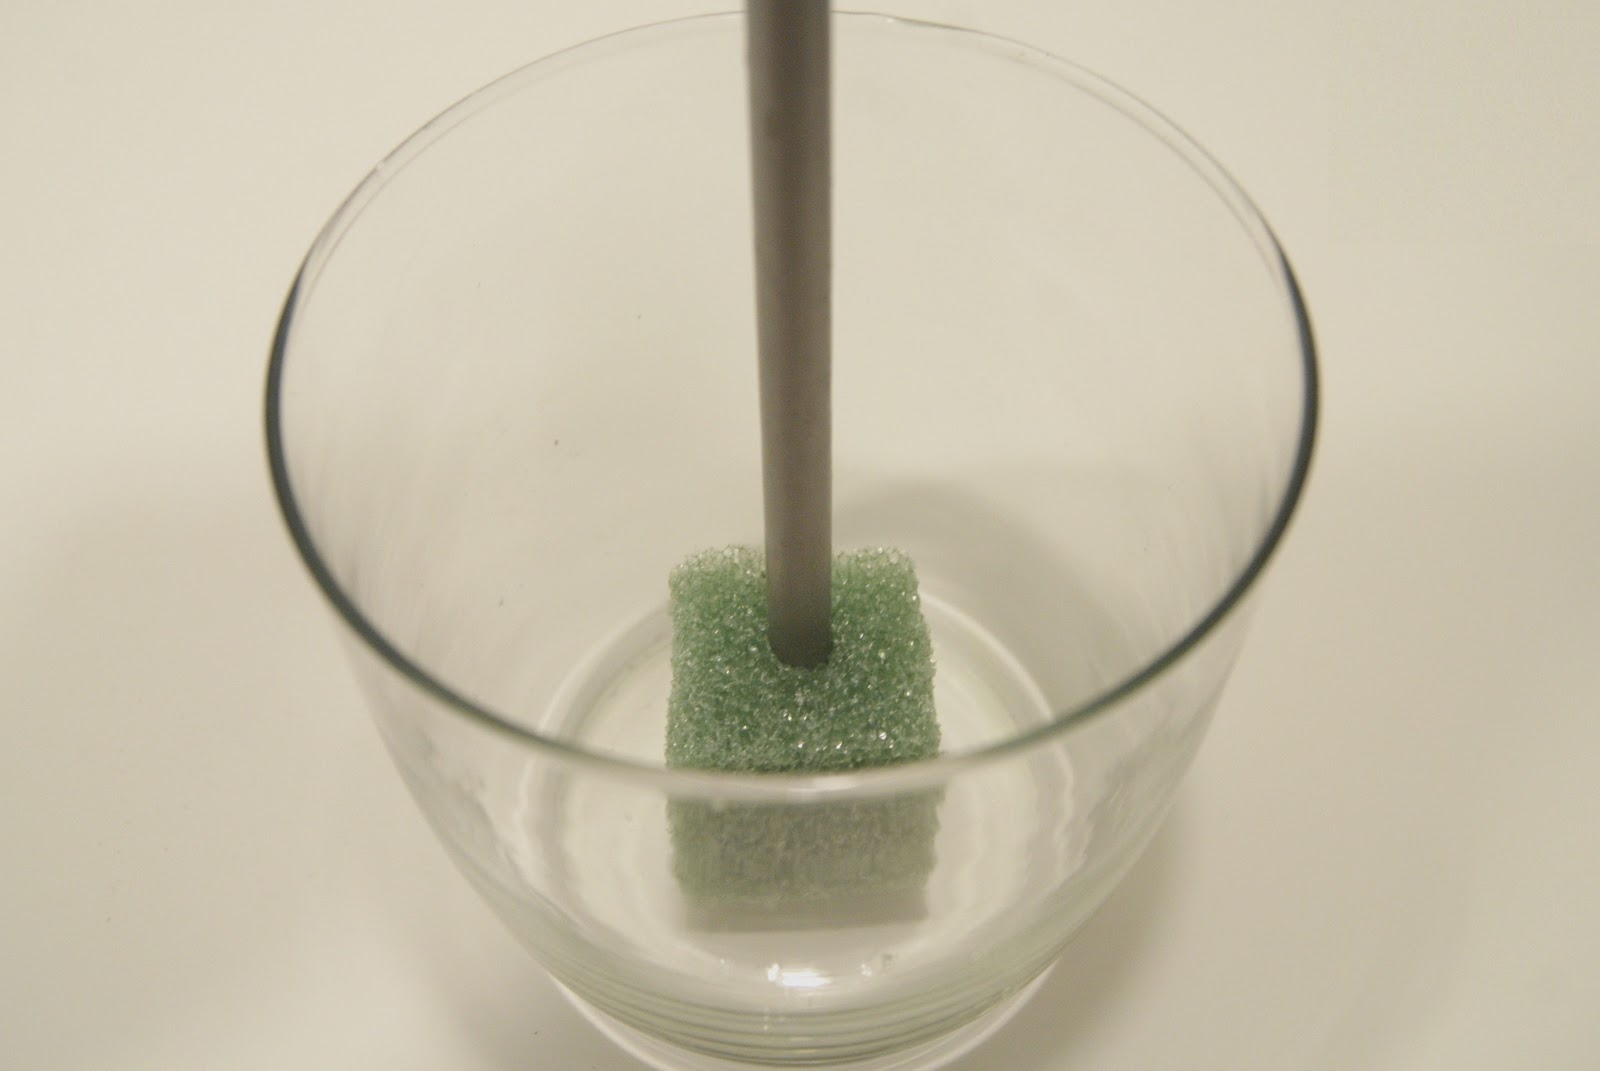
Set that aside for a bit and let’s start on the base. Stick your dowel into a piece of styrofoam and place it in the bottom of your vase. You may need to glue it down to keep it from tipping. Add marbles or other decorative items to fill the vase.

Place the top of the dowel in the center of your balloon cluster. You don’t need to glue it, just twist a couple of balloons around it to keep it in place.

It’s cute and simple like this, but I like to dress it up a bit more. Tuck some ribbon into the center of the cluster and wrap it loosely around the dowel a few times. Tie down the other end with another piece of ribbon and then make a bow.

Cut 5-6″ squares from foil sheets or tissue paper and stick between the balloons. Repeat all over the ball and fluff until it looks good.

Finally, for some more color, add a cute star spray to the base.

Isn’t it fun and festive?

And, since balloons come in so many different colors, you can make a topiary to match any party decor!

Thanks, Michelle for inviting me! I hope you all enjoyed this tutorial and will come over and visit me at Burton Avenue.

———————————————————————-
Isn’t Angie great?! This is a totally fun idea for a New Year’s celebration. You could even disassemble it at the end of the party and let the kids pop the balloons as party to ring in the New Year! Thanks Angie for such a cute idea!

P.S. Don’t forget to sign up for free Tipsy updates via RSS or email.

We have decided to truncate our feed to help protect against stolen content. I apologize for any inconvenience. Please love us anyway. 🙂

Christmas DIY with Martha Stewart

November 21, 2011 By Michelle Barneck 14 Comments

With snow on the ground holiday creating is in full force and I am so excited to share this Christmas DIY project! The Christmas decor in my front room is a little more rustic so I thought a burlap Christmas tree would be the perfect addition.

Start out with some green burlap and Martha Stewart Water-resistant fabric stiffener.
Cut three circles from your burlap.

Make three cones out of cardstock by rolling it and hot gluing in place.
This is my ode to the road construction that’s been going on around here.
Over a piece of wax paper, douse your circles in fabric stiffener spreading it evenly over the whole surface. I just used my hands so I could really get both sides completely drenched on both sides.
Lay your circles over the cones, helping them to ripple just how you want them. I put a rubber band lightly around the top to help them stay, but it really isn’t necessary. Let them dry overnight.
Cut a sturdy cardboard tube (smaller and thicker than a paper towel roll, I think mine may have been the middle of a tiny wrapping paper roll?) to size. About half of what is shown here.
Cover in garden twine securing with hot glue along the way. Hot glue it to an upside down dessert plate.

Hot glue on your “circles” one by one. This can get tricky gluing where the ripples touch the next layer without having the glue show.
Grab your Martha Stewart Adhesive stencils.

Use the smallest snowflake and stencil all around the plate with Martha Stewart silver metallic paint.
I love that you can literally stencil ANYWHERE wtih these! Can you imagine trying to get in that tiny nook with a regulr stencil?! These were so easy to use I had all the snowflakes done in like 5 minutes!
I let the silver dry and then went back over and hand painted glitter paint over each snowflake.
Now here she stands, waiting patiently for the rest of the Christmas decor to join her on the day after Thanksgiving.
Check out these other fun Christmas DIY projects!
Tatertots & Jello: Holiday Stenciled Sign

The Silly Pearl: Fabric Pinecones
Oopsey Daisy: Holiday Beadboard Frame
Prudent Baby: Patchwork Baby Onesie Christmas Stocking
I received product and payment for this post – all opinions and project instructions are my own.

Linking up:

Market yourself Monday
Making Monday Marvelous
Making the World Cuter
Motivate me Monday

P.S. Don’t forget to sign up for free Tipsy updates via RSS or email.

We have decided to truncate our feed to help protect against stolen content. I apologize for any inconvenience. Please love us anyway. 🙂

Thanksgiving for Kids

November 20, 2011 By Michelle Barneck 4 Comments

In case you missed my guest post on A Glimpse Inside here’s an idea to make it a fun Thanksgiving for Kids.

So here it is, my fun little turkey friend for the kiddos I have lovingly named…

Terrence the Turkey


He may be a little shy at first, but once you get to know him he is a total Butterball.

Supplies needed:

2″ Styrofoam ball
Serrated knife
Brown paint
Foam Brush
5 Crayons
Pointy nosed pen
Brown cardstock
Yellow cardstock
Red Cardstock
Scissors


1. Slice off the bottom of the ball with a knife so it will sit flat.


2. Paint the ball brown.

3. In the center of the ball, push the pen in to the styrofoam about 1/2 inch to make a holes for the crayons. It has to be in the middle straight to the center or the crayons will tip the ball over.


4. Cut a body shape, beak, and gobble out of the cardstock.


5. Use your knife to make a slit in the styrofoam in front of the crayons to slide the body in.


6. Hot glue the beak on. Cut a tiny slit in the gobble and slide it on to the beak.


Find a nice place for him on the kids table…


or set him free to roam.


We have decided to truncate our feed to help protect against stolen content. I apologize for any inconvenience. Please love us anyway. 🙂

Donut Snowman on a Stick: Once There was a Snowman, Snowman, Snowman…

November 18, 2011 By Michelle Barneck 25 Comments

We’re debuting the Point of View theme ideas a little early this month because though GIFTS is a fitting theme for Black Friday we though you might be busy with gifts elsewhere. 😉

Michelle (Stay right here!)
Leanne (Organize and Decorate Everything)
Amy (Ameroonie Designs)
Gwen (Gwenny Penny)
Debra (Housewife Eclectic)
Caitlin (Cait. Create.)
Jonie (Just Between Friends)
& YOU!!
 
We want to see your Point of View on gifts so be sure to link up your gift ideas on the Point of View link up on Organize and Decorate Everything!
 
Without further adeiu, an ode to the Snowman.
I grew up with a little song called “Once There was a Snowman.” Are you with me here?
Once there was a snowman, snowman, snowman.
Once there was a snowman tall, tall, tall.
In the sun he melted, melted, melted.
In the sun he melted small, small, small.
Lyrical genius right?
I saw the donuts with the carrot nose and thought an expansion on that idea would be the perfect homage to said song.
{Donut Snowman on a Stick}
CAREFULLY (two donuts were harmed in the making of this snowman) skewer three powder donuts.
Cut a baby carrot in half and put in hole for nose. Add grape Nerd eyes and mouth to look like coal. You my need a dob of frosting or honey to hold them in place.

Add a green apple sour straw as a scarf. Break a toothpick in half and secure the scarf by poking the toothpick through the straw and in to the donut on the top where they overlap and on the bottom of the piece that hangs down the front. You can see the tiny dot of the toothpick on the bottom of the scarf.

Add two red jawbreakers as buttons.
Place in a treat bag with a bow and pass out to your friends.
They will have all sorts of fun singing the song and gobbling him up small, small, small.
Be sure to visit the other girls for some great gift ideas and link up your gift ideas on the Point of View link up on Organize and Decorate Everything for your chance to be featured!


« Previous Page
Next Page »

  • Bloglovin
  • Facebook
  • Google+
  • Instagram
  • Pinterest
  • RSS
  • Twitter

Hi there! I'm Michelle. Mother of three little boys and one little princess. Welcome to A Little Tipsy, a place for exploring creativity and sharing inspiration.

Follow on Bloglovin


Visit Michelle Barneck {A Little Tipsy}'s profile on Pinterest.

Tutorials by Category


15 Family Reunion Games

Family Reunion Games Collage

15 Sprinkle Party Ideas

Sprinkle Birthday Party
Creative Commons License

© Copyright 2014 A Little Tipsy · Site Designed by The Fairy Blogmother · Web Hosting by RFE Hosting

This website uses cookies to improve your experience. We'll assume you're ok with this, but you can opt-out if you wish.Accept Read More
Privacy & Cookies Policy