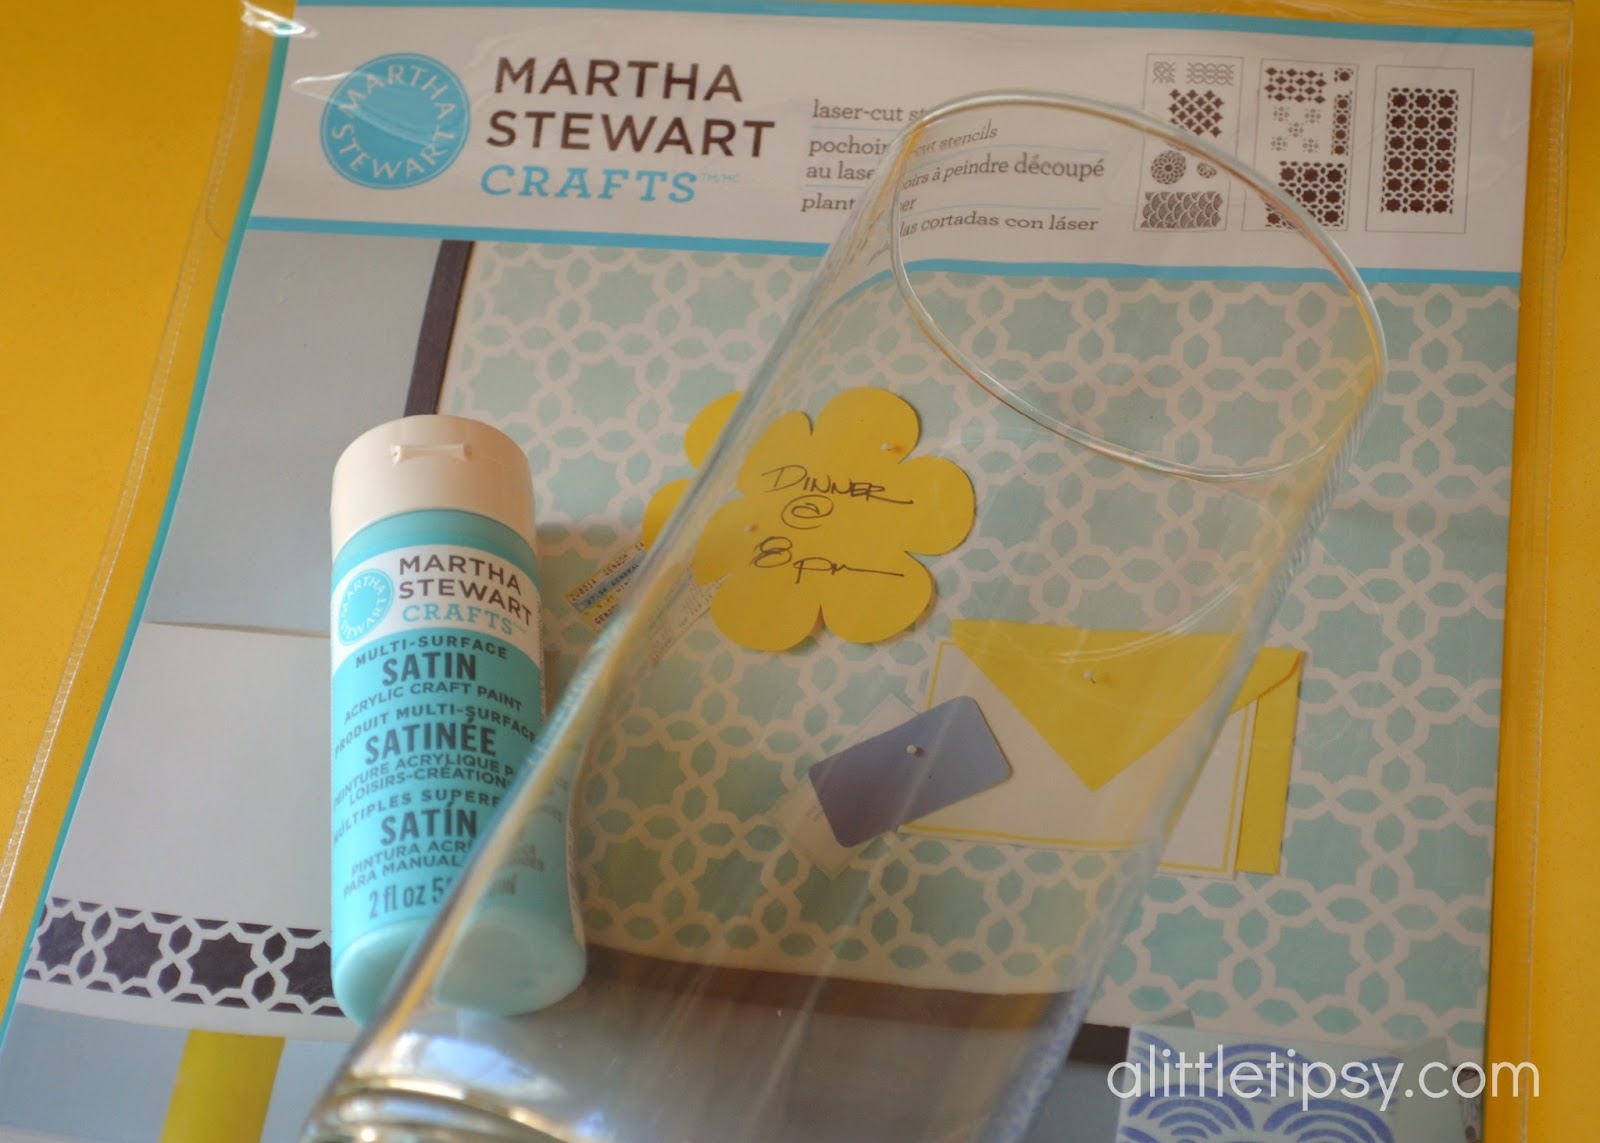
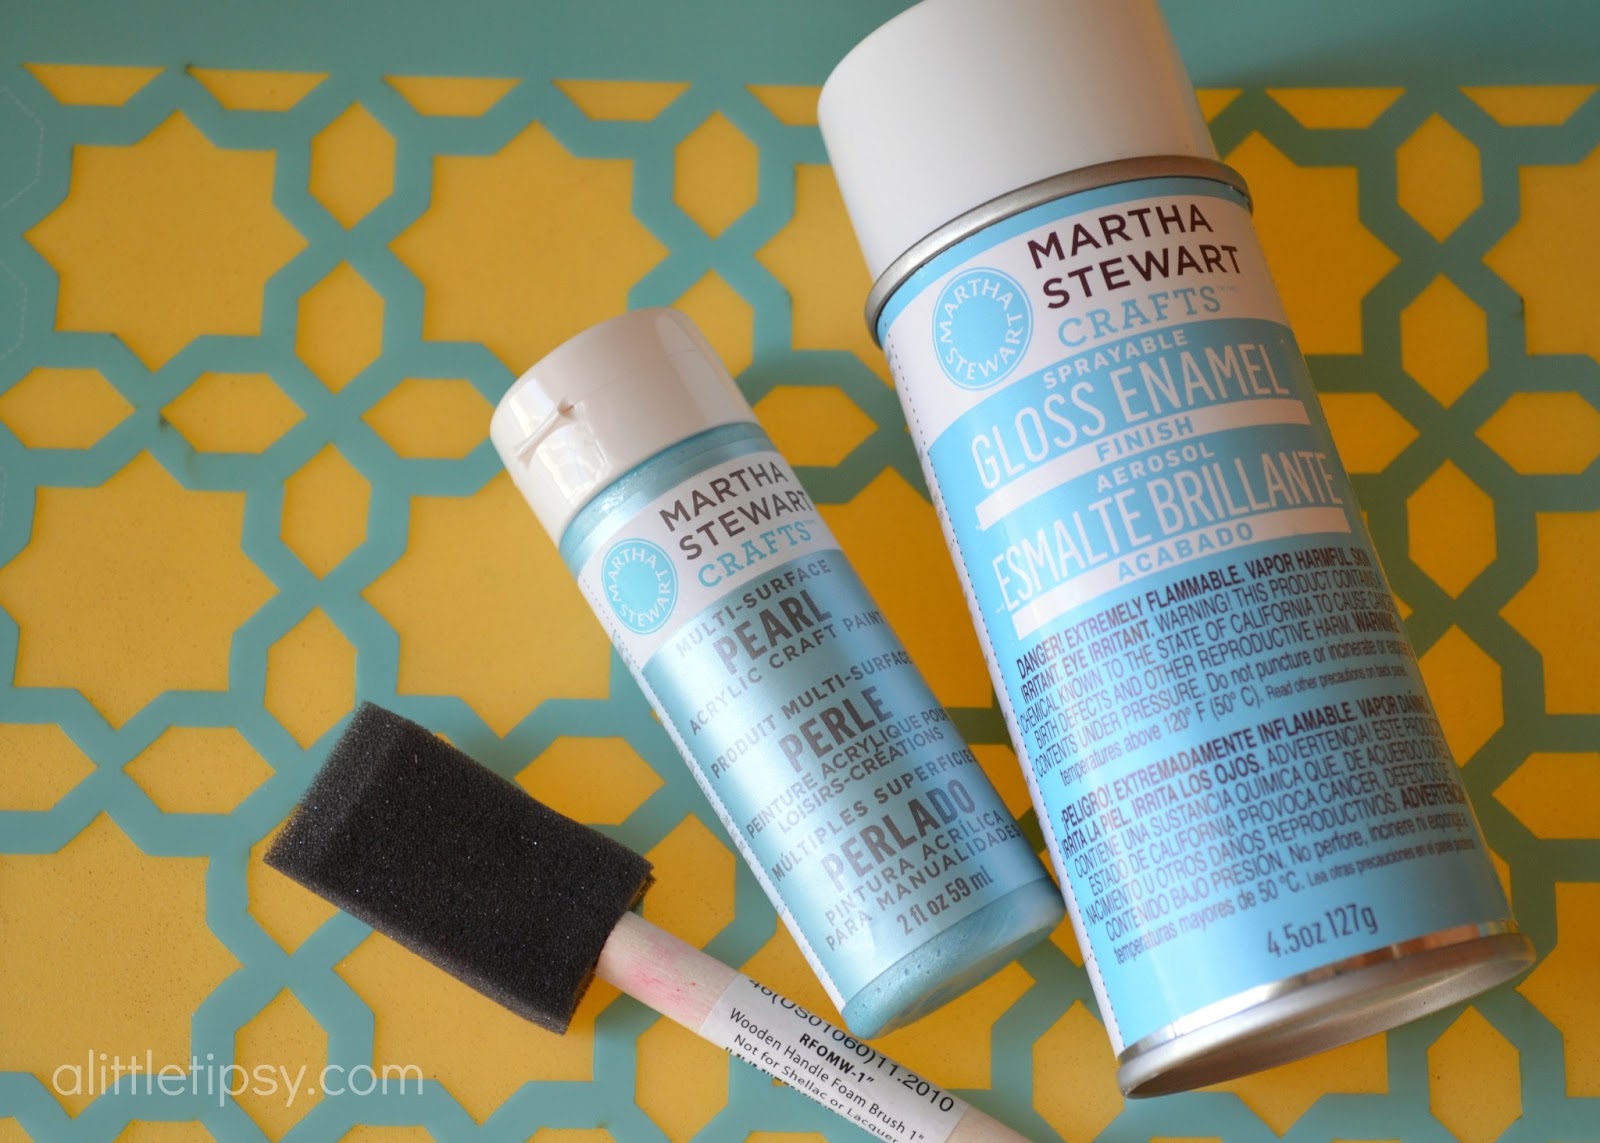
A Little Tipsy

Creative Tips & Ideas

  • home
  • About Me
  • the tipsy top
  • press
  • projects
  • contact me
[print_thumbnail_slider]

Stenciled Glass Vase #12MonthsofMartha

March 27, 2013 By Michelle Barneck 8 Comments


SUPPLIES:
  • Glass Vase
  • Martha Stewart Satin Paint in Pool
  • Martha Stewart Crafts Laser Cut Stencils
  • Martha Stewart Spray Adhesive
  • Martha Stewart Pearl Paint in Aquarium
  • Foam Brush
  • Martha Stewart Sprayable Gloss Enamel Finish


DIRECTIONS:

1. Pour the satin acrylic paint inside the vase around the sides and swirl, rotate, and tap to coat evenly. Let it dry overnight.


2. Spray the back of your stencil with spray adhesive so it will stick to your vase and help make the stencil lines crisper. Using your foam brush dob the pearl paint over the stencil. It may create little bubbles, but they will go away.


3. Let the paint dry completely, then spray a thin even coat of the gloss enamel to protect it.


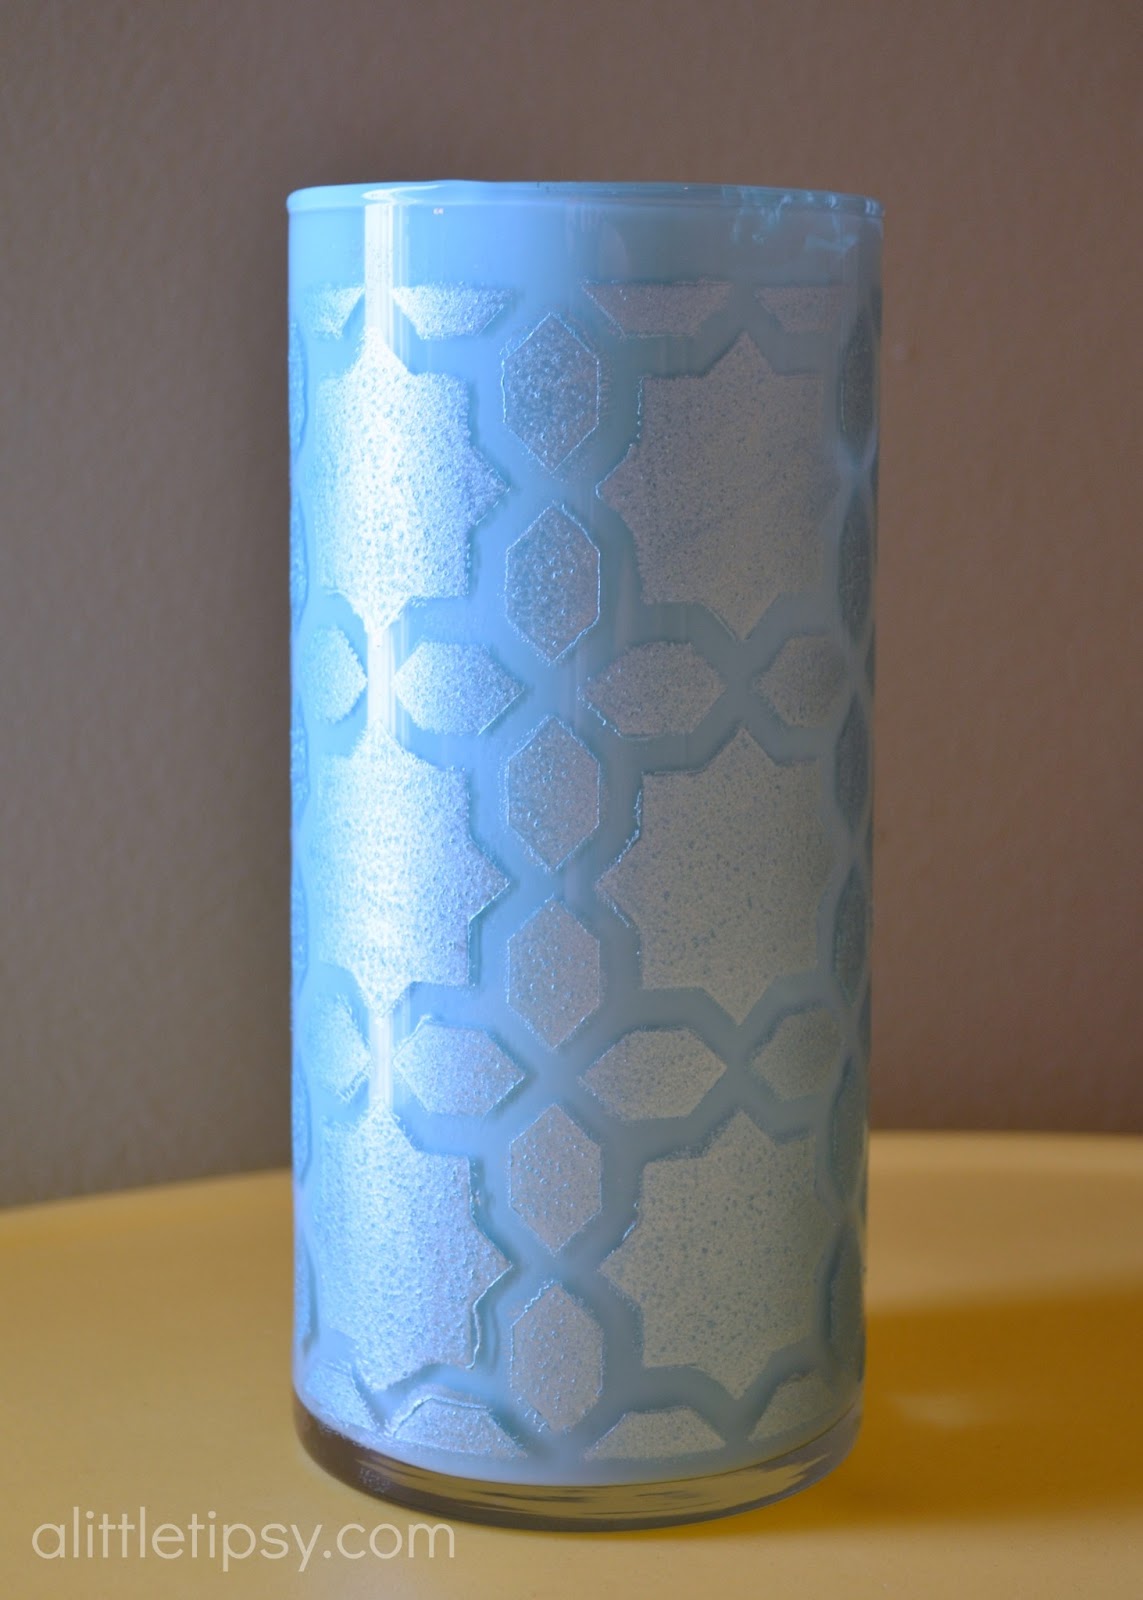
4. Place a smaller vase or cup inside the painted vase to protect the paint from water. (I used one of those kid’s cups they give you at restaurants.) Fill your stenciled glass vase with bright spring blooms and enjoy a little of the outside in!


There’s an AMAZING discount at Michaels right now! 30% OFF Entire Purchase of Martha Stewart Crafts Craft Paint Tools & Accessories good through April 13th 2013! View and print the coupon here: US URL and CAN URL

Disclosure: Martha Stewart provided product to complete this post. The idea and opinions are my own.

We have decided to truncate our feed to help protect against stolen content. I apologize for any inconvenience. Please love us anyway. 🙂

White Picket Fence

March 26, 2013 By Michelle Barneck 3 Comments

Hey everyone. I’m Vanessa hopping over today from Our Thrifty Ideas. I’m so happy to be a contributor here at A Little Tipsy and be able to share some of my crazy life with you from time to time. Today I’m sharing a fun tutorial to get you in the spring and summer mood!

Mini Picket Fence

I love to make décor to feature at my home for the seasons and holidays. Recently I made this fun homemade picket fence to use as a background for my table décor. Our kitchen table is pushed up against the wall, and I try to use just a small section of it to brighten up the area for the coming season.

DSC_0050

I used some pine stakes from Home Depot (just $4 for 12 stakes!) to get the fence effect. You can find them by the cement. I then used my staple gun to connect them. One at the top (just below the point) and one at the bottom.

Then I primed them and put a white wash on top of that. Once both were dry, I sanded them down a bit for a more rustic look.

DSC_0086

Once the “fence” was done, I dressed it up with a small fabric bunting. Using fabric shears, I cut out triangles and hot glued them to some bright bakers twine.

DSC_0094

Then I strung it (aka, used packaging tape to tape it to the back. Yup, real technical!) Oh, and I didn’t even take the time to paint the back. Lazy I guess!

Lazy or not, it turned out amazing and I’m loving it. You can use it as a center piece like I did (paint the back and stand it up in the middle if you’d like), use it to add height to already existing decorations you have, or even clip a picture to the bunting and use it like a frame.

PicMonkey Collage

However you choose to use it, you can switch out the bunting for the holidays, and use it all year round.

Do you have a home décor staple that stays up all year with just a little tweaking? I’d love to hear what it is.

————————————————————————–
Isn’t this the American dream, the white picket fence? I totally want one! This is so fun for spring and would be great with red and blue for summer! This is totally on my to do list. Thanks Vanessa!
We have decided to truncate our feed to help protect against stolen content. I apologize for any inconvenience. Please love us anyway. 🙂

How to Paint a Ceiling {the easy way}

March 22, 2013 By Michelle Barneck 3 Comments

Up until this weekend I was a ceiling painting virgin. Ceilings scared me, the thought of covering everything and paint in my hair and having a sore neck kept me away. I was a chicken really, but no more. I put on my big girl painting pants and with the help of a new tool gave it a go.

Now that I’ve done it I am embarrassed at how nervous I was. I started small with out guest bathroom so I wouldn’t get overwhelmed and I was actually underwhelmed. It took me all of about 15 minutes including set up for the first coat. I am totally in love with the fresh clean white!
My secret weapon? The PaintStick EZ-Twist from HomeRight. This handy tool sucks the paint right in to the handle and eliminates the need for a paint tray!

You just place a little nozzle in your paint bucket and follow the instructions to pull the paint right in to the handle. My paint bucket was a little shorter than most so I had to hold it down well while pulling the paint in.


Once the paint is in, you just push in or twist the handle to get more paint in the roller. Fancy!
Now just roll it on! It even has a little tray to catch drips. I was painting over old linoleum so I didn’t even cover anything, though if your flooring or surfaces are nicer I would recommend protecting them. I didn’t see any white drips anywhere.
I filled in the edges with a regular paint brush. I did not tape or anything because I was painting the walls.
Doesn’t it look sooo much better? From a dingy cream color everywhere to crisp white and a nice clean gray. Phase 1 of guest bathroom makeover complete!

Now for my thoughts on the PaintStick:

Pros:

  • Easy set up with much less covering
  • No messy paint tray.
  • Easy to reach normal ceilings without a ladder
  • Easy to get a good coat without pushing hard
  • Makes painting ceilings and rooms much faster

Cons:

  • While still simple, clean up is more time intensive than throwing away a paint tray liner.
  • Not meant for use in cramped spaced with lots of built in items (I didn’t use it for the walls in the bathroom because of the long handle)

The PaintStick runs for about $20 at big box and hardware stores. I think the time saved is worth the investment, especially if you would have to buy rollers/covers/paint trays anyway.

I can’t wait to try the PaintStick out on a bigger room!

This is a sponsored post on behalf of HomeRight but the thoughts and opinions are my own. See my disclosure for further details.

We have decided to truncate our feed to help protect against stolen content. I apologize for any inconvenience. Please love us anyway. 🙂

Pom Pom Bunny Pillow

March 19, 2013 By Michelle Barneck 5 Comments

Hi there, A Little Tipsy readers! I’m Terra from mama says sew and I’m excited to be here to share a sewing project with you today.
I’ve seen some Easter decor that have a bunny with a pom pom for a tail {see here and here}. I decided to take that idea and turn it into a bunny pillow cover.

I love his fluffy little tail.
I’ll show you how to stencil the bunny on your fabric, and then insert a zipper as you make your pillow cover. That way, you can easily change out your decor when Easter is over {and you don’t have to store an entire pillow}! Another great thing about zippered pillow covers is you don’t have to do any hand stitching to finish up.

Here’s how to make the bunny pillow.
You will need:
  • About 1 yard of fabric
  • Pillow Form
  • Freezer Paper
  • Fabric Paint or Acrylic Paint
  • Zipper
  • Sewing supplies, ie, thread, scissors, sewing machine

First, cut out two squares of fabric, the size of your pillow form, plus 1 inch. For example, if you have an 18 x 18 inch pillow form, cut out two 19 X 19 inch squares.

First, draw or trace a stencil onto freezer paper. I found the stencil I used here and enlarged it.

Cut out the stencil and iron the freezer paper onto the right side of one of your pillow squares.
Fill in the stencil with paint and allow to dry.
Peel off the stencil.

Sew your two squares right sides together along the bottom edge of what will be your pillow. This is important. Make sure the bottom of the bunny is closest to the seam.

Press the seam open and center the zipper over the wrong side of the seam with the zipper pull on the bottom, as shown. The size of your zipper isn’t a big deal, as long as it opens wide enough to insert your pillow through and is shorter than your pillow form.
Using your zipper foot, stitch up one side of the zipper.

When you get to the top of the zipper, leave the needle inside the fabric and pivot. Sew across the top of the zipper. Go back and forth a couple of times to make sure your zipper is secure. Then pivot again and go back down the other side. Pivot and go back and forth to secure the bottom of the zipper. You may find it helpful to stop and move the zipper pull as you sew, so that it is out of your way.
When you’re done, you should have something like this.
Use your seam ripper to open up the stitches on top of the zipper.
Make a pom pom and stitch it to the tail of the bunny.
I used a needle to make big stitches underneath the pom pom to hold it securely.
Match up the pillow squares right sides together and stitch around the rest of the pillowcase 1/2 inch from the edges. Make sure to unzip the zipper before you do this!

Clip your corners and turn right side out.
Insert your pillow into your new pillowcase and viola! Instant decor.
Thanks Terra for such a cute Easter project! I have seen pom poms popping up everywhere and this bunny pillow is such a fun way to try out the trend!
We have decided to truncate our feed to help protect against stolen content. I apologize for any inconvenience. Please love us anyway. 🙂
« Previous Page
Next Page »

  • Bloglovin
  • Facebook
  • Google+
  • Instagram
  • Pinterest
  • RSS
  • Twitter

Hi there! I'm Michelle. Mother of three little boys and one little princess. Welcome to A Little Tipsy, a place for exploring creativity and sharing inspiration.

Follow on Bloglovin


Visit Michelle Barneck {A Little Tipsy}'s profile on Pinterest.

Tutorials by Category


15 Family Reunion Games

Family Reunion Games Collage

15 Sprinkle Party Ideas

Sprinkle Birthday Party
Creative Commons License

© Copyright 2014 A Little Tipsy · Site Designed by The Fairy Blogmother · Web Hosting by RFE Hosting

This website uses cookies to improve your experience. We'll assume you're ok with this, but you can opt-out if you wish.Accept Read More
Privacy & Cookies Policy