A Little Tipsy

Creative Tips & Ideas

  • home
  • About Me
  • the tipsy top
  • press
  • projects
  • contact me
[print_thumbnail_slider]

Mom’s Guacamole

April 23, 2013 By Michelle Barneck 1 Comment

With both Cinco de Mayo and Mother’s Day approaching, I think it’s a perfect time to share one of my favorite recipes with you!
Why is it called Mom’s Guacamole? Well, the answer to that is as simple as the recipe itself. My mom taught me how to make this exact guacamole years (and years) ago, and because of the great big avocado tree I have in my front yard, I make it constantly! 

Since the recipe and ingredients are so simple and easy, I just know you’re going to love it too!
Here’s what you need: 
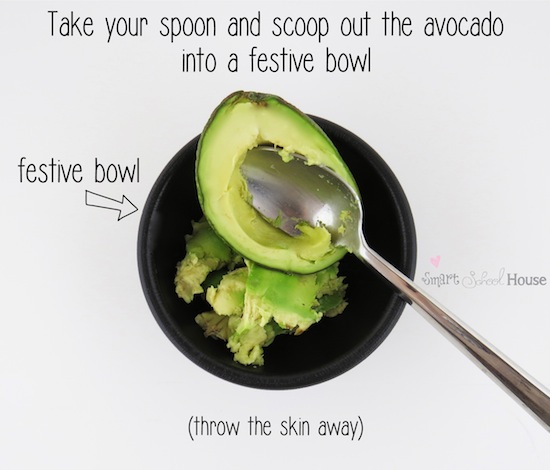
(Note: get this stuff together first!! Making guacamole can get a little messy, so it’s best to have everything you need right at your fingertips.)
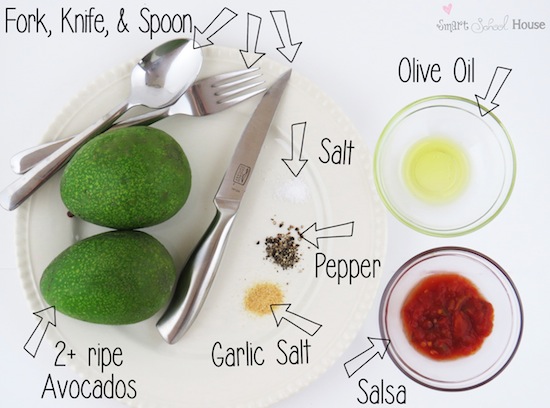
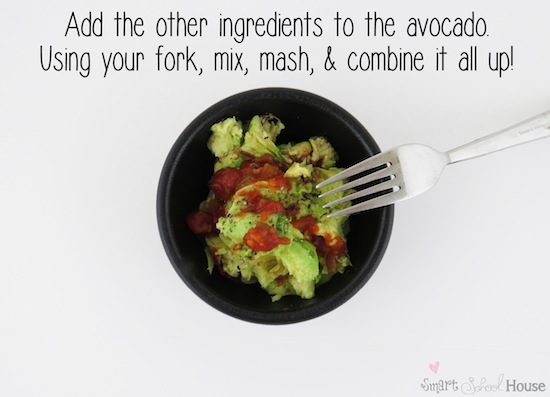
How much of each ingredient do I need, you ask? Well, in the wise words of my mom, “However much you like!” Oooohh let me tell you how much that frustrated me in the past. As a borderline perfectionist, that’s not a sufficient answer! But, she’s completely right. Using these ingredients, season it to taste just as you like. Start with a little and add more after a taste test. I find that a dash of the dry ingredients will do. I usually add a tablespoon of salsa and I find it to be just the right amount of spicy “kick”. OH- and here’s an awesome tip! The olive oil not only makes the guacamole a little creamier, it also helps prevent the leftover guacamole from turning brown! 
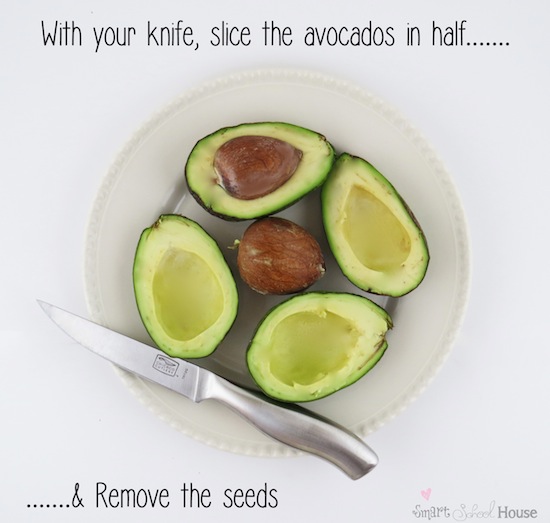
There you have it! Mom’s Guacamole is an easy recipe with simple ingredients that you most likely already have in your kitchen. Are you eager to make the guacamole but your grocery store only has unripened avocados for sale? Well, take a brown paper bag and let the avocados sit in there for a few days. The darkness helps them ripen faster! 
Thank you so much for having me again here at A Little Tipsy! I’d love for you to swing by my blog Smart School House to see what other crafts and treats I’ve been up to lately, like this picture perfect pink treat called Frosted Ice Cream:
Thanks Kelly! I love the tip about the olive oil! DYK if you leave the big avocado seed in the guacamole until ready to serve it keeps it green?! Can’t wait to try this recipe!
We have decided to truncate our feed to help protect against stolen content. I apologize for any inconvenience. Please love us anyway. 🙂

Minnie Mouse Hooded Towel

April 9, 2013 By Michelle Barneck 1 Comment

Hello A Little Tipsy Readers! This is Amber from Crazy Little Projects here to teach you to make a hooded towel-and I think you Disney fans are going to love this one. I make a new hooded towel every month-check them out here! But this one’s a little different from the ones I’ve made in the past. This one’s Minnie Mouse (or Mickey Mouse-take your pick). I’m thinking some kiddos would love these. They’d be
great to take on a trip to Disney!

  Minnie Mouse Hooded Towel Tutorial by CrazyLittleProjects.comMickey Mouse Towel Tutorial by CrazyLittleProjects.com  

Mickey and Minnie Hooded Towel Tutorial:

Supplies Needed: 1 Red Towel 1 Black hand towel Red polkadot fabric or ribbon for Minnie Towel   Instructions: In this post I am teaching you to make the head part of this towel. If you would like to see how I finish off my hooded towels and attach the hoods, see my basic hooded towel post. To start off, cut your hand towel in half horizontally. Fold the selvage edge under about 3-4 inches and stitch it in place. (Sorry, forgot to take pictures of this, but here it is on another towel):

  Fold 

 Now, flip that over and you will work on the underside, the side without the seam. With the extra piece of hand towel cut out your ears. You will need 4 ear pieces. Just cut a large circle but make it slightly oval shaped so that you can sew it in place easier (see image below). Grab 2 ear pieces and sew them together leaving an opening in the bottom.

  Eear2 
 Turn them right side out:
  Ear 
 On your hand towel decide where you want the ears and cut small slits. Pull the ear through so that it looks like this on the underside: 
  Earthrough 
 Do that with both ears and snip off any excess on the bottom. For Minnie-to make the bow either use red polka dot ribbon and tie it, or, use red polka dot fabric. Cut the fabric to be about 14 inches by 5 inches (it’s up to you how big or small you want the bow). Fold it so that right sides are together and stitch around it leaving a small opening to turn it.
  Bow1 
 Turn it right side out, press it and then sew the opening closed. The pinch your bow like this:
  Bow 
 And stitch it in the middle to hold it. Hand stitch the bow to the towel where you want it. Now, fold your hood part in half so that the ears are on the inside and zig zag up the back along the raw edges. Then, fold it 
like this:
  Backofhood 
 And sew a straight line across the top about 1-2 inches from the top and snip that off. (This rounds out the hood so it’s not so pointy.)
  Tip 
 And you’re done! Just sew the hood to your towel and you’ve got yourself a little Mickey or Minnie Hooded Towel! Here’s a few more of my hooded towels:
  Hooded Animal Towels  
 Come find me on facebook, pinterest and twitter!
——————————————————————
Oh my heavens Amber, this is adorable! I wish I had these for our Disney trip last fall. These would be perfect to take to the pool in the summer too! Thanks for such a great tutorial.
We have decided to truncate our feed to help protect against stolen content. I apologize for any inconvenience. Please love us anyway. 🙂

Succulents: A How-To Guide

April 3, 2013 By Michelle Barneck 2 Comments

I in no way claim to be a green thumb. Luckily there are those who excel in this area to help the rest of us along. I had been coveting the beautiful succulent arrangements popping up around the web for a while now and decided to bit the bullet and try my hand at it. I couldn’t be more thrilled with how mine turned out!
I am attending the SNAP! Conference in a couple weeks and as a fun way to prepare and get to know other bloggers participated in a SNAP Swap. We were given a budget of $15 and told to thrift store shop and raid our stashes to come up with some items for our partner to makeover. My partner Amber from Crazy Little Projects lives here in Utah so we were able to meet up and swap in person which was fun! Here’s the goods I came home with.
Be sure to run over and see what I sent her home with and what she came up with!
Now, how can you pot some succulents of your very own? Here’s the low down using tips I learned from this Outside Inside post from Ms. Green Thumb herself Cynthis Bee.
SUPPLIES:
  • Bowl or pot
  • Activated Carbon (found in the aquarium section)
  • Aquarium Gravel
  • Mirable Grow Moisture Control Potting Mix
  • Succulents (I found mine at Home Depot)

Layer your ingredients as follows: carbon, gravel, potting mix, succulents, gravel. You can keep the potting mix just in the middle and have only gravel around the edges if you want. The carbon and gravel are what make this bowl work with no drainage.
I love how it adds life, color, and texture to my front room!

I wasn’t sure about the blue gravel at first, but I had it on hand from when we used to have African swimming frogs and decided to give it a whirl. I am so glad because I am in love with it!

Come to find out, potting soil is not the best for succulents. Read all about it at the end of this succulent post from Cynthia. I am hoping the moisture control feature of the Miracle Grow combats this. Luckily, I am just keeping them indoors for a couple more weeks until it warms up in these parts and then they can move outside and re-pot if needed.
We have decided to truncate our feed to help protect against stolen content. I apologize for any inconvenience. Please love us anyway. 🙂

Industrial Light {DIY Style}

April 2, 2013 By Michelle Barneck 2 Comments

Hello A Little Tipsy readers!  It is quite exciting to be here as a contributor.  You can usually find me at my blog House Vintage where I share DIY projects, vintage finds and ways to fill your home with what you really love. Industrial chic is everywhere right now, and I must admit I have a little design crush on this look.  It is such a perfect mix of new and old, rustic and modern.  Today I am turning a salvaged metal cage into an industrial style pendant light.  Let me show you how.

This project began when I found an old and very dirty metal cage at a flea market.  I brought it home for $1 and knew it was the perfect starting point for a new light, after some cleaning of course! Also necessary to this project is a light cord (I usually buy mine from IKEA) and a vintage style light bulb.  The bulb was the most expensive supply. You can typically find them at any hardware store for around $10.

This particular cage opened to accommodate changing the light bulb, but I did need to find a way to keep it closed the rest of the time.  I used a simple fine gauge wire and threaded it through the two openings.  You will want to use a wire that is easy to bend.

Next, screw the light bulb into the cord, and insert the light cord and light bulb into the cage.  Use the wire to tighten the cage around the threaded end of the cord.  Once it is secure, cut off the excess wire.  Be sure to turn the pointy end of the wire under, so there are no sharp edges exposed.

And there you have it….a great vintage looking industrial pendant light.

The only thing left to do, is to find the perfect spot to hang it in your home.  I think I could cuddle up with a good book right here!

———————————————————————-
Oooh, I have a design crush on it too! It is beyond perfect with that brick! Thanks for sharing your fantastic find turned industrial light with us Ali.
We have decided to truncate our feed to help protect against stolen content. I apologize for any inconvenience. Please love us anyway. 🙂
« Previous Page
Next Page »

  • Bloglovin
  • Facebook
  • Google+
  • Instagram
  • Pinterest
  • RSS
  • Twitter

Hi there! I'm Michelle. Mother of three little boys and one little princess. Welcome to A Little Tipsy, a place for exploring creativity and sharing inspiration.

Follow on Bloglovin


Visit Michelle Barneck {A Little Tipsy}'s profile on Pinterest.

Tutorials by Category


15 Family Reunion Games

Family Reunion Games Collage

15 Sprinkle Party Ideas

Sprinkle Birthday Party
Creative Commons License

© Copyright 2014 A Little Tipsy · Site Designed by The Fairy Blogmother · Web Hosting by RFE Hosting

This website uses cookies to improve your experience. We'll assume you're ok with this, but you can opt-out if you wish.Accept Read More
Privacy & Cookies Policy