A Little Tipsy

Creative Tips & Ideas

  • home
  • About Me
  • the tipsy top
  • press
  • projects
  • contact me
[print_thumbnail_slider]

Making a Bedskirt and DIY Toy Storage Pockets

March 25, 2011 By Michelle Barneck 16 Comments

Remember a while back when I told you I was part of a fun new group called Point of View who would be showing you our takes based on a theme? Well, it’s time!! Today is the day. The reveal if you will. This month’s theme was SKIRT. So take a look around, see which point of view matches yours and even link up your own! But, first, take a look at mine cause I am like a proud project parent just waiting to show what I have been working on.

One of these things is not like the other…

1. Amy {Ameroonie Designs}
2. ME & here you are for the tutorial!
3. Camilla {Rosy Red Buttons}
4. Gwen {Gwenny Penny}
5. Stacy {Not Just a Housewife}
6. Jonie {Just Between Friends}

You can link up your point of view on the skirt theme over on Stacy’s page!

Being the lack lustre seamstress in a house full of boys, here is my point of view on the skirt theme. Enter the no-sew bedSKIRT and DIY toy storage pockets upcycled from an old cargo SKIRT for my 3 year old’s room! See how I worked the theme in there. 😉

Let’s start off with making a bedskirt. Seriously, this is a no-brainer people. It took me all of 5 minutes and was, in true Tipsy fashion, FREE!

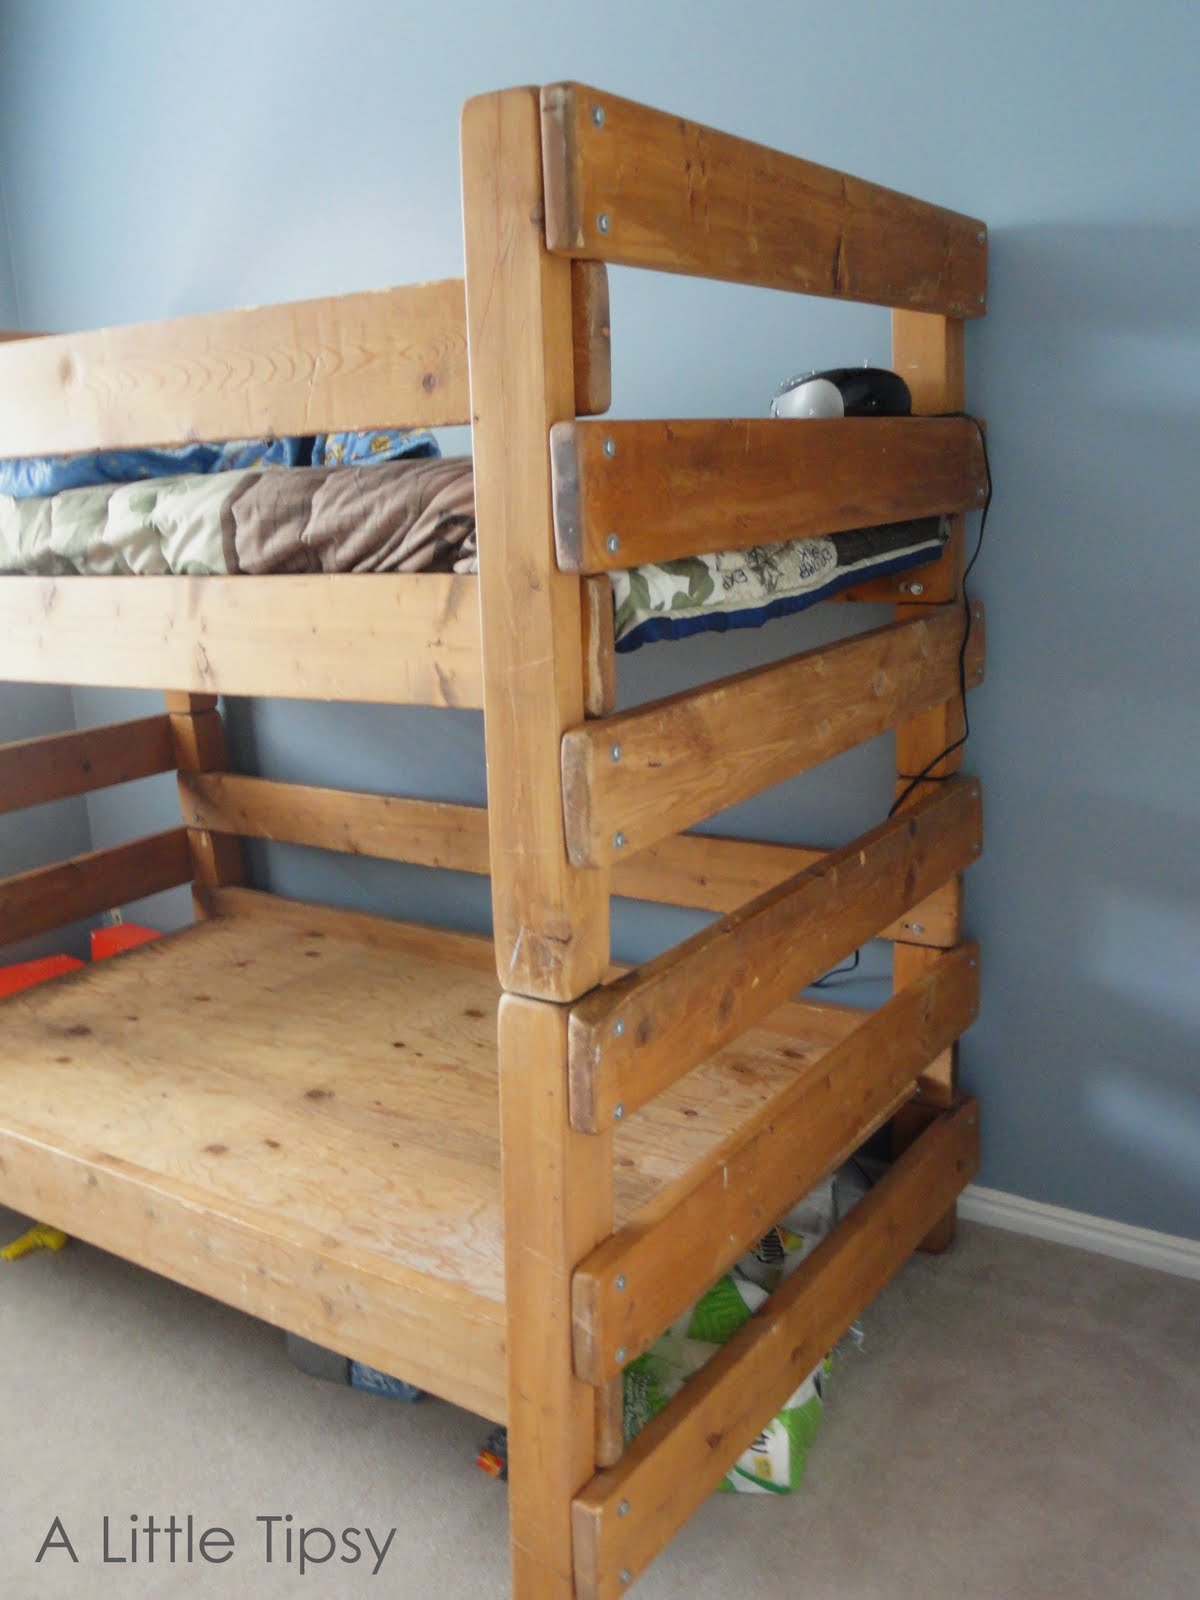
We have this bunkbed that my father-in law built and my husband grew up sleeping on. Sentimental, yet fun and rustic, perfect for the developing Paleontology theme (see more on that soon). There is always a collection of junk under there, some from my latest Costco run and some from the little guy hiding when I catch him awake during nap time. Either way, not pretty and full of clutter.

So here’s the kicker, grab the flat sheet (which my son refuses to sleep with anyway) drape it over the bed frame so it ripples a bit with the edges hanging to the floor.

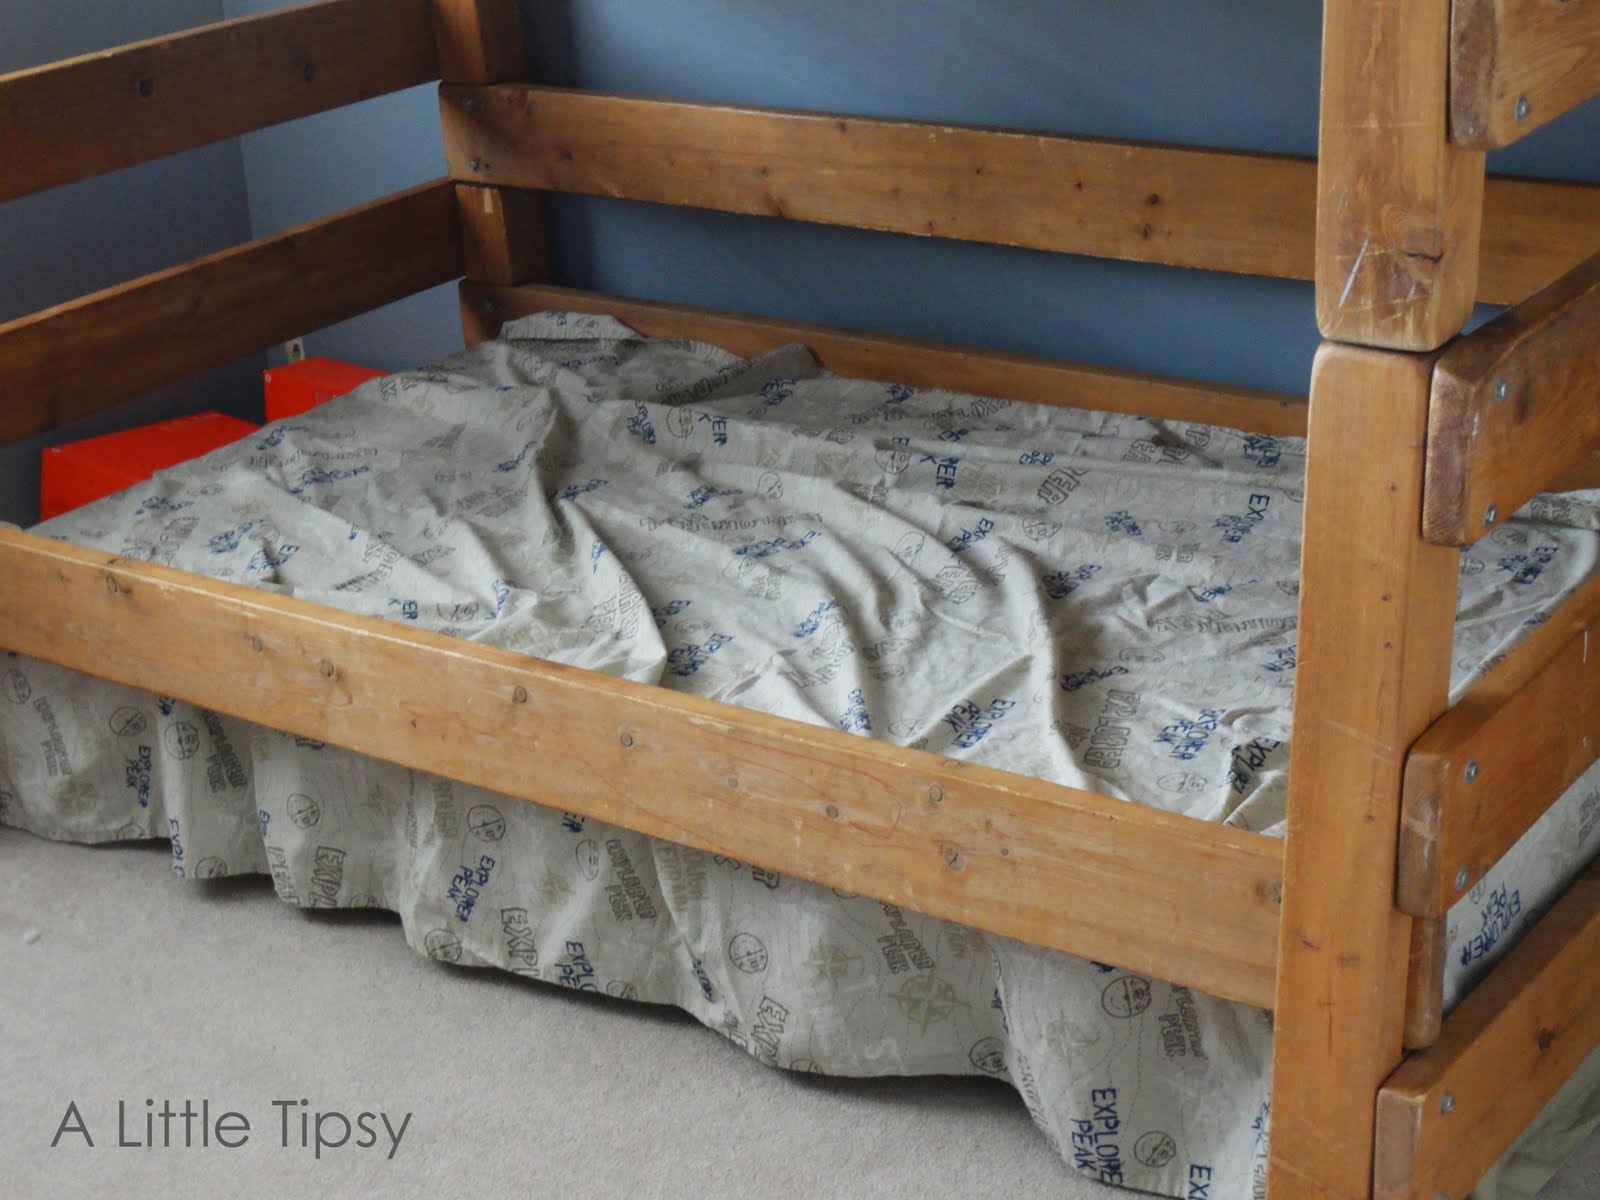
Plop the mattress and other bedding on and ta da, you’ve got a matching set!

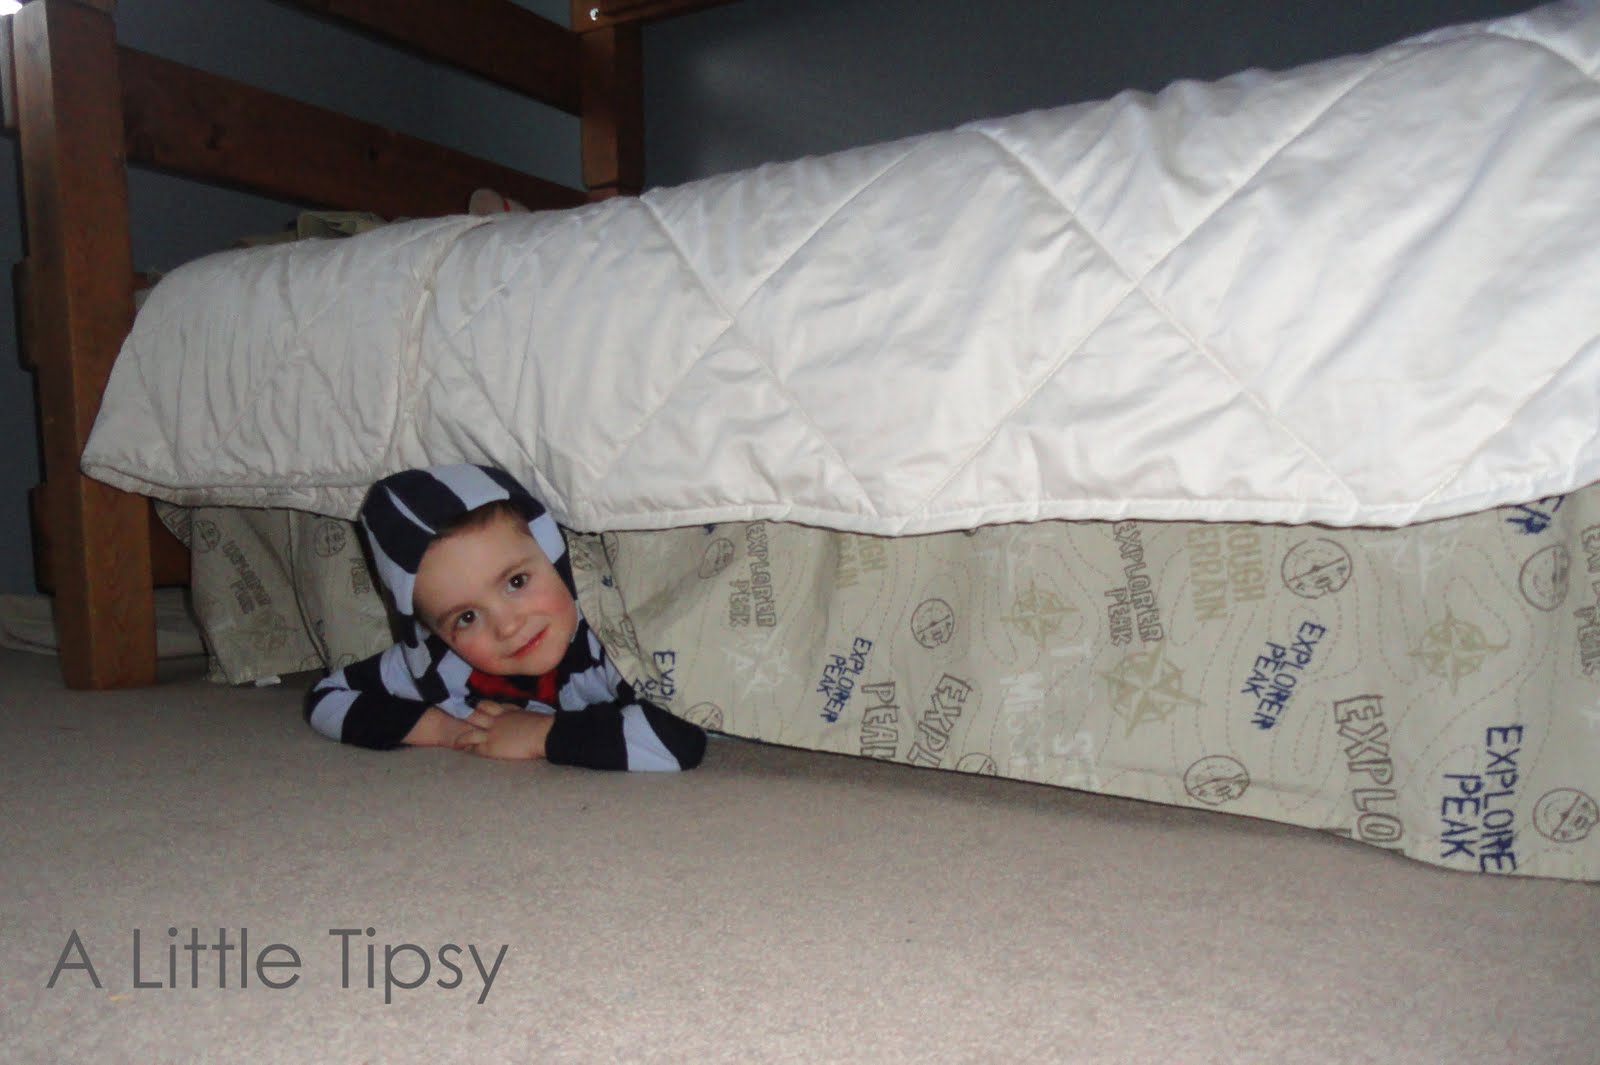
And now it’s an even cooler hiding spot.

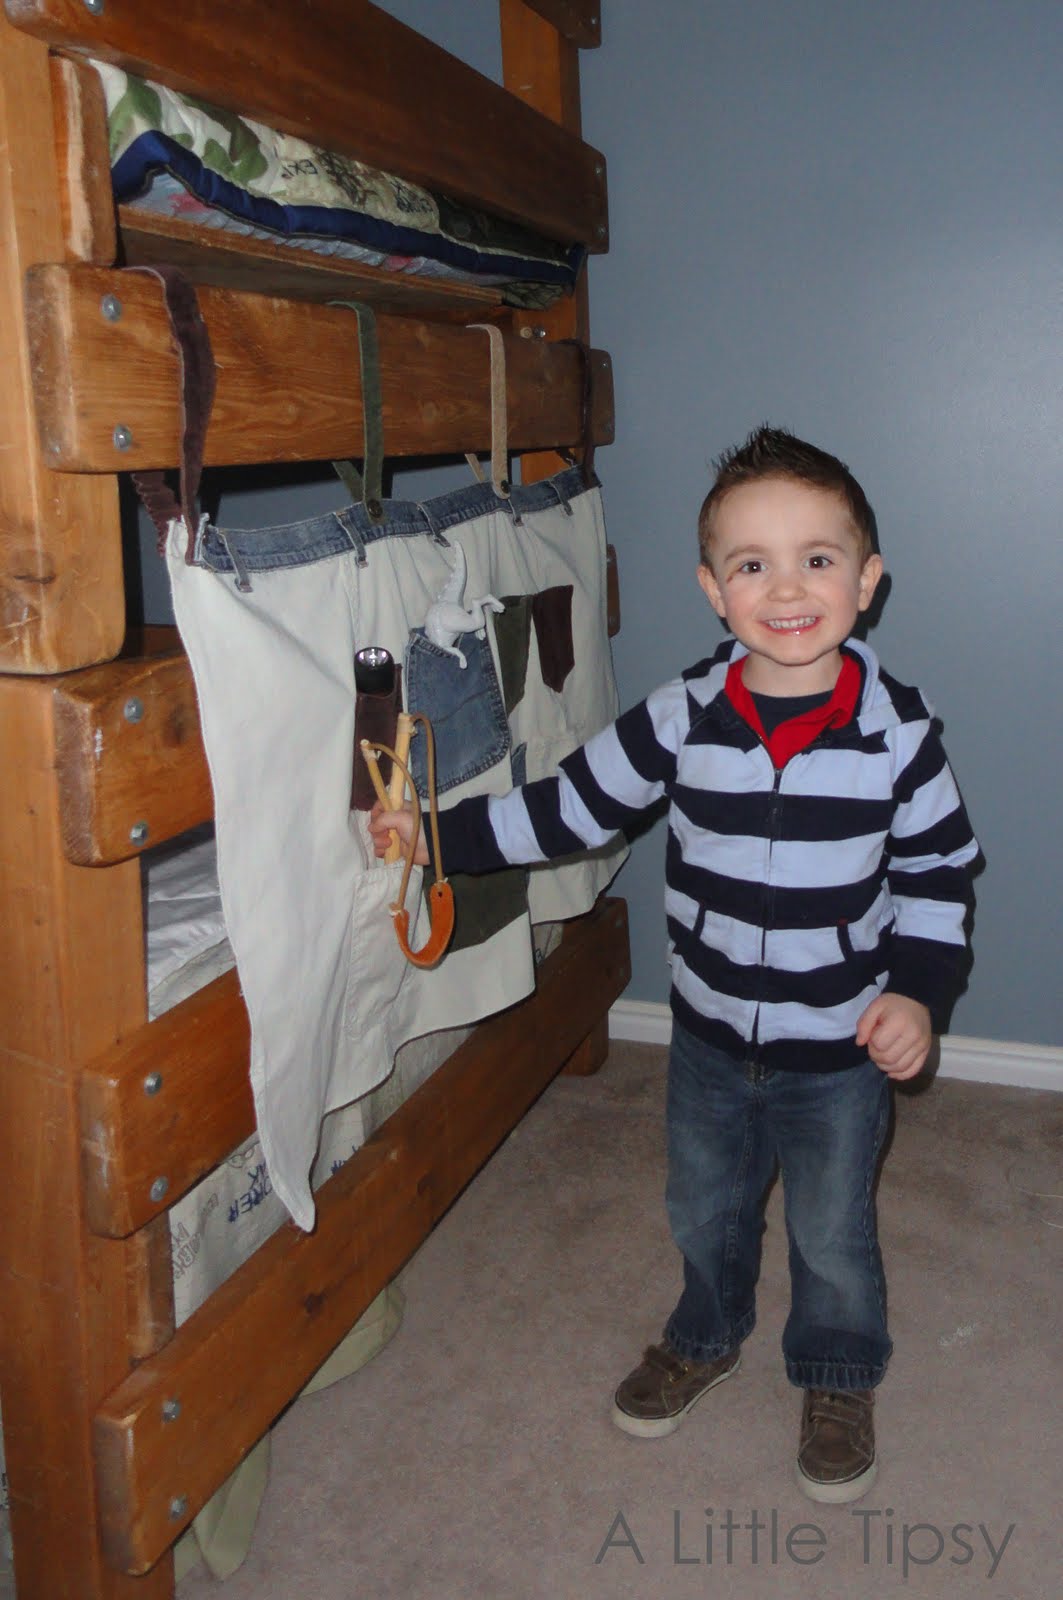
Now for the bare stair. My son always climbs the other side of the bed, so I thought it would be fun to make some DIY toy storage for him to keep all his little treasures. And get this, this project was free too! My husband is going to shout for joy!

It all started with this fantastical box of a cargo skirt that I have had for years and have not worn in well, years. Add to it the pair of hubs jeans that bit the dust recently (pretty sure he wore those in our engagement pics). Then, just for kicks take the pockets from a couple of corduroy maternity pants that were hand me downs from someone much shorter than myself.

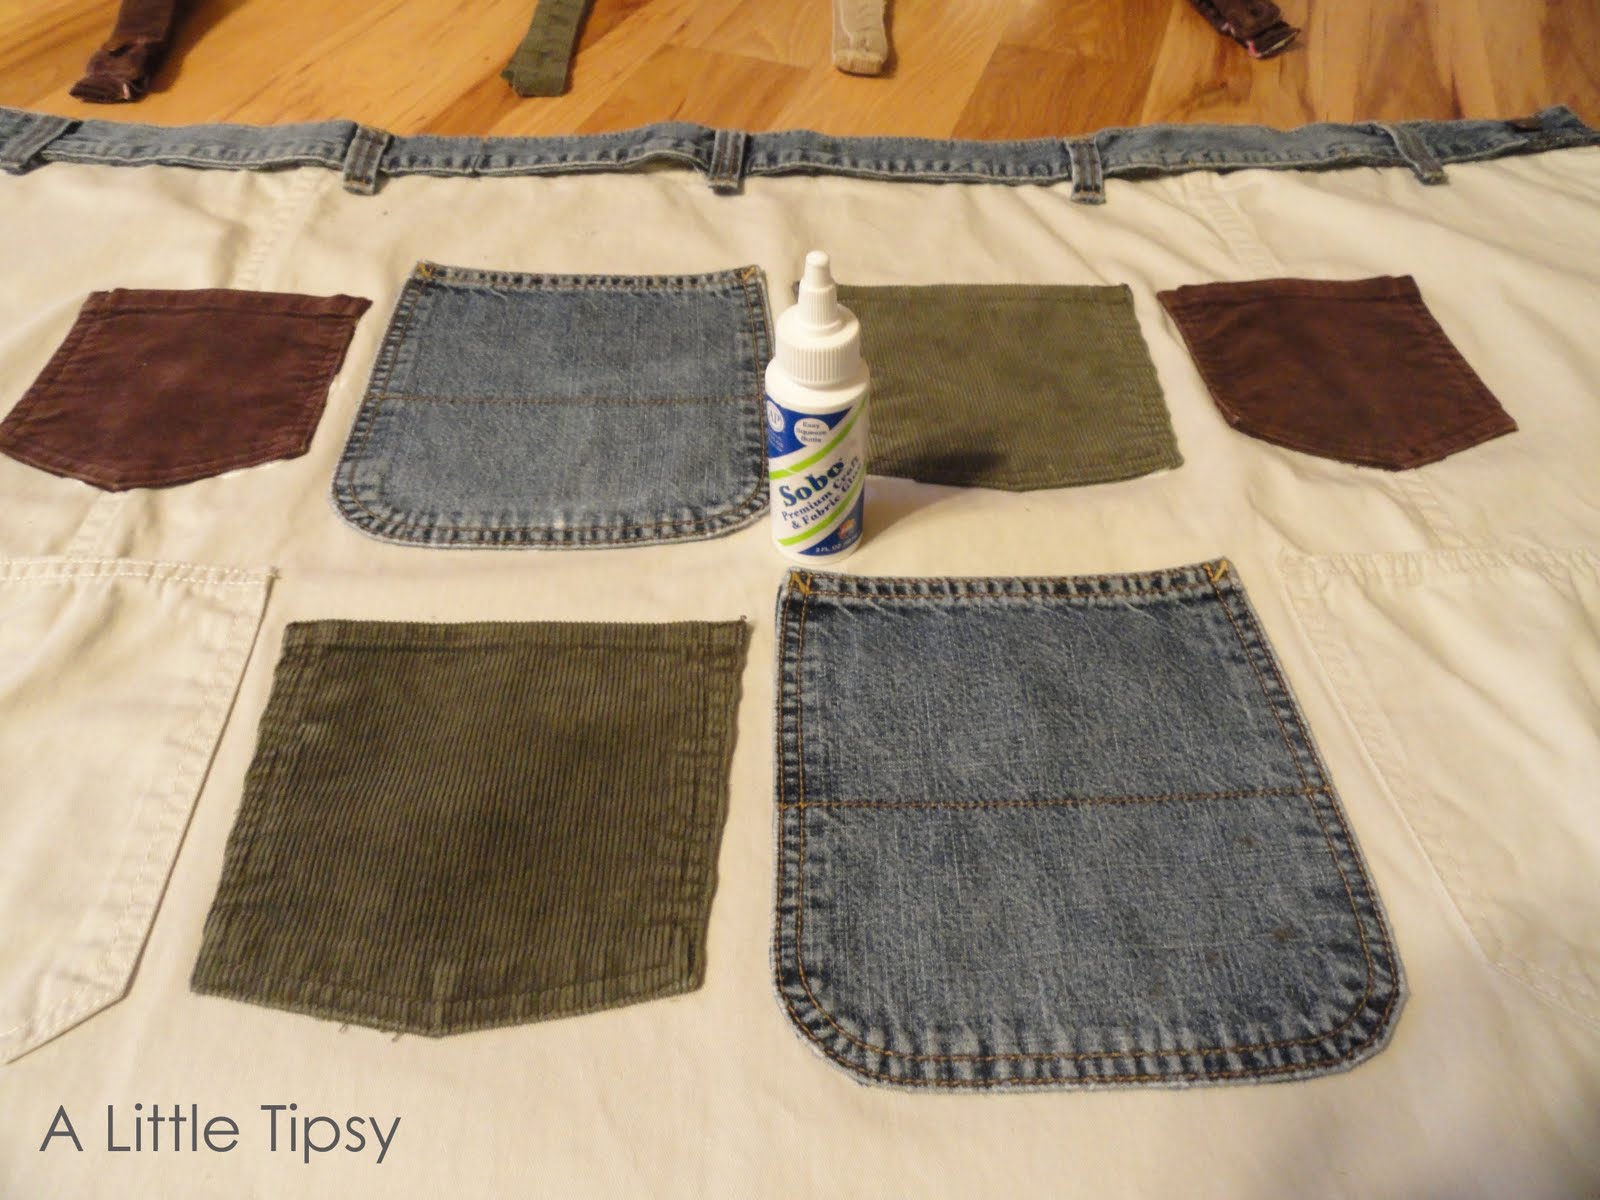
Slice and dice that baby right down the back seam so it’s a big open rectangle. Cut the pockets off the pants including the back fabric so it is a little envelope. This way the pocket is more durable


Grab your pockets and waistbands (used for hanging on to the steps) and play around with them until you get a placement that you like.

I wanted to keep it as no-sew as possible so I attached all the pockets with fabric craft glue.

I wanted each of the loops to have a button and be removable so I could take the toy storage pockets off the bed. I glued the back of each loop between the denim waistband and the cargo skirt to secure it. Since I used waist bands from pants, I automatically had a button on one end and a button hole on the other. So I used the button hole on the loop’s waistband and the button on the other half of the waistband to make the two end loops.

In the middle, I glued a random denim button on and used velcro for the re-usable closure. On the other one I used a denim button pin (in a pack of pant waist extenders) I had from the Dollar Tree.

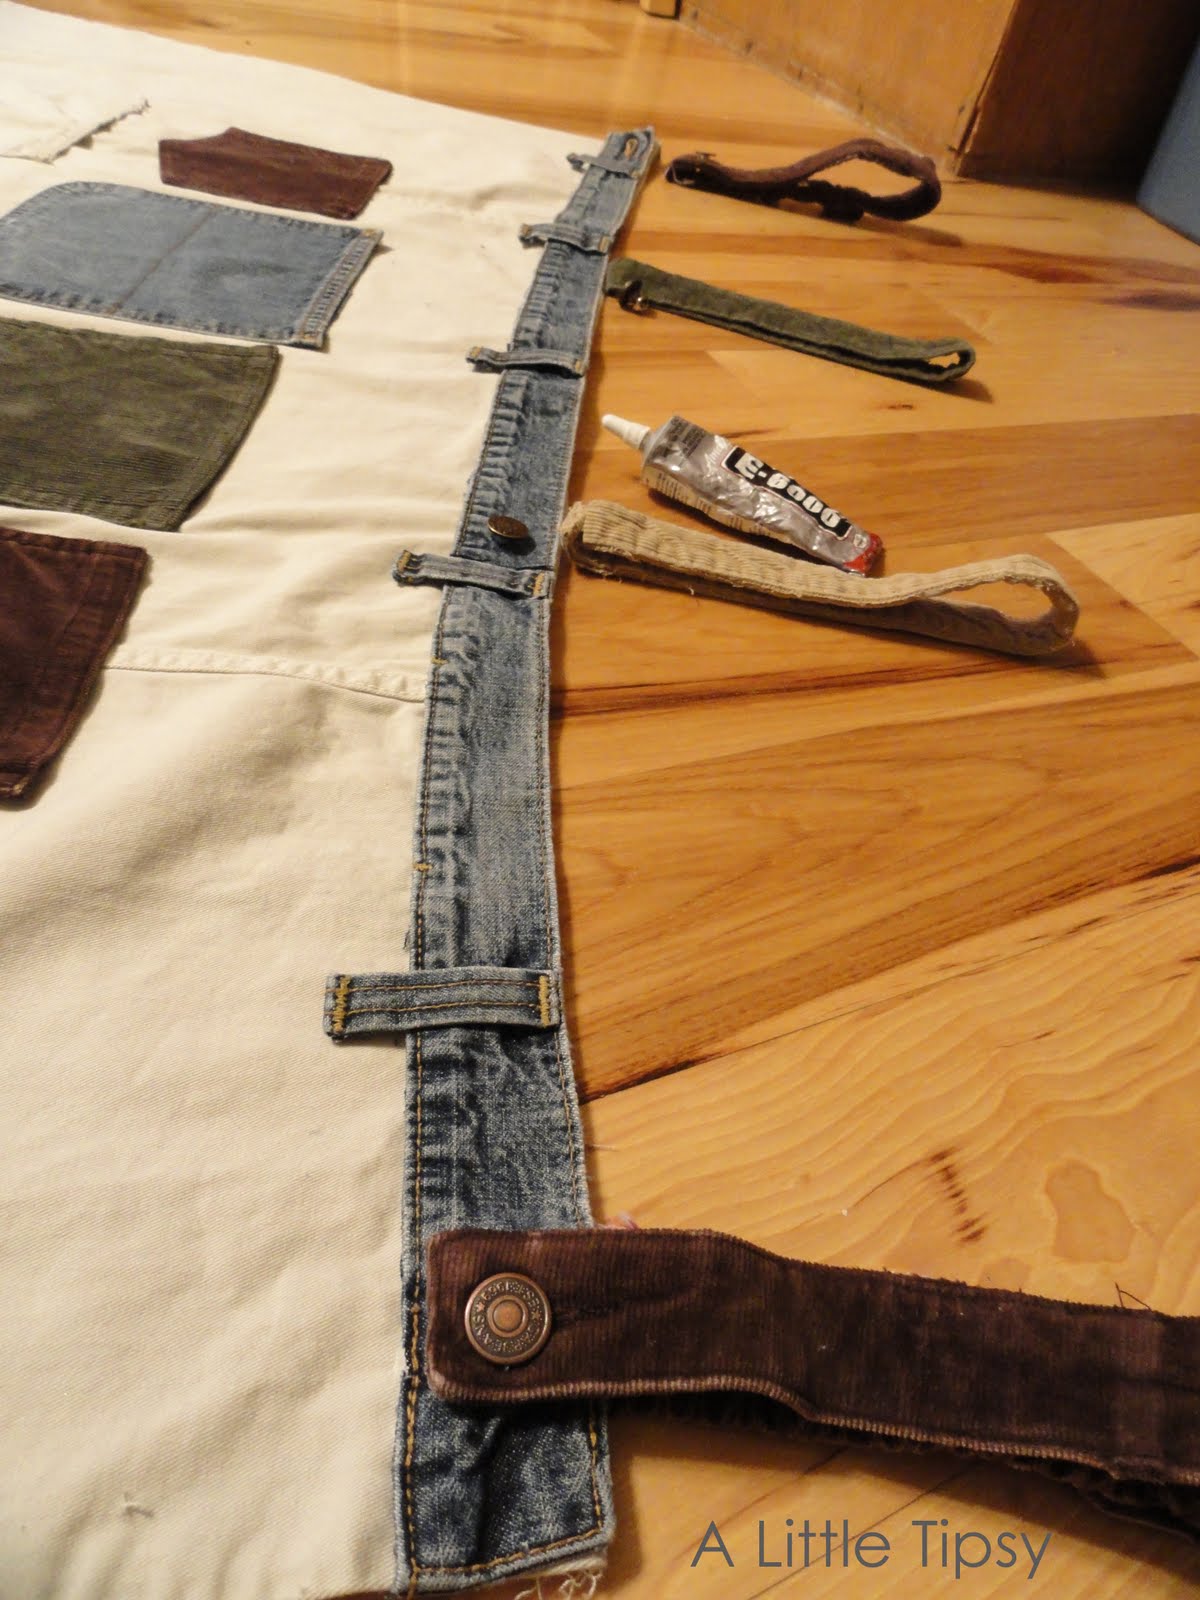
Let it all dry overnight so it is secure and then roll the edges of the skirt back to have a clean edge and zig zag stitch with coordinating thread.

Hang your DIY toy storage pockets and let your little one fill them with their treasures!

The unveiling…

Now that you’ve seen my point of view on the SKIRT, go check out some of the others and link up your skirt if you have one! We’d love to see it!

P.S. Don’t forget to sign up for free Tipsy updates via RSS or email.

We have decided to truncate our feed to help protect against stolen content. I apologize for any inconvenience. Please love us anyway. 🙂

DIY Under $5: Flower Monogram Frame

March 16, 2011 By Michelle Barneck 15 Comments

I have a fun new series to introduce today!! We’ll be calling it
DIY Under $5.

Each week I will feature a project that was done for five dollars or less. I think this will be really fun and will showcase some super budget friendly projects! I am really excited about it and hope you will be too! I am also going to include a place for you to link up your $5 or less projects so we can all be inspired by each other! Get ready for some totally affordable fun! Now on to our first project!!

Flower Monogram Frame

Supplies:

  • Wood frame (50 cents thrift store, easily found for $1 at craft store)
  • Decorative packing tape ($1 Michael’s)
  • White & Black Craft Paint
  • Exacto knife
  • Cutting board
  • Scrap paper
  • Chalk
  • Buttons
  • 3-D adhesive squares
  • Glue dots

Total project cost: $1.50

1. Paint the frame. I used black on the edges and white on the front because the monograms on my tape were clear and I wanted them to be white.

2. Cover the frame with tape. I placed mine with the bottom of the B’s always facing the center.

3. Place the frame tape side down on a cutting board and using an exacto knife trim the excess.

4. To make a flower, cut three paper squares that gradually get smaller. I did the biggest and smallest in turquoise and the middle in white. Cut a flower with 8 petals (a petal from each side and a petal from each corner make it super easy to gauge where to place them) from each square.

5. I added chalk around the edge of each petal to add more depth. Teal on the turquoise and yellow on the white.

6. Curl each petal around a marker to make it stand out a bit.
7. Assemble the flower, attaching the flowers with 3-D adhesive squares and the buttons with glue dots. Stick the flower to the frame with glue dots so you can change it out if you so desire.

OK, so now it’s time to link up!!

Please remember:

  • Only link projects that cost you $5 or less (price does not have to include items you had on hand)
  • You can link past projects that fit the dollar limit
  • Please link back so others can join the party

DIY under $5

Linking Up:
Look What I Made
Whatever Goes Wednesday
Sugar & Spice & Everything Nice

P.S. Don’t forget to sign up for free Tipsy updates via RSS or email.

We have decided to truncate our feed to help protect against stolen content. I apologize for any inconvenience. Please love us anyway. 🙂

St. Patrick’s Printable {Oh So LUCKY to Have You}

March 3, 2011 By Michelle Barneck 12 Comments

Here’s the St Patrick’s Day Printable as promised. You are welcome to print one out for yourself. Just click the image below to enlarge.

If you missed the St Patrick Crafts display…

I love it in the green display with the pics of my boys.

Linking Up:
I Share Printables
Kirstikoo Green Link-Up
Strut Your Stuff
Show Off Your Stuff

P.S. Don’t forget to sign up for free Tipsy updates via RSS or email.

We have decided to truncate our feed to help protect against stolen content. I apologize for any inconvenience. Please love us anyway. 🙂

St Patrick Crafts

March 2, 2011 By Michelle Barneck 19 Comments

With so many cute St Patrick Crafts floating around, I was GREEN with envy. So, I got to work during nap time and made a green display of my own. I did not purchase anything new for this shelf. I was surprised how many green items and supplies I had on hand. This may look familiar to any facebook fans. 🙂

I made the “Oh so LUCKY to have you” sign and will have the printable posted for you soon! (I didn’t want this post to be monstrous!) I will also explain the vase if anyone is curious.

For now, let’s take a closer look at the Shamrock banner shall we.

Supplies:
  • cardboard
  • green fabric scraps
  • green scrapbook paper
  • green ribbon
  • hot glue
  • 3D shamrock stickers

For starters, make your shamrock. Cut out three hearts and a trianglish stem shape from some food boxes you have in the recycle bin (that ones for you Kim.) I used a muffin box and a cereal box.

Next, wrap with fabric scraps and secure with hot glue. If you need more detail, refer to my fabric heart tutorial.

I added a 5 inch lollie and a little bow with hot glue.


String that baby onto a ribbon with a few more lollies secured with paper clips and you’re good to go! There is a good lollie tutorial from Margie Aslett, so I won’t reinvent the wheel. The shamrocks in the middle are 3D stickers I left over from last year’s scrappy shamrock wreath.

Linking Up:
Visit thecsiproject.com
Kirstikoo Green Link-Up
Transformation Thursday
Strut Your Stuff
Show Off Your Stuff

P.S. Don’t forget to sign up for free Tipsy updates via RSS or email.

We have decided to truncate our feed to help protect against stolen content. I apologize for any inconvenience. Please love us anyway. 🙂
« Previous Page
Next Page »

  • Bloglovin
  • Facebook
  • Google+
  • Instagram
  • Pinterest
  • RSS
  • Twitter

Hi there! I'm Michelle. Mother of three little boys and one little princess. Welcome to A Little Tipsy, a place for exploring creativity and sharing inspiration.

Follow on Bloglovin


Visit Michelle Barneck {A Little Tipsy}'s profile on Pinterest.

Tutorials by Category


15 Family Reunion Games

Family Reunion Games Collage

15 Sprinkle Party Ideas

Sprinkle Birthday Party
Creative Commons License

© Copyright 2014 A Little Tipsy · Site Designed by The Fairy Blogmother · Web Hosting by RFE Hosting

This website uses cookies to improve your experience. We'll assume you're ok with this, but you can opt-out if you wish.Accept Read More
Privacy & Cookies Policy