A Little Tipsy

Creative Tips & Ideas

  • home
  • About Me
  • the tipsy top
  • press
  • projects
  • contact me
[print_thumbnail_slider]

Creative Picture Frames

September 17, 2012 By Michelle Barneck 4 Comments

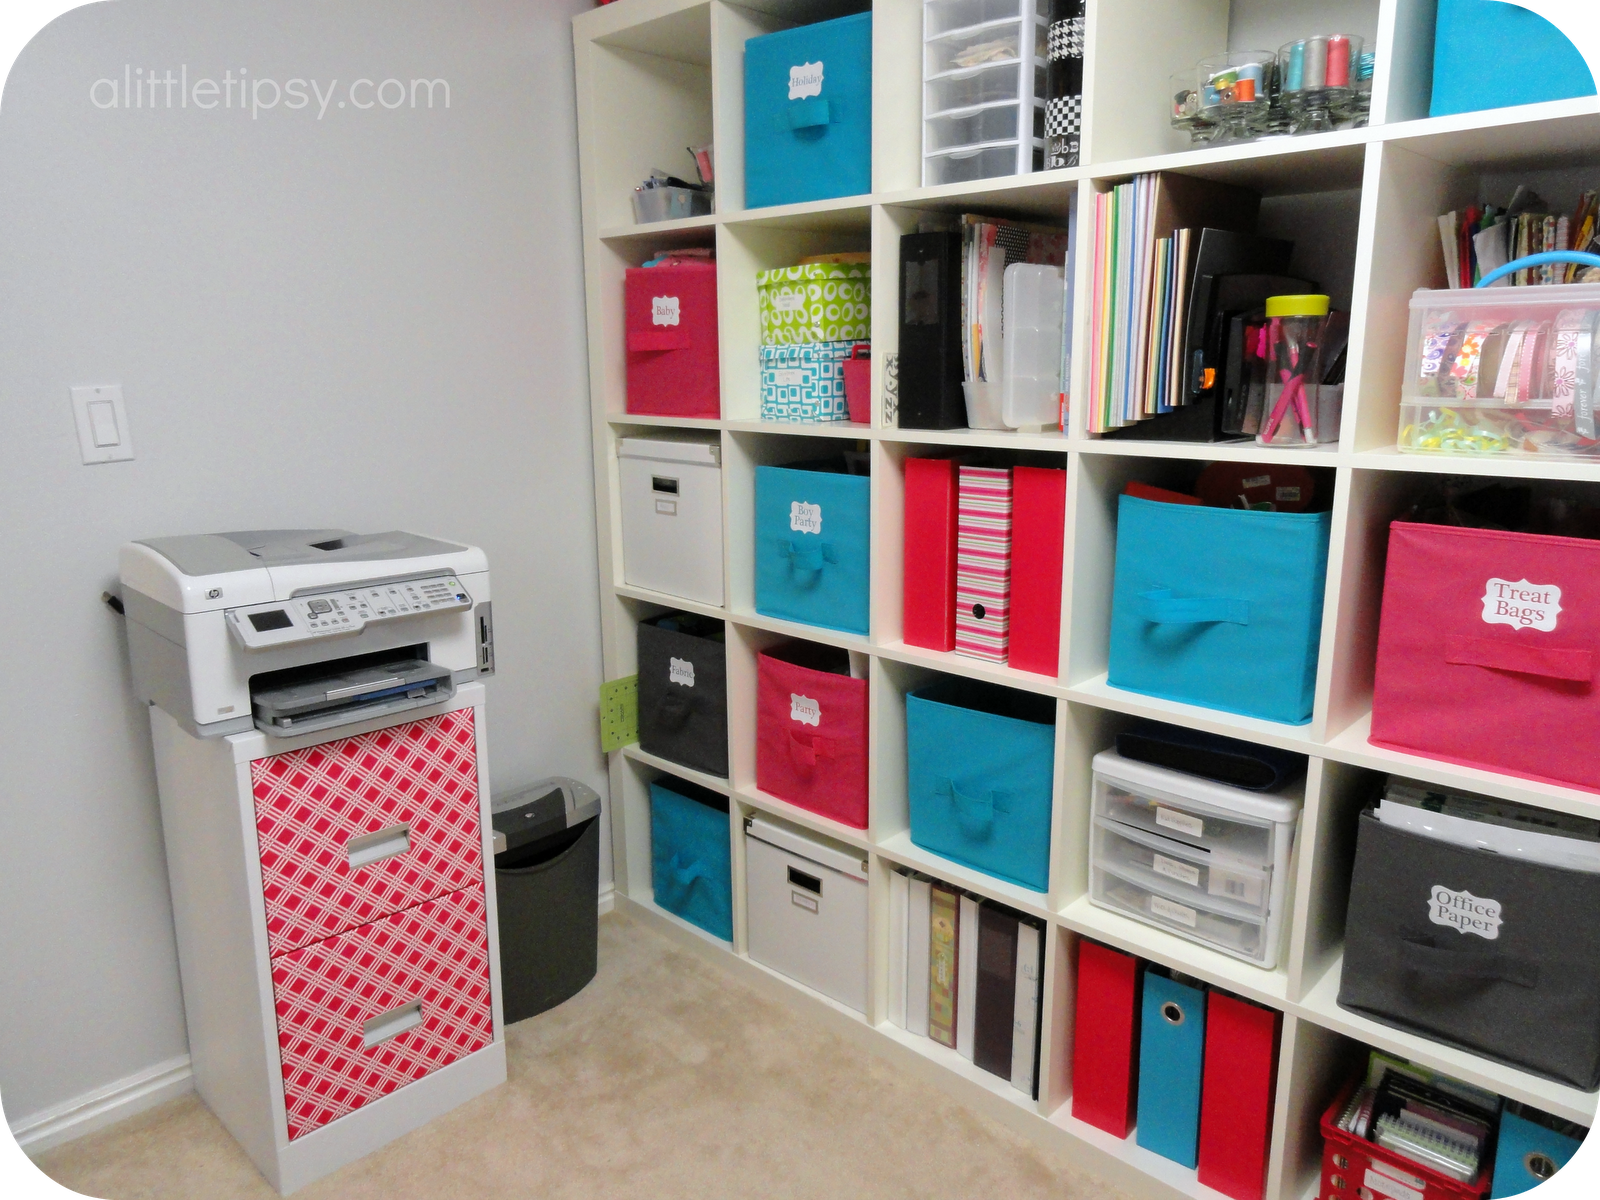
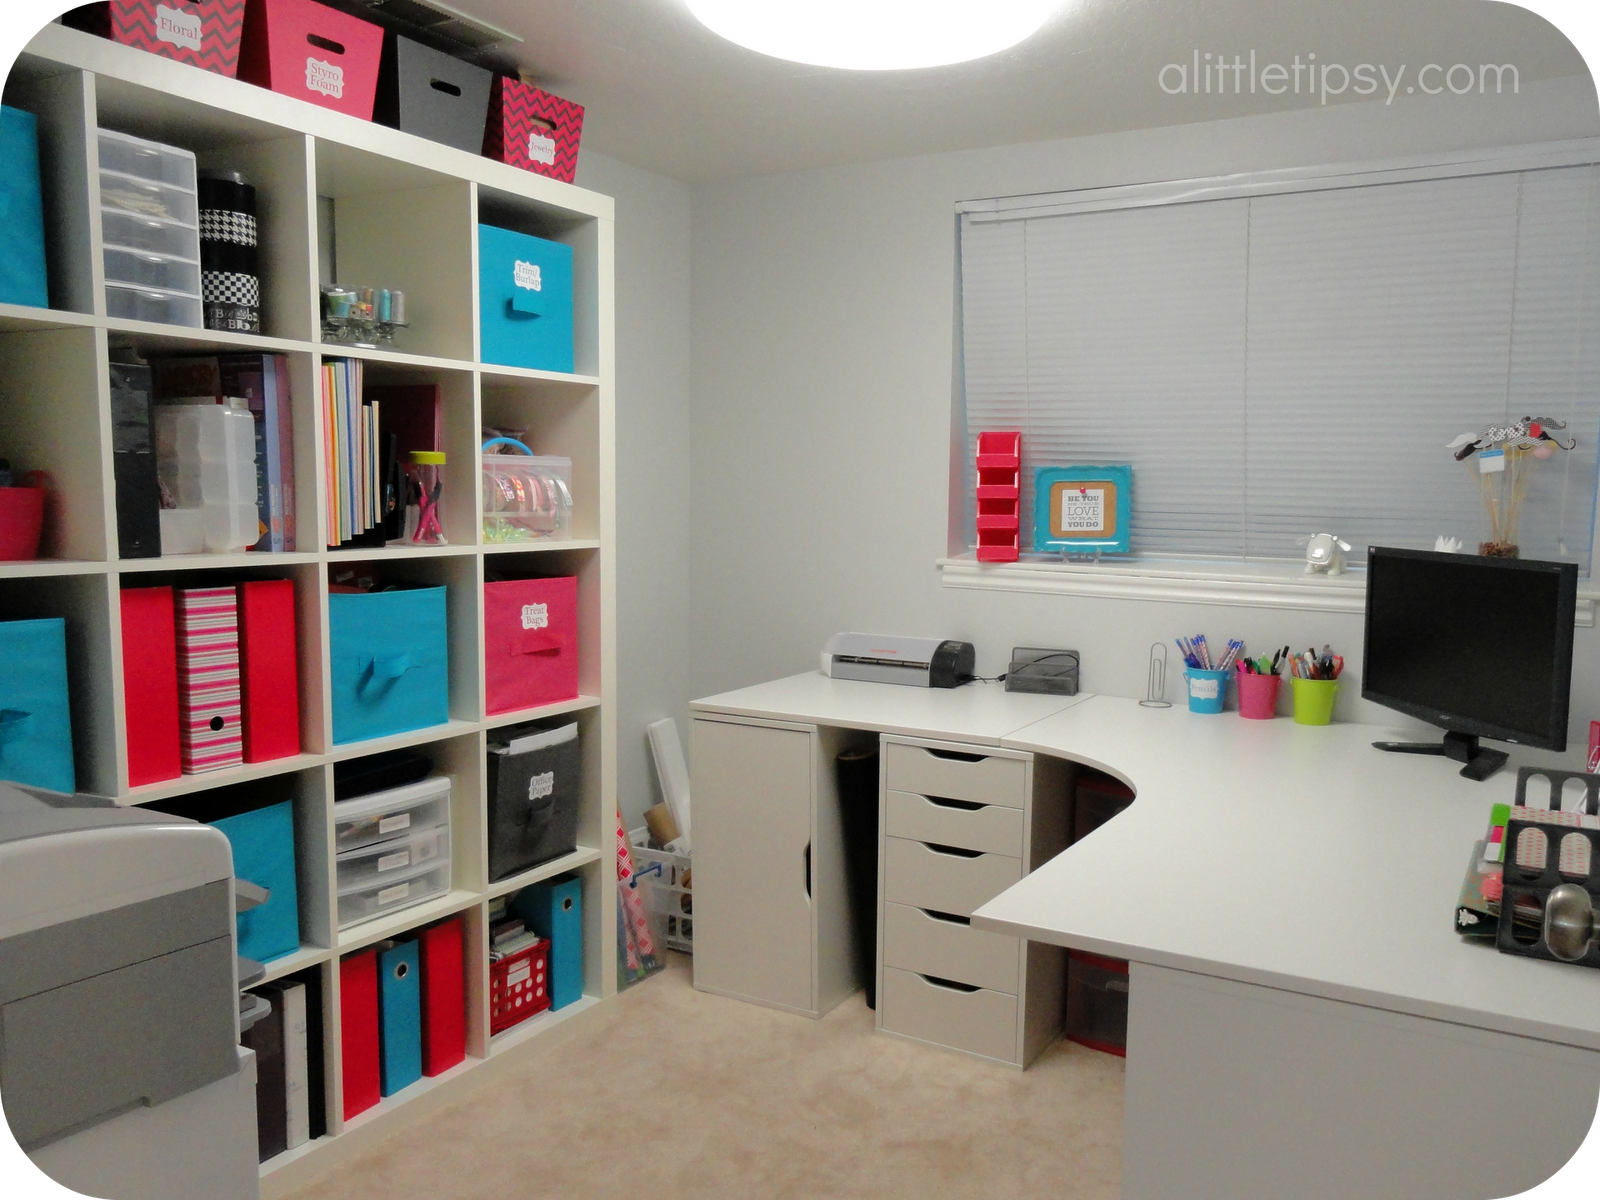
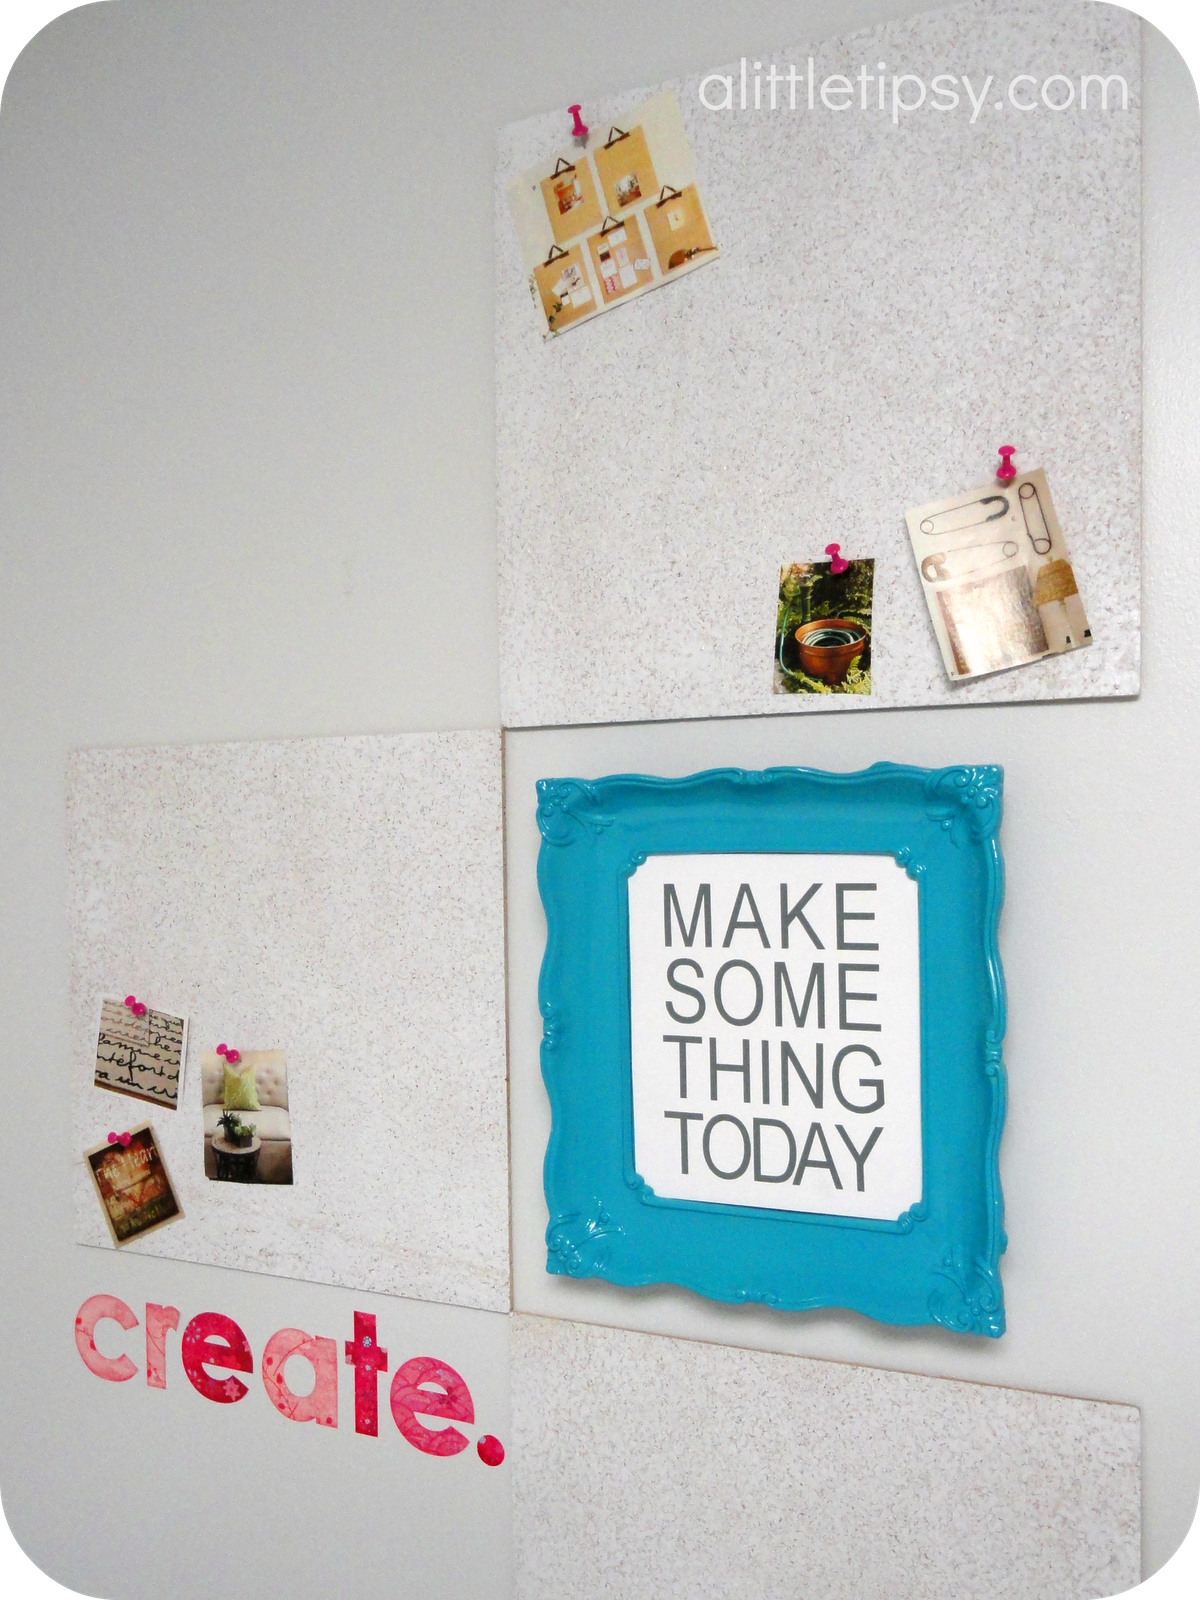
Picture frames are a great way to add pops of color without committing to a large expensive piece. I used three chunky frames in my new office/craft room to house quotes that I love. 
I started with these thrift store frames…
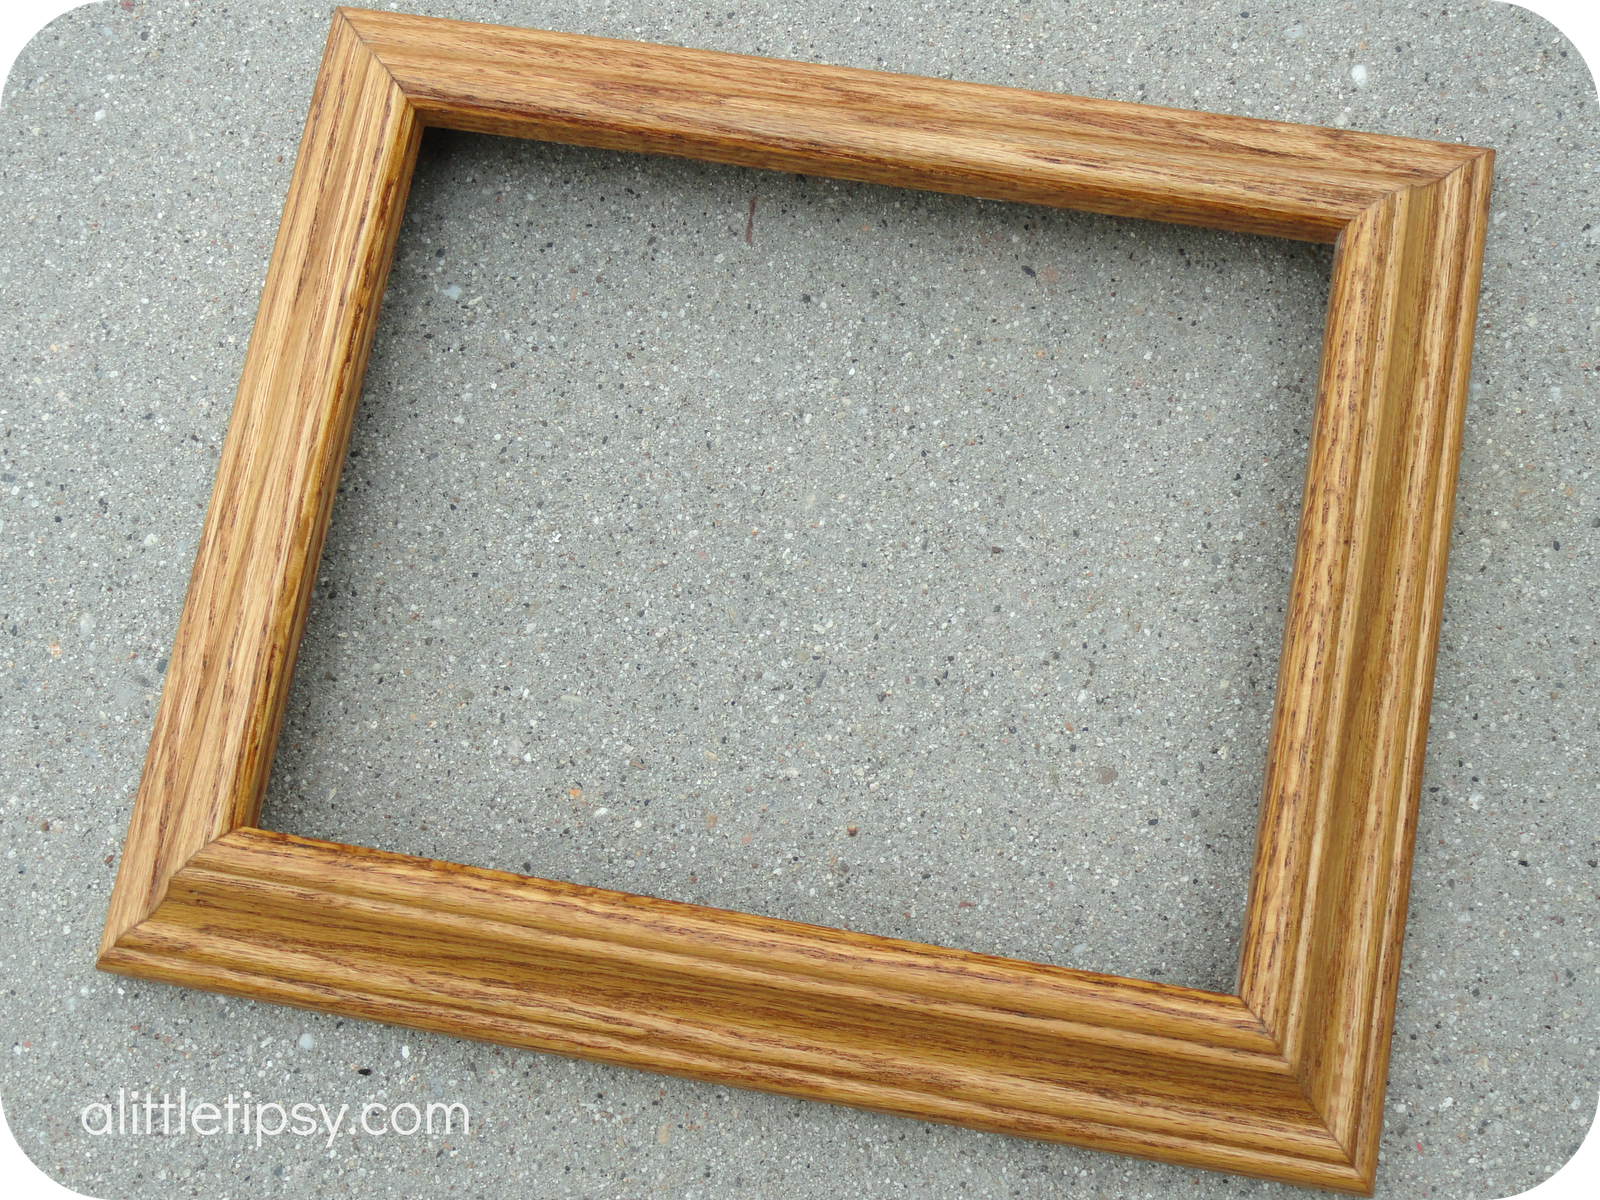
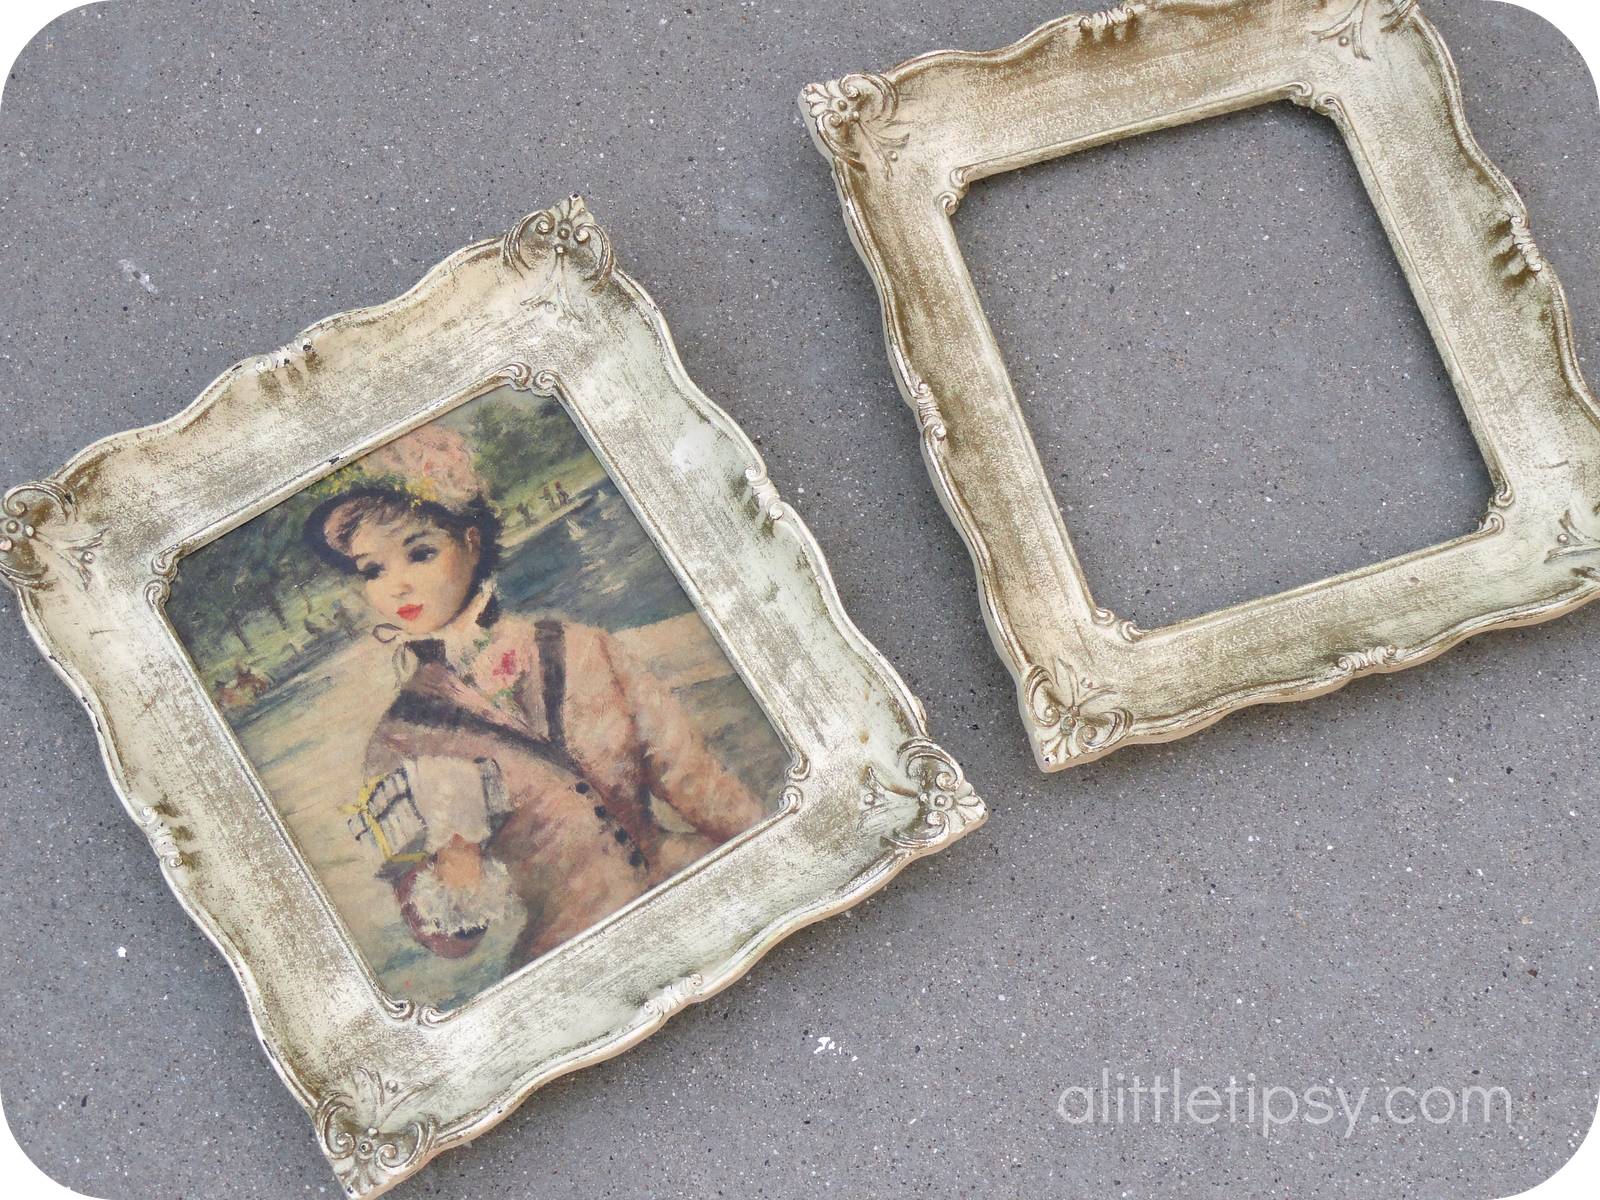
and with a few coats of Valspar gloss spray paint in Exotic Sea, a little vinyl, cork, and creativity ended up with these fun additions to my craft space.

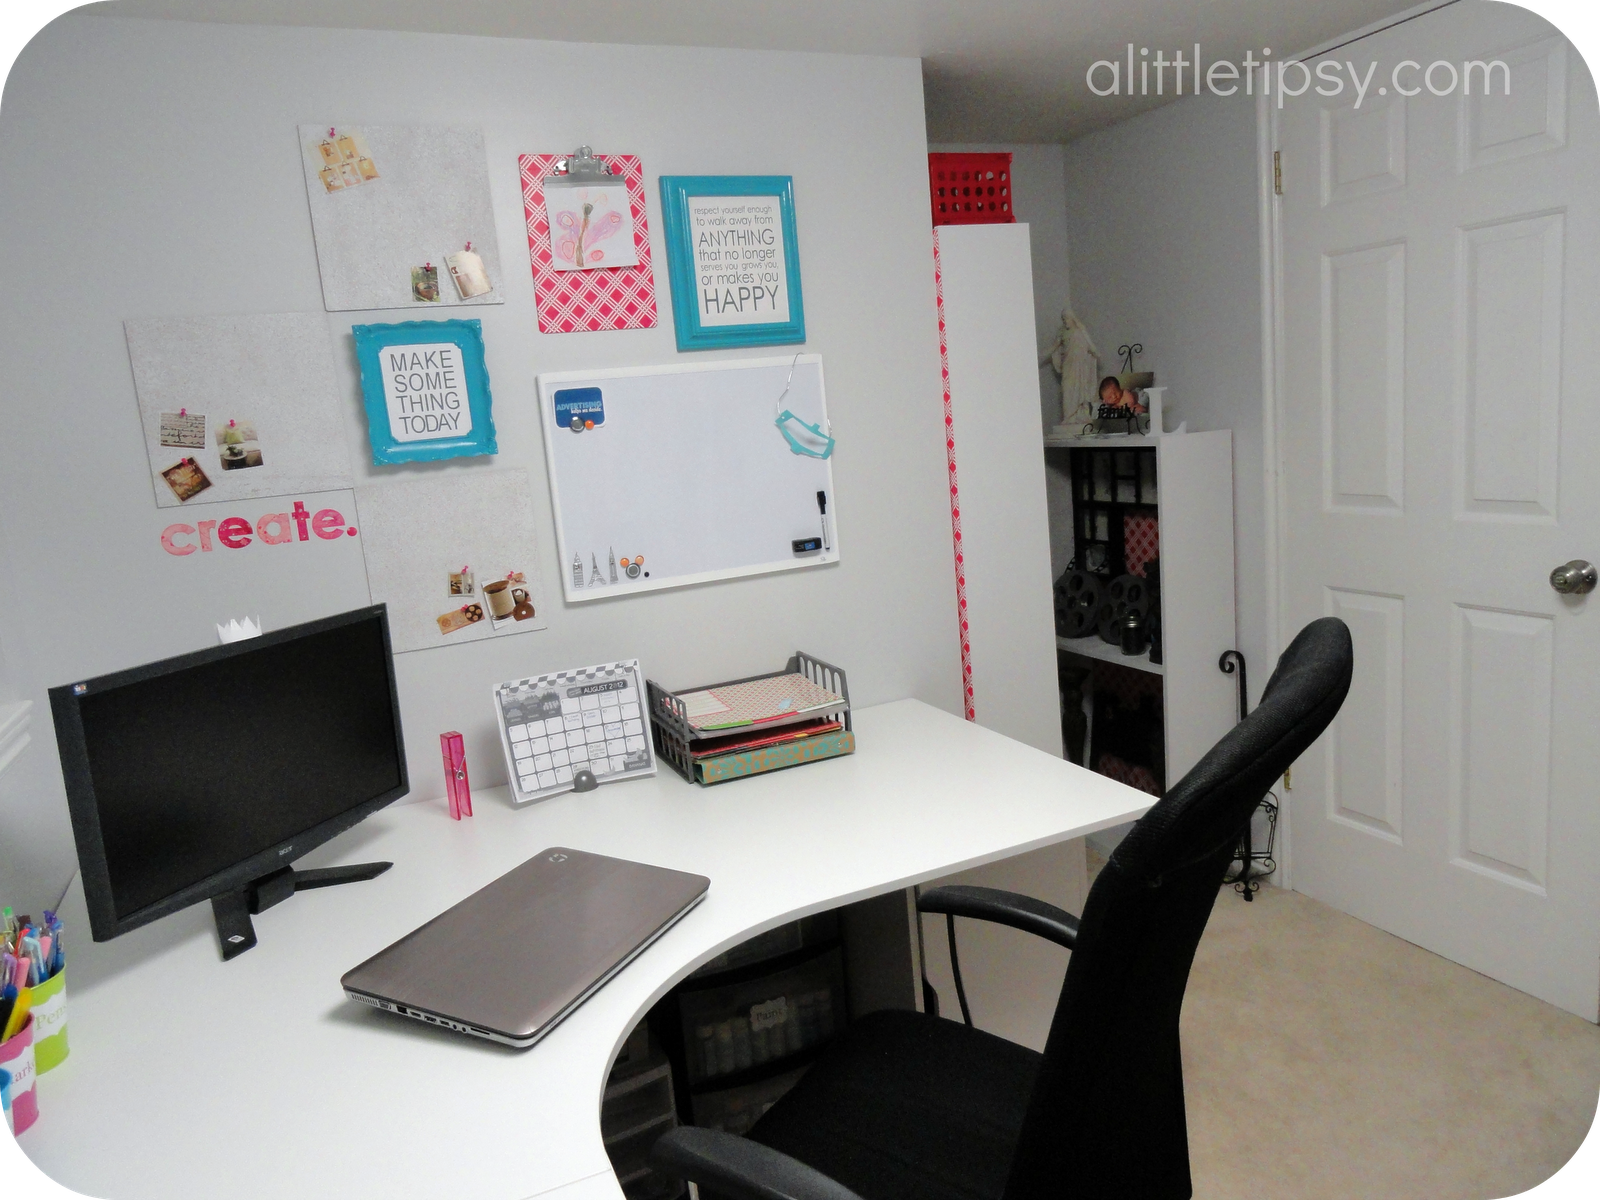
I love this reminder to simply Make Something Today. That’s really what this space is all about. Creating something whatever it may be.

Quote inspiration
I think as women we sometimes have a hard time saying “NO.” This quote reminds me to fill my time with things that better my life and clear it of what may be good, but is just cluttering my life from what is best. It reads, “respect yourself enough to walk away from anything that no longer serves you, grows you, or makes you happy.”
Quote inspiration
This last one is my favorite of the creative picture frames in my space. I simply inserted a piece of cork and added a printed quote with a push pin. I love the dimension and texture it adds to the space. The quote says, “Be you. Be true. Love what you do.”
Quote inspiration
What do you think? Have you used creative picture frames to update or add color to a space?
Click here to see more of my craft room.

P.S. Don’t forget to sign up for free Tipsy updates via RSS or email.

We have decided to truncate our feed to help protect against stolen content. I apologize for any inconvenience. Please love us anyway. 🙂

EasyMake Bedding for Kiddos

September 13, 2012 By Michelle Barneck Leave a Comment

 You know where I find my son’s comforter every morning? In a pile next to his bed. We long ago discarded the flat sheet. It was more of a tangle hazard than anything. What if I told you that your five year old could make his bed by himself every day? Comforter sheets and all. Sounds like a myth right?
That’s what I thought too…

I was contacted by Easymake to try out their bedding that makes it super easy for kids to make their beds. How does it do that you may ask? Zippers. Zip the comforter to the flat sheet and the flat sheet to some panels on the fitted sheet and voila. Genius.
The panel holds the blanket and sheet in place as to avoid the aforementioned bedside pile in the morning. I don’t know who was more excited to try it out me or my son. We put it through the ringer. Night after night of ninja sleeper. I swear I don’t know what that kid does in his sleep, but it is crazy. 
The first few nights the zipper was unzipping while he slept and the blanket would be disheveled or even off by morning. I was frustrated and even tried safety pinning it until I realized just today as I checked their site that we had put the bedding on upside down. The panels were supposed to be by his feet. Whoops! I felt a little better when I saw that the instructions on the website are more clear than those on the packaging.
As a sidenote there was also a flaw (shown above) on one of the panel zippers when it came out of the packaging.
So let’s review…
Cons:
Directions on packaging should be clearer like those on website
Quality control needs improvement (small tears in product)
Currently only comes in two colors
Pros:
Machine washable
Comes apart easily for washing
Classic look (goes with lots of decor and age groups)
Kids can make their own beds!!!
Saves time
Keeps blankets on the bed so they don’t get cold in the middle of the night
If I do end up making it, it looks like this in less than a minute…
Now that I figured out what was going on I really do love it. It’s fluffy and cozy for my little guy and sooo easy for me. It keeps the sheet and blanket together which is something I had given up on long ago.  Hurrah for chore time slashed!

I received product and a stipend from Easymake for my time. The opinions are obviously mine.

P.S. Don’t forget to sign up for free Tipsy updates via RSS or email.

We have decided to truncate our feed to help protect against stolen content. I apologize for any inconvenience. Please love us anyway. 🙂

File Cabinet Makeover

September 12, 2012 By Michelle Barneck 1 Comment

Now that you saw the overview of my craft room, it’s time to dig in to the details about how it all went down. Being that it is the first thing you see when you step in the room let’s start with the file cabinet makeover shall we?
She was well loved and frankly a bit gloomy when we started out, but a few coats of paint and some creative use of wrapping supplies and she’s a downright diva. 

You won’t believe how easy it is to take your file cabinet from blah to aah!


SUPER EASY FILE 
CABINET MAKEOVER

SUPPLIES:

  • Metal file cabinet
  • White Spray Paint
  • Wrapping Paper
  • Poster Tape
  • Xacto Knife
HOW-TO:


1. Wipe down the cabinet and make sure it is free from dust.

2. Spray paint the cabinet using lots of thin coats spraying off the edge as you go back and forth. I used a paint and primer in one so it would get a great finish fast. Let the paint dry.

3. Pull the drawers out and lay them with the drawer front up.

4. Cut a piece of wrapping paper a few inches larger than the face of your cabinet drawer.

5. Tape around the edges of your handle. Tape around the edge of the front of the drawer and on all the lips around the edge to wrap the paper around.

6. Carefully, from the middle to the edges, lay your paper on flat on the face of the drawer and wrap it around each edge folding down corners to make them flat like you would a present.

7. Trim the excess paper from the edges.

8. With your fingers lightly feel for the edges of the handle. Score the edges with a fingernail so you know where to cut then follow with an Xacto. 

9. Put the drawers back in place.

10. Move the cabinet in and let your files ride in style!

I love that with this method using the poster tape the paper is totally removable. If I decide in 6 months that I am over this pattern I am not committed. I can rip it off and replace with whatever new style I love. I can totally change the look with 10 minutes and a $3 roll of wrapping paper! Oh the joy of options!
What do you think? 
Would you paper your file cabinet?

P.S. Don’t forget to sign up for free Tipsy updates via RSS or email.

We have decided to truncate our feed to help protect against stolen content. I apologize for any inconvenience. Please love us anyway. 🙂

Craft Room Reveal

September 10, 2012 By Michelle Barneck 13 Comments

I can’t believe it’s finally time! I have been working on my craft room/office for an embarrassing amount of time and I’m thrilled that it is finally finished and ready to share! Today I’ll give you the grand overall tour and then break things down with how-to’s for many of the different pieces. Let’s get right to it!
My space is small (8.5′ x 8′) in a basement with crazy low ceilings (just short of 7 ft) and next to no natural light because a bay window blocks all but about an 8 inch gap above the window well. Exciting right?! But really, I am lucky to be able to have this space all for myself.
When you walk in and turn around this is your view. Imagine a door next to that file cabinet that leads to the playroom. I love that my craft room is right next to my kiddos.
I updated an existing file cabinet which makes the perfect place for our printer. Being that I have a small space I really needed to maximize storage. I measured and shopped and shopped and mapped out the room and finally got all the puzzle pieces to work with some great Ikea items. Those are the 5×5 Expedit cubbies. Lucky for me, the Target dollar spot used the exact colors I wanted in my office so I got all those pink/turquoise/gray fabric bins for $2.50 each! I die. They are usually at least $7. The other stuff was upcycled, thrifted, or on hand for the most part. I will go in to more detail in a later post.
Above is the view from the door. You can see I literally have storage to the ceiling. I am not a space waster. These shelves hold most of my craft supplies as well as office items in the bottom right. The bins on top of the shelves are also from Target for $2.50. I’m telling you, their dorm organization supplies were my best friend. People thought I was nuts walking out with stacks of them.
Continuing around, you can see my little wrapping paper peeking out in the corner. Then, comes my L-shaped desk made with Ikea items (mixture of Galant tops with Vika Alex drawer and storage units). I love that there is storage everywhere!
You also get a peek at my light here as well. I would have loved to have one of those pretty chandeliers you see everywhere, but with 81 inch ceilings even at 5’6″ I would bonk my head on it. I opted for fluorescent lighting to mimic natural light. It has a huge round diffuser (like 2 ft) and makes me feel like I am in a casino because I can never tell what time it is. It always seems like the middle of the day. I usually have the blinds open to let what little natural light there is in, but opted to shut them for pics because really who needs a view of the window well?


I love having my cutting machine out and accessible at all times. I have literally used it more in the time I set it there than in the whole time I owned it previous. I just plug and go. I did all the labels with it. I just noticed that in some of the pics some of the labels are missing and then they magically appear in another. Ha, go figure.

You can see in this desk pic that I even snuck some storage and a laser printer (thus the random cord) under the desk. There was so much room under that corner how could I not? My boys love hiding in the very back corner. 
On the wall I have cork boards for inspiration pics, a whiteboard to keep track of accounting. I also included some quotes that I love and a clipboard for my son’s latest artwork.

In this last pic, you get a glimpse of my little closet nook. It is fairly deep and I decided it was the perfect place to store non-seasonal home decor not currently in use. It was hidden away in about five different places and I had forgotten about most of it. I upcycled two existing bookcases to have it out in the open where I could easily see what I have to swap out on occasion.

And that takes us to the door where we end our tour. I almost feel like this is just a sneak peek at what is to come. It really doesn’t do it justice because I saved the close ups, tips and how-to’s for posts to come. But, don’t worry they are on their way down the pipeline.

Craft room tutorials:
DIY Bookshelf
Clipboard Art Frame
File Cabinet Makeover
Creative Picture Frames
Updating Office Accessories with Paint
Giving Your Office a Little Personality

P.S. Don’t forget to sign up for free Tipsy updates via RSS or email.

We have decided to truncate our feed to help protect against stolen content. I apologize for any inconvenience. Please love us anyway. 🙂
« Previous Page
Next Page »

  • Bloglovin
  • Facebook
  • Google+
  • Instagram
  • Pinterest
  • RSS
  • Twitter

Hi there! I'm Michelle. Mother of three little boys and one little princess. Welcome to A Little Tipsy, a place for exploring creativity and sharing inspiration.

Follow on Bloglovin


Visit Michelle Barneck {A Little Tipsy}'s profile on Pinterest.

Tutorials by Category


15 Family Reunion Games

Family Reunion Games Collage

15 Sprinkle Party Ideas

Sprinkle Birthday Party
Creative Commons License

© Copyright 2014 A Little Tipsy · Site Designed by The Fairy Blogmother · Web Hosting by RFE Hosting

This website uses cookies to improve your experience. We'll assume you're ok with this, but you can opt-out if you wish.Accept Read More
Privacy & Cookies Policy