A Little Tipsy

Creative Tips & Ideas

  • home
  • About Me
  • the tipsy top
  • press
  • projects
  • contact me
[print_thumbnail_slider]

DIY Rustic Silverware Caddy

May 28, 2013 By Michelle Barneck Leave a Comment

I was lucky to meet Kelly at the SNAP conference where we were teamed up for the Lowe’s Challenge. She is awesome and I am excited to have her to share a fun project today so without further adeiu…

Hello sweet friends! I’m Kelly. I was tickled silly when Michelle asked if I’d like to be a guest over here. If you aren’t familiar with who I am, I’m the author of the creative lifestyle blog, Live Laugh Rowe, where I share crafts, recipes, life’s moments and more. I’d {love} for you to stop by sometime — and if you like to party, I host a weekly linky party where you can show off your mad talents!

  Kelly Rowe and LLR Avatar_550

Today I’m sharing a fun and simple DIY Rustic Condiment Caddy with you. As the warmer weather strolls in, we’ll be spending a little more (for some, a lot more) time outdoors. So, for those barbecues and outdoor picnics, this caddy will come in super handy.
 

Click for full tutorial…

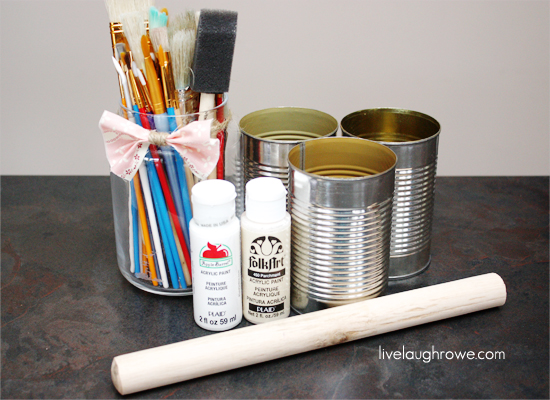
First and foremost, let’s grab a few supplies. Three empty soup cans, white and cream acrylic paint, brushes, and large dowel for handle. Not pictured: twine, high temp glue gun and sand paper.

  DIY Conidment Caddy Supplies

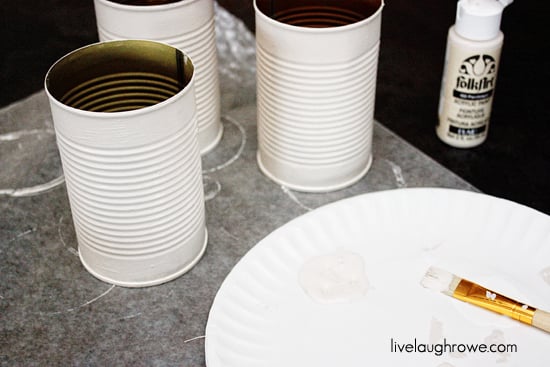
In just a few easy steps, we’ll see this caddy come to life. Are you ready? Let’s do it! 1. Paint the soup cans in two coats of the cream colored acrylic paint. 2. Paint the soup can in one coat of the white acrylic paint.

  DIY Condiment Caddy painting cans

3. Lightly sand for a worn, rustic feel. 4. Glue twine around each of the soup cans. Set aside. 5. Drill hole the dowel on one side to string twine through for carrying (optional). 6. Glue each can to the dowel. Be sure to use a hot temp glue gun. Side Notes: The hot temp glue holds the cans to the dowel just fine; however, if you’re looking for something much more durable, consider using this tutorial using screws. Also, if you don’t want to purchase a dowel, I purchased a plunger at the dollar store and cut the handle from that. It worked perfectly!

DIY Rustic Condiment Caddy

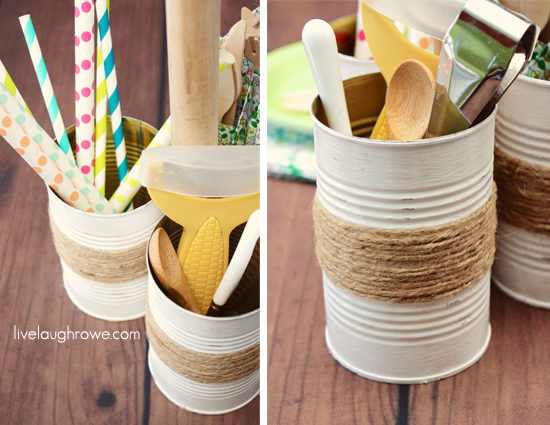
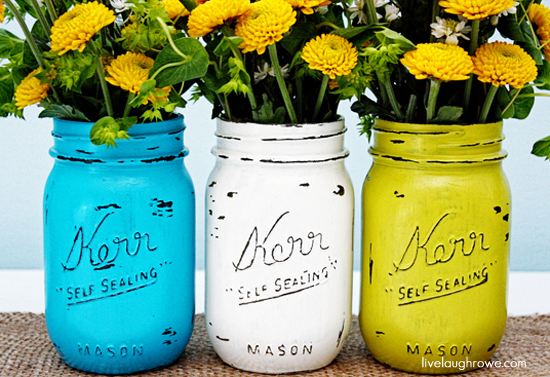
There you have a perfectly functional and rustic condiment caddy! I adore it and think it will add a sweet touch to our indoor and outdoor barbecue needs. If you like the paint and sanding technique used in this project to create a vintage feel, you might also like my DIY Painted Mason Jars tutorial.

DIY Painted Mason Jars_550
Today I’m sharing a delicious dessert recipe for French Vanilla Dream Bars over at LLR. Be sure to stop by for some coffee and dessert {wink}. I’d {love} to have you!
Delicious French Vanilla Dream Bars with livelaughrowe.com
Thanks so much for having me, Michelle! Happy Crafting, friends! xo
 Kelly140
We have decided to truncate our feed to help protect against stolen content. I apologize for any inconvenience. Please love us anyway. 🙂

Water Spigot Coat Rack

May 21, 2013 By Michelle Barneck 3 Comments

Hello…it’s Ali from House Vintage back again with another fun DIY project.  This project only takes a few hours and shouldn’t cost much money.  By utilizing salvaged materials, you can make a coat rack.

The supplies you will need are:

Click here to see the full tutorial.

Water spigot knobs are easy to find at flea markets and usually cost a few dollars.  They can also be found on Etsy.  My pile has been collected over time, as I would find them out thrifting.  The wood board was a leftover scrap.  If you don’t have any scrap wood around, you can buy this already precut at the hardware store.  They come in a variety of lengths.  Pick the right size for your space.

Rusty knobs were painted with several thin coats of spray paint.  I also added some stain to enhance the tone of the wooden board. Remember to always paint and stain in a well ventilated area.

Decide how many knobs you would like your coat rack to have.  Four worked well on my board.  I used a yard stick to make sure they were evenly spaced.   The knobs are then screwed into the board, from the front.  The thickness of the board and the knob will determine the size of screw to use.  I also added a plastic spacer and/or washer to allow for space behind the knob where items can hang.  Each of my knobs had a different depth, so you may have to use a different configuration on each.  I also didn’t pre-drill my holes, but if you are using a wood that splits easily, you may opt to do that.

Find a place that could use some extra organization or storage, and hang it up.  Your salvaged coat rack is done!

————————————————————-
Thanks Ali! I love the color and character of this coat rack! It would be great as a towel rack in a bathroom too! 
We have decided to truncate our feed to help protect against stolen content. I apologize for any inconvenience. Please love us anyway. 🙂

Decorating with Succulents

May 20, 2013 By Michelle Barneck 10 Comments

Attribution Statement: Brought to you by The Home Depot, click here to learn more.

I was excited to be invited by Home Depot to attend one of their Do-it Herself Workshops. This one was on succulents and they demonstrated how to plant them in containers for indoors. I was shocked at how easy it was! I collected the supplies in store, went on the hunt for the perfect out of the box containers, and created this…

I am in LOVE with it! I always say I should have lived in simpler times and this takes me back to the time of fresh cream on the farm and homemade gravy for Sunday dinners.
Now going back to the workshop, she demonstrated how to create a pot of succulents like in the picture below. 
This is actually one of the ones she created, I was lucky enough to be one of the winners and got to take it home. Isn’t it happy in my living room? I love the modern day terra cotta! They have some adorable pots at Home Depot.

So how to make a succulent arrangement of your own?


SUPPLIES:

  • Miracle Gro Cactus, Palm and Citrus Soil
  • Container of Your Choice
  • Succulent Plants
  • Water
  • Small Bristle Brush (like a paint brush)

INSTRUCTIONS:
1. Fill your container most of the way full packing the soil tight and leaving about an inch at the top. 
2.  Break up the roots of your succulents and add to container using a variety of heights and colors to add interest. Press them in firmly and add additional soil where needed.
3. Use the bristle brush to brush off any stray soil bits lodged in the succulents or around the rim of your container.
4. Water them generously as you would any newly moved plant. 

5. Succulents hold water in their leaves. They rarely need to be watered, probably only once every 2-3 weeks. So ignore them for the most part and when they start to dry out a bit and that is when you should water them. 

I can’t wait to try out more succulent arrangements! They are so easy and low maintenance which is perfect for me!
I’m looking forward to more Do-It Herself Workshops as well! The next two on the agenda are build your own Adirondack chair and learn to install bathroom faucets and vanities. So awesome right?! And free! Love it.
We have decided to truncate our feed to help protect against stolen content. I apologize for any inconvenience. Please love us anyway. 🙂

Shabby Apple Giveaway

May 16, 2013 By Michelle Barneck 121 Comments

I got a fun little surprise in the mail just in time for Mother’s Day. Shabby Apple (I am an affiliate) sent me their At First Sight dress. It was so fun to have something nice and new to wear to church for Mother’s Day. The hubs was kind enough to do a mini photo shoot beforehand. This was the first shot he got!
I adore the rich color of the dress and the length is perfect. I love the look of the wrap dress with the ruffles and bow. It is dressed up and girly without being stuffy. My only complaint is the liner near the neck tends to unfold and peak out. Nothing that can’t be easily fixed with an iron, clothing tape or simple stitching.
There are so many dresses over at Shabby Apple that I just love!
GondolaThis lighthearted polka-dot dress has all the spunk of a joyride in an  old-school red convertible. Featuring an ivory ground energized by  scads of bold teal polka dots, this dress may tempt you to throw on a  headscarf, shades, and driving gloves for a cruise downtown. Fully-  lined. Machine-wash cold, delicate cycle.Scalloped tiers of openwork lace in a soft seafood hue descend from a dainty grosgrain ribbon that defines the waist of the Alice dress. The charming shape--cap sleeves and a high boat neck, nipped at the waist and full through the skirt--lets the color do all the talking (or is that your next door neighbor wishing out loud that she knew your style secrets?).  Dress it up with dainty kitten heels or bold tights for a perfectly eye-popping look.
Does your closet need a new addition? 
Shabby Apple is giving away a $75 gift card!
Enter using the Rafflecopter form below.


a Rafflecopter giveaway

We have decided to truncate our feed to help protect against stolen content. I apologize for any inconvenience. Please love us anyway. 🙂
« Previous Page
Next Page »

  • Bloglovin
  • Facebook
  • Google+
  • Instagram
  • Pinterest
  • RSS
  • Twitter

Hi there! I'm Michelle. Mother of three little boys and one little princess. Welcome to A Little Tipsy, a place for exploring creativity and sharing inspiration.

Follow on Bloglovin


Visit Michelle Barneck {A Little Tipsy}'s profile on Pinterest.

Tutorials by Category


15 Family Reunion Games

Family Reunion Games Collage

15 Sprinkle Party Ideas

Sprinkle Birthday Party
Creative Commons License

© Copyright 2014 A Little Tipsy · Site Designed by The Fairy Blogmother · Web Hosting by RFE Hosting

This website uses cookies to improve your experience. We'll assume you're ok with this, but you can opt-out if you wish.Accept Read More
Privacy & Cookies Policy