A Little Tipsy

Creative Tips & Ideas

  • home
  • About Me
  • the tipsy top
  • press
  • projects
  • contact me
[print_thumbnail_slider]

Easy Painted Notebook Paper Frames

July 31, 2013 By Michelle Barneck 8 Comments

This post is sponsored by Michael’s and their Back to School Challenge.
I have a thing for back to school. Something about fresh notebooks and backpack shopping gives me a big grin. I am a nerd. I loved school and want my kids to love it too. There is something fun about capturing those first day excitement and end of year celebrations which brings me to my project…School Picture Frames. I joined up with Michael’s to participate in their First Day of School Challenge and I think you’ll like what I came up with. This is not my first rodeo, see my ruler frame and back to school frame, this year I went with paper.


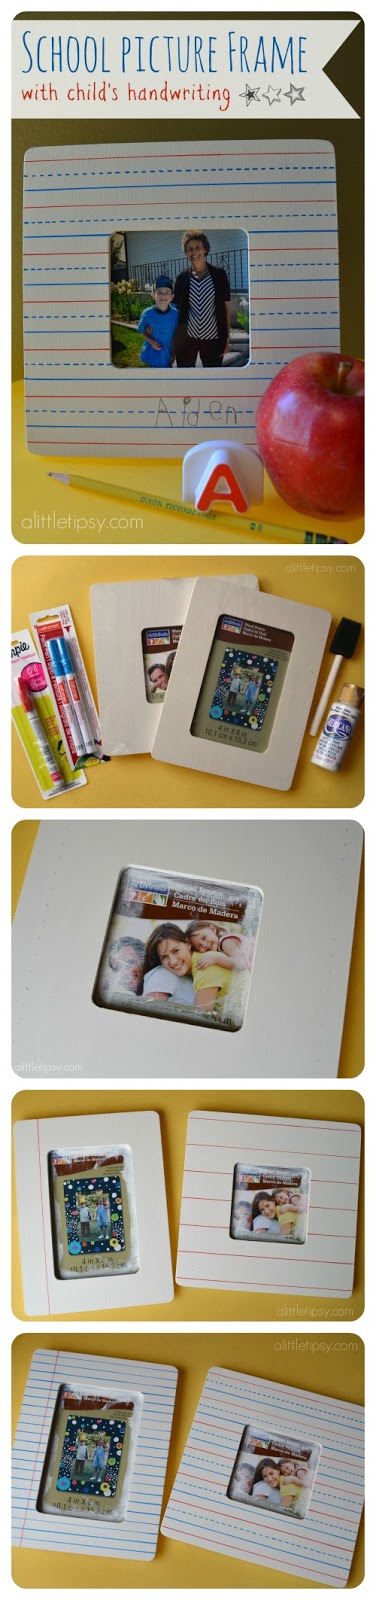
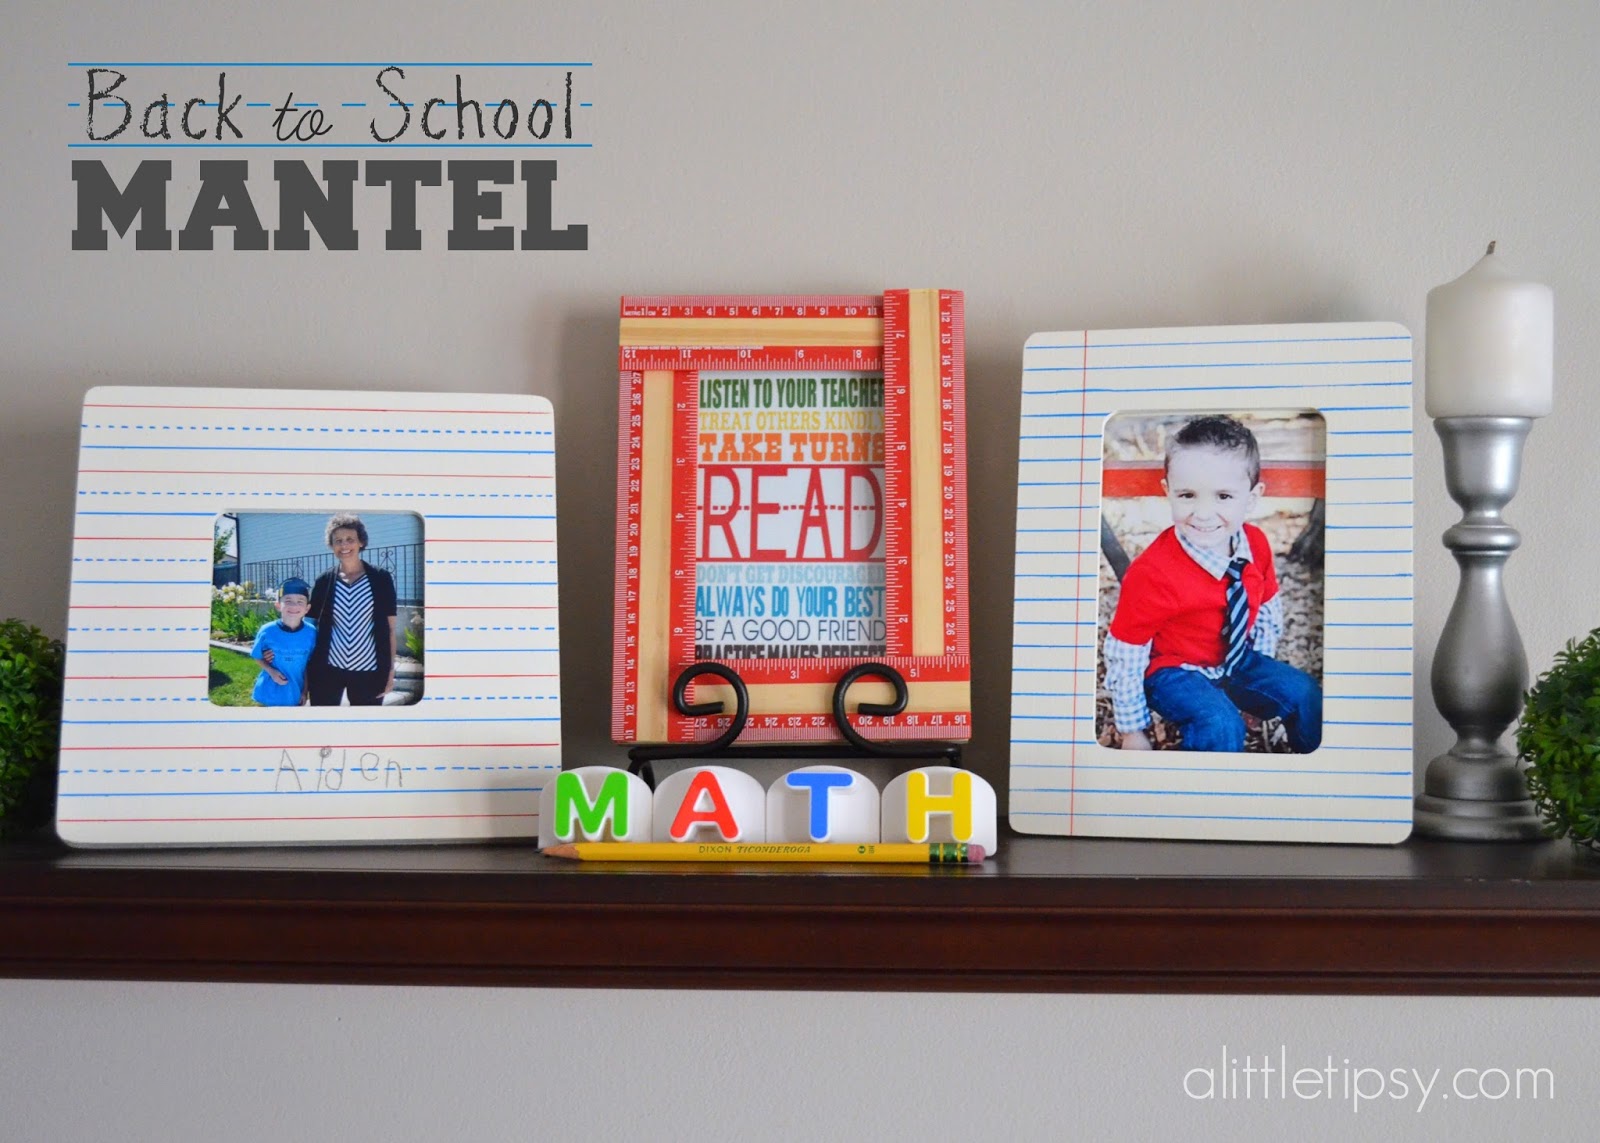
The notebook paper frames are hand painted, but sooo easy! I made two versions one frame with college rule paper for the older kids and one frame with the “learn to write” paper for little kids (see picture on left).

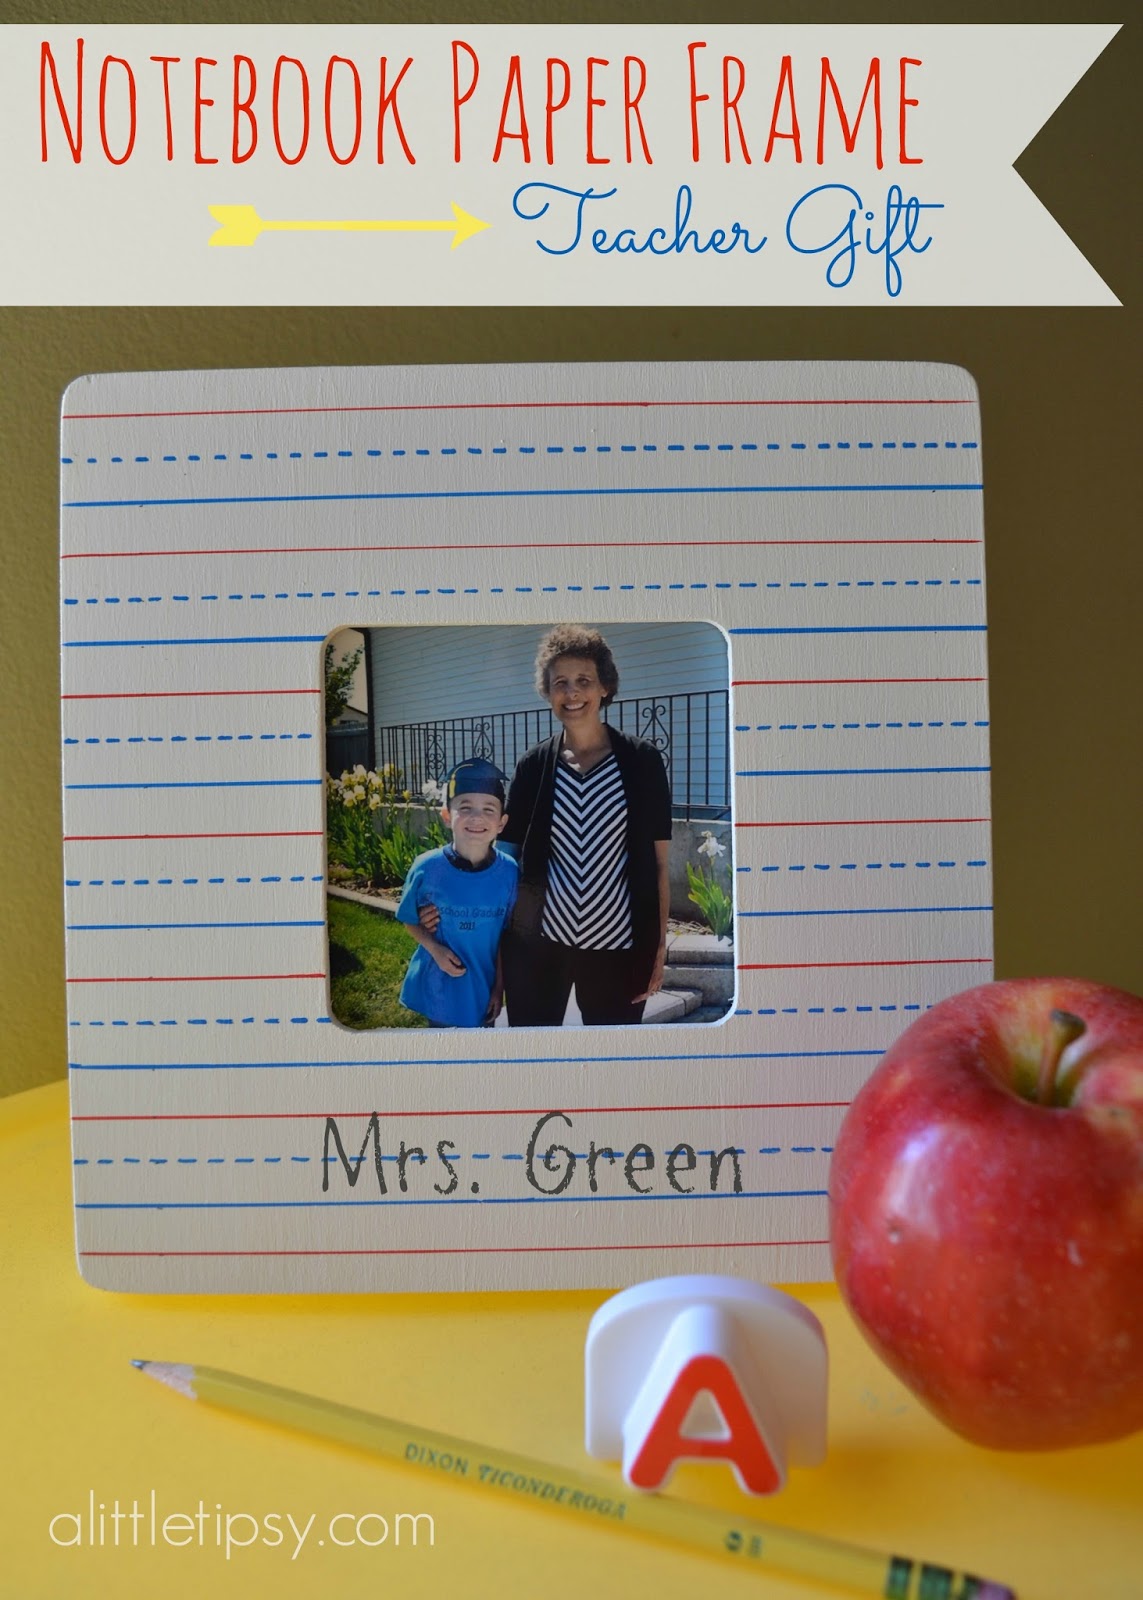
They are perfect for your first day of school pictures and I love that they can preserve your little person’s adorable handwriting.


SUPPLIES:

Wood Frames ($1 each)
White Craft Paint
Foam Brush
Ruler
Pencil
Red Fine Tip Paint Pen
Blue Fine Tip Paint Pen
Mod Podge or Clear Spray Paint

*all available at Michael’s*


DIRECTIONS: 

1. Paint the frame white. I used three coats. Let dry.

2. Using your ruler make marks on each side of the frame where you want the lines to go. I spaced my lines one centimeter for both versions, you just alter the colors of the lines for the learn to write paper.

3. Using your ruler add the red lines with your paint pen. One line going down vertically about an inch from the left side for the college ruled or every 3rd pencil mark for the learn to write. Let dry.

4. Using your ruler add the blue lines with your paint pen. For the college ruled on each pencil mark. For the learn to write, one under each red line. After the blue lines are dry, go back and add the blue dashed lines after your blue lines are dry.

5. To personalize, have your child add their name with a pencil or add the teacher’s name and use for a gift.

6. Cover with protective clear coat.

Not bad for buying all the supplies (most of which you may have on hand) for about $10 right?

Speaking of gifts for teachers, Michael’s offers a 15% off discount for teachers everyday! Talk to a store associate for more info. Also, be sure to download the Michael’s app so you always have their deals and coupons at your fingertips! I love just pulling out my smartphone and getting a discount!

Last, but not least, here is how I put it all together. I still can’t believe my little guy is starting Kindergarten. Tear.

Disclosure: I was provided a Michael’s gift card to pick up supplies for this challenge.

We have decided to truncate our feed to help protect against stolen content. I apologize for any inconvenience. Please love us anyway. 🙂

ABC Letter Chips

July 30, 2013 By Michelle Barneck Leave a Comment

Hello Little Tipsy readers! I’m Kelly from Smart School House and, as I’m sure you can imagine, I love educational crafts. The other day my toddlers (2 and 3 years old) were playing with their play-dough while I was preparing their lunch. My daughter, Stella, absolutely LOVES those unbaked tortillas that you can find in the refrigerator section of any grocery store (or Costco in our case). It dawned on me that I could combine the play-dough activity with lunch for an educationally fun experience!

Read more of this fun tutorial…

These fun chips are made from play-dough letter cutters! The play-dough cutters make creating shapes and letters in uncooked tortillas so easy. In fact, the dough of the uncooked tortillas is thinner than play-dough, so this educational craft is as easy as can be for mommies. Be sure to scrub off any play-dough with some soap and water before making your ABC chips (play-dough is not fun to eat hehe!).

To make the ABC chips, simply place the letters on the tortilla like so:

Next, place the letters on a griddle and cook the letters according to the directions on the tortilla package. In this case, I cooked the letters for about 30 seconds on each side (so easy!!).

The neat thing about these chips is that they aren’t too crunchy for the little mouths of toddlers. Yet, they are crisp enough to dip into any fun dips that your toddlers may like. My little ones, Stella & Mitch, absolutely loved “playing with their food” so to speak. It was the perfect time for me to sit with them and teach them letters.

Stella is 3 and recognizes most of her letters. So for her, I would say things like, “Where is the letter T, can you find the T?” Mitch is 2 and still learning to identify the letters of the alphabet. So for him, I lined up a series of about 4-5 letters and pointed to each one while saying its name. For example, “This is the letter I and this is the letter L.” What I love about these ABC chips is that the activities can be modified for different ages. If your child is having a difficult time learning their letters (or maybe reversing their letters), then this is a perfect activity for them!

You can even use the letters to form a series of words that will put a smile on any beginning readers face:

If you are looking for more educational activities for your little ones, feel free to stop by Smart School House and say hello! Check out this other fun DIY activity that can help children learn their letters:

Thank you for having me here!

——————————————————————————
My kiddos love helping cook and my little guy starts kindergarten this week so it is the perfect back to school activity! Thanks Kelly!
We have decided to truncate our feed to help protect against stolen content. I apologize for any inconvenience. Please love us anyway. 🙂

5 Reasons to Love Vacation Rentals #VRMonth

July 25, 2013 By Michelle Barneck 1 Comment

Did you know July is National Vacation Rental Month? Fittingly so. I feel like we are always running around crazy trying to squeeze the last little bit of summer in with family reunions and vacations before we head in to year round school. 

We discovered vacation rentals about five years ago and man has it made a difference in our travel plans! We have used vacation rentals for tropical trips, family reunions, national park discovery and more! So what’s so great about them?

Five Reasons to Love Vacation Rentals

1. Vacation rentals offer more space. We often travel with my family which means well over 20 people. Try squeezing that in to a few hotel rooms! I love the options vacation rentals present for family common areas to watch movies or play games, sitting for meals together, etc. It can also mean a private pool/hot tub which is fabulous!


Click for more reasons to love…


2. Enjoy the many of the conveniences of home such as fully-equipped kitchens, washer/dryers and multiple bedrooms/baths to accommodate multiple couples/families or separate napping babies from the rest of the noise.


3. You can enjoy the best of both worlds – the space and comfort of home with the conveniences and amenities of a hotel stay like housekeeping, Wi-Fi, shuttle services and a concierge desk. Who doesn’t love someone to clean up while you are on vacation?

4. I love that you are not tied down to one type of place, there are a nice variety of offerings. For example, in the U.S. Wyndham Vacation Rentals’ properties range from private homes, resorts condos and villas in beach destinations such as Florida, South Carolina, Delaware and Alabama’s Gulf Coast to mountain-side condos and luxury cabins in Colorado, Utah, Tennessee and Idaho. 


5. If you’re like me you do your vacation research and planning online. Online listings and booking are essential to me. If rentals make you nervous, ease your mind by booking with a professionally managed vacation rental provider such as Wyndham Vacation Rentals® that has a “Vacation Rental Bill of Rights®” service pledge ensuring quality standards (rental listings with accurate images), comprehensive customer service and real-time payment and bookings. I hate having a phone tag booking hassle or like my poor aunt having things fall through last minute.

All this talk make you feel the need to get away? Give it a whirl! The time could not be better to book. Wyndham Vacation Rentals is offering summer deals at up to 35 % off nightly rates on bookings made throughout July at www.WyndhamVacationRentals.com!

I was selected for this opportunity as a member of Clever Girls Collective and the content and opinions expressed here are all my own.

We have decided to truncate our feed to help protect against stolen content. I apologize for any inconvenience. Please love us anyway. 🙂

Honey Sugar Face Scrub

July 23, 2013 By Michelle Barneck Leave a Comment

Hi Friends, it’s Aly from Entirely Eventful Day again! I am happy to be here to share with you a Summer-time life saver. Seriously though, it may not actually save your life, but it will save your face (which is pretty close).  
I’m a big believer in Natural Beauty Treatments, and this face scrub is one of my absolute favorite! There are a lot of sugar scrub recipes out there, and all I have tried are great. But this one (which I’m pretty sure I invented) is the best, best, best! 
If you have never tried a honey facial, I highly recommend it. Turing honey into a scrub is just a little bonus to all the benefits of slathering honey all over your face; it is sooo moisturizing and soothing.
Click for the full tutorial.

Here’s what you do…
You can either make it as you go (which is what I usually do) or you can make a whole batch and package it up cute (I even created a little printable label for you).
1. Use new-ish (not old and gooey) honey (the honey in the squeezy bear bottles works best because it’s so soft). Fill a container 2/3 full with honey.
2. Add white granulated sugar a tablespoon at a time until you achieve the right consistency.
3. Use as you would use any other facial scrub to exfoliate your face and neck (don’t scrub too hard).
4. Leave the honey mixture on your face for 5 minutes to receive the hydrating benefits.
5. Rinse and enjoy!
The printable label is formatted to fit the lid of a mason jar. I used one of the short Mason jars to package my facial scrub. It turned out so cute. I also wrapped a little washi tape around the outside of the lid. I was happy and surprised to find that it was the perfect width! Bonus!

This is a perfect gift idea! You’re friends will thank you. Package it up cute and give it away.

Go here to download a high-resolution version of the darling honey sugar scrub printable label.
Also, check out my other free printables and the ones in my printable shop.
You might also like… How to Make a Custom Desk Pad // Jello Flavored Watermelon Cookies // Blue and Pink Girl’s Room Ideas // Green Smoothie Popsicle Recipe
——————————————————————————-
Thanks Aly for this yummy face scrub recipe! It is so adorable all wrapped up in a jar with washi!
We have decided to truncate our feed to help protect against stolen content. I apologize for any inconvenience. Please love us anyway. 🙂
« Previous Page
Next Page »

  • Bloglovin
  • Facebook
  • Google+
  • Instagram
  • Pinterest
  • RSS
  • Twitter

Hi there! I'm Michelle. Mother of three little boys and one little princess. Welcome to A Little Tipsy, a place for exploring creativity and sharing inspiration.

Follow on Bloglovin


Visit Michelle Barneck {A Little Tipsy}'s profile on Pinterest.

Tutorials by Category


15 Family Reunion Games

Family Reunion Games Collage

15 Sprinkle Party Ideas

Sprinkle Birthday Party
Creative Commons License

© Copyright 2014 A Little Tipsy · Site Designed by The Fairy Blogmother · Web Hosting by RFE Hosting

This website uses cookies to improve your experience. We'll assume you're ok with this, but you can opt-out if you wish.Accept Read More
Privacy & Cookies Policy