A Little Tipsy

Creative Tips & Ideas

  • home
  • About Me
  • the tipsy top
  • press
  • projects
  • contact me
[print_thumbnail_slider]

Cinnamon Swirl Cake with Simply Kierste

September 1, 2014 By Michelle Barneck 3 Comments

Hello, friends! I’m Kierste, from Simply Kierste, and I’m delighted to be here with you today! Fall is my ABSOLUTE favorite season, and after recently moving to upstate New York, I’m even more excited. I love the crisp mornings, cozy sweaters, vibrant leaf colors, pumpkin patches, cider mills, and of course, the yummy food. Today I’m sharing one of our family’s all-time favorite fall recipes, Cinnamon Swirl Cake. You are going to love me (or hate me, because you’re going to want to eat it all!) for this!

Cinnamon Swirl Cake | simplykierste.com
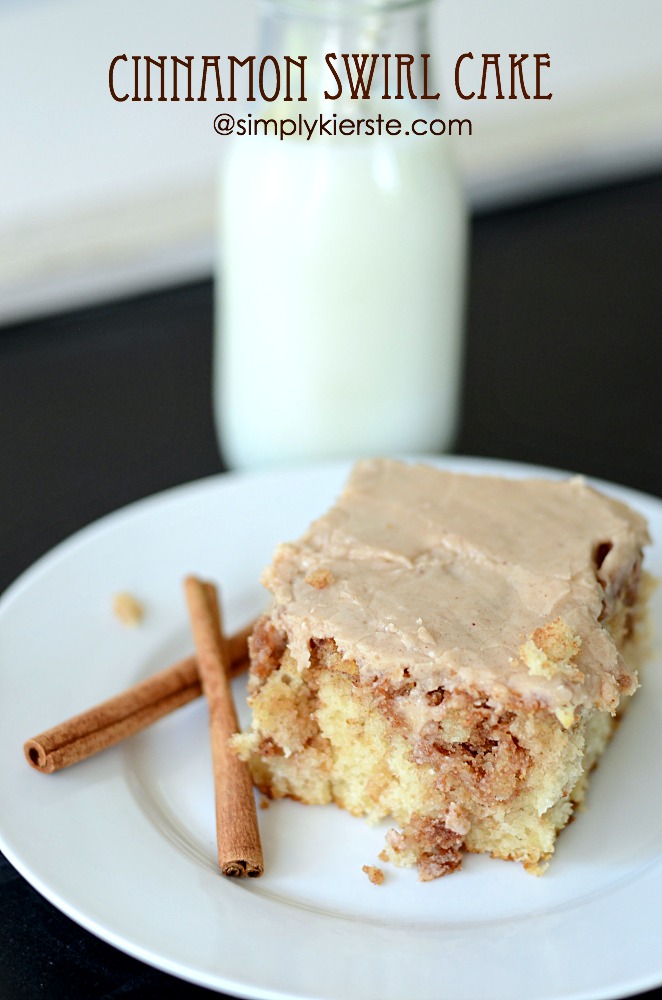
Seriously, it is SO good. Bits of cinnamon & sugar are swirled around inside the moist, buttery cake, and it’s topped with a creamy cinnamon buttercream frosting that I could eat with a spoon. (And I may or may not have done that before…)

This cake is very similar to a coffee cake, and could be served at brunch, or for dessert. It’s always a hit wherever I take it, and recipe It’s also a recipe that works well with gluten-free flour. I’ve served it numerous times that way, and no one was the wiser!

This really is the perfect cake for fall, and the entire holiday season. I love to serve it on the weekends for breakfast, and it’s also a yummy breakfast on Christmas morning. You really can’t go wrong serving this cake…anytime!

Cinnamon Swirl Cake | simplykierste.com

Cinnamon Swirl Cake
Recipe Type: Dessert, Breakfast
Author: Simply Kierste
Ingredients
  • 3 c. flour
  • 1 c. sugar
  • 4 tsp. baking powder
  • 1/4 tsp. salt
  • 2 eggs
  • 2 tsp. vanilla
  • 1 1/2 c. milk
  • 1/2 c. melted butter
  • 1/2 c. melted butter (Yes, another one! Keep them separate.)
  • 2/3 c. brown sugar
  • 1 T. flour
  • 1 T. cinnamon
  • Cinnamon Buttercream Frosting
  • 4 c. powdered sugar
  • 1/2 c. butter, softened
  • 1-2 T. milk
  • 1/2 T. cinnamon
  • 1 tsp. vanilla
  • dash salt
Instructions
  1. Mix the flour, sugar, baking powder, and salt. Add the eggs, vanilla, milk, and 1/2 c. melted butter, and mix well. Pour into a greased 9×13 pan. Melt the second 1/2 c. butter, and stir in the cinnamon, flour, and brown sugar. Pour on top of the cake and swirl through with a butter knife. Bake at 375 degrees for 20-25 minutes, or until done through.
  2. While it’s baking, make the Cinnamon Buttercream Frosting! Place the powdered sugar and softened butter in a large mixing bowl. Beat with a hand mixer, adding the milk a little bit at a time until you get the right consistency. Add the vanilla and salt, mix well. Mix in the cinnamon.
  3. Frost the cake as soon as it comes out of the oven!
  4. ENJOY!!

Thank you so much for having me, I’m happy to meet you! Come on by Simply Kierste and say hello, I’d love to have you! I’m sharing lots of ideas for the holidays, yummy recipes, organization tips and ideas, home decor and DIY projects, tons of free printables, family ideas and more!
Halloween Ideas | simplykierste.com
Striped & Polka Dot Pumpkins // Halloween Book Countdown // You’ve Been Boo’ed Free Printables // Halloween Treat Jars

About the Author: Kierste is the girl behind the blog Simply Kierste, where she shares her love for all things creative and DIY. When she’s not chasing around two sets of twins, a teenager, and a baby, she’s working on a project, training for her next race, reading one of her favorite books, or baking something with chocolate in it. Please add her to your Google circles. You can also find her on Facebook, Pinterest, and Twitter.

Apple Pie Pizza from Creations by Kara

August 29, 2014 By Michelle Barneck Leave a Comment

Hello Little Tipsy fans! I’m Kara from Creations by Kara, and I’m thrilled to be filling in for Michelle while she spends time with her newest little bundle of joy!

When fall rolls around, one of my favorite things to do is start baking! We have an apple tree, so I am always looking for new ways to use up apples. In one of my recipe books, I found a recipe for apple pizza, but it called for cream cheese. I didn’t have any, so I came up with my own version. And trust me, this Apple Pie Pizza is amazing!
Apple Pie Pizza ~Creations by Kara

This stuff smells so amazing while it is baking! The apple filling is so yummy I had to stop myself from eating it by the spoonful. The crust is nice and chewy, and the crumb topping is buttery and delicious. It’s similar to apple pie, but much easier to make and serve. It is truly a perfect fall treat!

Apple Pie Pizza

Dough:
1 tsp instant yeast
1 1/2 Tbsp sugar
2 Tbsp hot water
1/3 cup milk, warmed
1/4 tsp salt
2 Tbsp oil
1 1/4– 1 1/2 cups flour
Apple Filling:
1 Tbsp butter
2 large granny smith apples, thinly sliced
1/4 cup sugar
1 Tbsp flour
1/2 tsp cinnamon
Pinch of nutmeg
Crumb Topping:
1/3 cup flour
3 Tbsp sugar
2 Tbsp butter, softened
For dough: Combine yeast, sugar, hot water, and warm milk in a mixing bowl. Stir till yeast dissolves. Add salt and oil. Stir in one cup of the flour and mix well. Add enough remaining flour to make a soft dough. Knead a few times on a floured counter. Return to the bowl, cover, and let rest 15 minutes.

For filling: Melt butter in a skillet. Add remaining ingredients. Cook and stir over medium heat for 5 minutes. Turn heat to low; cook and stir for 3-4 more minutes, or till apples are crisp tender. For topping: Combine all ingredients in a small bowl. Mix with a fork till crumbly.

To make pizza: Pat dough onto an 8-9″ circle on a lightly greased cookie sheet, making a rim around the edges. Arrange the apples evenly over the crust. Sprinkle the crumb topping over the apples. Bake at 350° for 20-25 minutes or till crust is golden brown.

Fall is one of my favorite times of year! I hope you’ll stop by to see more of my yummy fall recipes.

If cooking isn’t your thing, I also have lots of fun fall decorating ideas!
Fall Decor
Thanks for having me stop by for a visit Michelle!

Maple Bacon Cookies with Snap

August 20, 2014 By Michelle Barneck Leave a Comment

Hi Tipsy readers, my name is Tauni. I run a daily site called Snap and several times a year host a competition called So You Think You’re Crafty.

tauni

I’ve known Michelle for quite a while. Since we live fairly close, she’s one of the first bloggers I met in real life. I have had fun watching her little family grow…especially because she’s running a home full of boys just like me!

Maple Bacon Cookies via @SnapConf #recipe #dessert

I don’t know what dinner is like over at Michelle’s house, but in our house things can get a little bit crazy. Every once in a while I throw up my arms and we either settle on having pizza delivered or breakfast for dinner.

Truth be told, I am actually a huge fan of breakfast for dinner. Breakfast foods are my favorite. The other day while dreaming of ways to incorporate more breakfast food into my life, I decided to come up with a breakfast cookie and maple bacon cookies were born…

These maple bacon cookies consist of a nice soft cake cookie, topped with a thin maple glaze and crumbled bacon. It’s like a full breakfast in every bite!

In addition to the delicious taste, these little bites of yum are super-easy to make.

Maple Bacon Cookies via @SnapConf #recipe #dessert

Ingredients:
1 yellow cake mix
2 eggs
1/4 c. softened butter

3 c. confectioners sugar
1/4 tsp. maple extract
1/2 c. milk

bacon

Directions:
Prepare crunchy bacon bits (I used three large strips of bacon cut down into small pieces).

Pre-heat oven to 350 degrees.

Mix together cake mix, 2 eggs, 1/4 softened butter. Roll dough into one inch balls and place on cookie sheet. Bake for 10-12 minutes.

While cookies are baking in the oven, mix confectioners sugar, maple extract and milk until sugar has dissolved.

Drizzle maple glaze over cookies and top with crumbled bacon.

Your mouth will thank you…

Maple Bacon Cookies via @SnapConf #recipe #dessert

If you liked this cookie recipe, you may want to try my Almond Joy cookie recipe…It’s a family favorite.

Almond joy cookie recipe

Hands down my favorite cookie recipe is still my easy gingerbread – it’s been pinned over 100,000 times!

Easy Gingerbread Cookies via SNAP!

Thanks for letting me participate in your fun fall series Michelle!

Giant M&M Cookies from Lil’ Luna

August 13, 2014 By Michelle Barneck 2 Comments

Guest Post Header

Hi there A Little Tipsy friends!!! My name is Kristyn, and I blog over at Lil’ Luna!! I’m so excited to be here today while Michelle enjoys her sweet bundle of joy!! I think it’s just SO exciting when babies are born and I hope Michelle is enjoying this little break from blogging to spend it with her new little one!!

Today, I wanted to share with you a new favorite cookie recipe. We’re HUGE cookie fans here in our home and make them at least every other week. Sometimes it’s just for fun and other times for friends or for a get-together, but it’s become tradition for the kids to gather around the kitchen island to help make these sweet treats, and I LOVE it!! We usually stick to our all-time FAVORITE Chocolate Chip Cookies recipe but we ventured out a tried a new recipe that was a hit with the whole fam! These Giant M&M Cookies were easy to make and so delicious. I mean, how can you not like M&M Cookies?

Giant-Chewy-MM-Cookies-1

These Giant M&M Cookies were soft, chewy and have become a new favorite!!

Here is what you’ll need to make them:

INGREDIENTS:

– 2 heaping cups flour
– 1/2 tsp. baking soda
– 1 1/2 sticks unsalted butter (melted and cooled)
– 1/2 tsp. salt
– 1 cup brown sugar
– 1/2 cup sugar
– 1 egg + 1 egg yolk
– 2 tsp. vanilla
– 1 cup mini M&Ms
– 1 cup regular M&Ms

DIRECTIONS:

1. Mix flour, baking soda and salt in a bowl and set aside.

2. In a separate bowl, mix butter and sugars until well combined. Add egg, egg yolk and vanilla and mix well.

3. Slowly add flour mixture to the we mixture and mix until dough forms. Use hands if needed.

4. Crush 1 cup of regular M&Ms. Fold in crushed and non-crushed M&Ms to your dough.

5. Decide how big you would like your cookies. I wanted giant cookies, so I used a large ice cream scoop. With your hand, shape each portion into a ball and then pull into two equal pieces. Turn one piece rough side (what used to be the inside of the ball) down onto the cookie sheet. Put the other piece on top of that, rough side up. Space 1-2 inches apart, depending on how big your cookie is.

6. Bake large cookies for 12-14 minutes and small cookies for 8-10 minutes or until the edges are golden. Centers should be soft and puffy. Let cool and enjoy!

Recipe adapted from How Sweet It Is.

Giant-Chewy-MM-Cookies-2
Giant-Chewy-MM-Cookies-3

Seriously, how could you NOT want to devour these big beauties??

Mmmmmm – they were so good!

For more great cookie recipes on my site be sure to check out:

Cookies Collage

Soft M&M Cookies – White Chocolate & Butterscotch Chip Cookies – Gooey Butter Cookies

And with Halloween just around the corner, be sure to head to the blog for these festive treats!

Halloween Collage

Halloween Wreath – Gooey Monster Eye Cookies – Halloween Cookie Jar Gift

Thanks for having me here today, Michelle!

Head on over to Lil’ Luna for recipes as well as great craft and home decor tutorials, printables and tips!

ENJOY!

« Previous Page
Next Page »

  • Bloglovin
  • Facebook
  • Google+
  • Instagram
  • Pinterest
  • RSS
  • Twitter

Hi there! I'm Michelle. Mother of three little boys and one little princess. Welcome to A Little Tipsy, a place for exploring creativity and sharing inspiration.

Follow on Bloglovin


Visit Michelle Barneck {A Little Tipsy}'s profile on Pinterest.

Tutorials by Category


15 Family Reunion Games

Family Reunion Games Collage

15 Sprinkle Party Ideas

Sprinkle Birthday Party
Creative Commons License

© Copyright 2014 A Little Tipsy · Site Designed by The Fairy Blogmother · Web Hosting by RFE Hosting

This website uses cookies to improve your experience. We'll assume you're ok with this, but you can opt-out if you wish.Accept Read More
Privacy & Cookies Policy