A Little Tipsy

Creative Tips & Ideas

  • home
  • About Me
  • the tipsy top
  • press
  • projects
  • contact me
[print_thumbnail_slider]

Painting a Table: a love story

August 15, 2012 By Michelle Barneck 6 Comments

It was love at first site with this little side table. I spotted her from across the room and walked over slowly as to not draw attention. The price was right, the size was perfect, and she had oh so much character. The only problem was the lovely brown wood grain finish. Nothing a little can of magic couldn’t fix. She was coming home with me. This is my story of painting a table.


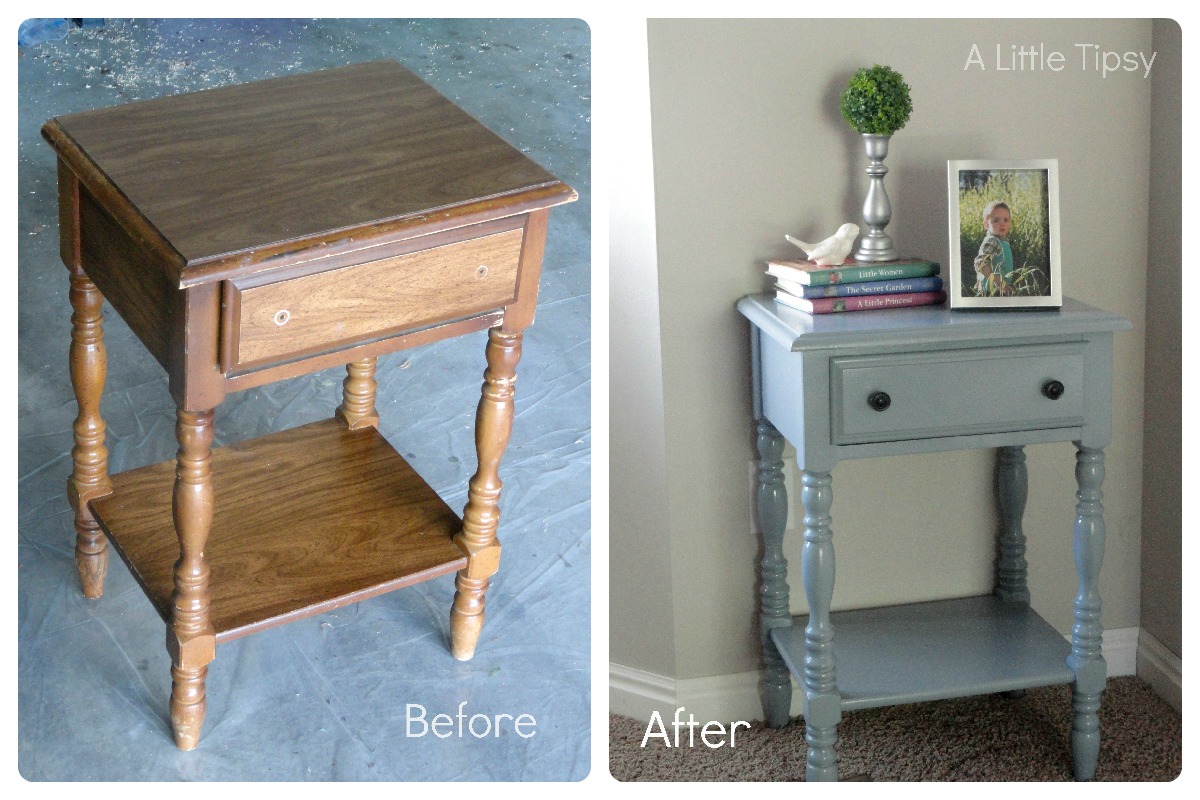
My table was one of those with awesome brassy knobs and a super shiny finish. I was not in the mood to try to sand those curvy legs down much so I used a good primer that is said to work even on laminate. What’s not to love about  making things easier on ourselves.
SUPPLIES:
Drop Cloth
Ziinsser Cover Stain Primer
Paint Brush
Medium and fine sanding blocks
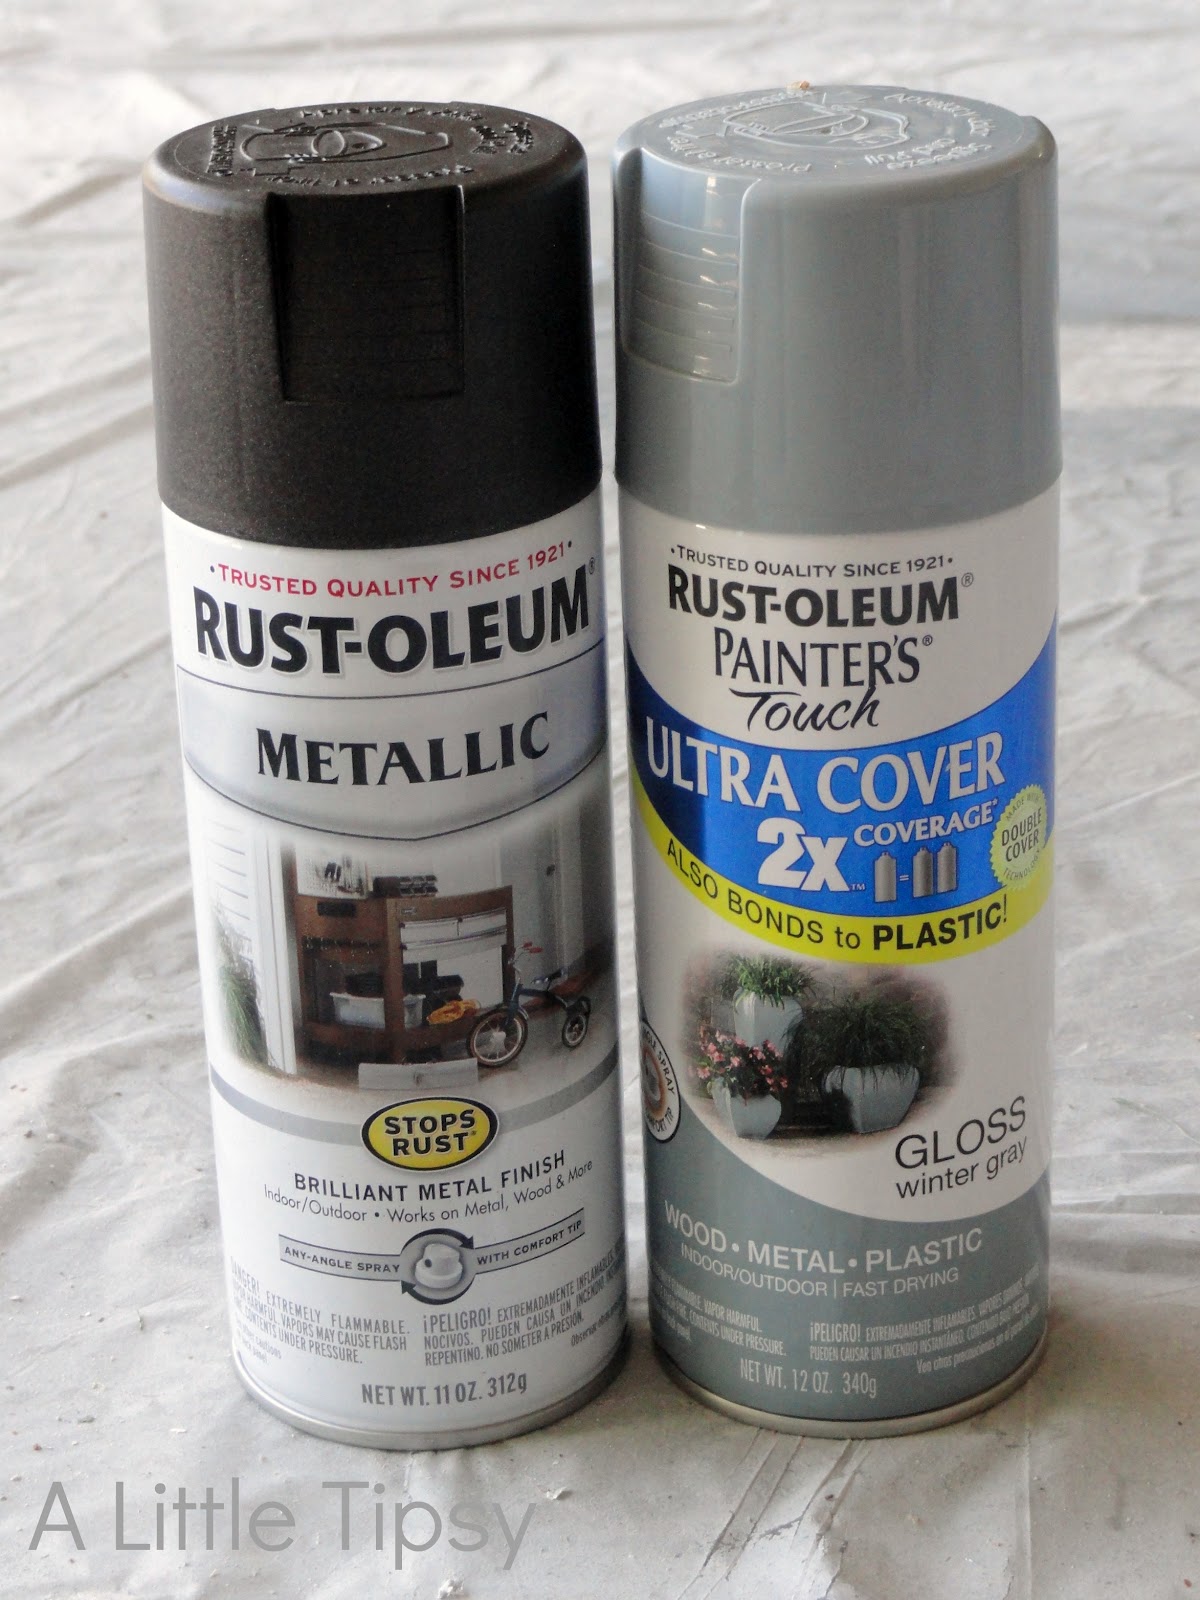
Spray Paint 

(I used Rust-oleum Winter Gray for the table and Metallic Brushed Nickel for the knobs)
DIRECTIONS:
1. Paint the table with two coats of primer following the directions on the can for dry and re-coat times. Once the primer is completely dry, sand off the brush strokes starting with the medium grit sandpaper and moving to the fine grit to get it completely smooth on the flat surfaces. Be patient and get it right. Your paint will look so much better if you start with a nice surface.

2. Spray paint the table and the hardware using multiple light coats (moving slowly across and going off the edge to change direction) until evenly painted. Be sure to spray from all directions to fully coat all the nooks. 


3. If it will be used in a high traffic area, I would recommend a protective finish like a poly or a spray on clear coat.


I love a good thrift find and this little lady was no exception. She has become one of my favorite pieces in my home. I guess you could say it was fate.

P.S. Don’t forget to sign up for free Tipsy updates via RSS or email.

We have decided to truncate our feed to help protect against stolen content. I apologize for any inconvenience. Please love us anyway. 🙂

Tie Dye Accessories

May 17, 2012 By Michelle Barneck 4 Comments

Tie Dye brings back lots of memories like demolition derbies, girls camp, and my brother in-law when we first met him. I was excited when I was asked to try out Tulip Tie Dye not only because we had a past, but because I like a challenge and wanted to see what I could create using tie dye besides the traditional t-shirt. Ok, so I did start with an old stained t-shirt, but I came up with these coordinating Mom and tot tie dye accessories. 
Necklace inspired by I Heart Naptime

I had no idea why in the world I was making matching accessories. I have no daughter nor do any of my little nieces really wear cutesy headbands. Later, I found out an adorable family whom I adore was going through a big trial and could use a little sunshine in their life. Things happen for a reason I believe.


Ready for a little how to?

SUPPLIES:

Tulip Tie Dye Kit Including:
-Tie Dye
-Squirt bottles
-Gloves
-Surface cover

  • Pre-washed white t-shirt (mine was 95% cotton, 5% spandex so it was nice and smooth with a bit of elasticity and also does not roll as much when stretched)

  • Fabric scissors
  • Big wood beads
  • Gray spray paint
  • Needle
  • Thread
  • Felt
  • Hot Glue Gun


DIRECTIONS:

1. Lay out your surface cover and pre-washed shirt. Wearing your gloves mix up yellow and black dye. I did a black ombre shirt before this, so you can either use the dye for something else until you have about 1/4 of the black left and then fill the bottle with water to dilute to gray or just use less dye powder and more water to begin.
2. Use the squirt bottle to dye the top of the shirt with the gray using a sweeping side to side motion until covered completely to about 4 inches down. Then dye with yellow using the sweeping motion, but leave about 1.5 inches between stripes. Do not oversoak with yellow. You want the back to remain mostly white. Let dry for at least 6 hours. I let mine dry completely.
3. While the shirt is drying, spray paint your beads gray letting them dry between coats. I used 3 thin coats.
4. Launder separately in the hottest water safe for your fabric using the large load setting with a little bit of laundry soap. Dry separately in the dryer. 
I actually loved how it looked as a shirt and was tempted to stop here…

but there was a small stain on the back of my shirt on the white part, so I grabbed the scissors and continued on my way.
5. Cut 1/2 inch strips from the back of the shirt on a diagonal so they are as long as possible. This will give the strips yellow ends.
6. Make a small slit in the end of each strip and thread them through each other so they are attached.
7. Tie a knot where you attached the two strands for extra security and to start your necklace. Work out from that center knot. Twist up the end of the strip so it looks like the top of a pointy ice cream cone. Slide the point through the beads one by one. You can make the hole in the bead a bit larger by placing the tip of some ordinary scissors in and twisting around if needed. Tie a knot on either side of each bead so they stay in place. Leave about a 2 inch space for the flower with five beads on one side and one bead on the other.

8. For the flower, cut 6 circles about 2 inches in diameter from the yellow striped part of the shirt.

9. Fold the circles in half and then in half again to get a pie shape. Attach them by poking the needle through the point of each pie. Rotate and fluff the “petals” as needed to get a nice full shape.
10. Hot glue the flower in place and then secure a circle of felt to the back of the flower for additional security and  finished look.
11. Tie the necklace around your neck to the desired length using a bow. The ends of the strips will still have a bit of a twist from threading them through the beads.
Have you ever seen tie dye look so cute?
Just wait until you see the tot side of the coordinates!

1. Cut a 2 inch strip of the yellow stripes. Pull the ends tight so it rolls in a bit. Attach the ends with hot glue. Cute another strip about 1″x 2″ Roll in the edges and hot glue over the seam to keep it soft for the little one.
2. For the flowers, cut a 3 inch square in the yellow stripes and a 3 1/2 inch square from the white. Cut out a wiggly shape like an amoeba. It does not have to be perfect. Now place a dob of hot glue in the center and squish to give the flower ripply volume. 
3. For one center, take a strip of gray and make a rosette. For the other, take a strip and tie knots all along it. Then, wrap it round itself in a spiral twisting as needed to make it fit right. Hot glue them to the center of the flowers.
4. Hot glue the flowers to the headband.

Ug, I love it so much! It is just dying to be donned on a sweet little soul! I am excited to try some more techniques!

If you like this necklace, you might also like our Fabric Necklace, Tshirt DIY Necklace, or our Quite a Spectacle Anthro Knock off.

Tulip Tie Dye Kits are available at Walmart, Walmart Canada, Michaels, JoAnn, A.C. Moore, Hobby Lobby, Hancock Fabrics, Meijer. Tie dye kit contents and colors may vary by store.

See more fun ideas from ilovetocreate.com on…

  • Twitter: http://twitter.com/ilovetocreate (@ilovetocreate)
  • Facebook: http://www.facebook.com/ilovetocreate and http://www.facebook.com/ILoveTulipFashionArt
  • Pinterest: http://pinterest.com/ilovetocreate

Disclosure: I wrote this post as part of a paid campaign with iLoveToCreate.com and Blueprint Social. The opinions and creations in this post are my own.

P.S. Don’t forget to sign up for free Tipsy updates via RSS or email.

We have decided to truncate our feed to help protect against stolen content. I apologize for any inconvenience. Please love us anyway. 🙂

DIY Swim Suit Covers

March 27, 2012 By Michelle Barneck 10 Comments

I am that girl who buys the 5XL t-shirt from the dollar store because she likes the color. You know, you figure what the heck it’s $1, you’ll do something with it someday. Well my friends, today I am vindicated. Not only did I use that 5XL shirt from my stash, but I used a sewing machine without breaking something. 

For some reason the only swim suit covers I could find last month for our trip either didn’t cover much of anything, or they were long sleeved (which I honestly don’t understand). Those of you who are fair skinned and farmer tanned know that it doesn’t take long for our shoulders to completely sizzle, thus began (and ended) my search for cute swim suit covers that had sleeves, but also covered enough that when I bend down with my kids I’m not embarrassing myself.
How to Make Your Own Swim Suit Covers

Supplies:
5XL (or very large) shirt
Pins
Scissors
Sewing Machine
Thread
1. Turn the 5XL shirt inside out and lay your fitted t-shirt on top of it.

OPTIONAL: pin out about 3/4-1 inch on each side using safety pins. This makes it so you can turn it right side out and try it on to make sure it will fit right. Remember if you did not pre-wash the shirt it will probably shrink a bit.
2. Once you know where you want the seam pin with straight pins. I continued the flare of the fitted shirt all the way to the bottom so the skirt would be a short A line.
3. Trim off the excess material from the sides. 
4. My seams lined up with the shoulder seams on the large shirt so if I cut it off right on the seam it would have been a cap sleeve. I wanted the sleeves a tad longer so I just left about an inch outside the seam.
5. Sew along the pins and stop when you get to the sleeve seams to finish the sides for a plain t-shirt dress.
6. Use strips of the excess material to form your ruffle. I had 4 strips about 3 1/2-4 inches wide and 13 inches long. You can sew all four strips together for one long strip or do two at a time to make it easier. 
7. Sew a loose stitch all along one edge of the strip about 1/2 inch from the edge leaving strings on each end. Pull one of the strings, holding the other in place to gather the fabric. 
8. Pin the gathered strips on to the skirt. I ended up with seams on the right and left sides and in the middle of the front and the back, but they are not visible because of the gathering.
9. Sew a straight stitch right down the line where you gathered to attach the ruffle.
Congrats you made your very own swim suit cover! 
I wore this all day on the dive boat in Maui and it was so comfortable! I borrowed my mom’s sewing machine  (cause well I killed mine after 3 uses) and when I told her what I was doing she gave me the courtesy smile and nod like “this should be interesting.” When I told her in Maui that this was the one I made, couldn’t believe it.
I also made the matching ruffly headband from the shirt material, but this post was getting massive, so we’ll save that for another day.
I hope your having as much fun with the De-stash Bash as I am!
If you like this post you may like these projects made with t-shirts:
  • DIY Shoe
  • DIY Shirt to wear over your suit
  • DIY flip flops
  • T-shirt DIY Necklace

P.S. Don’t forget to sign up for free Tipsy updates via RSS or email.

We have decided to truncate our feed to help protect against stolen content. I apologize for any inconvenience. Please love us anyway. 🙂

DIY Shirt

March 26, 2012 By Michelle Barneck 4 Comments

Spring is here which means swim suit season is around the corner. My new swimming suit came with a skirt cover up, but I wanted a cute tank to pair with it. The hubs had lost some weight and I guess you could say his loss was my gain because I found the perfect shirt for this project in the donate pile. I do not claim to be a seamstress, but seriously this DIY shirt is easy enough for even the most beginner.
DIY shirt supplies:
Old shirt (really light jersey so it flows nicely)
Scissors
Pins
Sewing Machine
Ribbon
1. Start by cutting off the sleeves and the neckline at a diagonal.

2. Fold over diagonal sleeve area and pin. Sew to have a finished edge on your arm hole.
3. Cut the neckline straight across on the front and the back of the shirt. Fold over about 2 inches (far enough that you leave a place for the ribbon to go through), pin in place and sew.
4. Attach a safety pin to the end of your ribbon and thread it through the front and back of the shirt. 
5. Put it on and tie a bow to gather the fabric to your liking.
 
Mine also has the back higher than the front which I love because I can switch it around and wear it higher in the front or the back based on where I am getting too much sun. Freckles/fair skin + sun = burn.
I would love to see if you give this DIY shirt a whirl!
Hope you are enjoying the De-stash Bash!

If you like this post you may like these projects made with t-shirts:
  • DIY Shoe
  • DIY Swim Suit Covers
  • DIY flip flops
  • T-shirt DIY Necklace

P.S. Don’t forget to sign up for free Tipsy updates via RSS or email.

We have decided to truncate our feed to help protect against stolen content. I apologize for any inconvenience. Please love us anyway. 🙂
« Previous Page
Next Page »

  • Bloglovin
  • Facebook
  • Google+
  • Instagram
  • Pinterest
  • RSS
  • Twitter

Hi there! I'm Michelle. Mother of three little boys and one little princess. Welcome to A Little Tipsy, a place for exploring creativity and sharing inspiration.

Follow on Bloglovin


Visit Michelle Barneck {A Little Tipsy}'s profile on Pinterest.

Tutorials by Category


15 Family Reunion Games

Family Reunion Games Collage

15 Sprinkle Party Ideas

Sprinkle Birthday Party
Creative Commons License

© Copyright 2014 A Little Tipsy · Site Designed by The Fairy Blogmother · Web Hosting by RFE Hosting

This website uses cookies to improve your experience. We'll assume you're ok with this, but you can opt-out if you wish.Accept Read More
Privacy & Cookies Policy