A Little Tipsy

Creative Tips & Ideas

  • home
  • About Me
  • the tipsy top
  • press
  • projects
  • contact me
[print_thumbnail_slider]

Garage Mud Room with Metal Lockers

January 9, 2014 By Michelle Barneck 7 Comments

Post sponsored by schoollockers.com.
I have always wanted a mud room, but let’s be real, in this house it just isn’t going to happen. There is no room inside to convert. Not even a closet I could make do. So, I got to looking around and there was a space that would work right outside the door in the garage. There is an odd place where the wall sticks out that we never really did anything with. It was a junk collecting place, but now it is the perfect place for each of my boys to have a little space of their own.
Read on to see before and afters!

As you can see, the before is not impressive. It was a dumping ground for junk, in this case boxes from Christmas. Anyone do much of their shopping online?

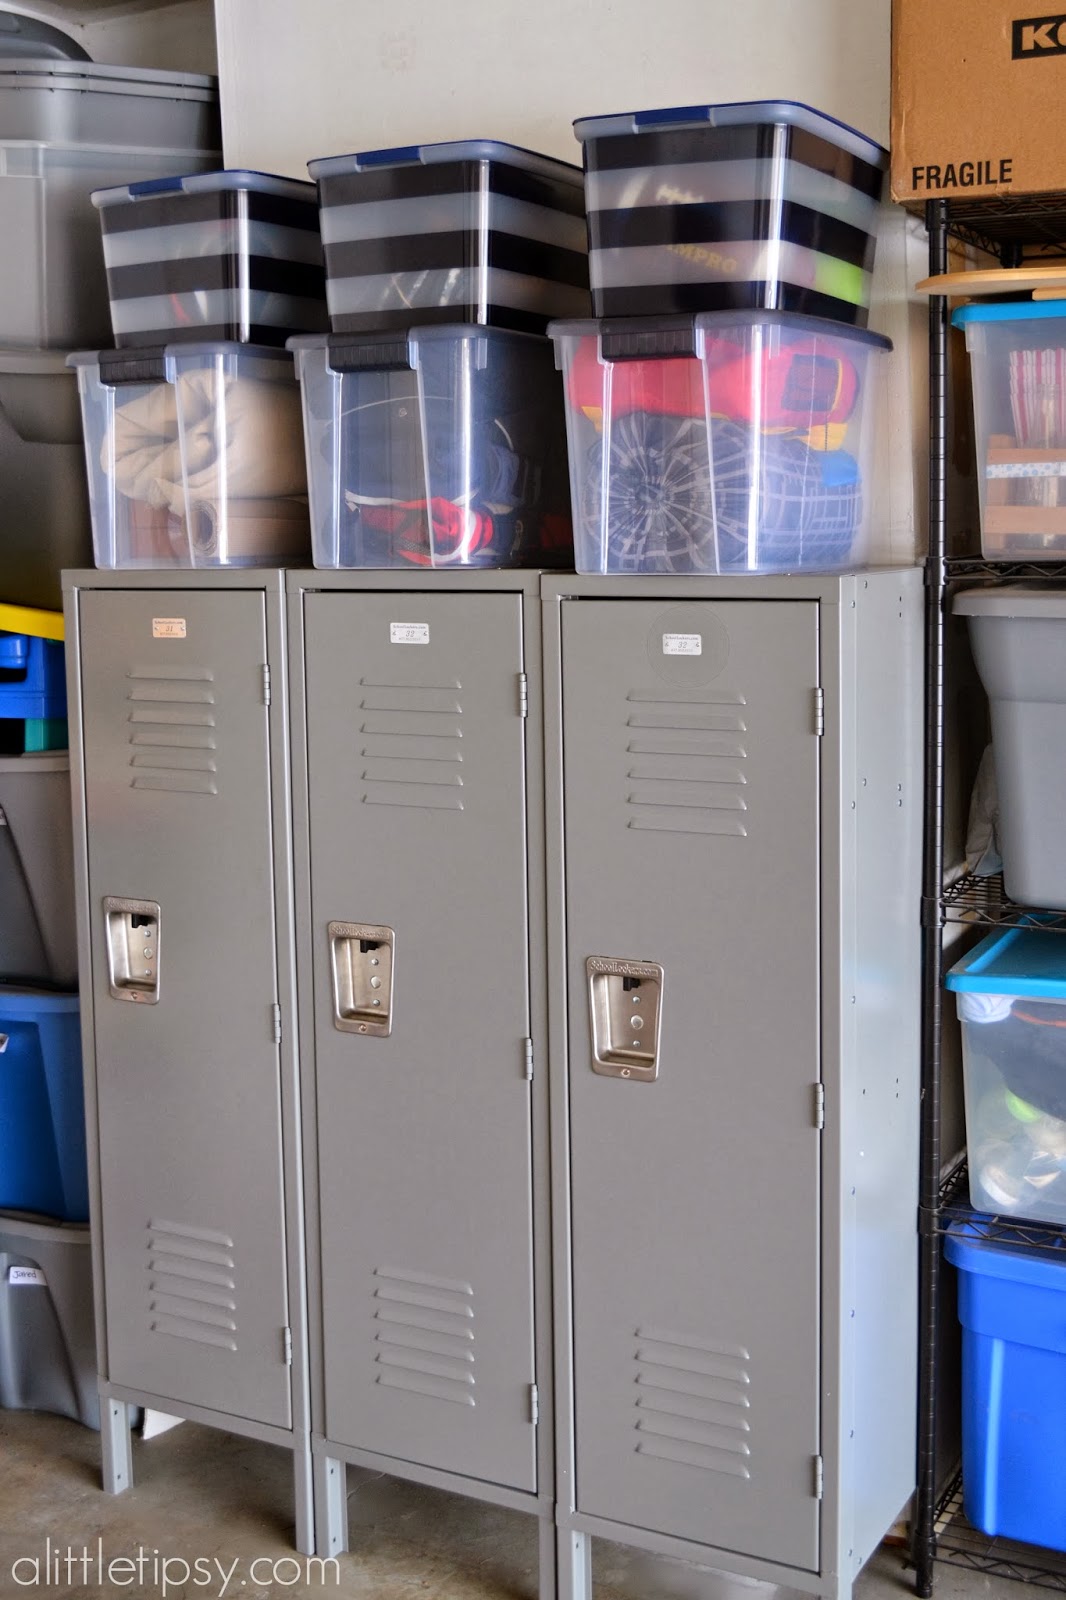
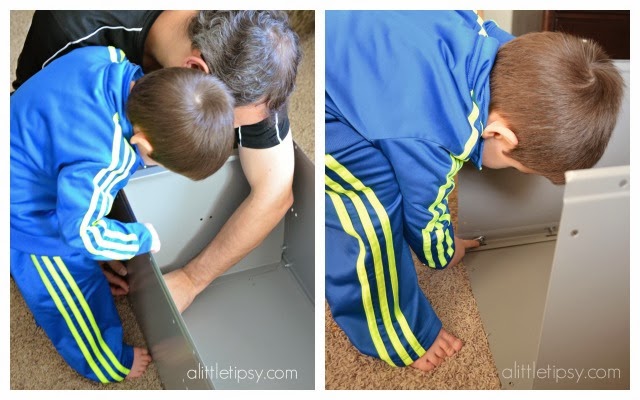
 We started by getting three metal lockers from schoollockers.com. I ordered gray, but they come in a rainbow of colors. They are 15″ x 15″ x 54″ and are the perfect size for my little boys and even for my husband. I’ll show you what I mean a little later. We all got to work putting them together. The assembly is super simple. My three year old and six year old could easily help with the nuts and bolts.

Once the lockers were all put together, we placed them in the garage. Our garage floor is sloped so we did not bolt the lockers together, but with them up against the wall we felt they were secure enough individually. 

My boys love having their own space to fill how they like and I love that there are tons of hooks for storage. For my six year old that means: coat, backpack, snow boots, basketball and hat. My husband’s holds his cleats and multiple jackets and my three year old’s holds snow clothes and umbrellas. I love that men’s size jackets fit and little kid jackets and backpacks leave room for items on the floor. I’ll be adding carpet squares (they have some at the dollar store I can cut to size) to the bottom to catch water from dripping clothes/boots.
We have limited storage in our house and with our boys transitioning to share a room we needed space in their closet. Vertical space is a nice commodity so we added some plastic storage bins on top of the lockers to hold, sports gear, sleeping bags, etc. that were cluttering up their closet. The current sport can be housed in their locker (thus the basketball) and the rest on top in the bins until their season comes around again.

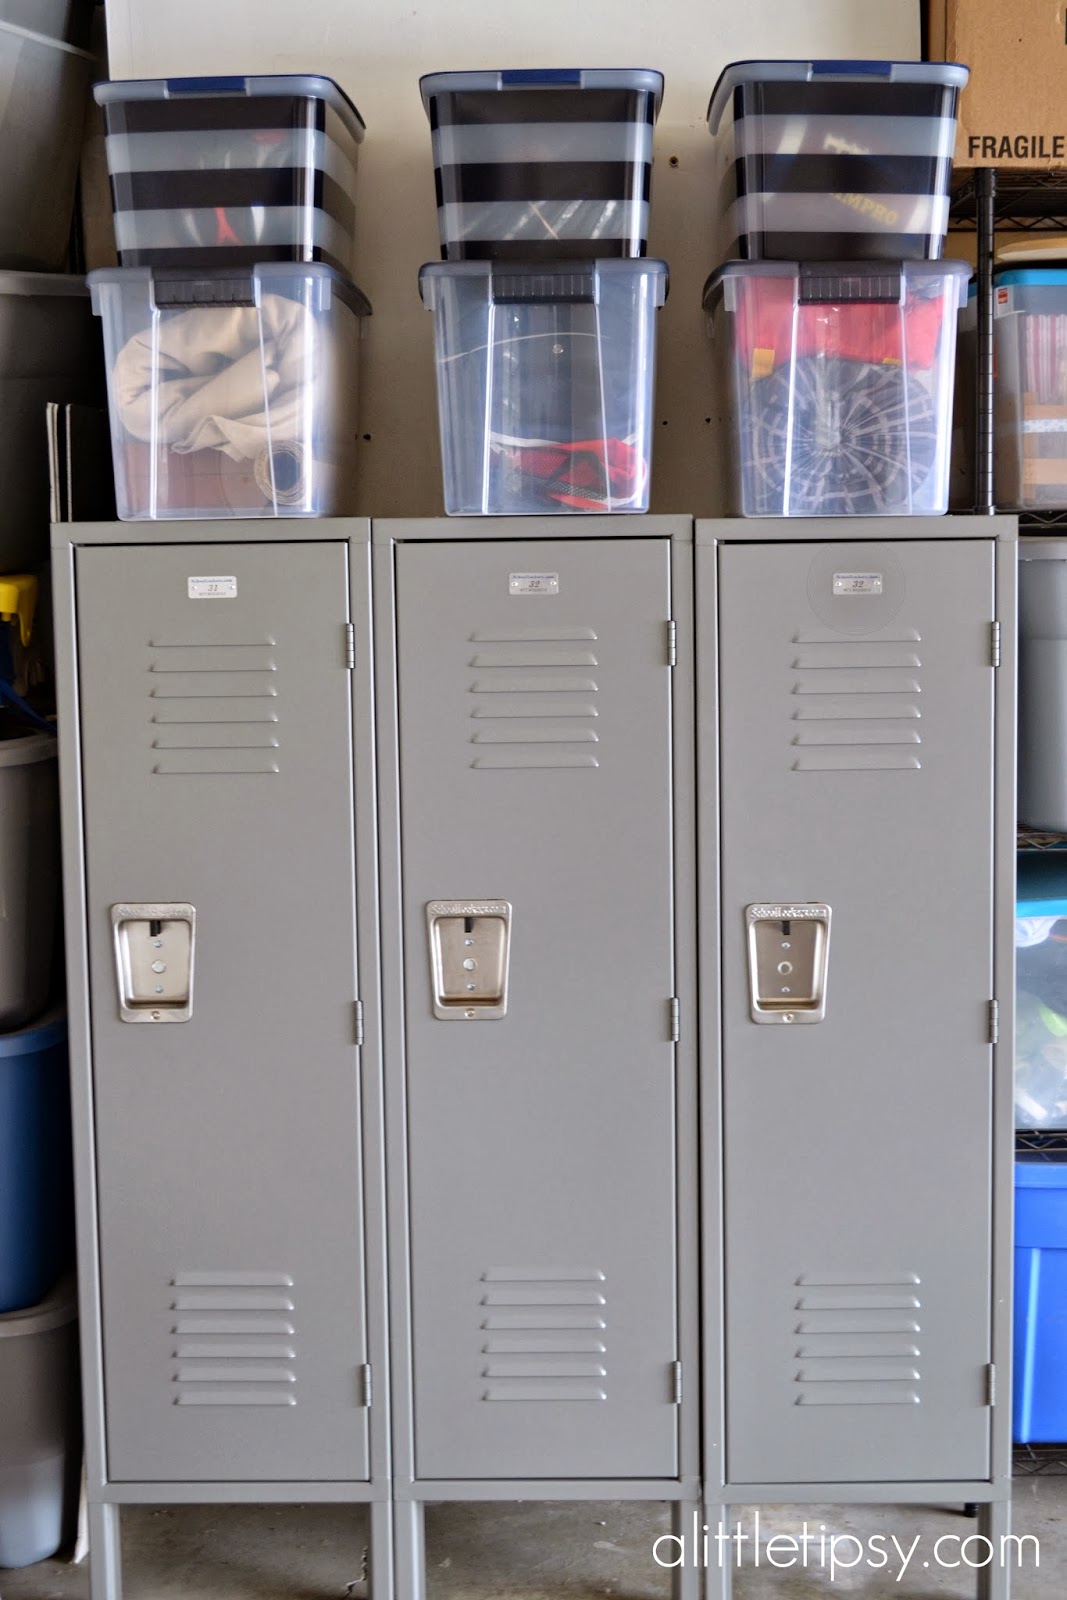
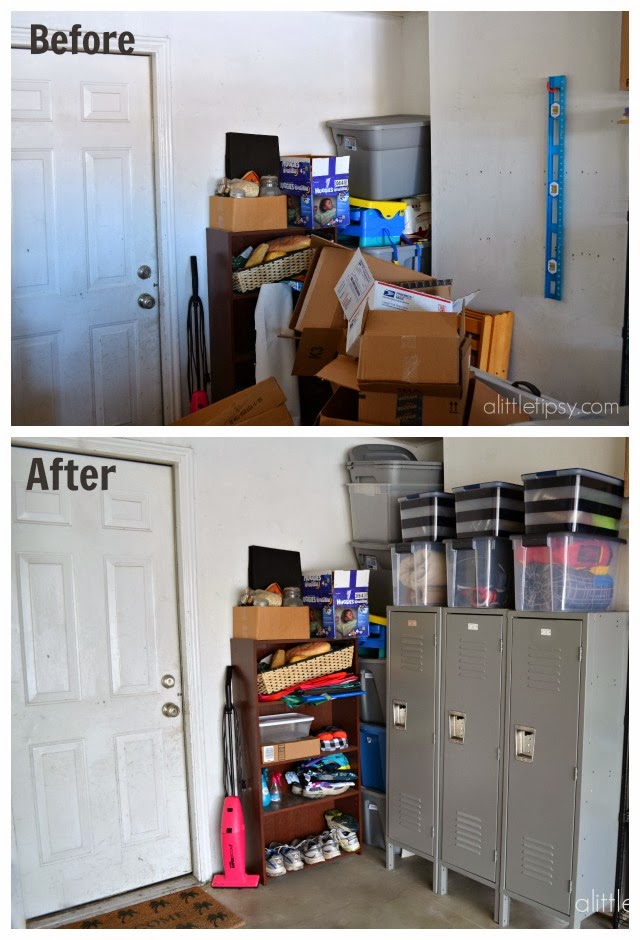
I am loving this garage mud room and the boys think the lockers are super cool like the kind they’ll get at school when they are big kids. Mom is happy because I have a feeling metal lockers will be able to take a beating from growing boys and now some of the closet clutter has an organized home. My kids can’t wait to personalize their lockers with name magnets. I also think we will add a shelf above the bins for trophies and awards. It’s the perfect place to show off their collections without having an overly crowded dresser top.

What do you think? Would you use metal lockers in your garage/home?
Disclosure: I was provided lockers for review. I liked the lockers so much that I purchased a third to have one for each of my guys. The opinions and ideas are all my own.
We have decided to truncate our feed to help protect against stolen content. I apologize for any inconvenience. Please love us anyway. 🙂

Cub Scout Participation Chart

October 4, 2013 By Michelle Barneck 3 Comments

In Cub Scouts we start each week by repeating the Pledge of Allegiance, the Cub Scout Promise and the Law of the Pack. We work with the Wolves so it is good practice to help them learn it for the rest of their time in Cubs. Between asking for a volunteer for each one, them looking for it in their book and standing up and sitting it each time was taking up to 20 minutes to get through this which is ridiculous considering we only have an hour. We needed a chart to streamline so each cub scout got a chance to practice.
I threw this participation chart together with some clothes pins, cardstock and paper scraps. I covered a clothespin with paper for each scouts name to rotate through the chart. I added an “arrow point” for each assignment and we just move the names down each week so everyone gets a turn.
We are a religious pack so we start and end each time with a prayer. You could easily leave these blank or change them to something specific for your pack. The boy who says the Pledge asks the boys to stand and the boy who does the Law of the Pack says ” too” to have them sit.  I left the last one blank, but the boys decided to add treats on that one so each scout will taking a turn bringing treats to share at the end. 

To eliminate the book searching, I wrote the Cub Scout Promise and the Law of the Pack on the back of the chart for a little cheat sheet until they have it memorized. The chart has been a huge help and now it takes under 10 minutes to get through all of it so we have the bulk of the time for the activity. 
Do you work in/have boys in scouts? What things have helped you?

We have decided to truncate our feed to help protect against stolen content. I apologize for any inconvenience. Please love us anyway. 🙂

Storage Room Organization in One Day

September 19, 2013 By Michelle Barneck Leave a Comment

The other day I heard a crash and went downstairs to see that  shelf in my storage room had crashed to the floor and there was a sea of food storage covering the floor. It was a disaster and it was finally time to give my neglected storage room a little attention. I had probably, ok, surely been stacking the shelves with way too much and it was time for action. A trip to the hardware store and $117 later we were ready to install eight additional shelves that were much stronger than the originals. 

Overall it was fairly simple. 1. Clear everything out. 2. Add additional brackets for strength and more shelves closer together. 3. Cover the mismatched wood of the shelves with shelf paper. 4. Move everything back in with a purpose in mind.

We added two shelves on the left in the entryway, two more running the length of the wall, and a set of four to hold our five gallon water jugs. Our shelves use brackets, so we added an extra bracket holder to each set for strength, along with making the shelves a lot closer together so they would not be so loaded down.

Tips for organizing your storage or pantry:

  • Use the vertical space. Adding shelving to a small space can made it hold twice as much.
  • Buy clear $1 plastic containers to house smaller packages of things like pasta and make them easy to stack. 
  • Organize so it is like shopping. It’s kind of fun to have everything lined up like a grocery store.
  • Organize everything by date with the oldest in front so you never have to question which to use and things are less likely to expire.
  •  Put the things you use most often down low so you can send the kids to grab items.
  • Cover shelves with shelf paper to add personality and cover mismatched or stained shelves.
  • If you have buckets for Flour, Sugar, Rice, etc. Get the easy access spin off lids! They save you time and frustration. I got mine at Macey’s grocery store.
  • Can rollers are fabulous to use vertical space but still have easy access to cans. Plus they rotate your store for you!
  • Keep #10 can in their original boxes and label with what is in them and expiration dates. This keeps them easy to move, but you don’t have to search wondering what is where.
  • Keep 72 hour kits easy to grab in an emergency.

This organizing makeover gave us access to twice as much space! I was able to move things in that were stacked ominously in the corner of the playroom. Our 72 hour kits and emergency supplies were in a huge tote on the bottom of that stack. Not great for access. They are now in backpacks in the entry of the storage room, easy to grab and go if needed.

What are your favorite storage/organizing tips? How do you make the best use of your space?

We have decided to truncate our feed to help protect against stolen content. I apologize for any inconvenience. Please love us anyway. 🙂

DIY bookshelf

October 29, 2012 By Michelle Barneck 2 Comments

With my recent craft room redo, I had a small budget and so tried to shop my house for pieces I could re-purpose to use in the space. There was a little closet area where I wanted to store unused home decor and needed some shelving. I found two sad bookshelves residing in our family room that needed some love, but would fit perfectly in the space.

I am a little embarrassed to admit those were in our house. I think they came with Jared when we got married. I had ignored them sitting there full of books for so long that I hadn’t realized how ugly they were. 
So, how do you update a cheap laminate bookshelf without sanding or spending a ton of money?

Cover stain primer my friends. A couple coats of this stuff and paint away! 
DIY Bookshelf

1. Carefully pry off backing. Mine was attached with staples, so I made good use of a butter knife and removed the cardboard like back piece.
2. Apply two coats of primer letting each one dry completely. I used a brush in the corners and a low-nap roller for the rest.
3. Spray paint using multiple light coats.

If you’re lucky and your family is on a father/son camping trip you’ll do it all in pjs and bare feet in the garage and end up looking like this. Yikes!

4. Cover the backing with your favorite patterned fabric or economical choice wrapping paper. I used a glue stick around the edges where the bookshelf would attach and spray adhesive on the rest.

5. Wrap the paper/fabric around the edges of the boards and secure with glue.

6. Have a friend hold the back in place as you re-attach it. I used a nail gun, but a staple gun would work just as well.

Move them in to place and admire your handiwork! It has been so nice having a storage area for all my home decor items.

If you like this, come see the rest of my craft room makeover.

P.S. Don’t forget to sign up for free Tipsy updates via RSS or email.

We have decided to truncate our feed to help protect against stolen content. I apologize for any inconvenience. Please love us anyway. 🙂
Next Page »

  • Bloglovin
  • Facebook
  • Google+
  • Instagram
  • Pinterest
  • RSS
  • Twitter

Hi there! I'm Michelle. Mother of three little boys and one little princess. Welcome to A Little Tipsy, a place for exploring creativity and sharing inspiration.

Follow on Bloglovin


Visit Michelle Barneck {A Little Tipsy}'s profile on Pinterest.

Tutorials by Category


15 Family Reunion Games

Family Reunion Games Collage

15 Sprinkle Party Ideas

Sprinkle Birthday Party
Creative Commons License

© Copyright 2014 A Little Tipsy · Site Designed by The Fairy Blogmother · Web Hosting by RFE Hosting

This website uses cookies to improve your experience. We'll assume you're ok with this, but you can opt-out if you wish.Accept Read More
Privacy & Cookies Policy