A Little Tipsy

Creative Tips & Ideas

  • home
  • About Me
  • the tipsy top
  • press
  • projects
  • contact me
[print_thumbnail_slider]

Glitter Candle Gift Idea #MadeWithMichaels

November 13, 2014 By Michelle Barneck 33 Comments

Michaels sent me a gift card and a list of Pinterest inspired projects with a challenge to make my own holiday DIY project. I saw this glitter candle and knew it would translate in to a great gift idea for my little guy’s preschool teacher. I chose to do a winter spin on the glitter candle gift so she can keep it out through January and it will keep her classroom looking cute and smelling great!

Easy Glitter Candle Gift idea

ITEMS NEEDED:

  • Ashland Jar Candle
  • Recollections Glass Glitter
  • Mod Podge Matte
  • Foam Brush
  • Paper Plate
  • Celebrate It Satin Ribbon (Pewter)
  • Wood Snowflake Ornament
  • Scissors

Glitter Candle Gift Supplies

Pour a good amount of glitter on to a paper plate and spread to cover the bottom. I love how this glass glitter is almost like tiny mosaic tiles and really shines!

Blue Glitter

Using a foam brush, paint one side of the jar with a coat of mod podge. Roll that side of the candle in the glitter and let it dry. Repeat for the other side. Tie a ribbon around the neck of the jar, thread the ornament on to the ribbon and tie a bow to secure.

 Glitter Candle Gift Idea

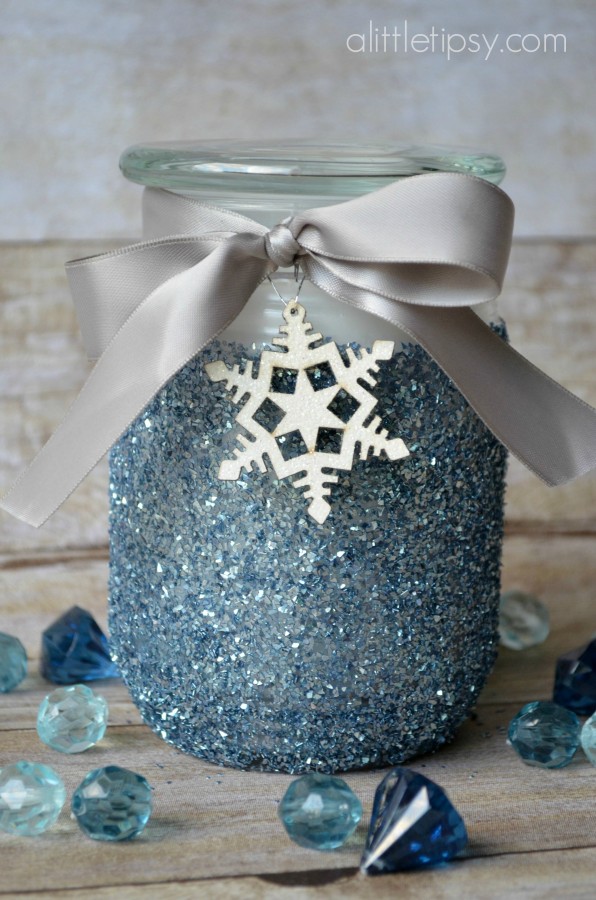
This is such a simple project with a big impact! We’ll be gifting this glitter candle to his teacher with a note that says, “Being in your class is ‘snow’ much fun!”

You can join the party at your local Michaels store on November 15th from 1-4 p.m. to create your own top holiday Pinterest craft! It should be a lot of fun!

From Spooky to Sports

October 22, 2014 By Michelle Barneck 2 Comments

I am a budget loving kind of gal. When I make a large purchase I want it to be something that is going to be able to be styled multiple ways so when I change my mood or when the trend winds shift I can easily alter small things to make big impact without having to make big purchases.

A few months ago, my boys moved in to the same room and needed more clothing storage. We received this Sauder chest of drawers and I dressed it up to match their paleontologist room.

Well, my six year old decided he is too big for a dinosaur room now and wanted a sports room. We have been racking up the little league trophies so I thought it would be the perfect way to meet his request and have a place to store them all. This transformations cost me nothing. Just grabbed gear and awards we had on hand.

It turned in to a nice display of all his hard work and achievements and my three year old is so proud of his soccer trophy right in the middle.

We even put together a fun way to display his karate belts and the first board he ever broke signed by his Hanshi Darren Cox, now 13 time World Champion.

You’d think they would be over the moon at this point, but they LOVE Halloween and just a few days later decided the needed some spooky fun in their room. Lucky for me it is super easy to swap out their dresser decor, so out when the baseball and in came the Halloween Decor.

With them being six and three we did not want anything that would give them nightmares so we went with glittery bats, pumpkins, and spiders. We set up a countdown for fun and a little spider my son made from clay and frosting eyes. Again it cost me nothing as I just took from my existing decor stash.

I’m loving how easy it is to switch up the look of their room by having staple pieces and simply changing out the accessories.

For more versatile furniture ideas and inspiration, check out our Multi-functional Furniture Pinterest board!

This is a sponsored conversation written by me on behalf of Sauder. The opinions and text are all mine.


Serving Up Autumn with Tea Rose Home

October 3, 2014 By Michelle Barneck 1 Comment

Hello everyone! I am Sachiko from Tea Rose Home where I share sewing, refashioning and craft projects. I am so happy for Michelle and her family for their new bundle of joy. I met Michelle in person a few years ago, and I really loved her warm down to earth manner. She is the type of person that when you meet her once you will consider her your friend. I am excited to share my autumn craft tutorial with you today.
I usually don’t like over-the-top seasonal decorations (except Christmas), but it is fun to have some items here and there to get the feel of the season.
I found a unique plastic plate at Hobby Lobby the other day. It is covered with burlap and get this… it was only $2.99. I had a light bulb moment and knew exactly what I wanted to create with this.

{You will need}
Plate
A few fall stems
glue gun
{How to}
1. Separate the small branches off the stems. I chose the ones in the picture, but you can choose something completely different and create your own look. Right now, fall stems are on sale for 40% off at most of the craft stores.

2. Start gluing them onto the plate. It is so much easier to create a perfect circle with a plate. All you need to do is to glue the stems along the inner edges of the plate.

3. Keep going until you connect the ends. Make sure that there is no glue showing. Add some branches to those spots to make it pretty.

The great thing about this Wreath on a Plate is, you can decorate in two ways.
I used a plate stand to prep the plate. Now, I can enjoy the small ‘Wreath’ on my buffet chest.

or, I can lay it flat and put candles and such to decorate the space.

I love versatility. 🙂
Thank you for having me here today, and I hope you enjoyed my post. Please come visit me and explore other sewing/craft posts such as these:
Dollar store find to a ring display case;

If you like sewing, you might like my She Carries flowers bag…

Burlap and Leather Thanks Banner from BD Design

October 1, 2014 By Michelle Barneck Leave a Comment

Hello Tipsy friends. I am Brandy and I’m the author over at BD Design, a blog providing ideas and inspiration for home decor, simple DIY crafts, and home improvement projects mixed with a little bit of real life! Today I’m sharing a quick tutorial for a burlap banner that is perfect for Thanksgiving.

 Right now I am loving LEATHER! I thought I would dress up the usual burlap banner by adding some texture with these fantastic leather pieces.
I found this gorgeous metallic bronze leather at Hobby Lobby and cut out the shape a little smaller than my banner pendant. Isn’t it SO pretty?

I wanted more texture on top of the leather so I sent a cereal box through my Silhouette and cut out the letters T-H-A-N-K-S. Cereal boxes make the best chip board! Instead of throwing them away, cut the boxes up and use them for future projects! If you don’t have a Silhouette than you can just buy chip board at your local craft store. Then I painted the letters GOLD.

I attached the pendants together with rich colored ribbons and lace. You can embellish as much as you want. I knew I would be hanging this banner on my hutch that already has a lot going on so I wanted to keep it clean and simple.
There you have it!

Be sure to check out more home decor tutorials or holiday ideas on FB, Insta, and Pinterest like my Fall Porch Ideas, or my Gold and White Striped Painted Napkins, or my traditional HARVEST MIX.


Michelle, THANK YOU so much for having me today! Happy Fall everyone! xoxo.

Next Page »

  • Bloglovin
  • Facebook
  • Google+
  • Instagram
  • Pinterest
  • RSS
  • Twitter

Hi there! I'm Michelle. Mother of three little boys and one little princess. Welcome to A Little Tipsy, a place for exploring creativity and sharing inspiration.

Follow on Bloglovin


Visit Michelle Barneck {A Little Tipsy}'s profile on Pinterest.

Tutorials by Category


15 Family Reunion Games

Family Reunion Games Collage

15 Sprinkle Party Ideas

Sprinkle Birthday Party
Creative Commons License

© Copyright 2014 A Little Tipsy · Site Designed by The Fairy Blogmother · Web Hosting by RFE Hosting

This website uses cookies to improve your experience. We'll assume you're ok with this, but you can opt-out if you wish.Accept Read More
Privacy & Cookies Policy