A Little Tipsy

Creative Tips & Ideas

  • home
  • About Me
  • the tipsy top
  • press
  • projects
  • contact me
[print_thumbnail_slider]

Feature Friday-Joys of Home

October 16, 2009 By Michelle Barneck 6 Comments

I am so pleased to present today’s Feature Friday Joys of Home. I cannot disclose the amount of time I spent on Joy’s blog preparing for this post, while my poor husband and child were ignored. There is just that much good stuff! I couldn’t help myself! I am so excited to share, but we must first get to know this amazing woman. Here we go with the one minute interview…

What is your favorite crafting tool or secret weapon?
I suppose my readers would say the obvious choice would be any type of paint. I love to transform almost anything with paint. My husband would say it’s my nail gun. However he loves it too, so I rarely get to use it. And I would have to say that my favorite tool/secret weapon is a tie between the internet and magazines. I get a lot of inspiration for my many projects from those two sources. Maybe too much inspiration since I have a to-do list about a mile long!

What is your favorite room in the house and why?
My favorite room would have to be my living room. Oh there are so many reasons why I love this room. It has five windows on one wall and three are over six feet tall and four feet wide so there’s always plenty of sunlight. With the exception of the flooring, we’ve redesigned and given every surface a makeover, including the placement and style of the windows. We’ve designed and added the moldings. I aged the beam on the ceiling using paint (and faced my fear of heights at the same time). It contains my suitcase stack and several pieces of furniture that we designed and built. And perhaps most of all, it’s the room where most of our favorite family memories have been made.

What is your all time favorite thrift store find?
This is a hard question since the majority of my home has come from the thrift store! I’m going to take the easy way out and say that my favorite thrift find is the latest one I’ve brought home, especially if it inspires me to make some changes in my home.

What is your favorite color of toe nail polish?
Oh dear! True confessions: I really don’t like the look of my toes, so I don’t wear polish. I would have to say that that’s one of the few spots where paint won’t make an improvement.

Now for the unveiling…my Joys of Home crush started with this candy dish.
Joy is asked to bring after dinner mints to a gathering and she shows up with this Over the Top Candy Dish. Talk about rocking the lame assignment!


This next post is a lesson I SOOO need! I have a really silly fear of color. I always end up doing everything in neutrals because they transcend through time and will be good when we sell the house. Do we have any plans of selling? No, so why does this thought creep in to my head when re-doing any room in my house? Silly. Let Joy help you with easing in to those pops of color.

I love this White pumpkin display and I covet (yes covet, don’t judge me) those suitcases. I can’t even find one good one. That is because they are all in Joy’s living room. Hoarder. 😉

I caught on to the whole DIY moss ball craze going around, but never thought to do Decorative leaf balls. Aren’t they festive! Love.

You know how I love a nice filled vase. This Spider Hurricane makes my Halloween loving heart smile!
Pumpkin trifecta. There is just no other way to describe it! This post will raise you up!
It’s time to start thinking about Thanksgiving crafts. How about this Be Thankful sign? And as a side note, that is her coffee table. Yep, a green door. So cute!

Joy shares some of her Thanksgiving decor. I am not usually a big fan of turkeys, but these shelves make me swoon!

Those candlesticks, old ballistrade from her neighbors porch. Fabulous! used for the legs of her coffee table too!
I did a happy dance when I found some skeleton keys at a garage sale recently. Again Joy is hoarding. Doorknobs and keys and instruments oh my! Thou shalt not covet…I am loving the starfish with the salt! Joy shares some fantastic Candle decor ideas. How many things can you think to decorate a candle with.

Keys please! If you can’t find some, make some. You will die when you see the before!
All of you avid reader know my love for laundry and anything decor related for the laundry room. Dryer sheet storage, because why not! Hmm. I think I may have a box like that. 🙂
Well folks, we are unfortunately out of time! It is after 11 and past my bedtime. Go check out Joy and trust me, do it when you have some major time to spend. It’s addicting!

Great ideas and tips Joy! You are now entered in the Hall of Fame as Tipster of the week!

P.S. Don’t forget to sign up for free Tipsy updates via RSS or email.

We have decided to truncate our feed to help protect against stolen content. I apologize for any inconvenience. Please love us anyway. 🙂

Easy Spider Craft

October 15, 2009 By Michelle Barneck 3 Comments

I wanted to do a little craft that my little guy could play with. I also needed a little something for my spooky banner. I thought a spider might be easy and I was right!

All you need is:

  • Chenille type yarn
  • Furry yarn
  • Scissors

I got my yarn at Big Lots for a total $3.


  • Start by cutting 4 equal length pieces of the Chenille yarn. (Big spider-6 inches, Small spider-4 inches)
  • Grab all the pieces and tie them all in a knot.
  • For the big spider, wrap the knot with chenille yard until it looks like a round body and tuck the end piece in. For the small spider, skip this step.
  • Wrap the knot/body with the furry yarn until desired furriness and then wrap then end around itself and pull tight. This will make the web string.
That’s it! Your ready to play with your creepy new spider. Make a bunch and hang them around the house from furniture and banners for a spooky touch!

I think it adds a nice touch to my banner.

This is what the small spider looks like. A bit more realistic.


I think he approves of the spider craft!

P.S. Don’t forget to sign up for free Tipsy updates via RSS or email.

We have decided to truncate our feed to help protect against stolen content. I apologize for any inconvenience. Please love us anyway. 🙂

Tricks for Treats-Cute Halloween Cookies

October 14, 2009 By Michelle Barneck 6 Comments

I got together with my sisters while the men were away at Priesthood session of General Conference and we made the cutest treats. Ghost, mummy, pumpkin and candy corn cookies made for quite the Halloween dessert fest.

We started making these cute ghosts last year…

Just dip Nutter Butters in white chocolate (I microwave a bag of chocolate ships with one tablespoon crisco to make it runnier and easier to work with) and add mini chocolate chip eyes.

And in a bit of late night inspiration, I thought to reinvent them in to mummies. I love them!! So cute in their little white chocolate wrappings.

Just dip a spoon in the white chocolate and drizzle away!

I got the idea for these adorable candy corn cookies from Once Upon A Party. They are still my nieces favorite! They are so simple, just dye your sugar cookie dough with food coloring and dip in white and brown chocolate (same thing with the bag of chocolate chips and tablespoon of Crisco)! Adorable!

The pumpkins, well the pumpkins are a standard right? The only difference with these is…the topping is not frosting, it’s chocolate. Hope you enjoyed these few tricks to make cute treats!

P.S. Don’t forget to sign up for free Tipsy updates via RSS or email.

We have decided to truncate our feed to help protect against stolen content. I apologize for any inconvenience. Please love us anyway. 🙂

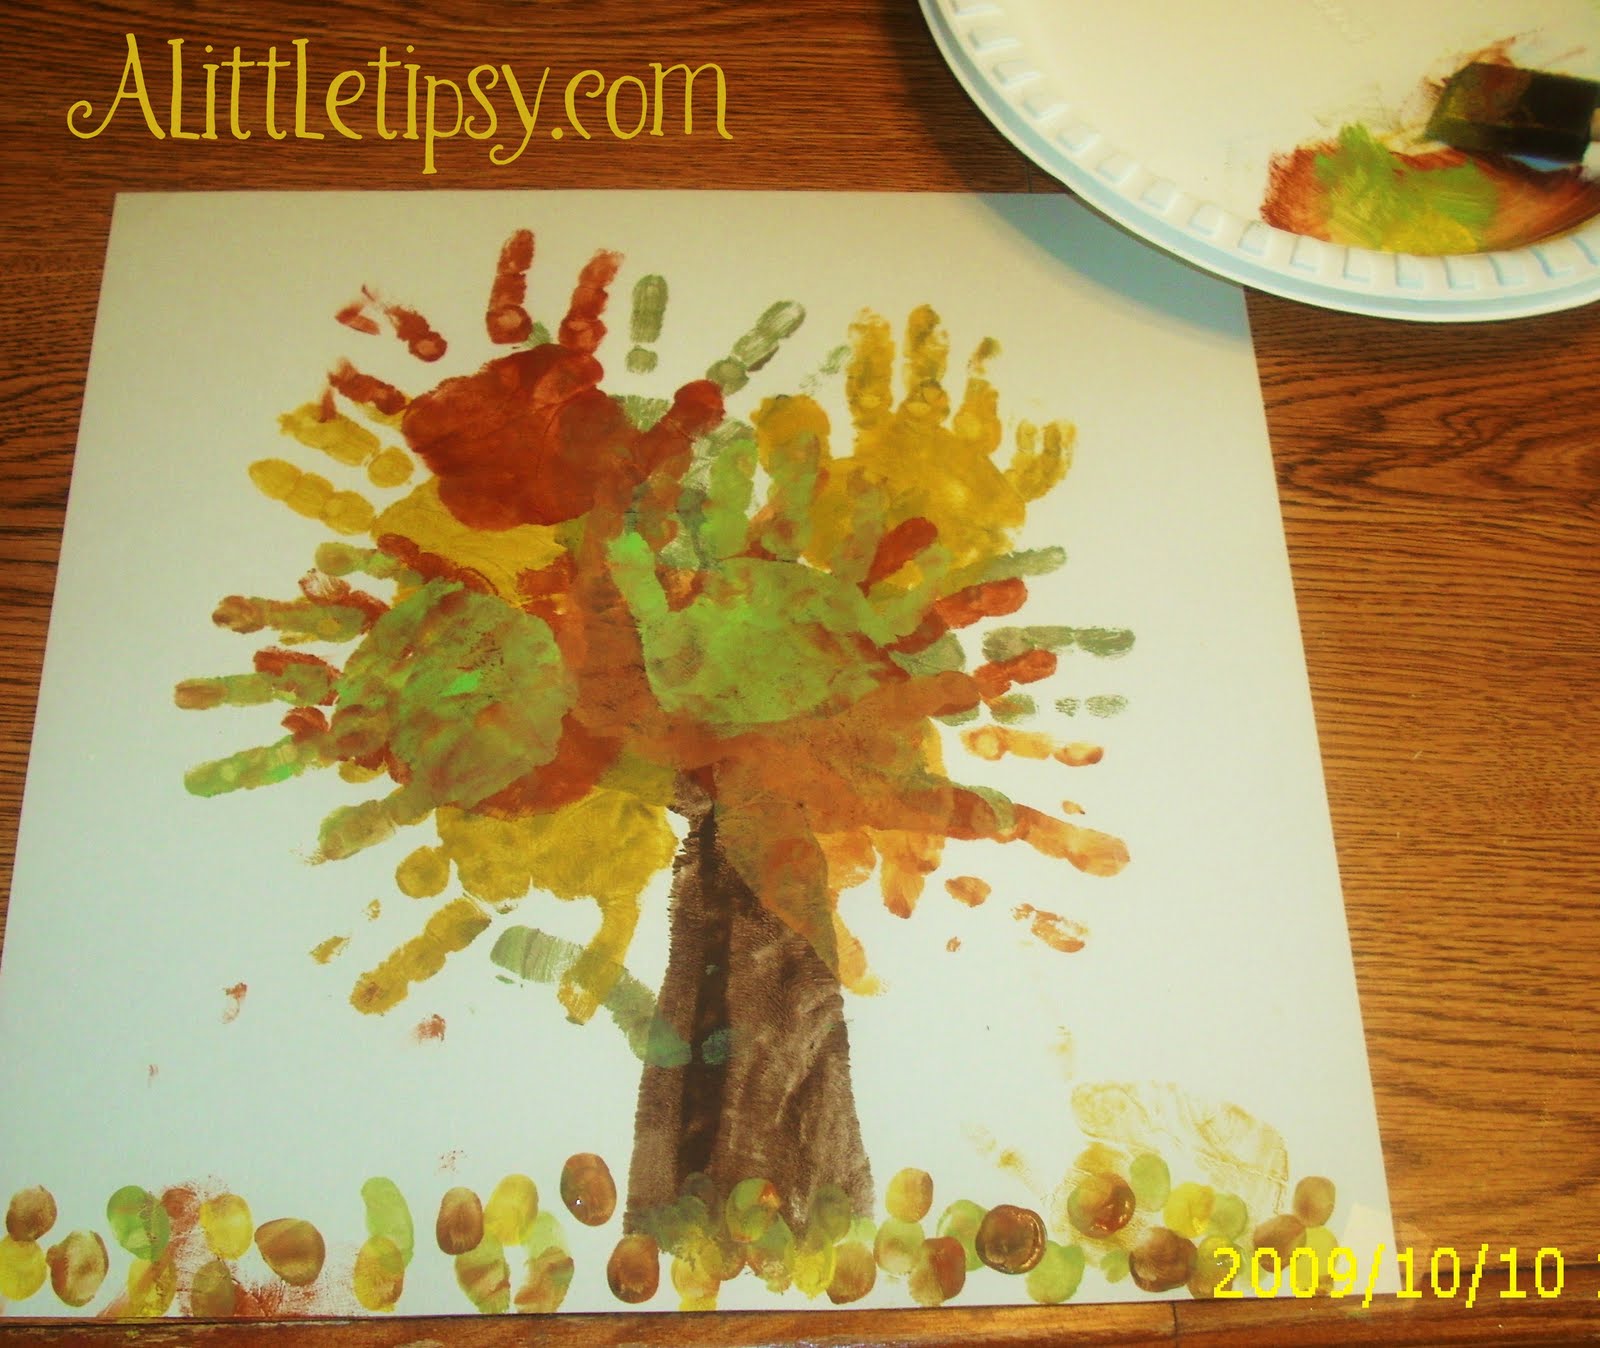
Finger Painting Fall Handprint Tree

October 11, 2009 By Michelle Barneck 13 Comments

I want to share a super simple little project to do with the kiddos that was inspired by those radiant fall colors, let’s call it Finger painting fall. I love a good alliteration. I love fall. It is my favorite season! The crisp air, the crunching leaves, the wardrobe change. I love the smells, the sounds, and the colors. Oh, the colors!!!

So here we go…

Supplies needed for you Kid’s fall handprint tree art project:

  • 12 x 12 cardstock (mine was a very light grey)
  • Craft paints (Red, Yellow, Orange, Brown, Green)
  • Foam brush
  • Disposable plastic plate
  • Hands (we all have a couple of those hanging around)

1. Start by squirting some brown paint on the plate and using the foam brush to paint the non-hairy side your little ones hand and arm brown. Then, place it with the hand spread wide in the middle of the page for form the trunk and the branches of your tree. Wipe arm and hand clean.

2. Choose your next color and squirt it directly over the brown. Mix it a little to give it a somewhat swirly look and paint just the hand this time. Stamp on two to three “leaves” pointing the fingers outward.

3. Repeat with remaining paint colors continuing to squirt and mix the paint and use the hands to stamp. We alternated hands and I wiped them off between each color to minimize the mess.

4. Once the tree has the fullness and coloring you like, dip just a fingertip in the paint to make leaves on the ground beneath the tree.

That’s it!! You’re done!

We loved ours so much that I framed it with a cheap wood frame I got from the craft store and painted black. Now our fall art project is proudly displayed in our kitchen for everyone to see.


P.S. Don’t forget to sign up for free Tipsy updates via RSS or email.

We have decided to truncate our feed to help protect against stolen content. I apologize for any inconvenience. Please love us anyway. 🙂
« Previous Page
Next Page »

  • Bloglovin
  • Facebook
  • Google+
  • Instagram
  • Pinterest
  • RSS
  • Twitter

Hi there! I'm Michelle. Mother of three little boys and one little princess. Welcome to A Little Tipsy, a place for exploring creativity and sharing inspiration.

Follow on Bloglovin


Visit Michelle Barneck {A Little Tipsy}'s profile on Pinterest.

Tutorials by Category


15 Family Reunion Games

Family Reunion Games Collage

15 Sprinkle Party Ideas

Sprinkle Birthday Party
Creative Commons License

© Copyright 2014 A Little Tipsy · Site Designed by The Fairy Blogmother · Web Hosting by RFE Hosting

This website uses cookies to improve your experience. We'll assume you're ok with this, but you can opt-out if you wish.Accept Read More
Privacy & Cookies Policy