A Little Tipsy

Creative Tips & Ideas

  • home
  • About Me
  • the tipsy top
  • press
  • projects
  • contact me
[print_thumbnail_slider]

DIY Wall Mounted Ironing Board

September 25, 2009 By Michelle Barneck 13 Comments

My little guy decided to do a little slice and dice on his finger during his battle with the wall mounted ironing board so I am taking some PTO. Sorry no Feature Friday today.

But, as a consolation prize I will show you the ingenious ironing board that my hubs built for me one Christmas. W have a really narrow laundry room that consists of one wall of cabinets over the appliances and one wall with a shelf and rod to hang clothes. No place for an ironing board. Yep, that is totally dirty laundry on the floor. I did laundry yesterday, this stuff multiplies like rabbits!

I do not want an ironing board set up in my bedroom and I am way too lazy to actually set it up and take it down every time I use it (Can you tell I don’t iron much? That is what the clothes hanging rod is for, eliminate ironing, hang stuff up with it’s warm. 😉 ). I would love one of those pretty ones hidden in the cabinet, but let’s be real who has $150 for that? So, my hubs took the cover from my college table top ironing board and went to work.

Mind you he did this while keeping it secret from me. Isn’t he inventive? At first I was like, wow… an ironing board…for Christmas. But now, I absolutely love it (accept for the whole maiming my child part). It is mounted in the 1/2 bath next to the laundry room. Oh, and the iron holder is from Ikea.

*EDIT: I asked my husband for a supply list for anyone who wanted to try to replicate it. He says…

I just made this up as I went along….

The screenshot has a good image. The hinge can be used as fence or shed door hinges. Print the picture and go to your local hardware store and you won’t have trouble finding it.

Supplies: (most I had on hand)

$5 cheap small ironing board (i just bought it for the cover and cotton padding and discarded the metal frame)
1×12 (used the same piece for the ironing board and the square-with-rouded-corners base. (you could replace this with a thick piece of plywood)
2×4 – Just needed a small one, you can get one big enough for free at any construction site. This is the base that screws to the wall.
1×4 – I used this because the 2×4 wasn’t quite thick enough and the ironing board would fall down
1×2 – I used this to make two runners by the hing. This is what keeps the ironing board level (otherwise the hing with just keep going down)
1 large Fence hinge
1 longer bolt and nut to use as a swivel (as I didn’t buy an expense swivel bolt)
2 big sqare washers (about 1/8th inch thick. (Maybe the square washer is 1-1/2″ x 1-1/2″) Really it was just nice to have a filler that allows for turning for the space between the ironing board and the square-with-rouded-corners base. I had these big square things on hand.
5 1-1/2″ lagg bolts for the hinge. – Mount it o to the wall, make sure that at least one row hits a stud.
2 1″ bolts and nut – that hook the hinge to the square-with-rouded-corners base. Notice in the picture the nut is on the bottom.
5 3-1/2 ” lagg screws to scre2 it to the wall.
4 square (i think 1/2″ by 1/2″) rubber feet – You can’s see them, but I have 4 rubber feet that provide stability between the ironing board and the square-with-rouded-corners base.
8 washers – I used washers on the bolts with nuts and the lagg bolts.
A dab of grease.

I didn’t completely tighten the bolt used as a swivel. Just snug enough you have to actually try to make the thing turn. I had a problem with the bolt loosening over time, so I actually used a clear glue to prevent that.

This was by no means under $5, but all the mounted ironing boards I found were $170 or more and I think I was around $30, but I did have some of it on hand. So I saved about $140 dollars.

Linking up with Trash to Treasure Tuesday on Reinvented.

P.S. Don’t forget to sign up for free Tipsy updates via RSS or email.

We have decided to truncate our feed to help protect against stolen content. I apologize for any inconvenience. Please love us anyway. 🙂

General Conference Activities for Kids-Temple Sewing Card and First Presidency Coloring Page

September 24, 2009 By Michelle Barneck 15 Comments

LDS General Conference can always be a tough time for kids. It can be difficult to keep them quiet and reverent during sessions for two days. We can all use some ideas and activities to keep the little ones interested and engaged. I created a couple of General Conference Activities for kids.

First off, I made a temple sewing card by adding dots to a Salt Lake temple image from Mormon Share. I printed it on a piece of 4×6 photo paper so it would have some strength. Then, laminated it using clear contact paper. Then, I punched holes where the dots were.


I took a piece of 3/8 inch ribbon and rolled one end and taped it so it would be like the end of a shoelace. Then, I tied it to the bottom corner.

Then, I gave it the ultimate test with the little guy. He loved it!

Salt Lake Temple Sewing Card
Click picture above to print a 4×6 sewing card

I also wanted a President Monson coloring page. Many of the ones I had seen did not look much like him, or did not have him smiling. Many of the pictures are so serious and I wanted my little boy to see his prophet happy and full of love. I found this picture of the First Presidency from the press conference when President Thomas S. Monson was called and immediately fell in love it. I threw it in to Photoshop and played with it until it looked like something to color.


<span class=
Click thumbnail above to print 8.5×11 page

Here are a whole bunch of other great General Conference Activities for Kids:

LDS.org Friend Activities and Conference Packet

Deseret Book activity packet

Sugardoodle’s Packet for 7-12 year olds

Conference Bingo

Conference Reverence Tents

General Conference Coloring Book

Conference Chase Game

I hope you have a wonderful conference next weekend!! I know I am looking forward to it!

———————————————————————–
Post sponsored by:


Laminating Using Clear Contact Paper-Chore Chart & Color Matching

September 23, 2009 By Michelle Barneck 9 Comments

Did you know you can use clear contact paper to laminate at home? I had some things I wanted to reinforce to protect them from little hands. Basically, so they would last more than five minutes. I wanted to be able to laminate any time I wanted without running out to the copy shop. This works great and is easier than I thought.

I saw these cute color matching cards from Homeschool Creations and loved the nice clear photos. I printed them on card stock and then measured out and cut the clear contact paper. I left an excess of about half an inch on each edge so that I would not have to be too careful. Then, I carefully peeled off the backing, put a sheet on each side, and rubbed out any bubbles. Last, I trimmed the edges and cut them up.

I also found this chore chart template over at Controlling My Chaos. Though my little one is a bit young for chores, he loves to help out and I wanted another way to reinforce good behavior. I “laminated” it and now I can add and erase check marks each week. He gets so excited every time he gets a check mark. He signs “more” and says “more checks.” Then, I tell him what he get the checks for and tell him another “chore” he can do to get more checks.

I love being able to laminate at a moments notice and it is so much cheaper! When I called the UPS store they said laminating was 99 cents a page. I bought my roll of clear contact paper at Wal-mart for just under $6 and have already laminated 15 pages. It is about half gone. Score!

P.S. Don’t forget to sign up for free Tipsy updates via RSS or email.

We have decided to truncate our feed to help protect against stolen content. I apologize for any inconvenience. Please love us anyway. 🙂

Make Your Own Gourmet Caramel Apples

September 22, 2009 By Michelle Barneck 9 Comments

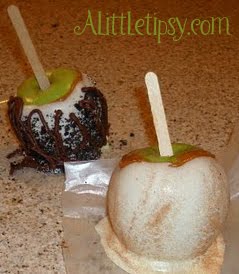
Every time we go to Park City we stop in The Village Candy Shoppe on Main Street to pick up a delicious caramel apple. Rocky Mountain Chocolate Factory sells them too. Want to know how to make your own? Here we go! I mean what is fall without a delicious caramel apple?

I taught my YW how to make Gourmet Caramel Apples for an activity. I wanted to make things super simple so they could remember how to do it and make them for their families, but you could definitely amp up the recipe with homemade caramel as long as it is a recipe that will stiffen over time.

Caramel Apple Basic Ingredients:
10 medium green apples (edit: Gma G suggests having them cold so the caramel sets up faster)
2 bags caramel bits (Love these! I bought them thinking they were regular caramels, but then opened them to find I did not have to unwrap them all. They are smaller balls so they melt easier too.)
Water
1 bag milk chocolate chips
1 bag white chips
Crisco

Optional ingredients: (these will be used for an additional coating depending on what flavor you want)
Cinnamon Sugar (used with white chocolate to make the apple pie flavor, my fav!)
Oreos
Butterfinger
Reese’s Pieces
Heath Bar
Chopped peanuts
anything else that you might like to try!

  1. Begin by washing the cold apples and removing the stem. Then insert the stick where the stem was. (The sticks come with the caramels.)
  2. Spread a good amount of wax paper on the counter and spray it with cooking spray so the apples won’t stick.
  3. Melt the caramel according to package instructions. I believe ours said something like add 2 T. of water and microwave for 90 seconds, stir and then melt until smooth. You want it pretty runny.
  4. Dip your apples in the caramel by tipping the bowl, holding the stick, and spinning the apple in it. (sorry forgot to take pics of all this) Cover all but about a 1 1/2 inch circle on the top. Continue turning the apple while the caramel drips off so that you have an even coat all around. Let it drip for quite a while, until it looks like a thin layer, otherwise you will have a huge puddle under your apple. Reheat caramel for additional apples as necessary to keep it runny.
  5. Place the apples on the sprayed wax paper and put in the fridge for about 20 minutes until the caramel is solid (I had them on a cookie sheet to make it easy to move them all at once).
  6. Get out two medium bowls and put each flavor of chocolate chips in each bowl. Add a Tablespoon of Crisco to each bowl. This will make the chocolate more viscous. Microwave until smooth, stirring at least once per minute.
  7. Repeat dipping step 4, but with the chocolate. Sprinkle with your Optional ingredient (oreos, butterfinger, etc.) so they stick to the chocolate.
  8. Place on sprayed wax paper and put in the fridge for 30 minutes.
  9. If you want to get really fancy, put the leftover chocolate in a ziploc, cut a tiny hole in the corner and drizzle over the apples.
  10. Enjoy! MmmMMmm! I like to cut mine up so it is easier to eat.

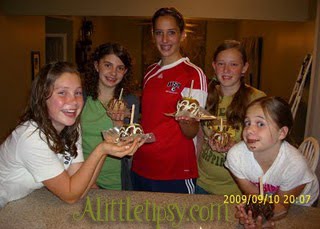
My Beehives with their apples. They LOVED this activity!

My little guy thought this was the best bedtime snack ever!

P.S. Don’t forget to sign up for free Tipsy updates via RSS or email.

We have decided to truncate our feed to help protect against stolen content. I apologize for any inconvenience. Please love us anyway. 🙂
« Previous Page
Next Page »

  • Bloglovin
  • Facebook
  • Google+
  • Instagram
  • Pinterest
  • RSS
  • Twitter

Hi there! I'm Michelle. Mother of three little boys and one little princess. Welcome to A Little Tipsy, a place for exploring creativity and sharing inspiration.

Follow on Bloglovin


Visit Michelle Barneck {A Little Tipsy}'s profile on Pinterest.

Tutorials by Category


15 Family Reunion Games

Family Reunion Games Collage

15 Sprinkle Party Ideas

Sprinkle Birthday Party
Creative Commons License

© Copyright 2014 A Little Tipsy · Site Designed by The Fairy Blogmother · Web Hosting by RFE Hosting

This website uses cookies to improve your experience. We'll assume you're ok with this, but you can opt-out if you wish.Accept Read More
Privacy & Cookies Policy