A Little Tipsy

Creative Tips & Ideas

  • home
  • About Me
  • the tipsy top
  • press
  • projects
  • contact me
[print_thumbnail_slider]

Archives for July 2011

What’s Your Favorite Handmade Creation?

July 12, 2011 By Michelle Barneck Leave a Comment

Summer is here and you know what that means, spray painting season! There is nothing I love more than personalizing, whether that means painting or adding little handmade touches. Summer is such a great time to get your creativity flowing and create something beautiful! There is something about the sun pouring in a window that is energizing and motivating, besides being great for pictures!

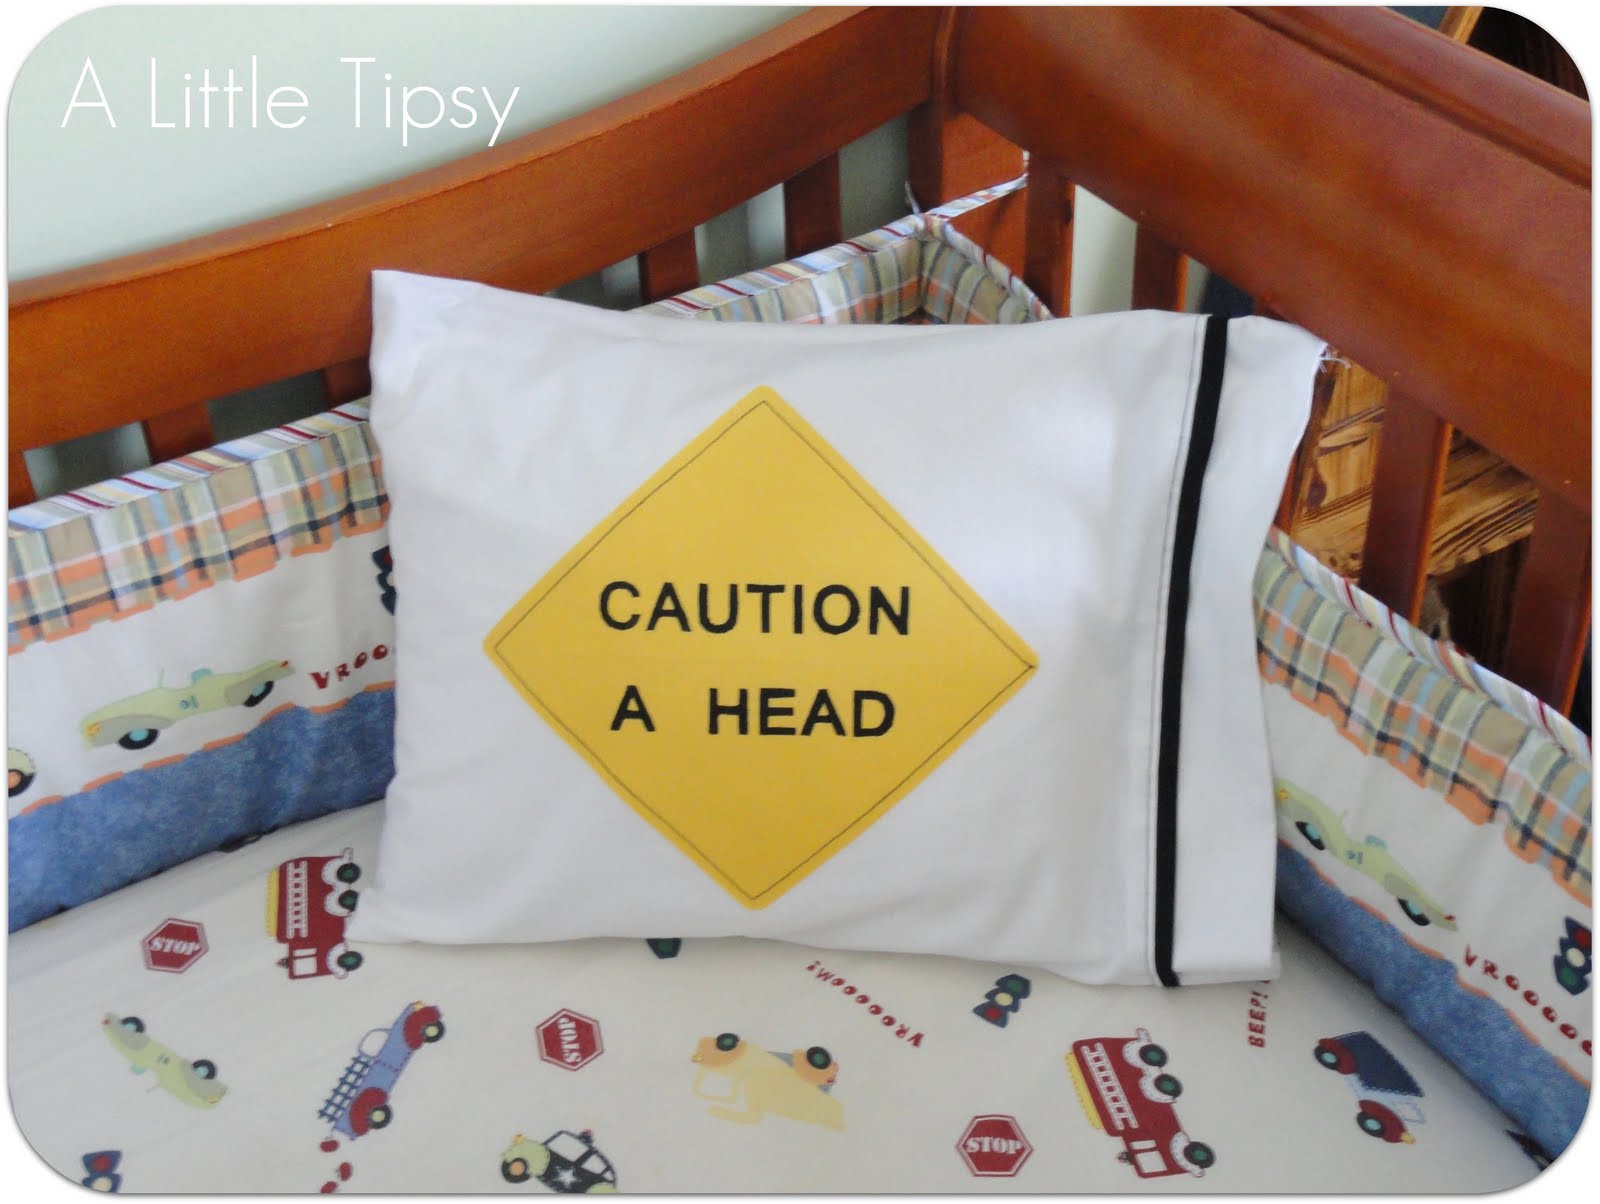
With the kids home during the summer we love making fun things that can either involve them or be displayed in their rooms like these: bean bags from socks, teddy bear hooded towel and toddler pillowcase.

Thanks to BlogFrog, I found the Home Made Simple site that has some really cute summer crafts for kids along with other fabulous ideas for the home.

I was also excited to find the Home Made Simple Marketplace where I can buy handmade items (like those requiring advance sewing skills). Combining Facebook with a handmade marketplace was ingenious! Social media meets women’s small business is as close to awesome as you can get.

I have not sold my creations in any way, but if I did this would probably be a great way to start where I could list just a couple of items.

So, how about you? Have you had your creative juices flowing this summer? Have you taken advantage of the prime painting weather or made something special for a party? I would love to hear what fun projects have been occupying your time!

A Little Tipsy is inspired by your creativity! Share your favorite handmade creation with us and get entered to win a 300-page hardcover copy of the book,β€œHome Made Simple: Fresh Ideas to Make Your Own”.

Three Ways for Readers to Enter & Win
Each entry requires a separate comment:

1. Tell us about your favorite handmade creation.

2. Join Home Made Simple Marketplace on Facebook, explore the fabulous finds and handmade items, then come back to share your favorites.

3. Have handmade items or fabulous finds to sell? Post them for sale with Home Made Simple Marketplace via Oodle and tell us about it.

The time is now to sell, shop & idea swap in the Home Made Simple Marketplacevia Oodle!

Disclosure: This is a sponsored conversation written by me on behalf of Home Made Simple. The opinions and text are all mine.


P.S. Don’t forget to sign up for free Tipsy updates via RSS or email.

We have decided to truncate our feed to help protect against stolen content. I apologize for any inconvenience. Please love us anyway. πŸ™‚

Make a Memory {Mystery Dinner}

July 11, 2011 By Michelle Barneck 7 Comments

Here we are, week 6 of the Make a Memory series. Each Monday now through the end of August I will feature a special family tradition from one of my favorite bloggers. It is so important to create lasting memories with our families and this will be a fun way to get ideas for fun traditions we can start with our own families. So let’s dive right in and see how Kendra from My Insanity and her family make a memory!

Today I’m sharing a memory-making event that my mom did for us and that I have now shared with my own children. We did this for April Fool’s Day, but it would be great to spice up a summer evening, or would work well to be adapted for a birthday, Halloween, or most any party!


Family Surprise/Mystery Dinner

To make this memory, you turn your kitchen/dining room into a “restaurant” for the night. Everyone gets menus and is served a multi-course meal. The basic premise of a Surprise Dinner is that you order your dinner in courses, but the food all has mystery names, so you really don’t know what is going to wind-up on your plate and in which course. My mom used to have anywhere from 20 to 30 different menu items, including a main dish, bread, butter, various fruits and veggies, a few small desert items, the utensils, drink, napkin, toothpick, and even an ice cube. She’d usually enlist one of my older sisters to help her, then she’d hang a sheet to cover the kitchen entry so the meal could really be a surprise. She would have all of the food set out and labeled with the appropriate number for quick serving. Then she would give us menus similar to what you see here and we would order our courses making the best guesses that we could as to what the items we were ordering, really were.

My kitchen is a bit too open for curtain hanging, but I did put up a foam core poster blockade and moved the table in to the front room so no one could see what was happening in the kitchen. I created these menus in publisher, and had a great time watching my family try and figure out what each item might be. The key is to have everyone order all four courses (or how ever many you serve) at the beginning of the meal, before anyone has been served anything. I had a mix of menu items that I thought were pretty simple and some that were rather obscure and difficult to guess. I was fun to see the orders come out. I was afraid BSB would have figured it out and have a normal boring meal, but that may have only lasted for one course. He was having to scramble like everyone else when his course came out looking something like these…

This course consisted of The Titanic’s Demise (ice cubes), Idaho deconstructed (mashed potatoes), colony builders (ants on a log), sugar transporter (spoon), and perfect coin place (mint–really it should be a mint mint per my clue). This one isn’t too bad, because you can use your spoon for the mashed potatoes, but there is nothing to do with the ice cubes since no water or soda was ordered, you might want that spoon for another course, and what will you do with the gravy that didn’t get ordered.

Here are some other sample courses…

My son had to figure out another way to eat his vanilla ice cream, since he didn’t order any utensils with that course.

Oh, but my daughter has a knife for her ice cream in this course. Much better!

Here’s a generic version of the menu I made. If you want to use all of my menu items, you are welcome to print this for your personal use on an 8 1/2 x 11 paper–landscape orientation. Cut the paper in half and then cut the side with the courses into fourths. (Right click to save image).

Answer Key:

1. Ice
2. Deviled Eggs

3. Mashed Potatoes

4. Gravy
5. Jello
(Utah consumes more per capita than any place else).

6. Goldfish

7. Cucumber Wheels

8. Ants on a Log
(Raisins on Peanut Butter on Celery)

9. Ham slice
10. Corn
11. Fork
12. Spoon
13. Knife
14. Toothpick

15. Water
16. Napkin
17. Ice Cream
18. Chocolate syrup
19. Mint
20. Lemon-lime soda

If you don’t get any of them. I’d be happy to explain. My husband took issue with a few of my clues. You might have more fun creating your own menu, but hopefully this will at least get you started. My family had a great time with this dinner–even if they did have to eat their corn with a knife or slurp the gravy off of their plates. Each course that was brought out to each person was a great surprise for everyone at the table! Watching each other figure out how to eat each course, was highly entertaining!
My sister blogged about a few different adaptations of the mystery dinner that she has done for particular events with different themes. They did one menu based on the states of the US and food that each state is known for. That could be a great educational tool. There are countless other ways to customize it or adapt it for your circumstances. You can get my April Fools menu here and my sister’s Book of Mormon mystery menu here.

A few pointers: My mom is notorious for making everything from scratch. I didn’t have all day to spend in the kitchen, so I used a few more ready-made or easy to make menu items. To keep your shopping list simple, you might want to look in your pantry for snack foods or other items you have on hand. Things like raisins and marshmallows are big hits with kids, and could lend themselves to some fun mystery names. Also, filling all of the orders and serving everyone is a big/busy job. You might want to enlist a partner in crime to server or help work in the kitchen, if you attempt one of these dinners.
I’ll never forget the memories I have of my family’s mystery dinners from when I was a child! Now my own kids have their own fun mystery dinner memories!

——————————————————————————

Fabulous mystery dinner idea Kendra! Those clues are hilarious! I remember doing a Christmas themed mystery dinner with menu items like Snowman’s nose and Santa’s beard. It was so fun! Thanks for sharing another great way to make a memory!

P.S. Don’t forget to sign up for free Tipsy updates via RSS or email.

We have decided to truncate our feed to help protect against stolen content. I apologize for any inconvenience. Please love us anyway. πŸ™‚

DIY Under $5 Features

July 9, 2011 By Michelle Barneck 4 Comments

Thank you, thank you to every one who participated in this weeks party! There is some serious talent out there! Here’s just a smidgen…


My Faves:

Flowers for the black thumb by Inspiration and Realisation


Bunting Lantern by City Girl Gone Coastal


Deck Lighting from Organize and Decorate Everything

Link with the highest clicks:

Contact paper re-use by A 37’s 42

Be sure to grab your A Little Tipsy featured button here.

P.S. Don’t forget to sign up for free Tipsy updates via RSS or email.

We have decided to truncate our feed to help protect against stolen content. I apologize for any inconvenience. Please love us anyway. πŸ™‚

Feature Friday {Pocket Full of Pink}

July 8, 2011 By Michelle Barneck 2 Comments

Hi! My name is Karen and I am from the crafty blog Pocket Full of Pink. I am really excited to be here on A Little Tipsy with Michelle! I have admired her blog for a while now!

I am going to show you how to make these cute little paper posie cards! They are so easy to make and you can also use paper scraps for them.


1. Rip 4 paper circles in different sizes and paper designs. You don’t have to be perfect with this! It looks cool when they really look ripped, so don’t try to get it perfect.

2. Wad up each paper in your hand to make it look really wrinkled. Flatten each of the circles out.

3. I like to ink the edges of each circle with a stamp pad. It gives them dimension and it looks pretty! You can use any color stamp pad that matches the paper.

4. Lay each circle on top of each other starting with the biggest and ending with the smallest. Now, you can either attach a brad in the center (that is what I did) or you can put a pretty button in the center!

5. There a a few different ways I have made this card: the first one, I covered the bottom half of a 4 1/2 x 5 1/2 inch card with patterned paper and glued a strip of ric rac at the top of the patterned paper. Then I put the posey in the center at the top of the card where it its blank. Your can either glue the posey down or stick the brad through the paper and attach it that way.

6. The other card is made with a strip of patterned paper going down the side of the card. Rip both edges of the paper so the white inside of the paper shows.

7. Then I attached the posey so it was half way on the patterned paper and halfway on the blank card. I also stamped Birthday Wishes on the bottom right hand corner of the card. You can also just leave the card blank if you wish.

8. Ink the edges with a stamp pad or a chalk ink pad.

9. These cards are so simple to do and you use tons of paper scraps!

Thanks so much for having me Michelle! I hope you can stop by my blog! I would love to have you:)
I hope this inspired you to use up your paper scraps and make something lovely to give to someone else!

———————————————————————————————-
Thanks for swappin’ it up Karen! Those cards are so cute and I love that they can use up the scraps we all have laying around!

P.S. Don’t forget to sign up for free Tipsy updates via RSS or email.

We have decided to truncate our feed to help protect against stolen content. I apologize for any inconvenience. Please love us anyway. πŸ™‚
« Previous Page
Next Page »

  • Bloglovin
  • Facebook
  • Google+
  • Instagram
  • Pinterest
  • RSS
  • Twitter

Hi there! I'm Michelle. Mother of three little boys and one little princess. Welcome to A Little Tipsy, a place for exploring creativity and sharing inspiration.

Follow on Bloglovin


Visit Michelle Barneck {A Little Tipsy}'s profile on Pinterest.

Tutorials by Category


15 Family Reunion Games

Family Reunion Games Collage

15 Sprinkle Party Ideas

Sprinkle Birthday Party
Creative Commons License

© Copyright 2014 A Little Tipsy · Site Designed by The Fairy Blogmother · Web Hosting by RFE Hosting

This website uses cookies to improve your experience. We'll assume you're ok with this, but you can opt-out if you wish.Accept Read More
Privacy & Cookies Policy