A Little Tipsy

Creative Tips & Ideas

  • home
  • About Me
  • the tipsy top
  • press
  • projects
  • contact me
[print_thumbnail_slider]

Honey Sugar Face Scrub

July 23, 2013 By Michelle Barneck Leave a Comment

Hi Friends, it’s Aly from Entirely Eventful Day again! I am happy to be here to share with you a Summer-time life saver. Seriously though, it may not actually save your life, but it will save your face (which is pretty close).  
I’m a big believer in Natural Beauty Treatments, and this face scrub is one of my absolute favorite! There are a lot of sugar scrub recipes out there, and all I have tried are great. But this one (which I’m pretty sure I invented) is the best, best, best! 
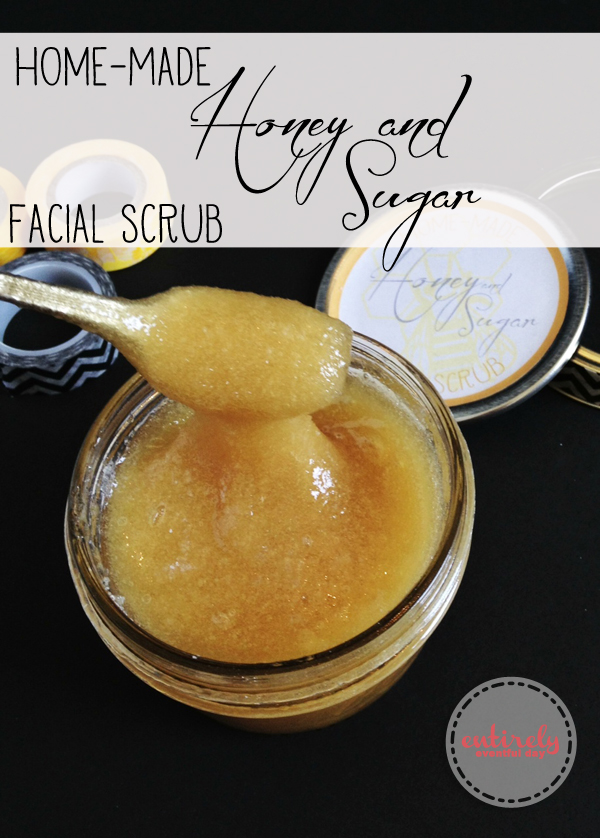
If you have never tried a honey facial, I highly recommend it. Turing honey into a scrub is just a little bonus to all the benefits of slathering honey all over your face; it is sooo moisturizing and soothing.
Click for the full tutorial.

Here’s what you do…
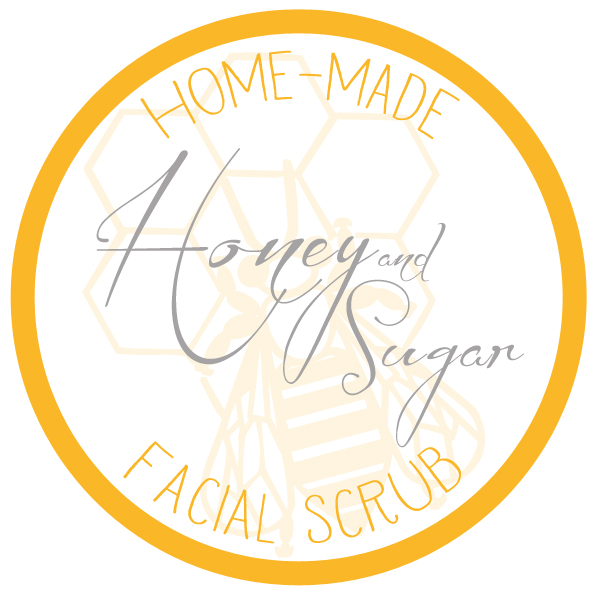
You can either make it as you go (which is what I usually do) or you can make a whole batch and package it up cute (I even created a little printable label for you).
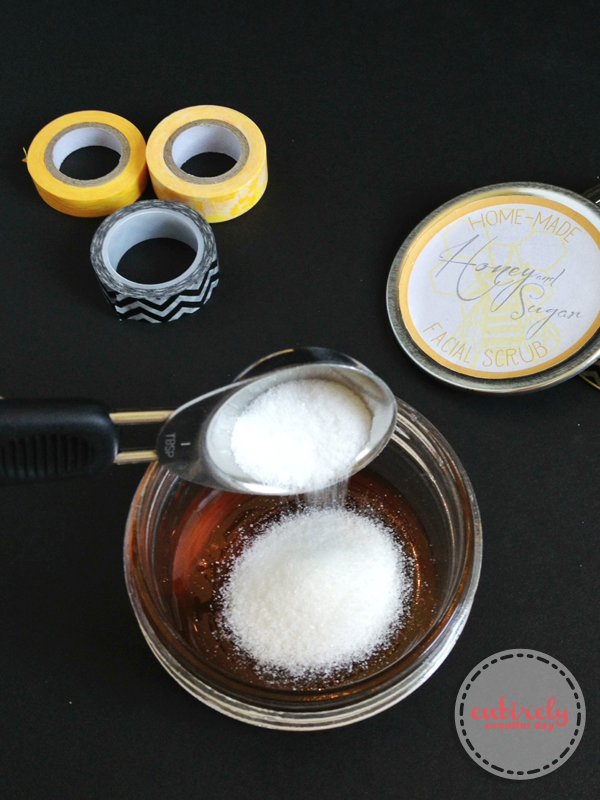
1. Use new-ish (not old and gooey) honey (the honey in the squeezy bear bottles works best because it’s so soft). Fill a container 2/3 full with honey.
2. Add white granulated sugar a tablespoon at a time until you achieve the right consistency.
3. Use as you would use any other facial scrub to exfoliate your face and neck (don’t scrub too hard).
4. Leave the honey mixture on your face for 5 minutes to receive the hydrating benefits.
5. Rinse and enjoy!
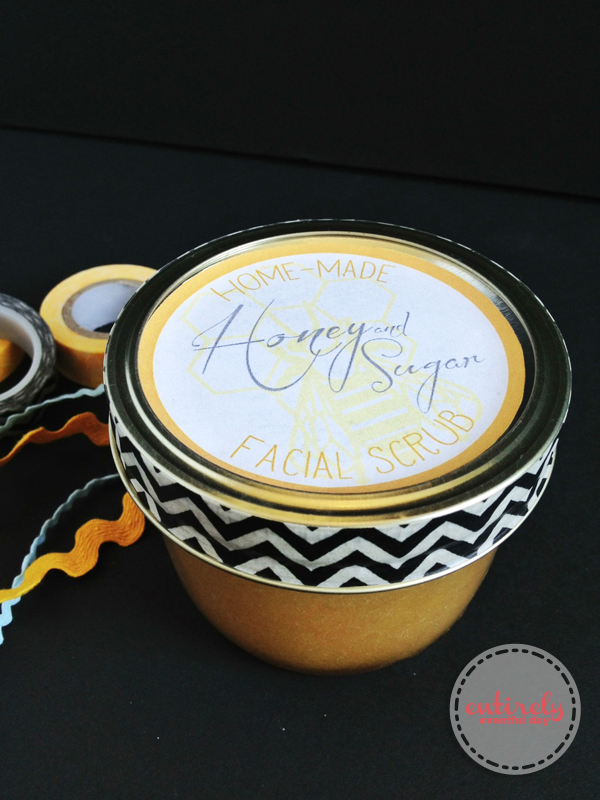
The printable label is formatted to fit the lid of a mason jar. I used one of the short Mason jars to package my facial scrub. It turned out so cute. I also wrapped a little washi tape around the outside of the lid. I was happy and surprised to find that it was the perfect width! Bonus!

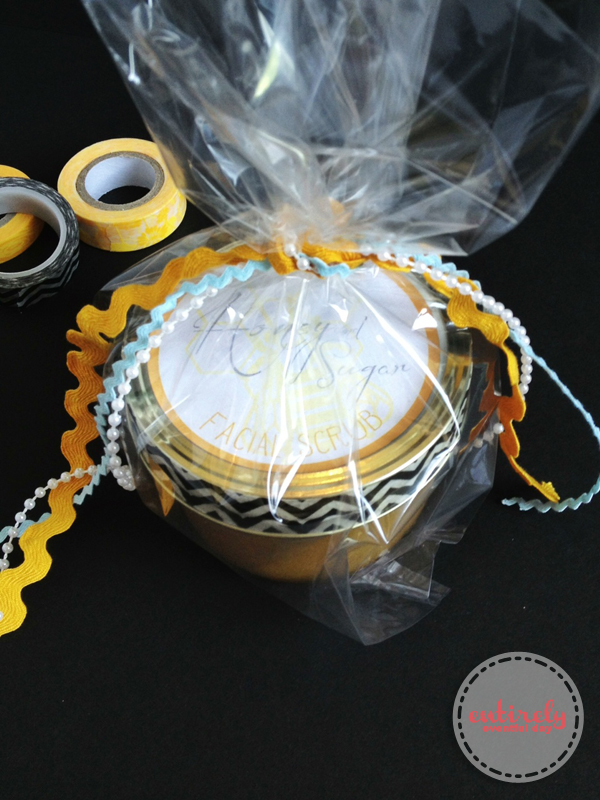
This is a perfect gift idea! You’re friends will thank you. Package it up cute and give it away.

Go here to download a high-resolution version of the darling honey sugar scrub printable label.
Also, check out my other free printables and the ones in my printable shop.
You might also like… How to Make a Custom Desk Pad // Jello Flavored Watermelon Cookies // Blue and Pink Girl’s Room Ideas // Green Smoothie Popsicle Recipe
——————————————————————————-
Thanks Aly for this yummy face scrub recipe! It is so adorable all wrapped up in a jar with washi!
We have decided to truncate our feed to help protect against stolen content. I apologize for any inconvenience. Please love us anyway. 🙂

Canvas Art Personalized for Your Home

July 17, 2013 By Michelle Barneck Leave a Comment

I was invited to participate in the Pins to Projects series on Studio 5 and inspired by this canvas art from Southern Belle Soul, Mountain Bride Heart created some one of a kind wall art for my master bedroom. You can see the TV segment below.


So here’s the low down on how I made the first canvas, since seeing as how that segment was filmed a few hours ago, the second canvas is not completed yet. 

SUPPLIES:
  • Canvas
  • Scrapbook Paper
  • Permanent Spray Adhesive
  • Vinyl & Cricut (or purchase letter stickers)
  • Acrylic Paint
  • Foam Brush

The best part about this canvas art besides it being completely personalized is it is super affordable canvas art. 16×20 Canvases are 2 for $8 at Hobby Lobby. You can even use a 40% off coupon.

First off, choose what you want it to say. I love the pieces in my home to hold special meaning. I was making art for our master bedroom so I chose lyrics from a song from our wedding video that both my husband and I love. I also chose paper that looks like love letters because my husband loves to write and wrote many poems for me.

If you want it wrinkly with seams and lots of texture and character:

-Experiment on the computer with fonts and the placement of the words on your canvas size so you know the exact design you want and size of letters you will need. (I experimented with an 8×10 area since my canvas was 16×20. Then I just made the letters twice as big)  
-Cut your words out of vinyl using a craft cutting machine. (If you want to save some money you can also use contact paper from the dollar store. Just be sure to adjust the cutting pressure accordingly.)
-Coat the canvas with spray adhesive. Use full sheets of scrapbook paper and lay them on the canvas perfectly lining up the seams. 

-Use transfer tape to keep the vinyl words straight and place on the canvas.

-Squirt swirls of paint directly on the canvas. Spread over the whole surface with a foam brush. Use one coat if you want your paper design to show through slightly. If you want solid color, use two coats. 


-The paint causes the paper to wrinkle and shrink up slightly to expose seams. You will need to touch up seams and edges with paint once it dries unless you want them white.

-Carefully remove the vinyl words to expose the design. If you try to do it too fast, the paper will rip.


-You can coat it with Mod Podge for protection.

I am an advertising nerd and love that this reminds me of old billboards or subway ads starting to wrinkle and peel to expose what is underneath.
I decided to do a second version too add more color to our space. You can see a bit of it in the tv segment above.

Spray paint collage canvas art:

For more of a patchy look…

-Use all the same steps as above with the vinyl words, but alter the paper and painting steps.


-Rip out colorful pieces of magazine pages and use a glue stick to glue overlapping the pieces collage style to your canvas. The amount of texture you want will determine how tightly you want to secure the edges of each piece. 

-In a well ventilated area free from wind or moisture, spray paint using thin coats and a slow even back and forth motion. Go off of the edges of the canvas when changing direction so the paint remains even and doesn’t puddle near the edges. 

I love how they turned out and can’t wait to hang them in my bedroom!
We have decided to truncate our feed to help protect against stolen content. I apologize for any inconvenience. Please love us anyway. 🙂

Grilled Artichokes with Garlic Butter

July 11, 2013 By Michelle Barneck 2 Comments

I love artichokes! Up until about a month ago I would just boil them for about an hour, then dunk the leaves in butter and enjoy. Then, something happened. I had them grilled and oh how that changed my life. Don’t get me wrong artichokes are good boiled, but they are delicious grilled! And it takes about the same amount of time!


INGREDIENTS:

  • 4 Artichokes
  • 1/4 cup butter
  • 1 clove garlic
INSTRUCTIONS:
Cut off the stems and slice each artichoke in half vertically. Cut curving below the “hair” and then pull the first few middle leaves to pull out the hair. They will now look like the photo above. Boil in a large stock pot for 25 minutes. This will help them stay moist on the grill. Melt your butter and use a garlic press on your clove. Mix the garlic and butter, pull the artichokes out and brush some of the garlic butter onto the insides of the artichokes. Place your artichokes with the inside down on the grill. Brush the outside of the artichokes with butter. Grill for about 20-25 more minutes keeping watch so they don’t dry out. They will look like the picture at the bottom of this post. 

For those who have never tried artichokes, here’s how to eat them. Pull the leaves off, dunk the leaves in more garlic butter (you can add a little lemon to the butter if you like) and scrape the “meat” off the bottom of the leaf with your teeth. MMmmm!

What’s your favorite thing to grill?
We have decided to truncate our feed to help protect against stolen content. I apologize for any inconvenience. Please love us anyway. 🙂

Clipboard Memo Board

July 9, 2013 By Michelle Barneck 1 Comment

Hello again!  It’s Ali from House Vintage, back with another project.  This message center has a chalkboard and a cork board, and is so quick and cute.  It is something you will want to try this weekend!

Start with a clipboard.  I’m using a vintage clipboard that I purchased from a flea market a few years ago.  This clipboard is a little longer than the standard size, but any clipboard will work.  I often see them at garage sales for less than a quarter.  Your clipboard doesn’t need to be in perfect condition, this is a great project for recycling.

Click for the full memo board tutorial.

Next, tape off a section of the board, so you can apply chalkboard paint.  Any shape or size will do, just think about how much writing space you will need.
Allow the paint to dry and cure.  Before you remove the tape, use a piece of chalk to season the board so your writing will be erasable.
For the cork board section of the message center, I used a cork trivet.  These can be purchased at any craft store or dollar store.  You can leave the cork trivet a la natural, or cover it.  I searched my scrap pile for a fun fabric to use.  Simply trace the trivet onto the fabric.
Cut out the fabric and glue it onto the cork.  I used hot glue.  Then secure the fabric-covered cork circle to the clipboard.
Now you can keep your family informed and organized with this clipboard message center!
————————————————————————–
What a fun idea for a memo board! Thanks Ali!
We have decided to truncate our feed to help protect against stolen content. I apologize for any inconvenience. Please love us anyway. 🙂
« Previous Page
Next Page »

  • Bloglovin
  • Facebook
  • Google+
  • Instagram
  • Pinterest
  • RSS
  • Twitter

Hi there! I'm Michelle. Mother of three little boys and one little princess. Welcome to A Little Tipsy, a place for exploring creativity and sharing inspiration.

Follow on Bloglovin


Visit Michelle Barneck {A Little Tipsy}'s profile on Pinterest.

Tutorials by Category


15 Family Reunion Games

Family Reunion Games Collage

15 Sprinkle Party Ideas

Sprinkle Birthday Party
Creative Commons License

© Copyright 2014 A Little Tipsy · Site Designed by The Fairy Blogmother · Web Hosting by RFE Hosting

This website uses cookies to improve your experience. We'll assume you're ok with this, but you can opt-out if you wish.Accept Read More
Privacy & Cookies Policy