A Little Tipsy

Creative Tips & Ideas

  • home
  • About Me
  • the tipsy top
  • press
  • projects
  • contact me
[print_thumbnail_slider]

Stamped Washer Necklace Tutorial: Courage

December 16, 2009 By Michelle Barneck 22 Comments

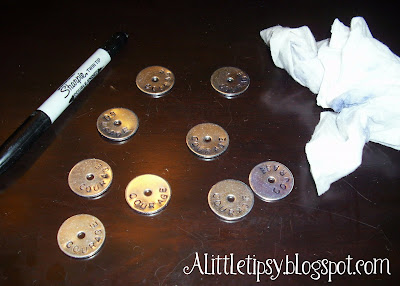
We always have a special Christmas lesson for our Young Women at one of our homes the Sunday before Christmas and wanted something special to give our Beehive class. My wonderful adviser and crafty girl extraordinaire, Amanda (from Every Crafty Endeavor), came up with the idea and the supplies to do stamped washer necklaces that say Courage to go along with next year’s mutual theme. I am so nice and took pics of the process so that you can do it too. I know, I know…too kind.

(Stay tuned for how we tie them in to the Christmas nativity lesson)

Supplies Needed:

  • Heavy Hammer (you can use a regular one, you will just have to hit harder)
  • Washers (ours were about an inch)
  • Alphabet stamp set
  • Black permanent marker
  • Baby wipe
  • Leather, ribbon, or a chain to put the charm on

Stamp sets are available on Amazon for $15 if you need one. *Update: I just bought a stamp set on sale from Harbor Freight for $10 including shipping!

1. Take your supplies to a concrete area so you don’t damage whatever is under your stamping. (We froze our little tushes on the porch in 30 degree weather, but the end result was well worth it and it really did not take that long.) Pull out the letters you will be using and put them in order. Place the first letter stamp equidistant from the hole in the middle and the edge. Now, with the other hand, whack the stamp with the hammer 3 or 4 times (depending on how hard you hit and the weight of your hammer).

See cute Amanda demonstrating her great skill.

2. Keep it going with the other letters. Place the next letter by aligning the edge of the stamp with the first letter and turning a hair so it follows the curve of the washer. This may take some getting used to. We had to redo some. Continue with each letter.

3. Once you have the letters stamped, get your permanent marker ready. Color over the letters so that the indentions are black. If you have a stubby marker like me this may take some doing. Once all the letters are covered, wipe with a baby wipe until you are left with black only in the letter indentions. I would do each washer one at a time. It is easy to wipe off when they have not been sitting.

4. Now just thread your “chain” of choice through the hole and you are good to go.

I love how they turned out! I love that they represent the theme so well! “Be strong and of a good courage.” Joshua 1:9

Now, for how they will be tied to the lesson. We are going to be talking about how each of the people in the Nativity Story had to have great courage. We will talk about each piece of the nativity as we place it on the table and also have a song to go with it.

  • Mary-to be the mother to God’s Son and to travel to Bethlehem 9 mos. pregnant and give birth in a stable
  • Joseph-to find out his wife to be will be giving birth to God’s Son
  • Jesus-to be the one to volunteer to come to earth and sacrifice himself for us
  • Shepherds-to have an angel come and then go to find the Christ child. Spreading the word to others.
  • Three Kings-followed a star to find the Christ child and did not tell Herod where He was

I am so excited for this lesson! It is so personal to have it in Amanda’s home with the fire crackling and everything so cozy. Last year, the Christmas lesson was AMAZING and I can only imagine this year will be the same!

P.S. Don’t forget to sign up for free Tipsy updates via RSS or email.

We have decided to truncate our feed to help protect against stolen content. I apologize for any inconvenience. Please love us anyway. 🙂

Wordless Wednesday-When Daddy Gets the Little One Dressed

October 20, 2009 By Michelle Barneck 13 Comments

Daddy made a makeshift belt out of a shoelace to keep the non-adjustable waist jeans on skinny boy.

See more Wordless Wednesday at 5 Minutes for Mom.

P.S. Don’t forget to sign up for free Tipsy updates via RSS or email.
We have decided to truncate our feed to help protect against stolen content. I apologize for any inconvenience. Please love us anyway. 🙂

enJOY the Journey

October 4, 2009 By Michelle Barneck 7 Comments

Today I am finding the joys in everyday life!

Like, the fact that I got to see a baby elephant at the zoo. Seriously, how many people get to see a baby elephant. How adorable is that tiny giant? I so wanted to take it home with me. Alas, I left her with her mommy.

Or putting a sticker on your toilet lid. I found this sticker at Dollar Tree (I know, big surprise) and just had to have it because it made me laugh so hard. It just so happens that it matches my bathroom decor. It makes me laugh and smile everytime I see it. I mean, it’s a sticker for a toilet lid. It made me laugh the hardest when my hubs put the lid down and I heard him from upstairs say, “What the…there’s a sticker on the toilet.” Good times.

Or when your kid gets creative and takes apart his water gun and his drill so he can combine the two. He ran around with it saying “hoot, hoot!” Luckily, he still has not caught on to the whole gun thing.

(wo)Men are that they may have joy!
Find the simple joys in your life!

P.S. Don’t forget to sign up for free Tipsy updates via RSS or email.

We have decided to truncate our feed to help protect against stolen content. I apologize for any inconvenience. Please love us anyway. 🙂

Laminating Using Clear Contact Paper-Chore Chart & Color Matching

September 23, 2009 By Michelle Barneck 9 Comments

Did you know you can use clear contact paper to laminate at home? I had some things I wanted to reinforce to protect them from little hands. Basically, so they would last more than five minutes. I wanted to be able to laminate any time I wanted without running out to the copy shop. This works great and is easier than I thought.

I saw these cute color matching cards from Homeschool Creations and loved the nice clear photos. I printed them on card stock and then measured out and cut the clear contact paper. I left an excess of about half an inch on each edge so that I would not have to be too careful. Then, I carefully peeled off the backing, put a sheet on each side, and rubbed out any bubbles. Last, I trimmed the edges and cut them up.

I also found this chore chart template over at Controlling My Chaos. Though my little one is a bit young for chores, he loves to help out and I wanted another way to reinforce good behavior. I “laminated” it and now I can add and erase check marks each week. He gets so excited every time he gets a check mark. He signs “more” and says “more checks.” Then, I tell him what he get the checks for and tell him another “chore” he can do to get more checks.

I love being able to laminate at a moments notice and it is so much cheaper! When I called the UPS store they said laminating was 99 cents a page. I bought my roll of clear contact paper at Wal-mart for just under $6 and have already laminated 15 pages. It is about half gone. Score!

P.S. Don’t forget to sign up for free Tipsy updates via RSS or email.

We have decided to truncate our feed to help protect against stolen content. I apologize for any inconvenience. Please love us anyway. 🙂
« Previous Page
Next Page »

  • Bloglovin
  • Facebook
  • Google+
  • Instagram
  • Pinterest
  • RSS
  • Twitter

Hi there! I'm Michelle. Mother of three little boys and one little princess. Welcome to A Little Tipsy, a place for exploring creativity and sharing inspiration.

Follow on Bloglovin


Visit Michelle Barneck {A Little Tipsy}'s profile on Pinterest.

Tutorials by Category


15 Family Reunion Games

Family Reunion Games Collage

15 Sprinkle Party Ideas

Sprinkle Birthday Party
Creative Commons License

© Copyright 2014 A Little Tipsy · Site Designed by The Fairy Blogmother · Web Hosting by RFE Hosting

This website uses cookies to improve your experience. We'll assume you're ok with this, but you can opt-out if you wish.Accept Read More
Privacy & Cookies Policy