A Little Tipsy

Creative Tips & Ideas

  • home
  • About Me
  • the tipsy top
  • press
  • projects
  • contact me
[print_thumbnail_slider]

Feature Friday-Whitney

March 20, 2009 By Michelle Barneck 1 Comment

Today’s Feature Friday is my wonderful friend Whitney! I am so excited to be able to share a few of her ideas with you and believe me it was hard to choose. She does so many cute things!

For those of you swinging over from the party, Here is an adorable idea for a birthday party favor. Her son Rocco was turning 5 and she personalized candy wrappers. So sweet. (I am workin’ it up the punny scale.)
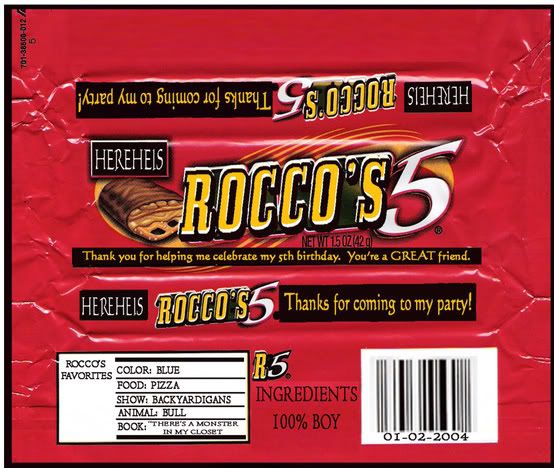
Or how about a little budget spring decor…
How fantastic is this little DIY arrangement made with carnations and a sugar shaker. Ingenious! See the tutorial here. This is one even clumsy old me could do. Flower arranging has never been my strong suit. This is like paint by numbers. 🙂

Can’t get enough Fassio Fantastico? Check out her Super Bowl super dip and get some inspiration for March Madness!

Almost done…not only does Whitney provide me with the best boy hand me downs on the planet (80% of my little guys wardrobe), but she also took the most adorable pics of my guy a few months ago that I just have to share. She is so talented!

Great ideas Whitney! You are now entered in to the hall of fame as Tipper of the Week!

We have decided to truncate our feed to help protect against stolen content. I apologize for any inconvenience. Please love us anyway. 🙂

Easter Eggstravaganza

March 16, 2009 By Michelle Barneck 12 Comments

I know, I know…more Easter. Hey, it is coming up. Don’t you want to have something festive? C’mon, make all your neighbors jealous. 🙂

First off, an idea from I swiped from Cindi that I saw on Tip Junkie. This adorable egg wreath is so cute and fairly easy to make. Ok, it just took a little time and patience. I had a little family night and made them with my Mom and Sis.

Now for the full tutorial I’m sending you over to Cindi because she has great step by step instructions. For my two cents, I would say cutting out the cardboard circles was the hardest part. Here are a few photos I took of the process.

Thank goodness my mom the professional (ok, maybe that is a little exaggeration) bow maker was there.

One thing we did differently with the hanger was fold the pipe cleaner in half and glue it between the two pieces of cardboard for added strength to hold the wreath up.

Here we are all finished!!

Now, I had some supplies left over and could not bear to let them go to waste so I made this little flower arrangement. Cost: For me nothing. It is all leftovers or stuff I already had.

Supplies:
Pipe Cleaners
Plastic Eggs
Easter Grass
Ribbon
Vase

1. Start by bending 3 pipe cleaners in to figure 8s. I used all one color, but alternating colors could be cute too.

2. Then, lay them over each other to make a flower shape and twist around them with a green pipe cleaner for a stem.

3. Then, twist another pipe cleaner the perpendicular to the green (green vertical, middle color in this case purple horizontal) to give added stability and make the flower middles.

4. Then, make the middles by rolling the pipe cleaner up into a swirl.
5. Next, fold the green in half and wind it around itself to make it more stable.
6. Finally, fill the vase by alternating Easter grass and plastic eggs and arrange the flowers by placing them in the top. I also added a bow of some leftover ribbon to the vase.

Last, but not least, I found this cute quilted place mat at Big Lots for $3, added some ribbon, and hung it up. I love finding cheap items that make it look like I did something fancy!

We have decided to truncate our feed to help protect against stolen content. I apologize for any inconvenience. Please love us anyway. 🙂

Easter Eggsitement

March 11, 2009 By Michelle Barneck 1 Comment

I love holidays. They give you something fun to look forward to. Here are a couple of ideas I have used for Easter Decor.

This first one is sooo simple, but fun and tasty. My little sis got these tiny candy jars (I think she said from Ikea) for her wedding and did not want them so I inherited them. I fill them with candy in the colors of the nearest holiday and put them on top of my fridge for a little festive joy. You could embellish the lids if you were feeling super motivated.

Plus, then I have a yummy treat on hand and it is in a place where I determine the distribution for the kiddo. I used Reese’s Eggs, Cadbury Mini Eggs, and Robin Eggs. Your mouth is watering isn’t it?

Today I was featured on Tip Junkie for an Easter basket idea I did on my personal blog a while ago. See the Basketball hoop basket idea here. On that post it also shows the Easter Garland that inspired my next project.

I think they used some type of sewing or embroidery string, but I don’t sew, so I used fishing line.
What you’ll need:
Fishing line
Plastic eggs with holes pre-punched (I got mine at the dollar store of course)
Mechanical pencil or toothpick

All you have to do is thread the line through the eggs without getting tangled. Sounds simple right? Ya, as long as you unwind the line as you go. I took it all off my husband’s pole (with his permission) in one long string. That made it difficult to keep untangled. I used the pencil to make sure the holes were completely clear to make the threading easier.

It would be super cute on a banister with some ribbons, as you can see here. But, with my little guy that would not last 5 minutes so I put mine on top of my cabinets in my kitchen.

Do you have any cute and simple Easter ideas? Please share!!

We have decided to truncate our feed to help protect against stolen content. I apologize for any inconvenience. Please love us anyway. 🙂

DIY Wall Art

February 23, 2009 By Michelle Barneck 8 Comments

Aren’t these great? One Saturday morning, $15 (if you have to buy everything) in supplies, and a little creativity is all you need! Come on, let’s make you some too!

I stole this idea from EightCrazy and modified it for my skill level and budget. I in no way claim to be a master crafter and so I will word this tutorial to those like me who would like to be crafty, but sadly are just taking baby steps. For you master crafters, this project will be a breeze. Ready, set, baby steps:

Items you will need:
Foam Core Board 20″x 30″
Box cutter (aka utility knife)
Something to raise the foam core or cut it on
Scrapbook Paper (the thicker papers work best trust me on this one)
Something to cover your work space
Modge Podge (I had gloss, but would recommend matte if you are buying it)
Sponge Brushes (about 1-2 inches wide)
Acrylic Craft Paint (little bottles at the craft store)
Hair Dryer
Scissors/paper cutter

1. Start by measuring and cutting your foam core into six 10″ x 10″ squares. I made my husband do this. (I am still scarred from a grade school pop bottle bird feeder experience with a box cutter. Who gives a kid a box cutter to cut a 2-liter with anyway?) He put the four corners on my son’s little books to raise it off the carpet and used the level to guide the edge.

2. Then I painted the edges brown. I did two thick coats letting them dry thoroughly after the first coat so I could see where they might need special attention on the second coat.

3. Then I tried cutting the paper to match the size, but found it easier to just match up two sides of the paper to the edge of the foam and modge podge it on. Using the sponge brush I coated the face of the foam with modge podge, placed the paper on top lining up two edges and pressed down firmly everywhere to make sure that it stuck. Let this dry for about 5 minutes.

4. Then place your foam on something (I used an old board) to trim the paper. (I got brave and did it myself this time) The trick is to go kind of quick and not press too hard with the cutter.

5. Some of my edges were not perfectly straight so I sanded them a little. That took a little paint off the edges, so I ran along the corner with the side of my paint brush that was still wet with the brown. This gave it an inked look that I liked, so I did it to all the edges.

5. Using the sponge brush, I put a thin layer of modge podge on the paper and covered it completely. I also put a layer of modge podge on the sides over the paint. As it dries the paper may begin to wrinkle or bubble a bit, check the edges closely (especially if you didn’t use the thick paper). That’s where your handy dandy hair dryer comes in! Once your piece is no longer sticky, use your hair dryer to warm the bubbles and wrinkles with heat and smooth them down with your fingers at the same time. I used the low setting, so it would not get as hot.

6. Voila! By using the foam core instead of canvas they weigh next to nothing, so I just stuck them up with the 3/4 inch glue dots. That way they do not damage the walls and you can move them around.

Yay for a successful project!!

We have decided to truncate our feed to help protect against stolen content. I apologize for any inconvenience. Please love us anyway. 🙂
« Previous Page

  • Bloglovin
  • Facebook
  • Google+
  • Instagram
  • Pinterest
  • RSS
  • Twitter

Hi there! I'm Michelle. Mother of three little boys and one little princess. Welcome to A Little Tipsy, a place for exploring creativity and sharing inspiration.

Follow on Bloglovin


Visit Michelle Barneck {A Little Tipsy}'s profile on Pinterest.

Tutorials by Category


15 Family Reunion Games

Family Reunion Games Collage

15 Sprinkle Party Ideas

Sprinkle Birthday Party
Creative Commons License

© Copyright 2014 A Little Tipsy · Site Designed by The Fairy Blogmother · Web Hosting by RFE Hosting

This website uses cookies to improve your experience. We'll assume you're ok with this, but you can opt-out if you wish.Accept Read More
Privacy & Cookies Policy