A Little Tipsy

Creative Tips & Ideas

  • home
  • About Me
  • the tipsy top
  • press
  • projects
  • contact me
[print_thumbnail_slider]

Wine Cork Pumpkin with That’s What {Che} Said

September 15, 2014 By Michelle Barneck 7 Comments

Hello everyone! I’m Cheryl! I live over at That’s What {Che} Said…

Facebook Twitter Pinterest Instagram Google+ RSS Bloglovin That's What {Che} Said... About Cheryl About Image Map

I just had my third boy this past July so I am extra thrilled to be here while Michelle gets to spend some extra time with her new little man! Today I am sharing this really easy and fun wine cork pumpkin project!

Cork Pumpkin Project at thatswhatchesaid.com

Supplies Needed:

  • 34 Corks
  • Orange Paint
  • Green Scrapbooking Paper
  • Green Washi Tape
  • Thin Craft Wire
  • Raffia
  • Hot Glue Gun/Glue Sticks
  • Newspaper
  • Paper Plate
  • Scissors

Pumpkin 1

I started out by spreading out a sheet of newspaper, then I used a bit of orange paint and dabbed one end of the cork into to the paint. If it’s on too thick, simply daub the cork down a few times to remove the excess. Repeat this for all corks.

Pumpkin 2Pumpkin 3
Lay all the corks out on the newspaper to dry.

Pumpkin 4

While those are drying, I cut a few leaves from some scrapbooking paper/green cardstock.

Pumpkin 5

Once the corks are dry, start assembling with your hot glue. Start out with a row of 5 corks, next row is 6 corks, next row is 7 corks, then top with 6 cork layer, and then a 5 cork layer and finish with a 4 cork layer. Then I added another cork as the stem. You can also make a cute curly-Q with some washi tape and wire! You can find out how I made that stem here.

Pumpkin 6

Next I bent the paper leaves slightly to give them some dimension and glued them into place.

Pumpkin 7

Pumpkin 9

I thought it needed something else to finish it so I added a raffia bow by simply tying a string or two of raffia in a bow!

Pumpkin 8

Cork Pumpkin

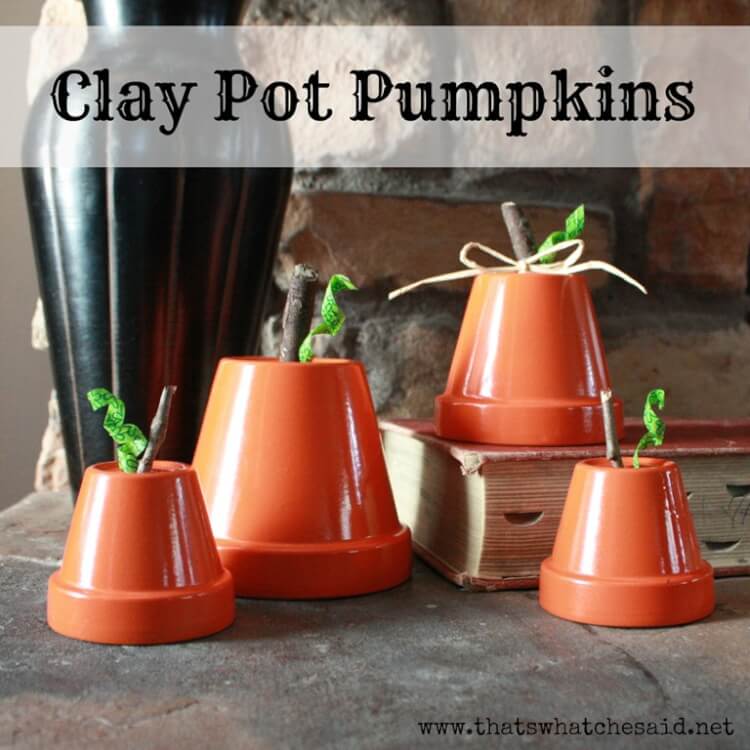
There you have it! A super cute little pumpkin to adorn your mantel or table top! If you like this pumpkin project I welcome you to hop over and see how easy it is to make these cute Clay Pot Pumpkins!

Clay Pot Pumpkins at thatswhatchesaid.com

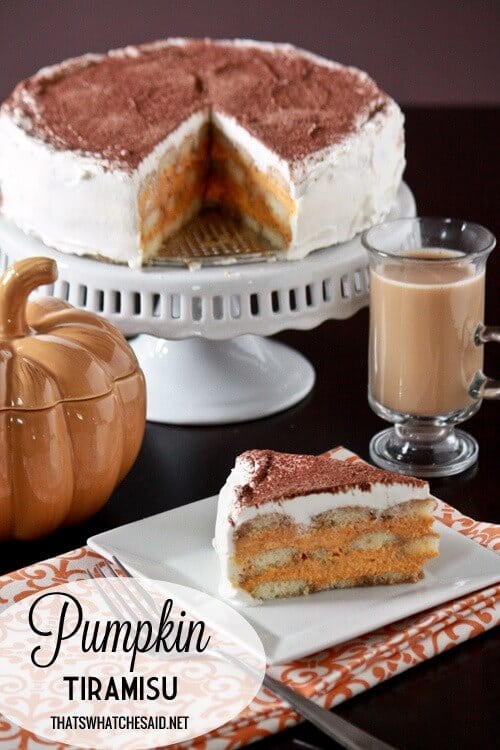
If you love pumpkin everything like I do then be sure to grab this Pumpkin Tiramisu Recipe

Pumpkin Tiramisu Recipe at thatswhatchesaid.com

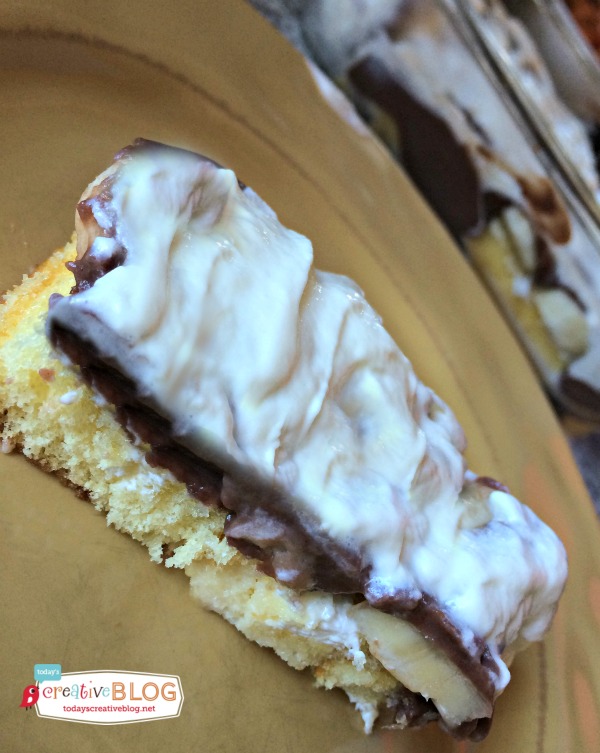
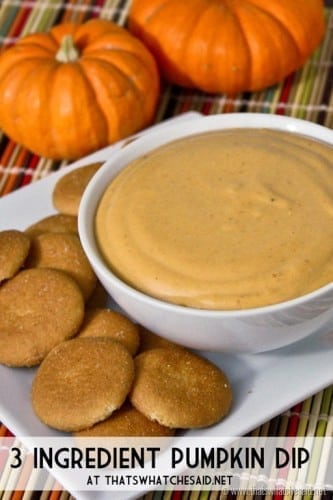
or perhaps this all-time favorite Pumpkin Gooey Butter Cake Recipe or 3-Ingredient Pumpkin Dip. Both recipes scream fall!

Pumpkin Gooey Butter Cake 3 Ingredient Pumpkin Dip at thatswhatchesaid.com

My door is always open and I love to make new friends! Please stop by and say hello! I’d love to connect on social media as well! You can find me below!

Facebook Twitter Pinterest Instagram Google+ RSS BlogLovin Image Map


Fall Deer Printable with Lolly Jane

September 12, 2014 By Michelle Barneck 3 Comments

Hi there Tipsy friends! We are twin sisters Kristi and Kelli of Lolly Jane, an eclectic craft/DIY blog, where we share it all… home decor tutorials, holiday crafts, free printables, home improvement projects and everything in between! We are here today to share a free print that will be sure to get you in the fall mood! Just hang and enjoy, my deer! (See what we did there? lol!)

FREE Antler print, perfect for fall! via LollyJane.com

We loooooove printables because you can simply print them off then frame them to instantly spruce up your seasonal mantel. Easy and free, which is our favorite kind of decor! We love the “Happy fall, deer” saying paired with autumn colors:

FREE Antler print, perfect for fall! via LollyJane.com

Download either fall deer printable here:

Happy Fall, Deer PRINT
Fall Antler PRINT

FREE Antler print, perfect for fall! via LollyJane.com

Be sure to check out more free printables on our blog or see the latest fall decor, knock off’s and projects on FB, Insta or Pinterest like our easy fall wreath, 11 free autumn fonts to make your own printables or our faux aged canning ring pumpkin.

Easy fall wreath with painted pumpkins + acorns and cute felt flowers #fall #wreath

11 FREE fall fonts

Pretty faux-aged canning ring pumpkin

A big thanks to Michelle for letting us snag her space today. Muah! Happy fall, y’all!

XOXO

Ruffles and Burlap Fall Wreath with Flamingo Toes

September 10, 2014 By Michelle Barneck Leave a Comment

Hello A Little Tipsy Readers! My name is Bev and I blog over at Flamingo Toes. I’m so excited to be here visiting today!

Bev-at-Flamingo-Toes

At Flamingo Toes I love sharing sewing and jewelry projects – as well as things I make for my home. We just moved across the country this summer from California to Tennessee so I am having a lot of fun setting up our sweet little farmhouse and exploring the area. I am so ready to experience our first real Fall – we don’t exactly get much of a season change in CA.

Today I’ve made up a Ruffles and Burlap Fall Wreath, inspired by the colors of Fall and all these pretty pots of mums I am seeing everywhere. I think I’m going to get some for our front porch!

Ruffles and Burlap Fall Wreath

Isn’t it fun? I paired up some fun fabric ruffles with this super cute lace covered burlap ribbon that I picked up at Walmart. The whole thing is so easy to put together, and since I’m kind of fickle with my decor, I’ve made it so it’s super easy to change up whenever you want!

Burlap Lace and Ruffles Wreath

Won’t it look pretty with some pots of mums around the door?

Fall Wreath DIY

So let’s get started. Here’s what you’ll need:

  • Straw Wreath (mine is 14″)
  • Burlap Ribbon – I used 1 1/2 spools
  • Fabric for ruffles
  • Needle and Thread
  • Pearl head pins in different colors
  • Gingham ball trim, or something similar

Begin by wrapping the burlap ribbon around the wreath. I left the plastic wrapper on but you can take it off.

wrapping wreath with burlap ribbon

Continue until the entire wreath is wrapped. Pin the ends in place on the back, or you can hot glue it.

wreath wrapped with burlap ribbon

Measure around the wreath, then double that amount. Cut four pieces of fabric 5″ x that measurement – so about 5″ x 10″ or so. Fold the fabric pieces in half, then sew a running stitch along the top raw edge. Gather up the fabric ruffles so they fit around the bottom of the wreath.

fabric ruffles for wreath

Wrap the ruffles around the bottom section of the wreath as in the picture, leaving a space of about 2 inches between the middle two ruffles. Pin in place. Cut a piece of fabric about 3″ wide and long enough to wrap around the center of the wreath once. Fold the long sides in and wrap this around the middle of the wreath, covering up the raw edges of the two inside ruffles. Pin the piece in place on the back.

ruffles on burlap wreath

Add some decorative touches by placing pins in the burlap.

Pearl Pins in Wreath

Mix and match your colors and scatter them around the wreath.

lace burlap wreath

Add a couple of little strands of cute gingham pom pom trim, or something else that looks great with your fabric. Pin it in place in the back of the wreath.

gingham pom poms on wreath

I love that since the pieces to the wreath are all pinned in place, you can easily change it out if you want to update it or just make something else entirely. You can definitely glue everything down though if you want something more permanent.

gingham ball trim

That’s it! So easy right?!

Ruffles and Burlap Wreath

Easy Fall Wreath

I hope you give it a try!

I’d love for you to come visit Flamingo Toes sometime!  Here are some of my other favorite projects!

Huge Fabric US Map Hoop Art

Spooky Crystal Ball Candlesticks

Thanks for having me Michelle!

Chocolate Banana Twinkie Cake with Today’s Creative Blog

September 8, 2014 By Michelle Barneck Leave a Comment

Hello everyone, I’m filling in for Michelle while she snuggles on that baby! I’m Kim from Today’s Creative Blog and InspirationDIY.com where I share all things creative and inspiring. I love sharing practical ways to decorate your home, like my son’s teen bedroom or delicious Crockpot meals for my Slow Cooker Sunday’s.

No Bake Chocolate Banana Twinkie Cake

Today I’m sharing a super easy NO Bake Chocolate Banana Twinkie Cake. “Easy” and “No Bake” are sometimes the best words you’ll ever read when searching for a dessert recipe. No Bake Twinkie Cake | TodaysCreativeBlog.net

I have a teen son who is always hungry. Always! It’s not uncommon to have 3 or 4 teen boys roaming around our home and it’s best if I keep them fed. I usually try to offer something with a little nutrition, but there are times, they just want good ole American junk food. This is when Twinkies come in.

Boys can put away a box of Twinkies in about 5 minutes, so I figured they would also enjoy this no bake cake. It is SO easy to put together, perfect if you’re in a pinch for dessert and it’s pretty tasty.

How to Make a No Bake Chocolate Banana Twinkie Cake

All you need is a small box of chocolate pudding (I used cook and serve, but instant would work too), a box of Twinkies, banana’s and whipped cream.

Using a 9 x 13 in baking dish, I started by unwrapping about 9 or 10 Twinkies, then cutting them in half.

No Bake Twinkie Cake | TodaysCreativeBlog.net


Lay them in your pan, creamy side up.

Add Banana’s – I slices up 3 large banana’s and placed them on top of the Twinkies. This is where I couldn’t decide if I wanted to put the pudding first, then the banana’s…..either way would work and since my pudding was still cooling, I went ahead and assembled my banana’s.

No Bake Twinkie Cake | TodaysCreativeBlog.net

Add Pudding – Once my pudding was finished, I poured it over the banana’s and Twinkies. Then place in your fridge to cool. I didn’t let it cool because I had teen boys ready to eat.

No Bake Twinkie Cake | TodaysCreativeBlog.net

When you don’t let it cool, the whipped cream kinda melts……..but guess what? Teen boys could care less.

No Bake Twinkie Cake | TodaysCreativeBlog.net

I thought about making real whipped cream, but again……the spray whip was so much faster and I knew they wouldn’t appreciate the difference. I sprayed the entire can over the pudding and should have placed it back in the fridge, but my son had a spatula out and ready. So I handed it over, but did beg for a quick photo.

It’s not pretty, but it was pretty good. You can see that the whipped topping was starting to melt.

No Bake Twinkie Cake | TodaysCreativeBlog.net

Had I been making it for any other occasion, I would have been more patient to let the pudding cool. Using instant would have been a good choice.

No Bake Chocolate Banana Twinkie Cake

  • 9 – 10 Twinkies
  • 1 small box of cook and serve or instant chocolate pudding.
  • 3 large banana’s
  • 1 spray can whipped cream. (cool whip or whipped cream works too)

Cut Twinkies in half and assemble in a 9 x 13 baking dish with the creamy side up. Layer banana’s over the Twinkies. Spread pudding over the banana’s and Twinkies. Let it cool if you’re using the cook and serve type. Once it’s cool, add whipped cream to the top.

Cut and enjoy!

divider

For more inspiration, join Kim over at Today’s Creative Blog or InspirationDIY.com

Like Pinterest? Kim’s got some rockin Pinterest boards!

Today's Creative Blog

« Previous Page
Next Page »

  • Bloglovin
  • Facebook
  • Google+
  • Instagram
  • Pinterest
  • RSS
  • Twitter

Hi there! I'm Michelle. Mother of three little boys and one little princess. Welcome to A Little Tipsy, a place for exploring creativity and sharing inspiration.

Follow on Bloglovin


Visit Michelle Barneck {A Little Tipsy}'s profile on Pinterest.

Tutorials by Category


15 Family Reunion Games

Family Reunion Games Collage

15 Sprinkle Party Ideas

Sprinkle Birthday Party
Creative Commons License

© Copyright 2014 A Little Tipsy · Site Designed by The Fairy Blogmother · Web Hosting by RFE Hosting

This website uses cookies to improve your experience. We'll assume you're ok with this, but you can opt-out if you wish.Accept Read More
Privacy & Cookies Policy