A Little Tipsy

Creative Tips & Ideas

  • home
  • About Me
  • the tipsy top
  • press
  • projects
  • contact me
[print_thumbnail_slider]

Hex Pencil Case Tutorial

August 13, 2013 By Michelle Barneck Leave a Comment

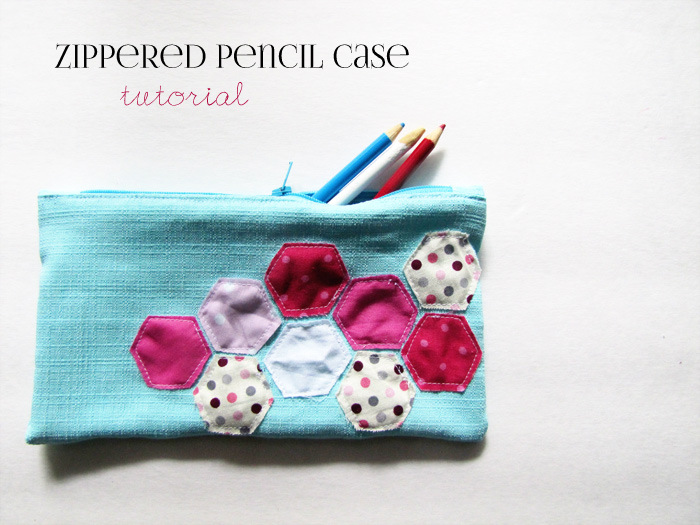
Hi again, A Little Tipsy readers! I’m stopping by from mama says sew again to share the tutorial for this zippered pencil case with you. Don’t let the zipper scare you! It’s actually really easy to sew up.

See the full tutorial.

It’s the perfect time of year to make one! My kids are getting ready to go back to school, and what better way to show their personality than to make them their own pencil case? Okay, really, I’m sure there are lots better ways to show their personality, but it’s still fun to have something that no one else will have.
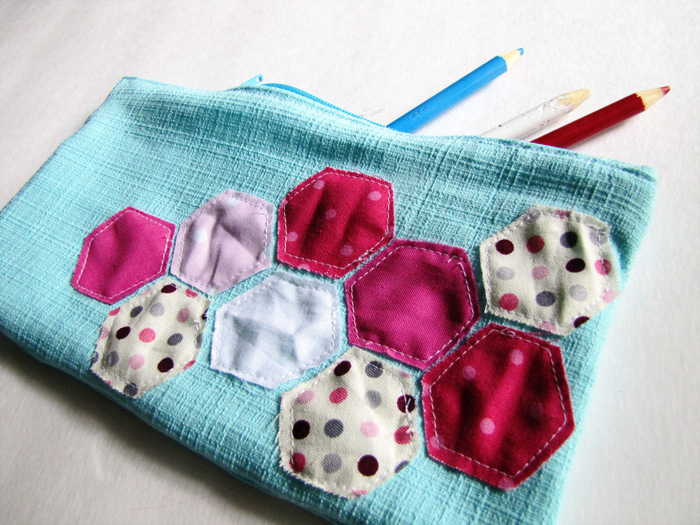
I appliqued hexagons in a honeycomb pattern, but you could do whatever you want. Here’s what to do.
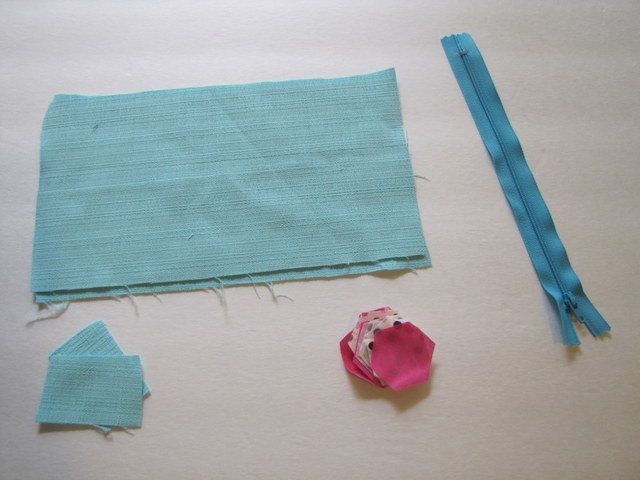
You will need:
  • Fabric (scraps work great)
  • 7 inch zipper
  • Sewing supplies, such as scissors and thread

First, cut out your fabric. My rectangles are 6 inches by 10.5 inches. Also cut out your applique pieces {here is a hexagon template if you want}, and some scraps for the zipper ends {to make the zipper long enough for the pouch}. 
First, stitch one of your scraps to the bottom of the zipper with right sides together, like this:

Trim off the end of the zipper.

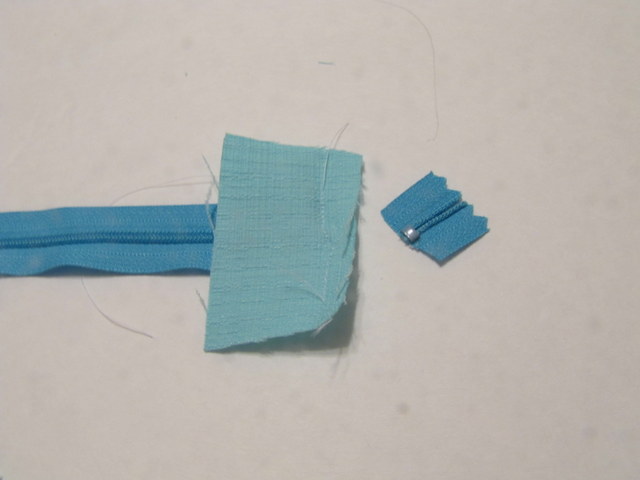
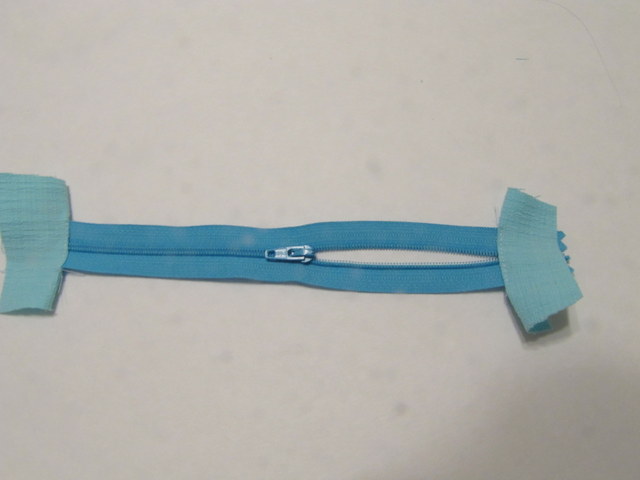
Repeat with the other end and the other scrap piece. Your zipper should now be 10 inches long, including the fabric {or the total length of the top of the pencil case, if you made it different dimensions}.

Next, applique your case. I arranged the applique pieces how I wanted them.

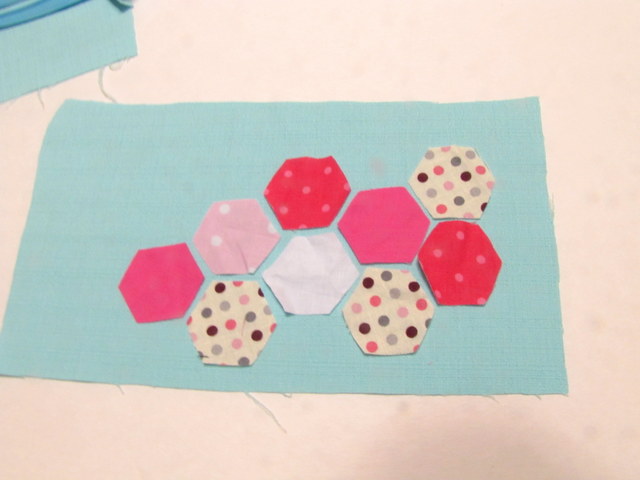
Then just stitched them in place.
Line up the zipper with the top of the pouch. The zipper should be face down on the top of the pouch. Stitch the zipper to the pouch along the top edge of the zipper and pouch.

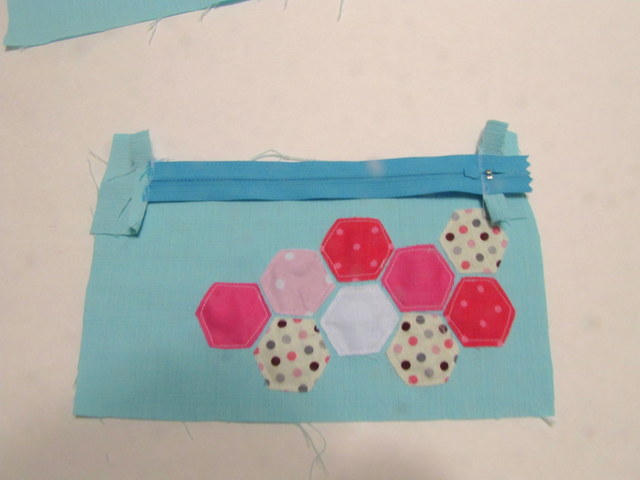
Then stitch the back of the pouch to the zipper the same way. When you’re done, it should look like the picture below. Press flat and topstitch along the edges of the zipper if desired.
Fold the pouch so that right sizes are together and stitch it down one side, across the bottom, and up the other side. Make sure the zipper is open when you do this so that you can turn the pouch right side out! You can zig zag the raw edges to help keep them from fraying.

Ta da! All set for school! 
———————————————————————
Thanks Terra! I love the pattern and colors you used and it’s so perfect to use up those scraps we all having hanging about!
We have decided to truncate our feed to help protect against stolen content. I apologize for any inconvenience. Please love us anyway. 🙂

Glittered Wine Glasses #12monthsofmartha

August 12, 2013 By Michelle Barneck 5 Comments

This post was sponsored by Martha Stewart and contains affiliate links to products.

Sometimes it’s nice to have a little something special. Whether it’s a wedding gift, late night date night, or special holiday with your family its nice to have something extravagant up your sleeve.


What better way to add a little glamour than glitter? The best part is, it’s so easy and dishwasher safe! That’s right, no one time use with this method! Let me show you how to paint wine glasses to bring that touch of elegance.

See the full tutorial.


SUPPLIES:
  • Wine Glasses
  • Martha Stewart Fine Glitter Translucent Glass Paint in Antique Silver
  • Martha Stewart Spray Paint System with Glass Medium 
DIRECTIONS:

1. Mix the glass paint with the gloss spray medium according to package directions. For two glittered glasses you will want to use about 1.5 ounces of paint and 1.5 ounces of medium. 
2. Attach the paint sprayer to the bottle being sure to take the straining cap off the bottom of the tube to allow the glitter through. 


3. Place a plastic grocery bag over your hand to hold the wine glass while spraying. 


4. Paint the glasses with multiple light coats letting them dry between to avoid puddling. Do not tilt the sprayer more than 45 degrees. Continue glittering, more concentrated at the base and gradually becoming thinner at the top giving it an ombre effect. If the sprayer gets clogged, put your finger over the hole and press down the sprayer. This will clear out the tube. Dry completely.


Enjoy your beautiful new glittered wine glasses with the beverage of your choice or give them away to someone celebrating an exciting occasion. Either way they will put a smile on your face.


Disclaimer: Martha Stewart provided product for my review. All ideas and opinions are my own.

We have decided to truncate our feed to help protect against stolen content. I apologize for any inconvenience. Please love us anyway. 🙂

Baked Apple Chips

August 9, 2013 By Michelle Barneck 8 Comments

I found a healthy snack that the kids love and makes the house smell scrumptious. What more could you ask for right? I shared this over on DIY Dreamer a few weeks ago, but couldn’t resist sharing here too. Check out these baked apple chips.
Are they not the cutest and so perfect for back to school?! You’ll be surprised how very simple it is to make your very own baked apple chips getting rid of preservatives and other gunk that comes with the packaged ones. Let’s get started.
Supplies:
Apples
Cinnamon
Mini Cookie Cutter (optional)
Knife
Parchment Paper
Cookie Sheet

1. Slice your apples into thin slices. The thinner you cut the crunchier they will be. 
2. Grab the nearest kiddo and have them cut out the cores with a mini cookie cutter.

3. Line your cookie sheet with parchment paper and spread apple slices on to pan. You can fit about two sliced apples per pan. Shake cinnamon over them.

4. Bake at 275 for about 2 hours 15 minutes. Flip them over after an hour so they bake evenly and then check them every half an hour thereafter until they look crispy. If you want to make a large batch, just do one pan at a time. They get too hot too close to the bottom.

It made the house smell divine and the kiddos gobbled them right up! They were the perfect healthy snack both kid and mom approved!
    We have decided to truncate our feed to help protect against stolen content. I apologize for any inconvenience. Please love us anyway. 🙂

    $100 Albion Fit Giveaway!

    August 8, 2013 By Michelle Barneck 128 Comments

    Post sponsored by Albion Fit.

    Have you heard of Albion Fit? They are a local Utah company that specializes in women’s fitness and swimwear and just opened their flagship store in City Creek in downtown Salt Lake City. They are awesome! For me, finding time to work out can be tough and when I put something on that is binding or uncomfortable it just makes things worse. I love that Albion items are made from super soft high quality fabric and are stylish which is nice considering most of my workouts happen outdoors. See their design yourself…

    Fabulous right? You have a chance to enter for a pretty swanky gift card a little later, but for now let’s talk hoodies. I tried out the Signature Hoodie in Silver and forget about working out, I want to live in this hoodie! The color is perfect, it’s long enough to cover my tush and has thumb holes to pull the sleeves down and cover your hands when it’s cold. I love to walk/hike in the fall with the beautiful leaves and this top is going to be my best friend!

    Lucky for us, Albion is generously giving A Little Tipsy readers an exclusive $20 off albionfit.com purchase of $50 discount! Just use the code tipsy20 at checkout through 8/11/13!

    And why stop there? Albion Fit is giving away a $100 gift card to one lucky reader!

     a Rafflecopter giveaway

    Disclosure: As shown above, Albion Fit provided product for review as well as the giveaway prize.

    We have decided to truncate our feed to help protect against stolen content. I apologize for any inconvenience. Please love us anyway. 🙂
    « Previous Page
    Next Page »

    • Bloglovin
    • Facebook
    • Google+
    • Instagram
    • Pinterest
    • RSS
    • Twitter

    Hi there! I'm Michelle. Mother of three little boys and one little princess. Welcome to A Little Tipsy, a place for exploring creativity and sharing inspiration.

    Follow on Bloglovin


    Visit Michelle Barneck {A Little Tipsy}'s profile on Pinterest.

    Tutorials by Category


    15 Family Reunion Games

    Family Reunion Games Collage

    15 Sprinkle Party Ideas

    Sprinkle Birthday Party
    Creative Commons License

    © Copyright 2014 A Little Tipsy · Site Designed by The Fairy Blogmother · Web Hosting by RFE Hosting

    This website uses cookies to improve your experience. We'll assume you're ok with this, but you can opt-out if you wish.Accept Read More
    Privacy & Cookies Policy