A Little Tipsy

Creative Tips & Ideas

  • home
  • About Me
  • the tipsy top
  • press
  • projects
  • contact me
[print_thumbnail_slider]

Halloween Silhouettes with Organize and Decorate Everything

August 15, 2014 By Michelle Barneck Leave a Comment

Halloween Silhouettes

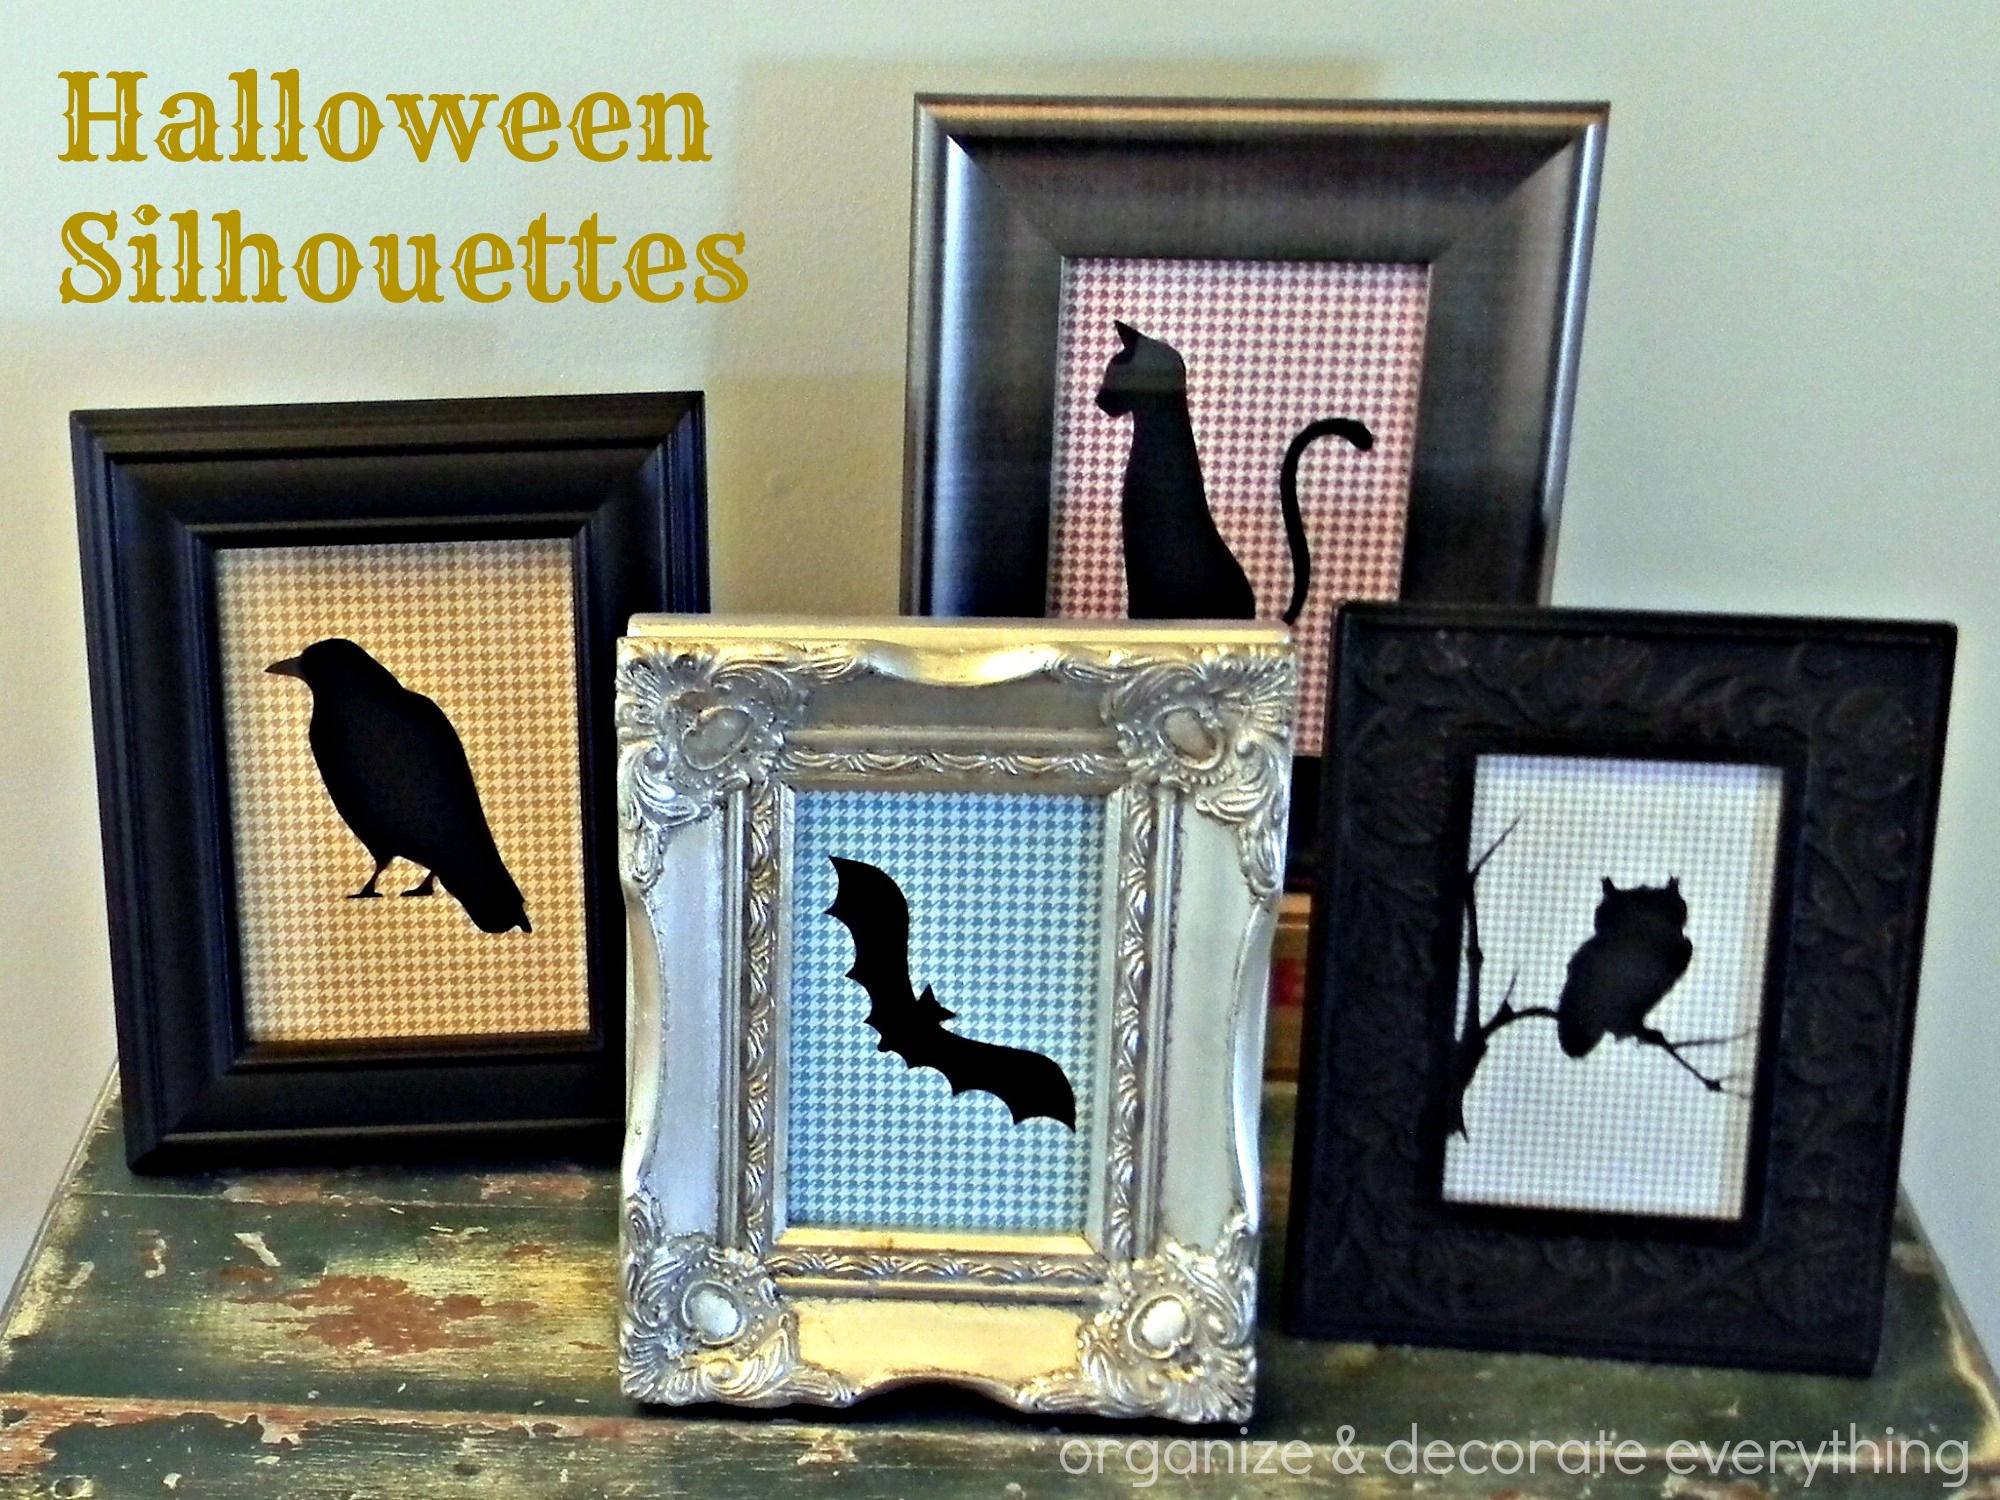
Hi Everyone! It’s Leanne at Organize and Decorate Everything. I’m so happy to be here while Michelle takes time to enjoy her cute little man and the rest of the men in her family. I love decorating for the holidays and Halloween happens to be one of my favorite. While I love traditional colors I also like to break away from them from time to time. I love how these silhouettes represent Halloween but don’t scream Halloween in your face.

Halloween Silhouettes 4

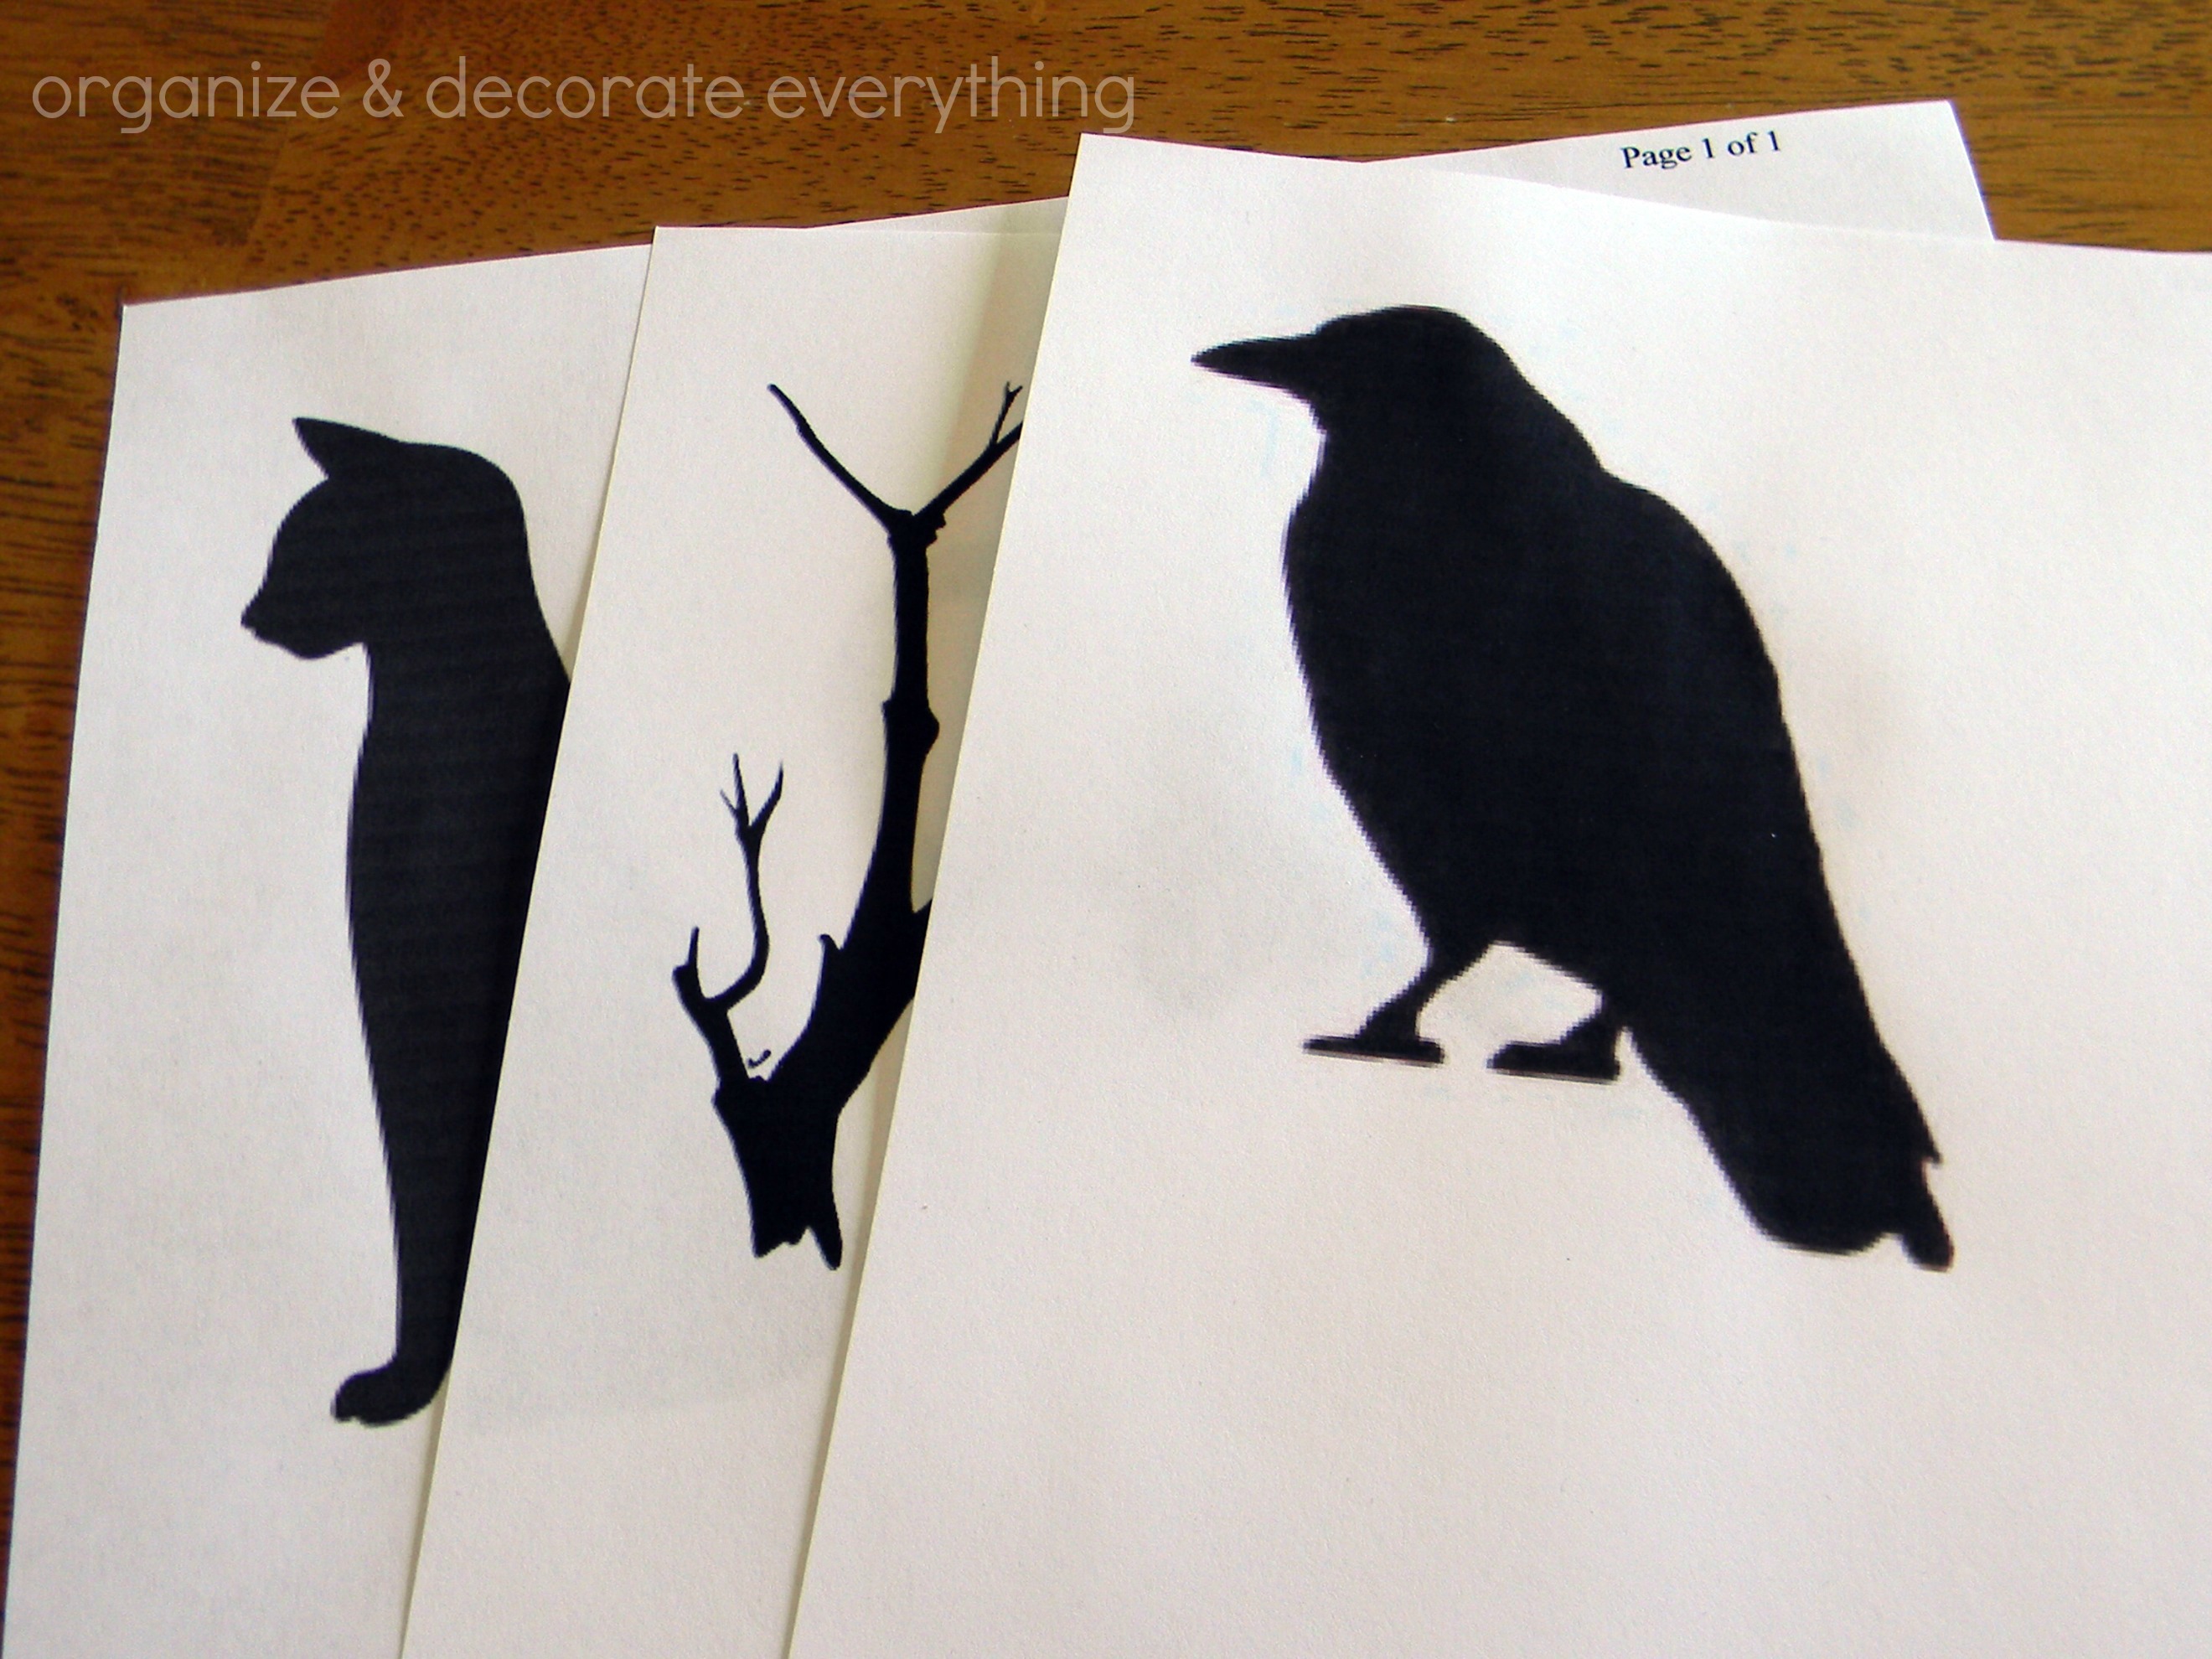
The best part is that you don’t need a cutting machine or anything fancy to make them, just a computer and a printer. I’ve heard from my readers so many times that things were cute but they weren’t able to duplicate them because they didn’t have a machine. Well, I’ve got you covered with this project. Just google different silhouette images, size them, and print them out. Use your imagination to come up with your favorite group of images.

Halloween Silhouettes 3

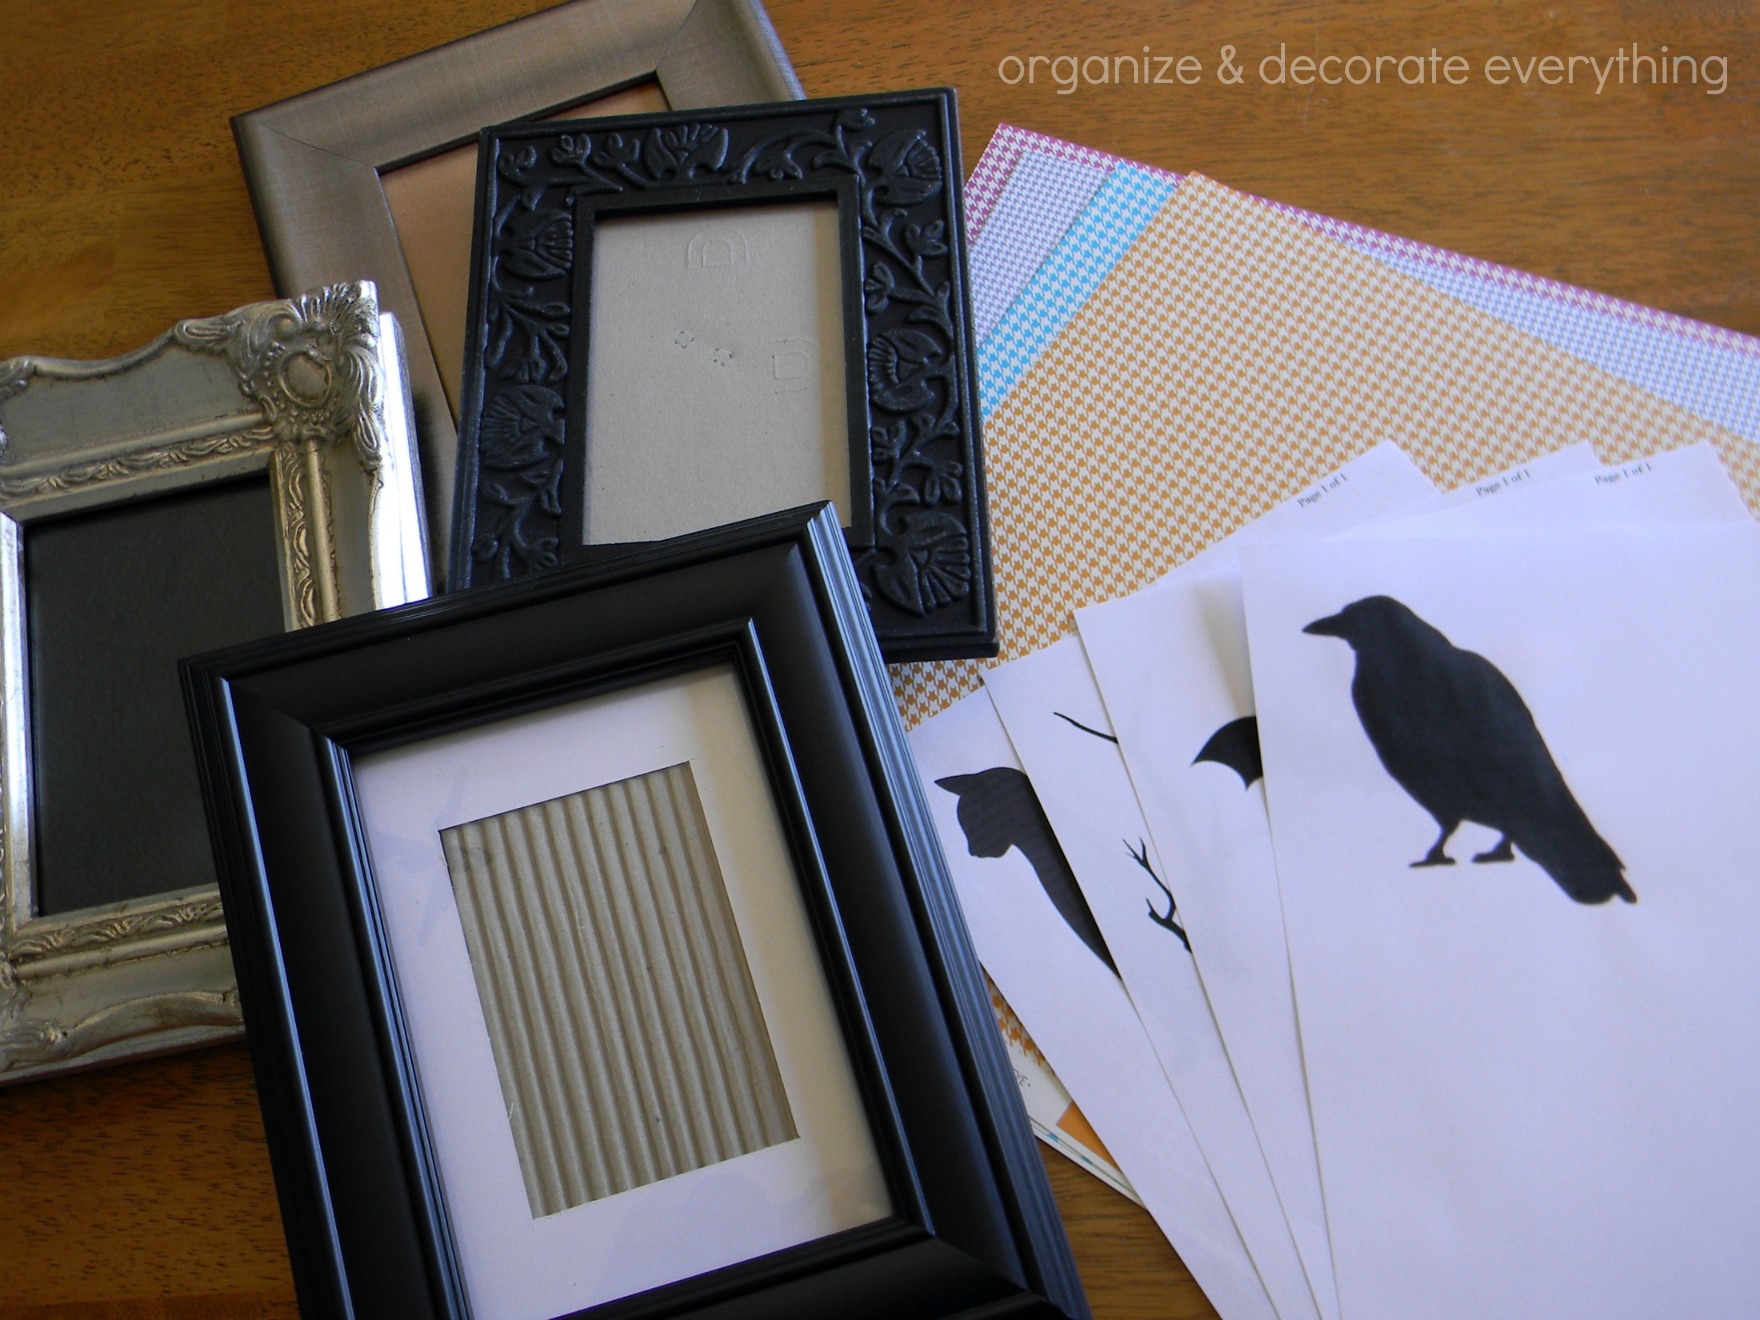
I chose scrapbook paper in different colors but the same pattern as the background for the silhouettes. Then I went through my frame stash and chose the frames I wanted to use. Yard sale frames are a good choice for Halloween decor. They don’t even have to be the same color.

Halloween Silhouettes 5

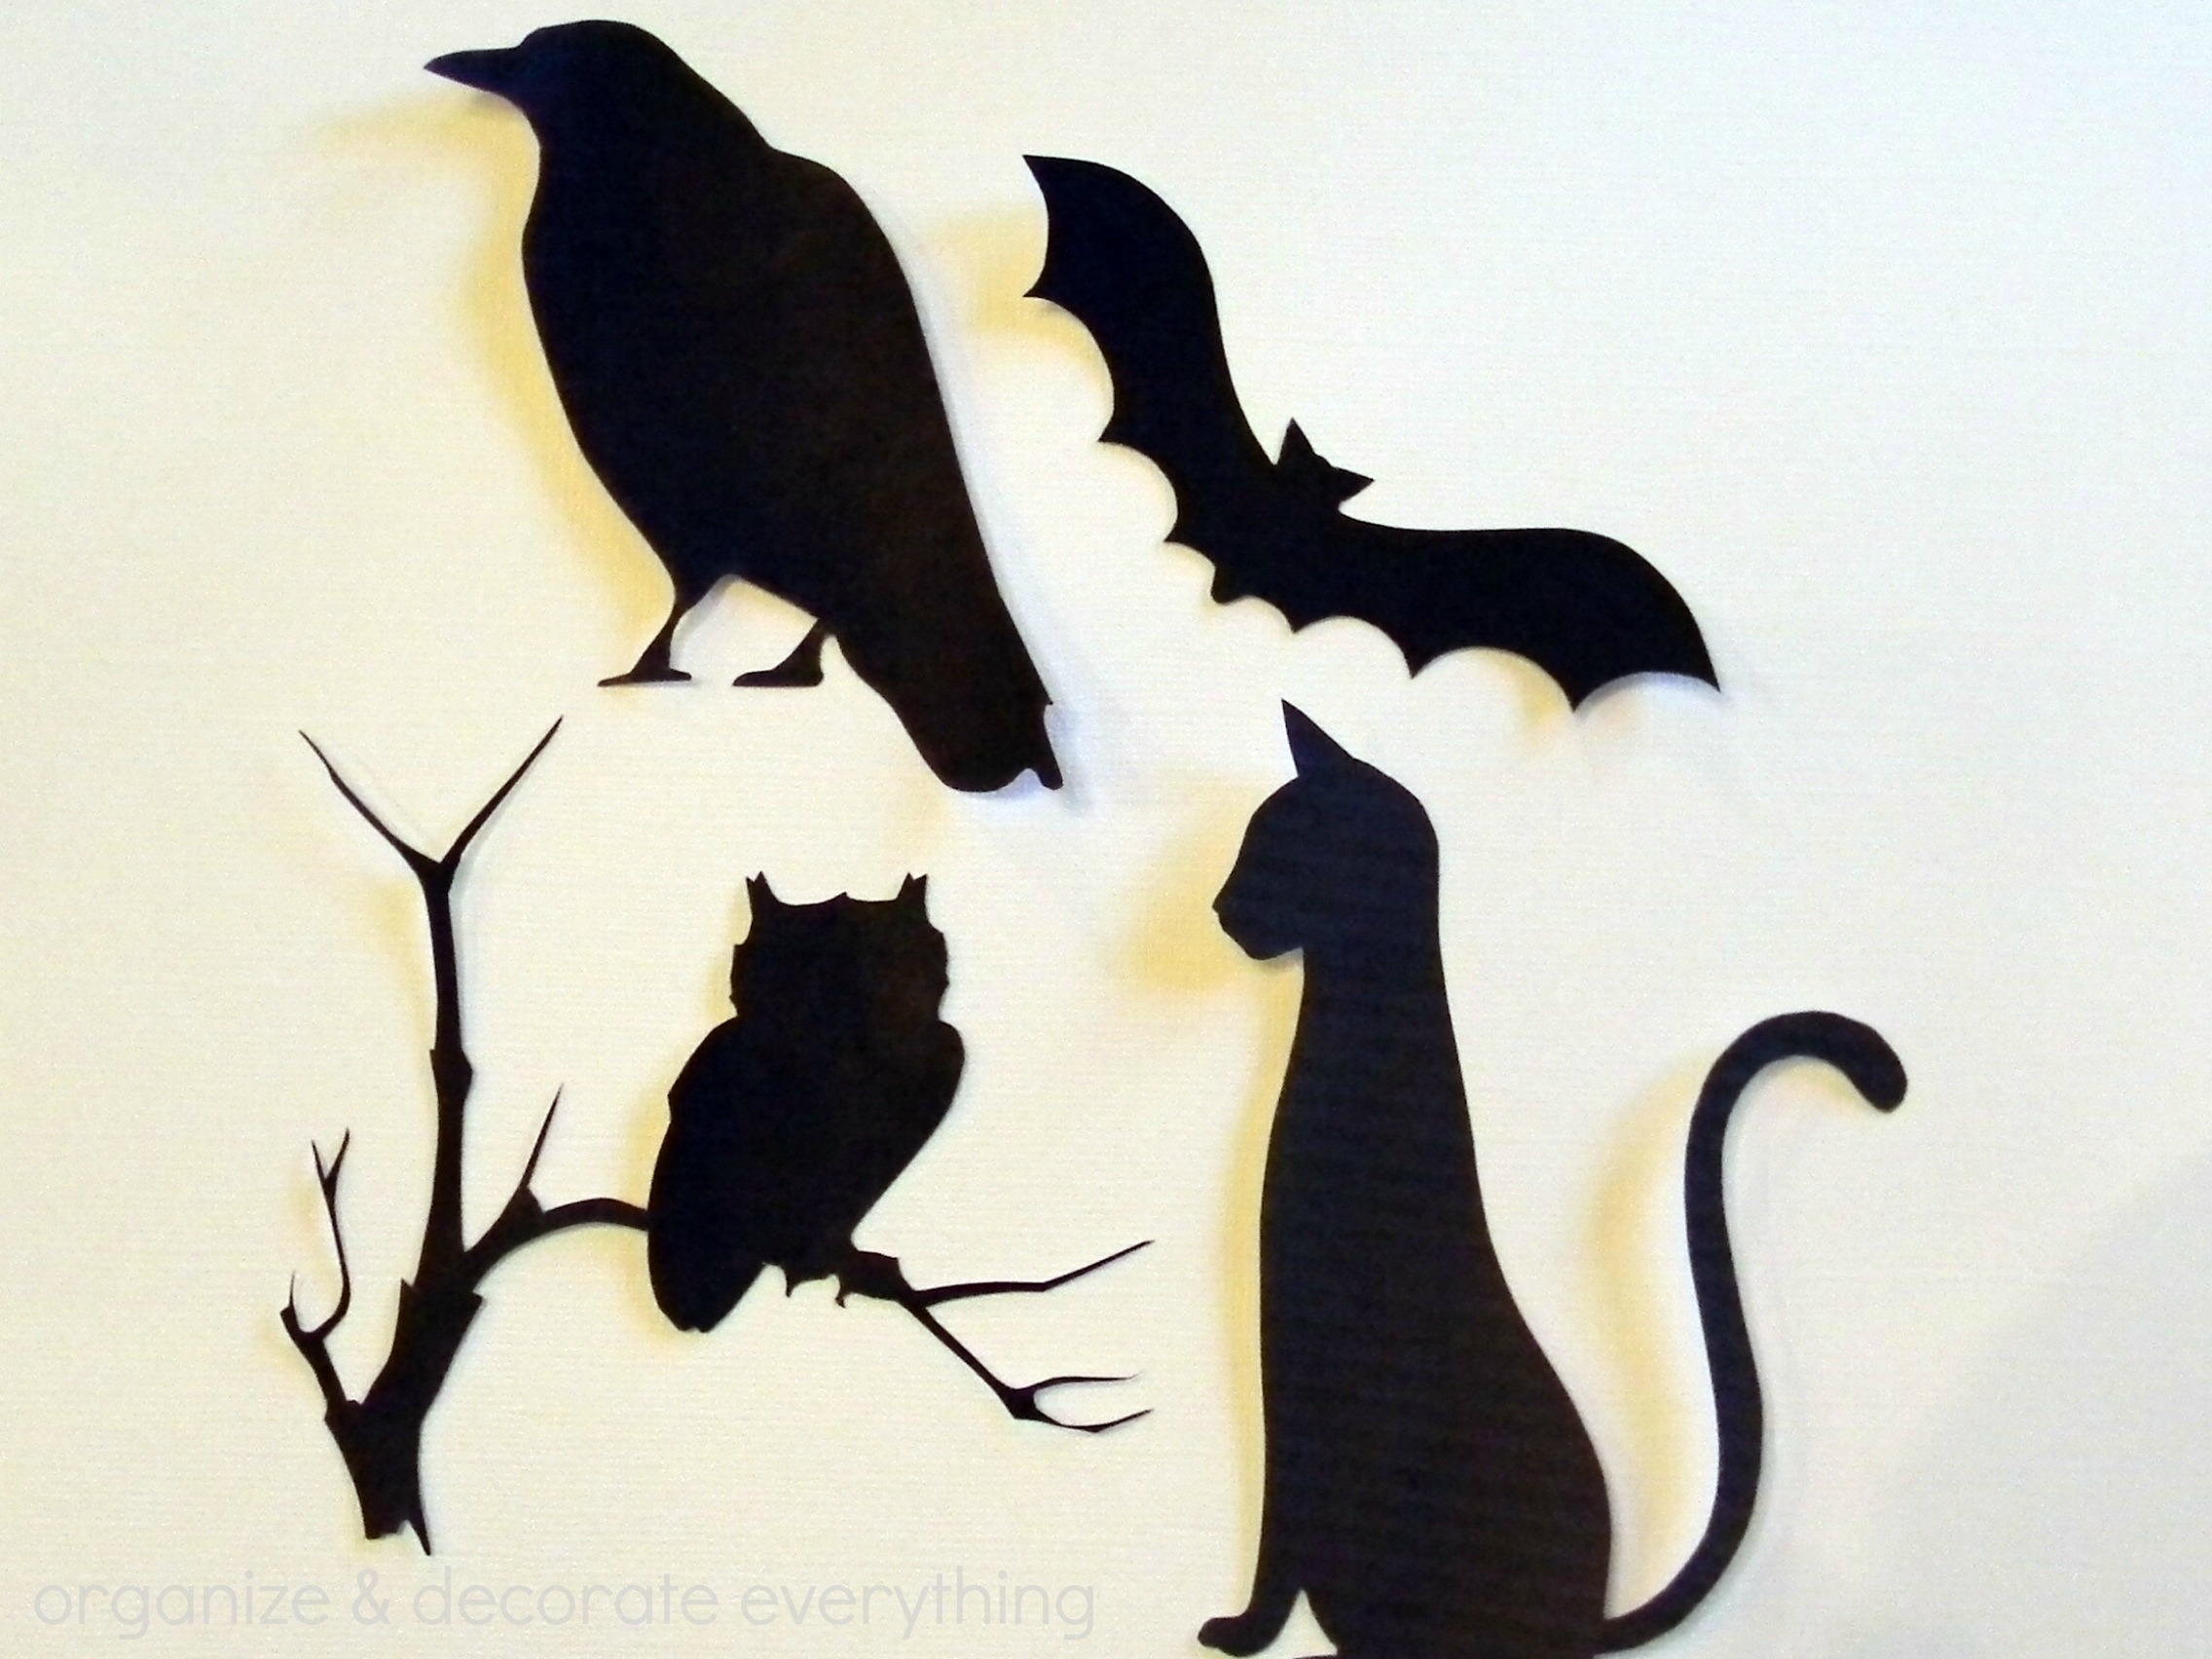
Cut out the silhouettes. I found ones with not much detail (except for the tree the owl’s perched on) to make it easier.

Halloween Silhouettes 6

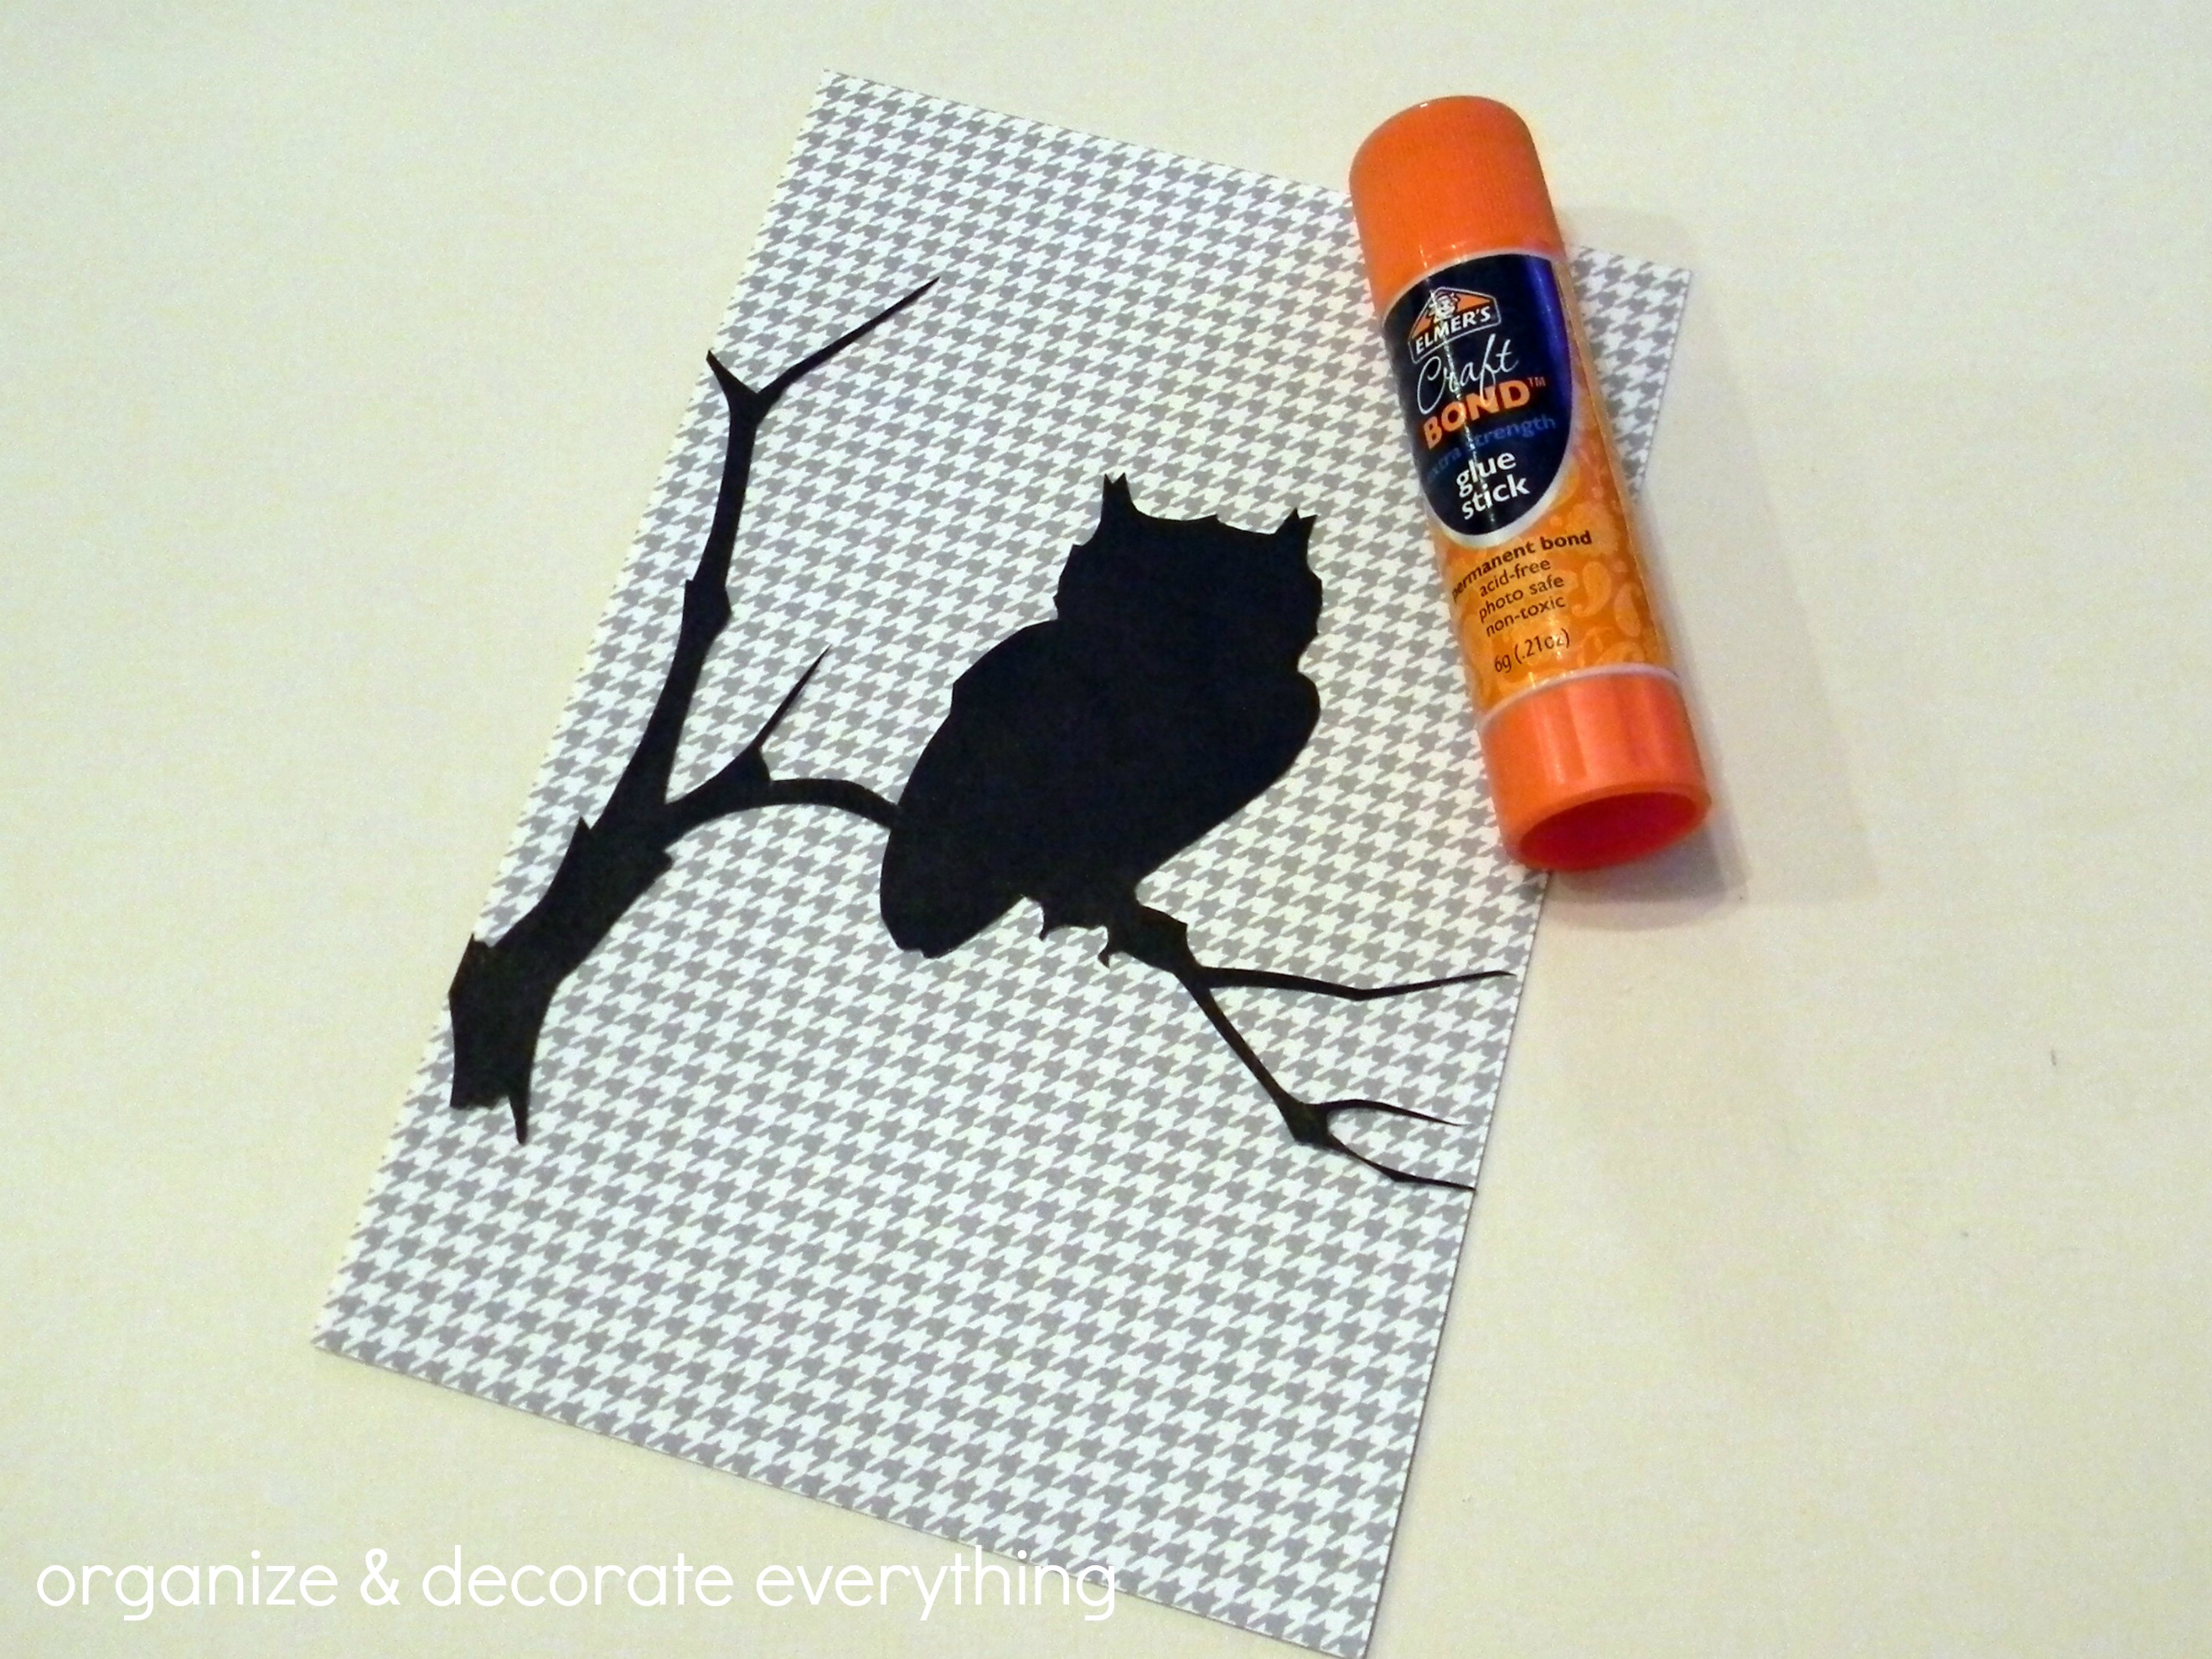
Cut the scrapbook paper to fit the frame then glue the silhouette on the paper. I used a regular glue stick. As you might notice I trimmed the tree a bit to fit perfectly on the paper.

Halloween Silhouettes 2

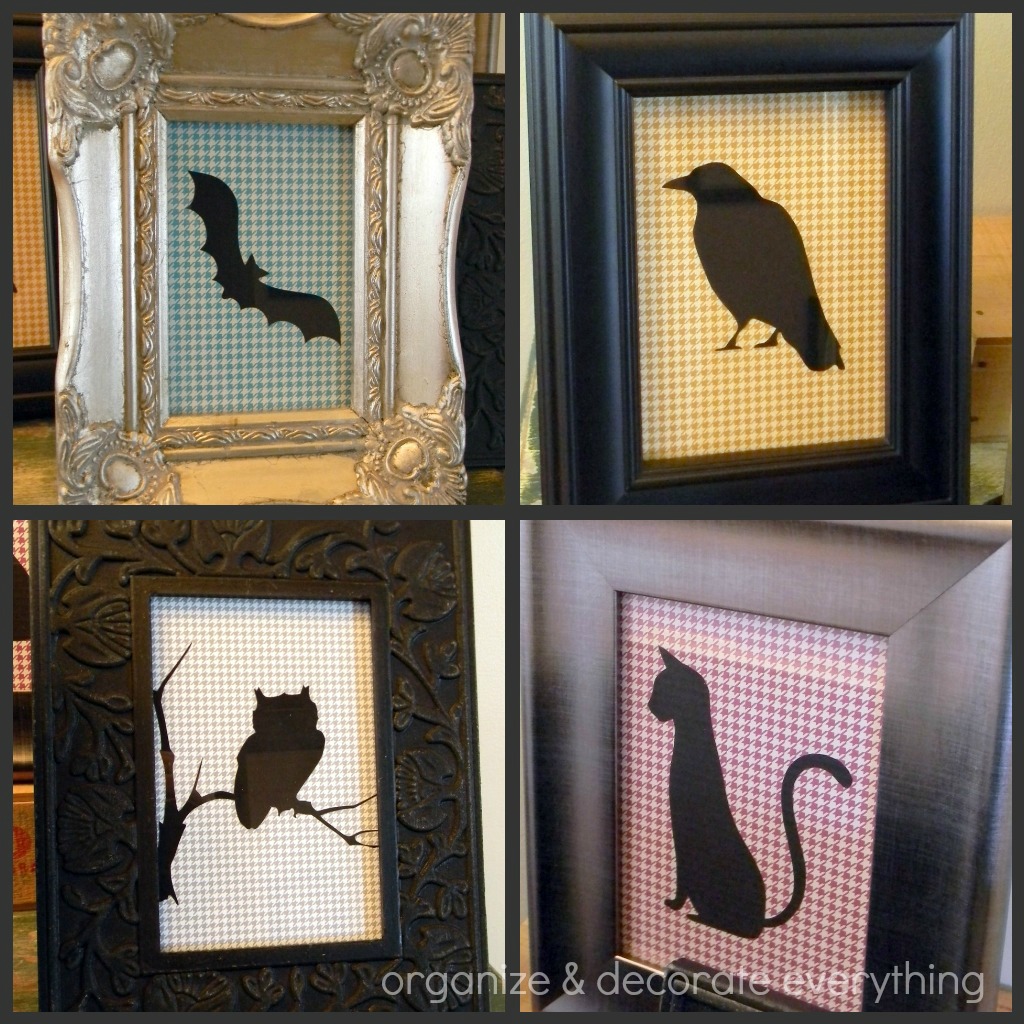
That’s it! Now you have 4 framed pieces for Halloween for very little cost. Thank you for letting me share a Halloween craft with you. I know it’s only August but I like to plan ahead and have all my projects finished. Here are a few more projects you might like.

Laundry Room Organizing Collage.1

Organizing the Laundry Room

pencil and cork wreath

Pencil and Cork Wreath

Painted Soda Can Vases 3.1

Painted Soda Can Vases

Giant M&M Cookies from Lil’ Luna

August 13, 2014 By Michelle Barneck 2 Comments

Guest Post Header

Hi there A Little Tipsy friends!!! My name is Kristyn, and I blog over at Lil’ Luna!! I’m so excited to be here today while Michelle enjoys her sweet bundle of joy!! I think it’s just SO exciting when babies are born and I hope Michelle is enjoying this little break from blogging to spend it with her new little one!!

Today, I wanted to share with you a new favorite cookie recipe. We’re HUGE cookie fans here in our home and make them at least every other week. Sometimes it’s just for fun and other times for friends or for a get-together, but it’s become tradition for the kids to gather around the kitchen island to help make these sweet treats, and I LOVE it!! We usually stick to our all-time FAVORITE Chocolate Chip Cookies recipe but we ventured out a tried a new recipe that was a hit with the whole fam! These Giant M&M Cookies were easy to make and so delicious. I mean, how can you not like M&M Cookies?

Giant-Chewy-MM-Cookies-1

These Giant M&M Cookies were soft, chewy and have become a new favorite!!

Here is what you’ll need to make them:

INGREDIENTS:

– 2 heaping cups flour
– 1/2 tsp. baking soda
– 1 1/2 sticks unsalted butter (melted and cooled)
– 1/2 tsp. salt
– 1 cup brown sugar
– 1/2 cup sugar
– 1 egg + 1 egg yolk
– 2 tsp. vanilla
– 1 cup mini M&Ms
– 1 cup regular M&Ms

DIRECTIONS:

1. Mix flour, baking soda and salt in a bowl and set aside.

2. In a separate bowl, mix butter and sugars until well combined. Add egg, egg yolk and vanilla and mix well.

3. Slowly add flour mixture to the we mixture and mix until dough forms. Use hands if needed.

4. Crush 1 cup of regular M&Ms. Fold in crushed and non-crushed M&Ms to your dough.

5. Decide how big you would like your cookies. I wanted giant cookies, so I used a large ice cream scoop. With your hand, shape each portion into a ball and then pull into two equal pieces. Turn one piece rough side (what used to be the inside of the ball) down onto the cookie sheet. Put the other piece on top of that, rough side up. Space 1-2 inches apart, depending on how big your cookie is.

6. Bake large cookies for 12-14 minutes and small cookies for 8-10 minutes or until the edges are golden. Centers should be soft and puffy. Let cool and enjoy!

Recipe adapted from How Sweet It Is.

Giant-Chewy-MM-Cookies-2
Giant-Chewy-MM-Cookies-3

Seriously, how could you NOT want to devour these big beauties??

Mmmmmm – they were so good!

For more great cookie recipes on my site be sure to check out:

Cookies Collage

Soft M&M Cookies – White Chocolate & Butterscotch Chip Cookies – Gooey Butter Cookies

And with Halloween just around the corner, be sure to head to the blog for these festive treats!

Halloween Collage

Halloween Wreath – Gooey Monster Eye Cookies – Halloween Cookie Jar Gift

Thanks for having me here today, Michelle!

Head on over to Lil’ Luna for recipes as well as great craft and home decor tutorials, printables and tips!

ENJOY!

Printable School Notes with Kiki and Company

August 11, 2014 By Michelle Barneck 1 Comment

This week our little guy will be making his debut and I am excited to introduce a new series including some of my favorite bloggers! Through September I have recruited the best of the best to share a favorite fall idea so get geared up for some fun new fall themed crafts, recipes, printables, and more! Without further adeiu let’s start things off with Kiki and Company!

——————————————————–

I am so excited to be here today at A Little Tipsy to kick off fall. I don’t know about you, but when I think of fall, I think of SCHOOL! I’m Kiki from Kiki and Company. With 5 little munchkins, I know how those back to school days can be filled with stress and anxiety to get everything ready, but also how exciting and exhilarating it is for our kids as well!

Today, I thought I’d make a fun little printable that you can use as lunchbox notes or for a note to the teacher. I love sending my kids off with little notes placed in random places (like a backpack or the book they are reading) to let them know I am thinking about them while they are away! I also know that I have days that I just want to write a quick thank you to my kid’s teachers and having these ready will make that a piece of cake!

To download these free School Notes, click on the link below:

School Notes

I hope your fall starts off great and that your kiddos have a great school year!

…..

To find other free School printables at Kiki and Company, check these posts out:

11 Free Sets of Lunchbox Laughs and Notes:

Free Smile Catcher (Back to School Edition)

Back to School Photo Cards and Interviews:

August Visiting Teaching Message Handout

August 5, 2014 By Michelle Barneck Leave a Comment

The August Visiting Teaching Message focuses on the divine mission of Jesus Christ as our Messiah. I love this quote from the message from Dieter F. Uchtdorf, “[Jesus Christ] is the Savior and Redeemer of the world. He is the promised Messiah. He lived a perfect life and atoned for our sins. He will ever be at our side. He will fight our battles. He is our hope; He is our salvation; He is the way.” 

August Visiting Teaching Message Handout

DOWNLOAD THE FREE VISITING TEACHING HANDOUT PRINTABLE

Feel free to print and share the message with your sisters. The handout is formatted to be printed on a 4×6 photo card.

« Previous Page
Next Page »

  • Bloglovin
  • Facebook
  • Google+
  • Instagram
  • Pinterest
  • RSS
  • Twitter

Hi there! I'm Michelle. Mother of three little boys and one little princess. Welcome to A Little Tipsy, a place for exploring creativity and sharing inspiration.

Follow on Bloglovin


Visit Michelle Barneck {A Little Tipsy}'s profile on Pinterest.

Tutorials by Category


15 Family Reunion Games

Family Reunion Games Collage

15 Sprinkle Party Ideas

Sprinkle Birthday Party
Creative Commons License

© Copyright 2014 A Little Tipsy · Site Designed by The Fairy Blogmother · Web Hosting by RFE Hosting

This website uses cookies to improve your experience. We'll assume you're ok with this, but you can opt-out if you wish.Accept Read More
Privacy & Cookies Policy