A Little Tipsy

Creative Tips & Ideas

  • home
  • About Me
  • the tipsy top
  • press
  • projects
  • contact me
[print_thumbnail_slider]

Archives for November 2011

Donut Snowman on a Stick: Once There was a Snowman, Snowman, Snowman…

November 18, 2011 By Michelle Barneck 25 Comments

We’re debuting the Point of View theme ideas a little early this month because though GIFTS is a fitting theme for Black Friday we though you might be busy with gifts elsewhere. 😉

Michelle (Stay right here!)
Leanne (Organize and Decorate Everything)
Amy (Ameroonie Designs)
Gwen (Gwenny Penny)
Debra (Housewife Eclectic)
Caitlin (Cait. Create.)
Jonie (Just Between Friends)
& YOU!!
 
We want to see your Point of View on gifts so be sure to link up your gift ideas on the Point of View link up on Organize and Decorate Everything!
 
Without further adeiu, an ode to the Snowman.
I grew up with a little song called “Once There was a Snowman.” Are you with me here?
Once there was a snowman, snowman, snowman.
Once there was a snowman tall, tall, tall.
In the sun he melted, melted, melted.
In the sun he melted small, small, small.
Lyrical genius right?
I saw the donuts with the carrot nose and thought an expansion on that idea would be the perfect homage to said song.
{Donut Snowman on a Stick}
CAREFULLY (two donuts were harmed in the making of this snowman) skewer three powder donuts.
Cut a baby carrot in half and put in hole for nose. Add grape Nerd eyes and mouth to look like coal. You my need a dob of frosting or honey to hold them in place.

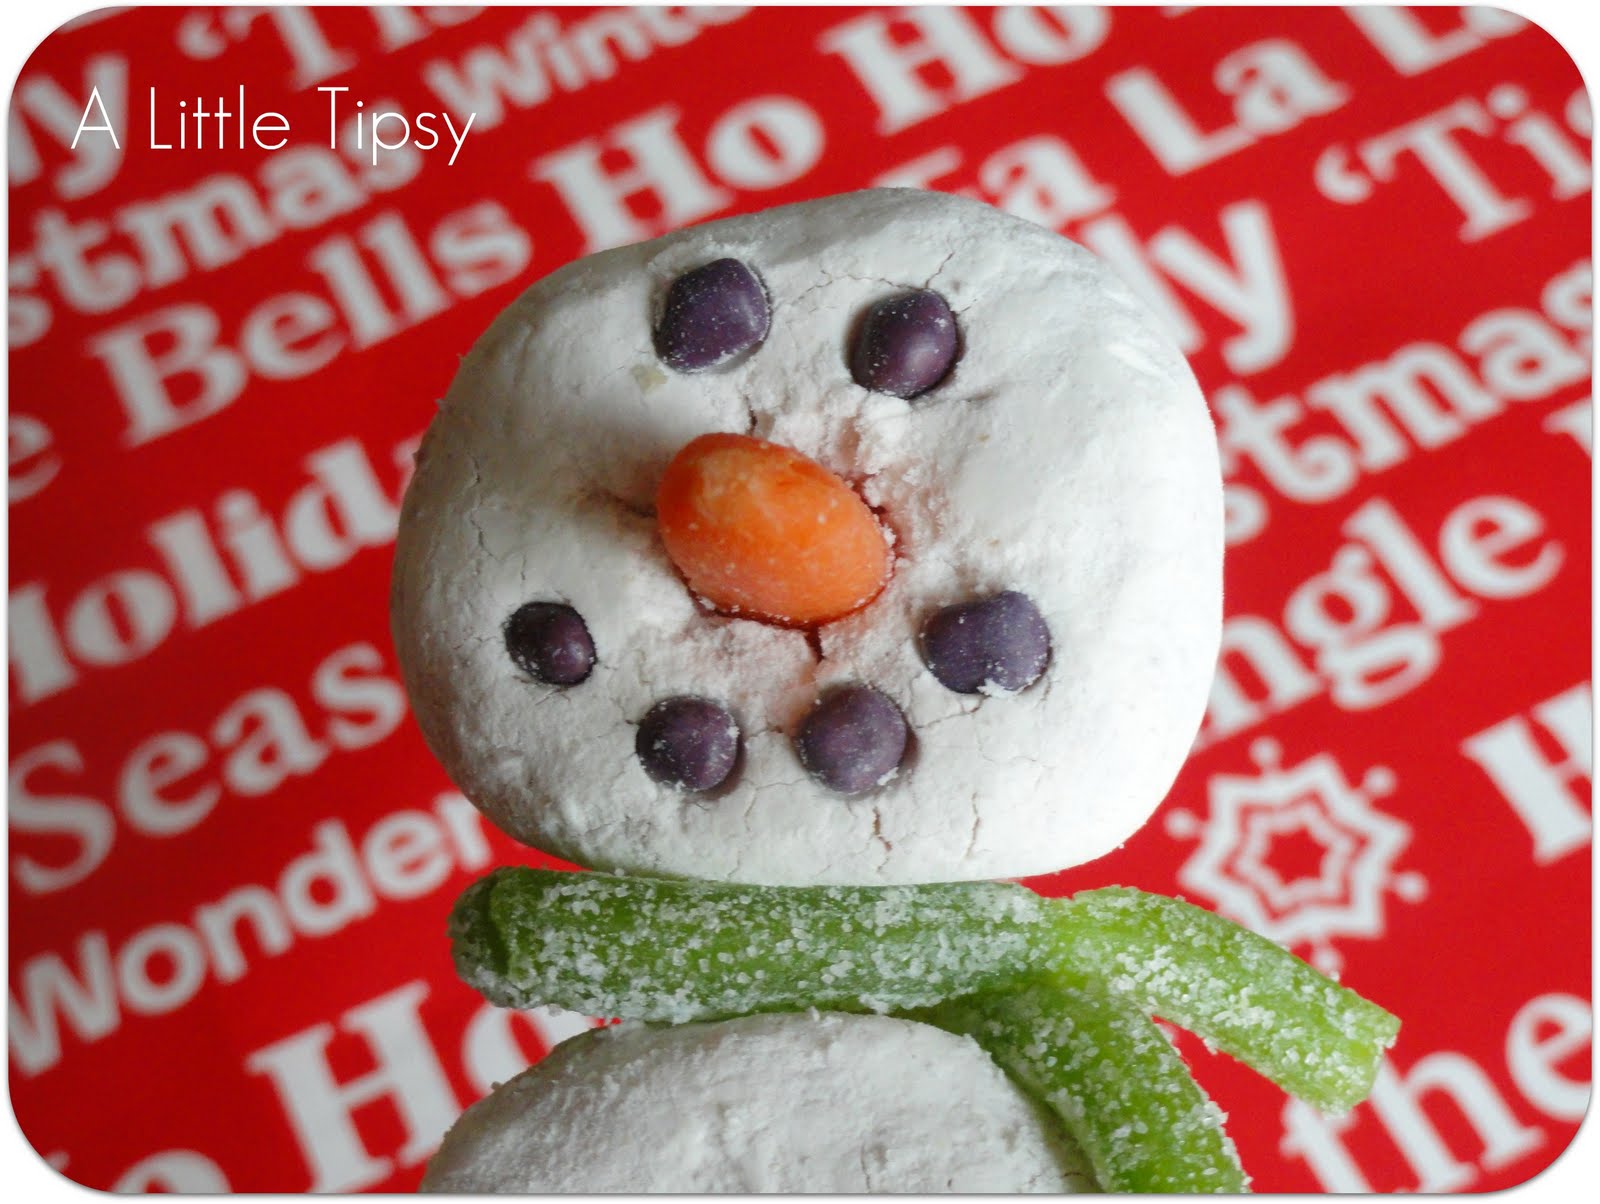
Add a green apple sour straw as a scarf. Break a toothpick in half and secure the scarf by poking the toothpick through the straw and in to the donut on the top where they overlap and on the bottom of the piece that hangs down the front. You can see the tiny dot of the toothpick on the bottom of the scarf.

Add two red jawbreakers as buttons.
Place in a treat bag with a bow and pass out to your friends.
They will have all sorts of fun singing the song and gobbling him up small, small, small.
Be sure to visit the other girls for some great gift ideas and link up your gift ideas on the Point of View link up on Organize and Decorate Everything for your chance to be featured!


Elmer’s Craft & Tell Party: How to Make a Christmas Tree

November 17, 2011 By Michelle Barneck 179 Comments

Check out what showed up on my doorstep the other day…
Ya, it was pretty much like a crafty Christmas morning. Elmer’s sent me this insanely cool box (Did you see those cutouts, talk about great packaging!) filled to the brim with super cool Elmer’s and X-acto products to try out and share. I called a few of my creative friends over for a little crafty get together.
Everybody got an awesome goody bag full of Elmer’s crafty supplies like scissors, glue of all kinds (dots, runners, tacky, sticks), retractable x-acto knives, foam boards and self-healing cutting mats.
Hannah, Jen, Jonie
What GNO is complete without some delectible seasonal offerings?! This was a great excuse to whip up some Starbuck’s Caramel Apple Spice, Nutella hot chocolate and pumpkin pie cake.
Everyone brought a roll of wrapping paper and we got to work on a little Pinterest inspired Christmas decor project.
Jennifer
All of you couldn’t fit in my house, but that doesn’t mean you can’t do the make and take! And later you’ll have a chance to win a little party of your own!
{How to Make a Wrapping Paper Christmas Tree}
inspired by
Supplies:
  • Wrapping paper
  • Elmers Glue Spots
  • Elmers foam board (we used bifold, but you only need one side)
  • Scissors
  • Large Popsicle sticks
  • Heavy duty kitchen shears
  • Garden twine
  • Elmers tacky glue
  • Hot glue
  • Wood Star
  • Martha Stewart Glitter Paint
  • Buttons
Cut pieces of wrapping paper and roll them in to tubes securing with a few glue spots. Secure the glue spots to the foam board making the tubes progressively smaller.
Break a popsicle stick in half. Put the halves side by side cover in glue and wrap with twine.
Let the glue dry then trim off the ends of the sticks with the kitchen shears (I used Cutco). Glue in place under the tree.
Paint the star with a thick layer of glitter glue and let dry. Hot glue a button on the star and then glue in place at the top of the tree.
Use glue spots to secure button ornaments on the tree.
And that my friends is how to make a Christmas tree!
Now you have the make and take, let’s get you an Elmer’s goody bag!
Elmers is giving away two Elmer’s Craft & Tell Prize Packs so you can have a crafty GNO of your own including:
  • 3 X-ACTO Retract-a-Blade knives
  • 3 CraftBond Extra Strength Glue Sticks
  • 3 CraftBond Tape Runners
  • 3 Mini Bi-fold 9×12 Foam Board packs
  • 1 Painters Markers pack
  • 1 X-ACTO Decorative Edge Scissors pack
  • 1 Circle Cutter
  • 1 X-ACTO Self-Healing Mat
  • 1 Glue Dots pack
  • 2 Photo Corners packs (various colors)
  • 1 Gel Pens pack
  • 1 Tacky Glue bottle
It’s a sweet party in a box, just add friends and treats!
To enter: (leave a separate comment on this post for each entry)
  • What in the prize pack are you most excited about?
  • Like Elmer’s on Facebook on tell them hello from A Little Tipsy
  • Follow Elmer’s on Twitter
  • Follow A Little Tipsy
  • Tweet or Facebook about this giveaway Ex: I’m hoping to win the @elmers #craftandtell giveaway on @littletipsyblog!
Giveaway ends on Tuesday, November 22nd. Good luck!

DIY Under $5

November 16, 2011 By Michelle Barneck 8 Comments

I’m went festive for my DIY Under $5 project this week. Nothin’ like a mistle-toe pedi to kick off the holidays!
Four bottles of polish (most of which you probably already have), a toothpick, and some patience is all you need.
Now let’s see what you’ve been up to!


I enjoy so much your $5 projects that I decided to add an addition link section for anything under $15! That’s right. It will open up a place to show additional projects that can’t be purchased with an Abe Lincoln, but are still totally affordable! I can’t wait to see more from you!

Please remember:

  • Only link to your own projects that cost you $5 or less (price does not have to include items you had on hand) or $15 or less in the 2nd section.
  • You can link past projects that fit the dollar limit, but please only link each project one time to one DIY Under $5 party. Do not link the same project week after week.
  • No linking giveaways or items for sale
  • Please link back so others can join the party and so you have the opportunity to be featured on Saturday!


DIY under $5


Projects under $5

Projects under $15


P.S. Don’t forget to sign up for free Tipsy updates via RSS or email.

We have decided to truncate our feed to help protect against stolen content. I apologize for any inconvenience. Please love us anyway. 🙂

Mistle-toe

November 15, 2011 By Michelle Barneck 7 Comments

Time to spread a little holiday cheer…to your toes with a festive Mistle-toe pedicure!
p.s. I am well aware they are holly leaves, but mistletoe leaves are boring and I still wanted to use the cute name.
It’s pretty simple. Take a little bit of this…
and turn it in to this!
Step-by-step Mistle-toe:
Red coat.
Two green dots.
Use a toothpick to pull the polish to make 6 points. Move the polish around with the toothpick as needed to make it look right.

Two more green dots.
Make points with toothpick.
Dip toothpick in white and make three dots to complete your mistle-toe. Add a single dot to all other nails.
Cover with a clear coat and BAM. Super jolly Mistle-toe pedi!
P.S. Don’t forget to sign up for free Tipsy updates via RSS or email.
We have decided to truncate our feed to help protect against stolen content. I apologize for any inconvenience. Please love us anyway. 🙂
« Previous Page
Next Page »

  • Bloglovin
  • Facebook
  • Google+
  • Instagram
  • Pinterest
  • RSS
  • Twitter

Hi there! I'm Michelle. Mother of three little boys and one little princess. Welcome to A Little Tipsy, a place for exploring creativity and sharing inspiration.

Follow on Bloglovin


Visit Michelle Barneck {A Little Tipsy}'s profile on Pinterest.

Tutorials by Category


15 Family Reunion Games

Family Reunion Games Collage

15 Sprinkle Party Ideas

Sprinkle Birthday Party
Creative Commons License

© Copyright 2014 A Little Tipsy · Site Designed by The Fairy Blogmother · Web Hosting by RFE Hosting

This website uses cookies to improve your experience. We'll assume you're ok with this, but you can opt-out if you wish.Accept Read More
Privacy & Cookies Policy