A Little Tipsy

Creative Tips & Ideas

  • home
  • About Me
  • the tipsy top
  • press
  • projects
  • contact me
[print_thumbnail_slider]

Halloween Monster Menu Plan

October 26, 2009 By Michelle Barneck 4 Comments

If you are like me the fun food is as much for you as it is for the kiddos. I love doing themed food and Halloween is prime time for food with a spooky theme. I found a whole bunch of totally easy recipes to keep your family on their toes this week. I especially love that I had many of the ingredients on hand so my shopping list was short!

Here’s the Monster Menu Plan, mix and match as you please! I added any tips from things I did differently from the original recipes.

1. Ham & Cheese Pumpkins
from Woman’s Day
I used cube ham instead of slices because that is what I had so I could use it for the mummy pizzas too. The pumpkins would be way easier to seal with slices.

I added in a spaghetti squash poked to look like a Jack-o-lantern. If you have not tried it, give it a whirl. We LOVE it at my house!

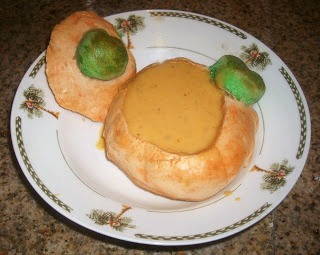
2. Pumpkin shaped bread bowls from the Idea Room filled with savory Pumpkin Soup
I dyed too much dough green so I improvised and made leaves.

Pumpkin Soup (recipe from my sister, not sure where she got it)
4 T butter
1/3 Cup flour
1 grated onion
4 Cups water
4 Chicken bouillon cubes
1 16 oz. can pumpkin
1 1/2 t. salt
1 1/3 t. lemon juice
1/4 t. pepper
1/4 t. nutmeg
2 2/3 cups half and half

In large pan melt butter and stir in flour.
Add onion and bouillon dissolved in water.
Stir until smooth and thick.
Add everything else except half and half.
Heat to boiling, stirring occasionally.
Let simmer 15 minutes.
Add half and half and heat through but do not boil.

This pumpkin soup is so easy and so yummy! The leftovers are just as good as the first day!
3. Mummy Pizzas
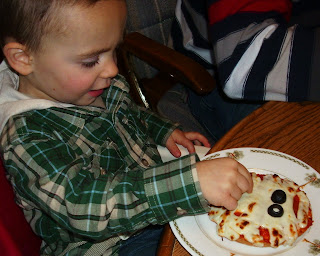
We have been making bagels pizzas for years, but never thought to use string cheese strips. I add a layer of cream cheese to the bagel before the sauce and put a pepperoni over the hole so the toppings don’t fall through.

4. Spaghetti and Eyeballs from mommy23Monkeys

I know this link is broken, but I am hoping it will come back so you can see it. Just put olive slices on meatballs to make eyes. This was my little guys favorite!! We paired it with Bones n Blood from Our Best Bites.

5. Mummy Dogs
We used this for a dinner we had to eat in the car while taking daddy to a class. Be sure to cook them until browned well. Ours were a bit doughy. 6. Mummy Meatloaf from Gourmet Mom on the Go
Have not tried this one yet, but totally plan to!


Now here are some bonus sides to mix and match with the above!

Vegetable Skeleton from Kraft

Skeleton and Brain Dip

Spider Web Dip
I am totally one of those moms who thinks you can count dip as dinner. I mean you have all the food groups. Beans-protein, Sour cream & cheese-dairy, Onions-veggie, Tomato-fruit, Chips or crackers-grain. Eggy eyeballs from Crafty Crow

Monster Jaws from Our Best Bites

Happy Haunting!

Linking withorgjunkiempm1

P.S. Don’t forget to sign up for free Tipsy updates via RSS or email.

We have decided to truncate our feed to help protect against stolen content. I apologize for any inconvenience. Please love us anyway. 🙂

Tricks for Treats-Cute Halloween Cookies

October 14, 2009 By Michelle Barneck 6 Comments

I got together with my sisters while the men were away at Priesthood session of General Conference and we made the cutest treats. Ghost, mummy, pumpkin and candy corn cookies made for quite the Halloween dessert fest.

We started making these cute ghosts last year…

Just dip Nutter Butters in white chocolate (I microwave a bag of chocolate ships with one tablespoon crisco to make it runnier and easier to work with) and add mini chocolate chip eyes.

And in a bit of late night inspiration, I thought to reinvent them in to mummies. I love them!! So cute in their little white chocolate wrappings.

Just dip a spoon in the white chocolate and drizzle away!

I got the idea for these adorable candy corn cookies from Once Upon A Party. They are still my nieces favorite! They are so simple, just dye your sugar cookie dough with food coloring and dip in white and brown chocolate (same thing with the bag of chocolate chips and tablespoon of Crisco)! Adorable!

The pumpkins, well the pumpkins are a standard right? The only difference with these is…the topping is not frosting, it’s chocolate. Hope you enjoyed these few tricks to make cute treats!

P.S. Don’t forget to sign up for free Tipsy updates via RSS or email.

We have decided to truncate our feed to help protect against stolen content. I apologize for any inconvenience. Please love us anyway. 🙂

Make Your Own Gourmet Caramel Apples

September 22, 2009 By Michelle Barneck 9 Comments

Every time we go to Park City we stop in The Village Candy Shoppe on Main Street to pick up a delicious caramel apple. Rocky Mountain Chocolate Factory sells them too. Want to know how to make your own? Here we go! I mean what is fall without a delicious caramel apple?

I taught my YW how to make Gourmet Caramel Apples for an activity. I wanted to make things super simple so they could remember how to do it and make them for their families, but you could definitely amp up the recipe with homemade caramel as long as it is a recipe that will stiffen over time.

Caramel Apple Basic Ingredients:
10 medium green apples (edit: Gma G suggests having them cold so the caramel sets up faster)
2 bags caramel bits (Love these! I bought them thinking they were regular caramels, but then opened them to find I did not have to unwrap them all. They are smaller balls so they melt easier too.)
Water
1 bag milk chocolate chips
1 bag white chips
Crisco

Optional ingredients: (these will be used for an additional coating depending on what flavor you want)
Cinnamon Sugar (used with white chocolate to make the apple pie flavor, my fav!)
Oreos
Butterfinger
Reese’s Pieces
Heath Bar
Chopped peanuts
anything else that you might like to try!

  1. Begin by washing the cold apples and removing the stem. Then insert the stick where the stem was. (The sticks come with the caramels.)
  2. Spread a good amount of wax paper on the counter and spray it with cooking spray so the apples won’t stick.
  3. Melt the caramel according to package instructions. I believe ours said something like add 2 T. of water and microwave for 90 seconds, stir and then melt until smooth. You want it pretty runny.
  4. Dip your apples in the caramel by tipping the bowl, holding the stick, and spinning the apple in it. (sorry forgot to take pics of all this) Cover all but about a 1 1/2 inch circle on the top. Continue turning the apple while the caramel drips off so that you have an even coat all around. Let it drip for quite a while, until it looks like a thin layer, otherwise you will have a huge puddle under your apple. Reheat caramel for additional apples as necessary to keep it runny.
  5. Place the apples on the sprayed wax paper and put in the fridge for about 20 minutes until the caramel is solid (I had them on a cookie sheet to make it easy to move them all at once).
  6. Get out two medium bowls and put each flavor of chocolate chips in each bowl. Add a Tablespoon of Crisco to each bowl. This will make the chocolate more viscous. Microwave until smooth, stirring at least once per minute.
  7. Repeat dipping step 4, but with the chocolate. Sprinkle with your Optional ingredient (oreos, butterfinger, etc.) so they stick to the chocolate.
  8. Place on sprayed wax paper and put in the fridge for 30 minutes.
  9. If you want to get really fancy, put the leftover chocolate in a ziploc, cut a tiny hole in the corner and drizzle over the apples.
  10. Enjoy! MmmMMmm! I like to cut mine up so it is easier to eat.

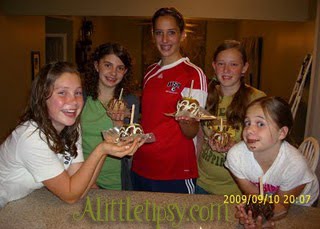
My Beehives with their apples. They LOVED this activity!

My little guy thought this was the best bedtime snack ever!

P.S. Don’t forget to sign up for free Tipsy updates via RSS or email.

We have decided to truncate our feed to help protect against stolen content. I apologize for any inconvenience. Please love us anyway. 🙂

Budget Trail Mix for Your Trek

August 5, 2009 By Michelle Barneck 1 Comment

While on my pioneer trek we were given trail mix for a snack one day. Being the inquisitive person I am and having nothing else to do at the time I got to thinking. Why do we not use peanut M&Ms in trail mix? They are the same price as the regular ones and already have the peanuts inside. I am all about saving a buck. Many of our kids only eat the M&Ms from the mix anyway so why not sneak some protein in there?

I am also not a big fan of raisins. I say trail mix does not have to be the usual peanut, M&M, raisin mix. I like to spice it up with things I will actually eat. I like adding pretzels, craisins, raw almonds and sometimes mini marshmallows. What do you like in your trail mix?

And just for fun, here are a few pics of me as a Pioneer “grandma.” My little family was so awesome! They worked so hard and really pulled together when on the third day (14 miles) when we had to pull members of our family in the cart (even over Rocky Ridge), one had an injured knee and the other a bad migraine. I am so proud of them! One of our “grandsons” was here for the summer from South Korea. He kept decorating the muddy wheels with flowers to make them beautiful. We had an amazing experience!


P.S. Don’t forget to sign up for free Tipsy updates via RSS or email.

We have decided to truncate our feed to help protect against stolen content. I apologize for any inconvenience. Please love us anyway. 🙂
« Previous Page
Next Page »

  • Bloglovin
  • Facebook
  • Google+
  • Instagram
  • Pinterest
  • RSS
  • Twitter

Hi there! I'm Michelle. Mother of three little boys and one little princess. Welcome to A Little Tipsy, a place for exploring creativity and sharing inspiration.

Follow on Bloglovin


Visit Michelle Barneck {A Little Tipsy}'s profile on Pinterest.

Tutorials by Category


15 Family Reunion Games

Family Reunion Games Collage

15 Sprinkle Party Ideas

Sprinkle Birthday Party
Creative Commons License

© Copyright 2014 A Little Tipsy · Site Designed by The Fairy Blogmother · Web Hosting by RFE Hosting

This website uses cookies to improve your experience. We'll assume you're ok with this, but you can opt-out if you wish.Accept Read More
Privacy & Cookies Policy