A Little Tipsy

Creative Tips & Ideas

  • home
  • About Me
  • the tipsy top
  • press
  • projects
  • contact me
[print_thumbnail_slider]

Make a Memory {Family Camping Trip}

July 25, 2011 By Michelle Barneck 2 Comments

Here we are, week 8 of the Make a Memory series. Each Monday now through the end of August I will feature a special family tradition from one of my favorite bloggers. It is so important to create lasting memories with our families and this will be a fun way to get ideas for fun traditions we can start with our own families. So let’s dive right in and see how Amanda from Every Creative Endeavor and her family make a memory!

I am so excited to be here for Make a Memory Monday! What a fun series and I love that I get to participate! It is so important to make memories with your family and I am thrilled I get to share one with you! I grew up in a family with five girls – but that never stopped my parents from taking us camping each summer. In fact, we looked forward to it each year and grew up loving the outdoors!

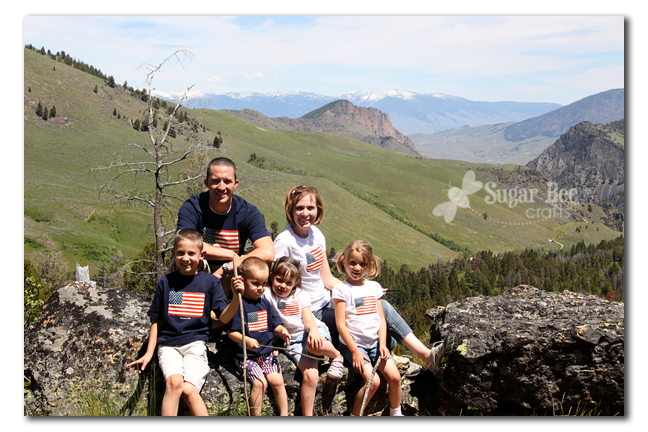
I have so many memories of packing up our car – sometimes dragging a U-haul behind us – and exploring Utah, Wyoming and Nevada! I loved laying out underneath the night sky and watching satellites and wishing on shooting stars, roasting hot dogs and marshmallows, rowing across lakes and down rivers, waking up to the fresh smell of the trees, tin foil dinners, Dutch oven dinners and Shasta sodas – but my very favorite thing was always sitting around the campfire!

make a memory 6

As my sisters and I have grown up and started our own families we have still made camping a priority – each year we have a family camping trip and are still making memories to share with our kids. I want my kids to love camping and the outdoors as much as I did growing up so my husband and I try to get up to the mountains as much as possible with our kids. We want them to get used to the idea because it will be happening each summer for many many years to come!

make a memory 4

make a memory 2make a memory 5Make a memory

So far – they both loving going for rides up to the mountains, playing under the trees, s’mores and snuggling up in sleeping bags! Let’s hope it stays that way so our little family can make lots of fun memories for years to come.

Thanks so much, Michelle, for letting me stop by and share some fun memories!

———————————————————————————

I loved camping with my family growing up too. Though now that we are all older with families and babies of our own we usually “rough it” by renting a cabin. Though with over 20 of us in one cabin it can get crazy! Thanks Amanda for sharing another great way to make a memory!

P.S. Don’t forget to sign up for free Tipsy updates via RSS or email.

We have decided to truncate our feed to help protect against stolen content. I apologize for any inconvenience. Please love us anyway. 🙂

Make a Memory {Homemade Ice Cream}

July 18, 2011 By Michelle Barneck 1 Comment

Here we are, week 7 of the Make a Memory series. Each Monday now through the end of August I will feature a special family tradition from one of my favorite bloggers. It is so important to create lasting memories with our families and this will be a fun way to get ideas for fun traditions we can start with our own families. So let’s dive right in and see how Mandy from Sugar Bee and her family make a memory!

Hi everyone!! So excited to be here on A Little Tipsy!! I’m Mandy, from over at Sugar Bee Crafts:

Here’s the whole gang on our recent vacation:

I enjoy all things crafty and have lots of DIY and tutorials on my blog. I even have a link party on Tuesdays so I can see your craftiness – then I show off a bunch of you on Wednesdays. You might know me from a few of my fabulously popular posts (click picture to check them out!):

You can see more projects in my new Tutorials Page, so check that out as well.

Don’t you just LOVE the Make a Memory Series – – such a great idea!!

Today I’m going to talk about a great tradition that I married into – – my husband’s family is always making homemade ice cream – yum!! So this year when we visited his family on our vacation, I was sure to pay attention – –

First off, their ice cream is always so smooth and creamy – – some homemade ice cream is kind of crunchy, but not this. Turns out you need a good thickening agent, and there are 3 choices (I hadn’t heard of using any of these – where have I been?!?!)

—Eggs – you know, frozen custard has eggs in it. So can homemade ice cream. It’s best to use eggs when making something like chocolate ice cream, since you have to melt the chocolate on the stove, that way the eggs get heated.

—Jello – – you know, jello thickens up itself, so it will thicken up ice cream. This is best for fruit-flavored ice cream. For example, they made raspberry ice cream with real raspberries and raspberry jello as the thickener.

–Junket – I had never even heard of this stuff, but it’s made specifically for making ice cream:

There are tons of homemade ice cream recipes out there, and they love trying lots of different varieties. Once it’s made, you pour it into the machine’s cylinder thing:

Put the top on, surround the cylinder in ice, and let it go! Then voila, ice cream – takes about 40 minutes – –

The kids all LOVE making ice cream at home – – and all the adults remember growing up eating homemade ice cream, so it’s for sure memories in the making….

What is is about food that makes for such great memories?!?

I should have taken lots of pictures of everyone enjoying the ice cream – but let’s face it, I was busy eating my own delicious portion – -but here’s a few I happened to capture:

Enjoy making your own summer memories!! – Hope to see you over at www.SugarBeeCrafts.com!

————————————————————————————–

Mandy is so right! Many of my memories are tied to great family recipes: fondue, Rocky Road Brownies, Pierre Armondd Crepes. I had no idea you needed a thickening agent, but that totally makes sense. Our ice cream is delicious, but always a little runny. No more! Thanks Mandy for another great way to make a memory!

P.S. Don’t forget to sign up for free Tipsy updates via RSS or email.

We have decided to truncate our feed to help protect against stolen content. I apologize for any inconvenience. Please love us anyway. 🙂

Make a Memory {Mystery Dinner}

July 11, 2011 By Michelle Barneck 7 Comments

Here we are, week 6 of the Make a Memory series. Each Monday now through the end of August I will feature a special family tradition from one of my favorite bloggers. It is so important to create lasting memories with our families and this will be a fun way to get ideas for fun traditions we can start with our own families. So let’s dive right in and see how Kendra from My Insanity and her family make a memory!

Today I’m sharing a memory-making event that my mom did for us and that I have now shared with my own children. We did this for April Fool’s Day, but it would be great to spice up a summer evening, or would work well to be adapted for a birthday, Halloween, or most any party!


Family Surprise/Mystery Dinner

To make this memory, you turn your kitchen/dining room into a “restaurant” for the night. Everyone gets menus and is served a multi-course meal. The basic premise of a Surprise Dinner is that you order your dinner in courses, but the food all has mystery names, so you really don’t know what is going to wind-up on your plate and in which course. My mom used to have anywhere from 20 to 30 different menu items, including a main dish, bread, butter, various fruits and veggies, a few small desert items, the utensils, drink, napkin, toothpick, and even an ice cube. She’d usually enlist one of my older sisters to help her, then she’d hang a sheet to cover the kitchen entry so the meal could really be a surprise. She would have all of the food set out and labeled with the appropriate number for quick serving. Then she would give us menus similar to what you see here and we would order our courses making the best guesses that we could as to what the items we were ordering, really were.

My kitchen is a bit too open for curtain hanging, but I did put up a foam core poster blockade and moved the table in to the front room so no one could see what was happening in the kitchen. I created these menus in publisher, and had a great time watching my family try and figure out what each item might be. The key is to have everyone order all four courses (or how ever many you serve) at the beginning of the meal, before anyone has been served anything. I had a mix of menu items that I thought were pretty simple and some that were rather obscure and difficult to guess. I was fun to see the orders come out. I was afraid BSB would have figured it out and have a normal boring meal, but that may have only lasted for one course. He was having to scramble like everyone else when his course came out looking something like these…

This course consisted of The Titanic’s Demise (ice cubes), Idaho deconstructed (mashed potatoes), colony builders (ants on a log), sugar transporter (spoon), and perfect coin place (mint–really it should be a mint mint per my clue). This one isn’t too bad, because you can use your spoon for the mashed potatoes, but there is nothing to do with the ice cubes since no water or soda was ordered, you might want that spoon for another course, and what will you do with the gravy that didn’t get ordered.

Here are some other sample courses…

My son had to figure out another way to eat his vanilla ice cream, since he didn’t order any utensils with that course.

Oh, but my daughter has a knife for her ice cream in this course. Much better!

Here’s a generic version of the menu I made. If you want to use all of my menu items, you are welcome to print this for your personal use on an 8 1/2 x 11 paper–landscape orientation. Cut the paper in half and then cut the side with the courses into fourths. (Right click to save image).

Answer Key:

1. Ice
2. Deviled Eggs

3. Mashed Potatoes

4. Gravy
5. Jello
(Utah consumes more per capita than any place else).

6. Goldfish

7. Cucumber Wheels

8. Ants on a Log
(Raisins on Peanut Butter on Celery)

9. Ham slice
10. Corn
11. Fork
12. Spoon
13. Knife
14. Toothpick

15. Water
16. Napkin
17. Ice Cream
18. Chocolate syrup
19. Mint
20. Lemon-lime soda

If you don’t get any of them. I’d be happy to explain. My husband took issue with a few of my clues. You might have more fun creating your own menu, but hopefully this will at least get you started. My family had a great time with this dinner–even if they did have to eat their corn with a knife or slurp the gravy off of their plates. Each course that was brought out to each person was a great surprise for everyone at the table! Watching each other figure out how to eat each course, was highly entertaining!
My sister blogged about a few different adaptations of the mystery dinner that she has done for particular events with different themes. They did one menu based on the states of the US and food that each state is known for. That could be a great educational tool. There are countless other ways to customize it or adapt it for your circumstances. You can get my April Fools menu here and my sister’s Book of Mormon mystery menu here.

A few pointers: My mom is notorious for making everything from scratch. I didn’t have all day to spend in the kitchen, so I used a few more ready-made or easy to make menu items. To keep your shopping list simple, you might want to look in your pantry for snack foods or other items you have on hand. Things like raisins and marshmallows are big hits with kids, and could lend themselves to some fun mystery names. Also, filling all of the orders and serving everyone is a big/busy job. You might want to enlist a partner in crime to server or help work in the kitchen, if you attempt one of these dinners.
I’ll never forget the memories I have of my family’s mystery dinners from when I was a child! Now my own kids have their own fun mystery dinner memories!

——————————————————————————

Fabulous mystery dinner idea Kendra! Those clues are hilarious! I remember doing a Christmas themed mystery dinner with menu items like Snowman’s nose and Santa’s beard. It was so fun! Thanks for sharing another great way to make a memory!

P.S. Don’t forget to sign up for free Tipsy updates via RSS or email.

We have decided to truncate our feed to help protect against stolen content. I apologize for any inconvenience. Please love us anyway. 🙂

Make a Memory {Movie Night with Personalized Concession Boxes}

July 4, 2011 By Michelle Barneck 3 Comments

Here we are, week 5 of the Make a Memory series. Each Monday now through the end of August I will feature a special family tradition from one of my favorite bloggers. It is so important to create lasting memories with our families and this will be a fun way to get ideas for fun traditions we can start with our own families. So let’s dive right in and see how Kierste from Brown Paper Packages and her family make a memory!

Hello there! I’m Kierste, from Brown Paper Packages, and I’m delighted to be here today!


I love summer. It’s full of so many of my favorite things–the beach, BBQ’s, watermelon, the 4th of July, flip flops, campfires in the backyard, and much more. But there is one more thing that our family loves to do in the summer, and has become a favorite summer tradition…movie nights!

Movie night is much loved at our house. A lot of the time it is spontaneous and casual, and we all cozy up together to watch and munch popcorn. But there are also extra special times during the summer when it’s an “official movie night”–planned in advance, and highly anticipated…mostly due to the concession stand.
The week preceding movie night, all the kids are able to earn concession “money” (in Monopoly form). They do this by being good listeners, obeying quickly, keeping their room clean, going the extra mile, being kind to siblings, extra chores, etc. (Want your baseboards or windowsills cleaned? This is a great week for that!)
That evening, I set up a concession stand with popcorn, cans of soda, candy bars, cookies, and cotton candy, all labeled with prices. I also have fruit available, for free. 🙂 They can even purchase a variety pack, that comes with pop (if you’re under 5, it comes in a sippy cup!), popcorn, and a candy bar for a set amount. It is SO fun. The kids love it, we all look forward to it, and it’s an extra incentive and reward for good behavior and helping around the house.

With all this yummy concession food, I needed something for them to keep it all together. Using the cardboard flats that canned goods come on, you can have adorable boxes that are perfect for movie night.

Movie Concession Boxes


ITEMS YOU NEED:

  • cardboard flats with sides–pick them up at the grocery store on your next trip! Look for boxes with sturdy sides and bottom, and no nicks or cuts.
  • spray paint
  • scrapbook paper
  • distress ink
  • Mod Podge and foam brush
  • craft paint
  • foam stamps
DIRECTIONS:

  • Dust off your boxes, and make sure they are free of any lint.
  • Paint them with the spray paint. The inside bottom and sides need to be done well–no cardboard showing, but the outside doesn’t need to be perfect, since you will covering most of it up with paper. Let dry.
    ***Painting tip: Take several large pieces of plywood or solid wood boards, and hammer in very long nails into them, so that they poke through on the other side at least an inch or more. (see my painting pics…you’ll see mine) When you’re ready to paint, lay the wood down with the nails pointing up. This will provide a great surface to set the items you’re painting on…allowing you to get at all angles and not have to stick to the surface.

  • Measure the sides of your boxes, then cut scrapbook paper to fit.
  • Distress all edges.
  • Using the foam brush, apply a layer of Mod Podge directly onto the box. Place your paper on the box, then add another layer of Mod Podge on top.
  • Repeat on all sides. Let dry.
  • Stamp desired names in the middle of your box using craft paint and foam stamps. I like to use my finger to apply the paint to the stamp–it allows for more control over your paint.

You’re done! You’re ready for a movie night of your own!
P.S. We LOVE our popcorn containers from the One Spot at Target…only $1, and SO fun. We use them all the time. Our Target has them right now, so yours might as well!

…..
Thanks so much for having me Michelle, and to all of you for reading. It was so fun to be here!

Come on by brown paper packages to say hi–I’d love to have you!

Kierste

———————————————————————–

What a fun idea to let them earn concessions. It is amazing what kids will do for some candy! My little guy would flip over having his very own! Thanks Kierste for a great idea on how to make a memory!

P.S. Don’t forget to sign up for free Tipsy updates via RSS or email.

We have decided to truncate our feed to help protect against stolen content. I apologize for any inconvenience. Please love us anyway. 🙂
« Previous Page
Next Page »

  • Bloglovin
  • Facebook
  • Google+
  • Instagram
  • Pinterest
  • RSS
  • Twitter

Hi there! I'm Michelle. Mother of three little boys and one little princess. Welcome to A Little Tipsy, a place for exploring creativity and sharing inspiration.

Follow on Bloglovin


Visit Michelle Barneck {A Little Tipsy}'s profile on Pinterest.

Tutorials by Category


15 Family Reunion Games

Family Reunion Games Collage

15 Sprinkle Party Ideas

Sprinkle Birthday Party
Creative Commons License

© Copyright 2014 A Little Tipsy · Site Designed by The Fairy Blogmother · Web Hosting by RFE Hosting

This website uses cookies to improve your experience. We'll assume you're ok with this, but you can opt-out if you wish.Accept Read More
Privacy & Cookies Policy