A Little Tipsy

Creative Tips & Ideas

  • home
  • About Me
  • the tipsy top
  • press
  • projects
  • contact me
[print_thumbnail_slider]

Puppet Playhouse & Craft It! Kit {GIVEAWAY}

April 26, 2012 By Michelle Barneck 6 Comments

I am so excited to share what we have in store today! It’s one of those projects that makes my heart smile when I think about it. My kiddos and I created a puppet playhouse along with some animal puppets to go along. With spring break and summer on it’s way it is a super fun way to bust the “I’m Bored” streak!

I was excited when Elmer’s contacted me about their Craft it! Community! Craft it! is a place for creative gals to share their creations and project ideas, gain inspiration and seek crafting advice. I love having a place to visit filled with people who “get it.” You know, people who don’t think it’s weird that you keep 10 different types of adhesive on hand at all times and may even have an entire drawer dedicated to them.
We got a box in the mail and it was like Christmas! So many fun X-acto and Elmer’s things to create with!! We decided to make a puppet playhouse and various puppets so we would have a project for mommy’s strong opinion, but also some pieces the kids could do to their specifications. The kids had a blast putting together the puppets and putting on little shows. 

Puppet Supplies:
Scrap Paper & Cardstock
Popsicle sticks
Googly Eyes
Scissors
X-acto Corner Punch
Elmer’s Permanent Dot Runner 
Elmer’s Foam Adhesive Roll (for pig nose)
Painter’s Marker in White (for tiger fur)

For the puppets I cut out simple shapes for the bodies and heads (since my little one is still learning the ins and outs of scissors) and let him glue them all together with the dot runner. Many of the heads were just squares that I rounded with the corner punch. So easy!! You can see the basic shapes we used in the pictures below.

The puppets turned out so sweet and with so much more personality than if I would have done them on my own. I did the fringe for the mane after we glued it with the little precision tip scissors. This little lion just oozes cute factor!

My son insisted that I needed a Miss Piggy complete with blonde hair. We used the a piece of the foam adhesive roll to make the snout 3-D.
 

I didn’t even realize when I was cutting this snake out that I was giving him a frown. My little guy was nice enough to point out that he was sad because he had lost his mother and that Miss Piggy would adopt him.

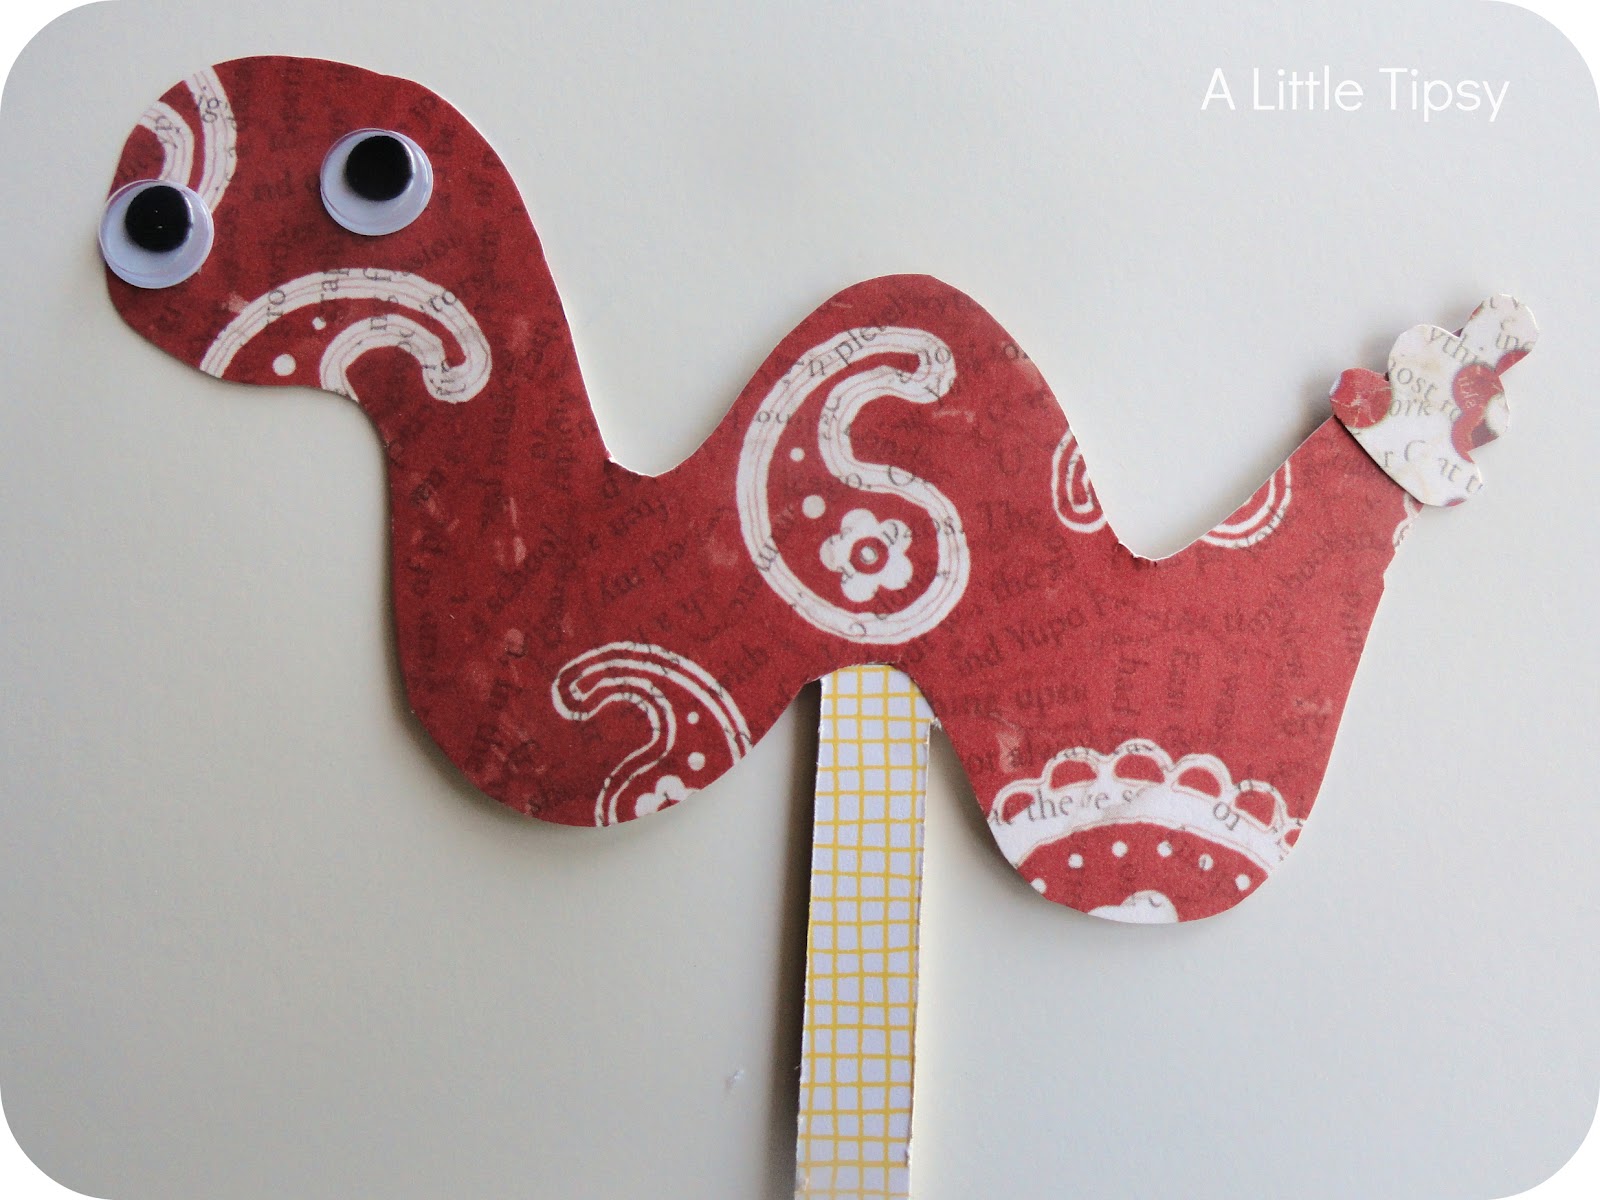
I love how Mr. Octopus looks like he’s taking a step. My little guy also pointed out that the polka dots were suction cups. So creative these little ones!
We added some whiskers and fur on the tiger with the white Painter’s marker. It was surprisingly easy to use except for the slight mishap on the tail getting the paint flowing in the beginning.
By now my kiddos were ready for a break so off to naps they went and I decided to tackle the X-acto knife work and puppet playhouse without the little hands.
Puppet Playhouse Supplies:
2 Elmer’s Bifold Foam
X-acto Self-Healing Mat
X-acto Metal Ruler
Packing tape
X-acto Knife
Scissors
3 12×12 Polka Dot Paper
Red Cardstock
Yellow Cardstock
Elmer’s Permanant Dot Runner
Elmer’s Quick Dry Glue Pen
Glitter Foam Adhesive Stars
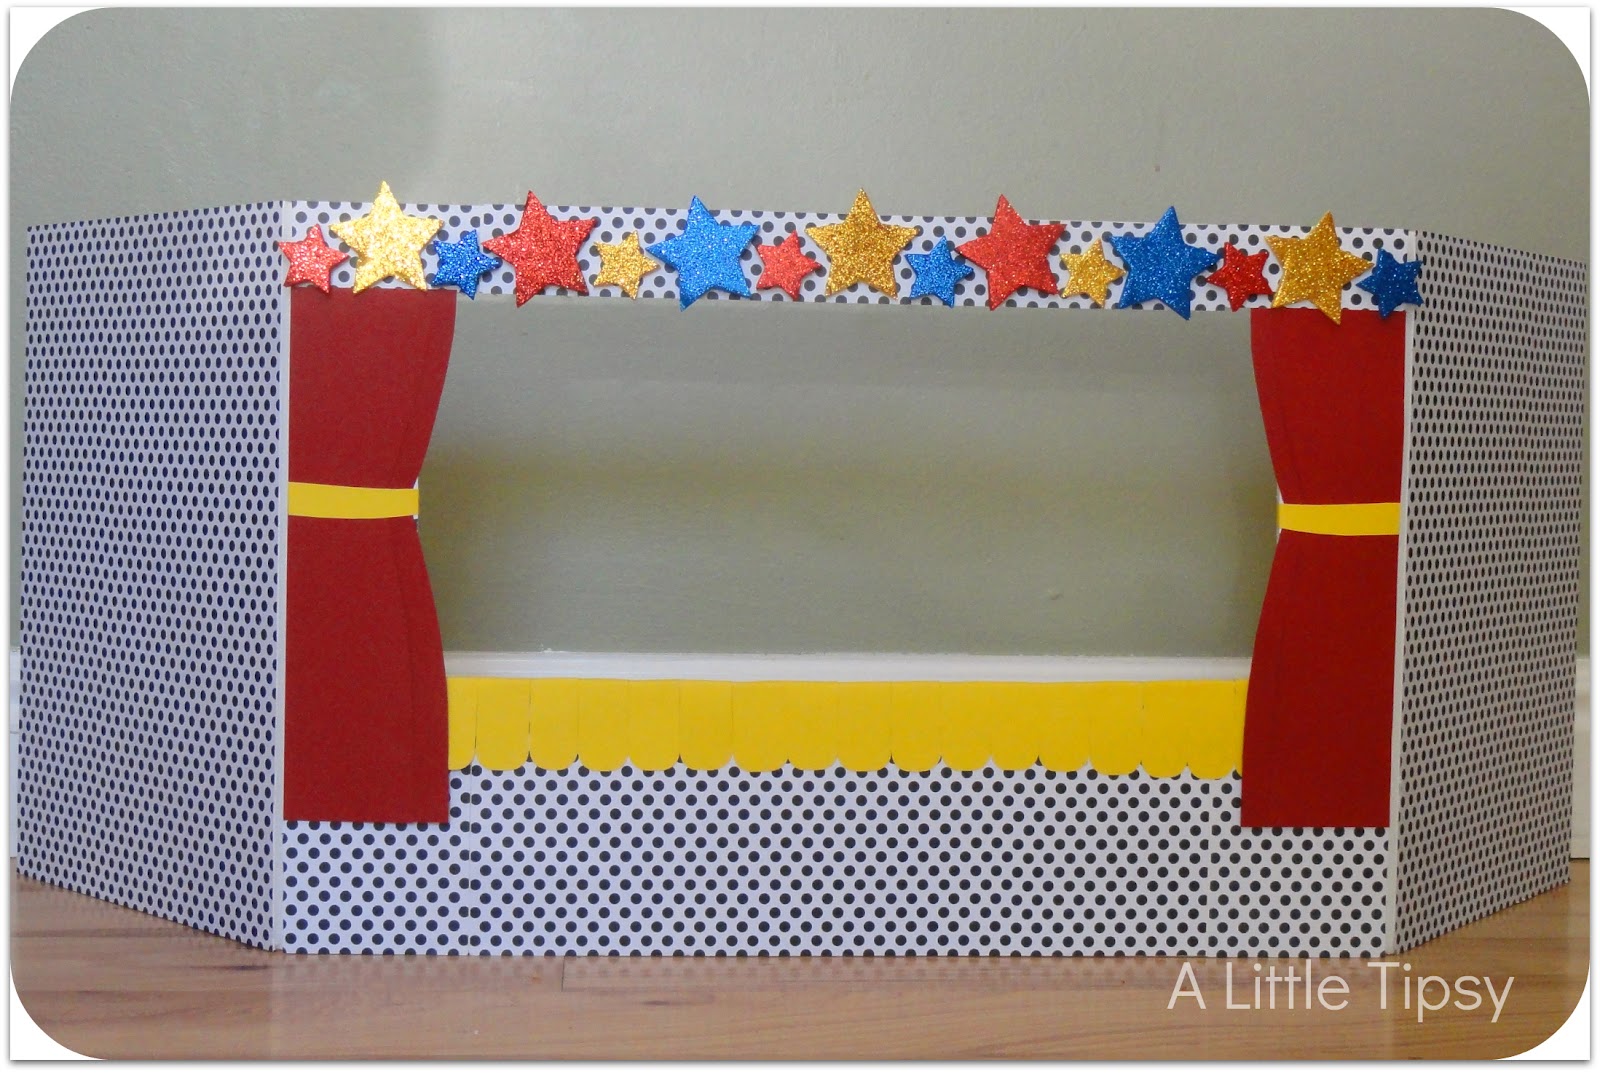
1. Open the two bi-fold foam boards and lay flat with the short ends together. Tape the two boards together with packing tape. Lay the center of the board on the self-healing mat and using the ruler and X-acto knife cut out a 6 inch by 12 inch rectangle about 1.5 inches from the top of the board.

2. Using the permanant dot runner around the edges, adhere your polka dot paper over the entire front of the board. I cut slits in the paper where the board folds so it could still fold flat when not in use.
3.Cut a bunch of little rectangles (about 1″ x 2″) out of yellow cardstock. Round the bottom edges with the corner punch. Glue the rectangles on the bottom of the “stage” by doing a line with the glue runner on the bottom edge of the stage on both sides and about and inch down from the bottom on the front. Also do a thin line of the Elmer’s quick dry pen where the foam is rough from the X-acto knife. Fold the rectangles over the edge of the stage one by one.
4. Cut 4 curtain shapes from the red, two slightly larger than the other and layer them to look like curtains. Cut a little piece of yellow cardstock to look like a curtain tie back. Glue them on with the permanent dot runner.
5. Stick the stars on the top of the stage.
The best is that it still folds flat for storage!
What are some things you like to do to keep your kids happy and creative? I would love some more ideas for summer!
How about some supplies to get you started?!
Elmer’s is giving away TWO Craft It! kits full of products!

FOAM AND DISPLAY BOARD:
•             9” x 12” Mini Bi-Fold Foam Board
X-ACTO:
•             Designer Series Gripster Craft Knife
•             Designer Series 12” Metal Ruler
•             Designer Series 12” X 12” Self Healing Mat
•             Designer Series 8” Scissors
•             Designer Series 5” Precision Tip Scissors
•             Designer Series Basic Shape Templates
•             Designer Series Decorative Shape Templates
PAINTERS:
•             Painters Bright Colors
•             Painters Sherbet Swirl
CRAFTBOND:
•             Dot Runner
•             Foam Mounting Tape
•             Thin Medium Glue Spots
•             All Purpose Glue Stick
•             Quick Dry Dual Tip Glue Pen
•             Elmer’s Designer Tape

Enter with the Rafflecopter form below.

a Rafflecopter giveaway

P.S. Don’t forget to sign up for free Tipsy updates via RSS or email.

We have decided to truncate our feed to help protect against stolen content. I apologize for any inconvenience. Please love us anyway. 🙂

Mikarose {$50 Giveaway}

April 19, 2012 By Michelle Barneck 68 Comments

I always love a new dress in the spring, so I was super excited when Mikarose contacted me about their clothing line. I got to try out the Ashley dress. The material is soft and so comfortable and I love that it is simple so I can dress it up with accessories any way I like. We were out of town for Easter so I actually wore this dress to church two Sundays in a row, once at my in-laws and once here. And did I mention that it is washable? Yes, ma’am!
Besides dresses, they also have modest skirts, shirts, and accessories. So cute, right?! They all have such great details!
Double Ruffle TopRiley1/2 Sleeve Flower Top
Want a little something of your own?
I am so excited that Mikarose is giving away a $50 gift certificate to one lucky reader!

Sorry internationals this giveaway is for U.S. & Canada residents only.


a Rafflecopter giveaway

Disclosure: Review product and giveaway gift certificate were provided by Mikarose. I was in no other way compensated for this post and all opinions are my own.

P.S. Don’t forget to sign up for free Tipsy updates via RSS or email.

We have decided to truncate our feed to help protect against stolen content. I apologize for any inconvenience. Please love us anyway. 🙂

Lisa Leonard {$50 Giveaway}

April 5, 2012 By Michelle Barneck 7 Comments

Are you ready for a post full of loveliness? We’re talking drool worthy jewelry from one Miss Lisa Leonard. Heard of her shop? I thought you may have. She has the most fabulous designs with a little something for everyone whether you are looking for something…

Romantic…

Sterling Illuminate Necklacesterling devoted bracelet

Organic…

autumn's song necklacetiny twig necklace

or just plain fun!

sterling through my lens necklacesterling blessed & lucky necklace

sweetheart tree necklaceI am so excited about the adorable necklace I received from Lisa. It is so fun and oozing with sentimental value. You see, when hubs and I got engaged we carved our initials in to a nearby tree. Is it not perfection? Now I have something special to commemorate that moment.

Oh and did I mention Lisa’s blog? Great read. Especially love her What I Wore Wednesday posts. She has great style combos I wouldn’t have thought of. Like turquoise, yellow, stripes and floral all in one outfit. Sounds crazy, but it’s totally charming!

So who wants to win a little loveliness?

Lisa Leonard is giving away $50 to her shop!


a Rafflecopter giveaway

P.S. Don’t forget to sign up for free Tipsy updates via RSS or email.

We have decided to truncate our feed to help protect against stolen content. I apologize for any inconvenience. Please love us anyway. 🙂

CioCo Photography {GIVEAWAY}

March 15, 2012 By Michelle Barneck 8 Comments

We’re taking a short intermission from our de-stash to highlight a super talented friend of mine. Camilla from CioCo Photography (you may remember her from Point of View) took our most recent family pictures and I adore them! She has major talent and makes what could be a totally stressful situation natural and dare I say fun. I love that she captured traditional shots as well as those full of life and personality!  
CioCo Photography is located in Salt Lake, but Camilla is available for travel. Cioco does both on location and studio work. I love options! She has experience in family and wedding photography, but specializes in newborn and baby photography. Ready to oooh and aaah or should I say gooo and gaah?

 
So precious! I did not get newborn pictures of my first son and always regretted it. I don’t want any of you (or your friends) to miss out on capturing those first days of your sweet little one. Lucky for you…

Cioco Photography is giving away a newborn session ($225 value)!

  • Session includes 20 images on a disc , or a $225 credit towards a Watch Me Grow Plan (includes the full newborn, and the 3 month, 6 month, 9 month, and 1 year mini sessions).
  • You, or whomever you win it for, must be able to travel to the session in studio in Salt Lake County.
Also, Cioco Photography is offering 10% off any session booked before March 31st!! Just mention Tipsy when you inquire. *excludes weddings.

a Rafflecopter giveaway


P.S. Don’t forget to sign up for free Tipsy updates via RSS or email.

We have decided to truncate our feed to help protect against stolen content. I apologize for any inconvenience. Please love us anyway. 🙂
« Previous Page
Next Page »

  • Bloglovin
  • Facebook
  • Google+
  • Instagram
  • Pinterest
  • RSS
  • Twitter

Hi there! I'm Michelle. Mother of three little boys and one little princess. Welcome to A Little Tipsy, a place for exploring creativity and sharing inspiration.

Follow on Bloglovin


Visit Michelle Barneck {A Little Tipsy}'s profile on Pinterest.

Tutorials by Category


15 Family Reunion Games

Family Reunion Games Collage

15 Sprinkle Party Ideas

Sprinkle Birthday Party
Creative Commons License

© Copyright 2014 A Little Tipsy · Site Designed by The Fairy Blogmother · Web Hosting by RFE Hosting

This website uses cookies to improve your experience. We'll assume you're ok with this, but you can opt-out if you wish.Accept Read More
Privacy & Cookies Policy