A Little Tipsy

Creative Tips & Ideas

  • home
  • About Me
  • the tipsy top
  • press
  • projects
  • contact me
[print_thumbnail_slider]

Make Your Own Gourmet Caramel Apples

September 22, 2009 By Michelle Barneck 9 Comments

Every time we go to Park City we stop in The Village Candy Shoppe on Main Street to pick up a delicious caramel apple. Rocky Mountain Chocolate Factory sells them too. Want to know how to make your own? Here we go! I mean what is fall without a delicious caramel apple?

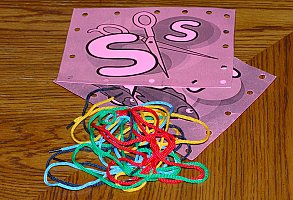
I taught my YW how to make Gourmet Caramel Apples for an activity. I wanted to make things super simple so they could remember how to do it and make them for their families, but you could definitely amp up the recipe with homemade caramel as long as it is a recipe that will stiffen over time.

Caramel Apple Basic Ingredients:
10 medium green apples (edit: Gma G suggests having them cold so the caramel sets up faster)
2 bags caramel bits (Love these! I bought them thinking they were regular caramels, but then opened them to find I did not have to unwrap them all. They are smaller balls so they melt easier too.)
Water
1 bag milk chocolate chips
1 bag white chips
Crisco

Optional ingredients: (these will be used for an additional coating depending on what flavor you want)
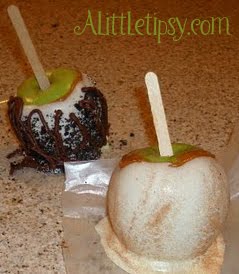
Cinnamon Sugar (used with white chocolate to make the apple pie flavor, my fav!)
Oreos
Butterfinger
Reese’s Pieces
Heath Bar
Chopped peanuts
anything else that you might like to try!

  1. Begin by washing the cold apples and removing the stem. Then insert the stick where the stem was. (The sticks come with the caramels.)
  2. Spread a good amount of wax paper on the counter and spray it with cooking spray so the apples won’t stick.
  3. Melt the caramel according to package instructions. I believe ours said something like add 2 T. of water and microwave for 90 seconds, stir and then melt until smooth. You want it pretty runny.
  4. Dip your apples in the caramel by tipping the bowl, holding the stick, and spinning the apple in it. (sorry forgot to take pics of all this) Cover all but about a 1 1/2 inch circle on the top. Continue turning the apple while the caramel drips off so that you have an even coat all around. Let it drip for quite a while, until it looks like a thin layer, otherwise you will have a huge puddle under your apple. Reheat caramel for additional apples as necessary to keep it runny.
  5. Place the apples on the sprayed wax paper and put in the fridge for about 20 minutes until the caramel is solid (I had them on a cookie sheet to make it easy to move them all at once).
  6. Get out two medium bowls and put each flavor of chocolate chips in each bowl. Add a Tablespoon of Crisco to each bowl. This will make the chocolate more viscous. Microwave until smooth, stirring at least once per minute.
  7. Repeat dipping step 4, but with the chocolate. Sprinkle with your Optional ingredient (oreos, butterfinger, etc.) so they stick to the chocolate.
  8. Place on sprayed wax paper and put in the fridge for 30 minutes.
  9. If you want to get really fancy, put the leftover chocolate in a ziploc, cut a tiny hole in the corner and drizzle over the apples.
  10. Enjoy! MmmMMmm! I like to cut mine up so it is easier to eat.

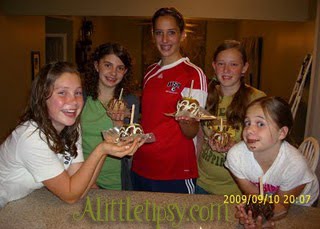
My Beehives with their apples. They LOVED this activity!

My little guy thought this was the best bedtime snack ever!

P.S. Don’t forget to sign up for free Tipsy updates via RSS or email.

We have decided to truncate our feed to help protect against stolen content. I apologize for any inconvenience. Please love us anyway. 🙂

Fun Fall Decor on the Cheap

September 21, 2009 By Michelle Barneck Leave a Comment

We have not quite entered in to “fall” yet here in Utah. The temperatures are predicted in the high 70’s this week, but you can have fall inside! Fall is my very favorite season and unfortunately sometimes here in the beehive state fall seems to be oh so short. Sometimes like 2 weeks. It is hot, then the leaves change and there is snow before they fall off the trees.

I am praying for a good Autumn this year. When it’s crisp at night and you get to pull out your sweaters for the first time. The visit to the pumpkin patch and drives up the canyon to see all the beautiful leaves. The smell of the leaves and pumpkin spice. Oh, how I love fall!

With the economy as it is and trying to be a wise consumer I have really been concentrating on using what I have and bargain shopping to feed my seasonal decor addiction. Here are my most recent displays I call an ode to fall.

I picked up this grapevine pumpkin up at Ross for $5. I loved it, but had to dress it up a bit. I remembered a scrap of ribbon I had saved from the lunch box at the Moms Who Make It conference a couple months ago. I curled it to look like pumpkin vines. The flowers were left over from the YW flip flop activity. I added a little raffia under it to give it that haystack feel.
Total cost:$5

I added more of the left over flowers to this shelf in the living room to bring in fall. Everything else was already there. That is my family motto and crest if you were wondering.
Total cost: $0

This bookshelf in the family room got the brunt of my random fall scraps. Click on the pic to get a close up.

Supplies:

  • Three bouquets of flowers from the dollar store. I was going to make flower pins and hair accessories. (I also used them for the the YW motherhood relay, which is another post entirely.)
  • Two mini pumpkins (from a set of three from Ross for $4)
  • Two sunflowers pulled out of a plant arrangement someone gave me when my little guy was a baby, that I killed and tossed a few months ago.
  • Three random candles I had sitting around
  • A fabric pumpkin from Ross ($3) that says “Give Thanks.” Put it up backwards until Halloween is over, then turn it around for Thanksgiving.
  • A pathetic plant with one long vine string, revived from my hubs old apartment. It usually sits on the kitchen table all wound around itself to make it resemble some sort of plant.
  • Raffia
  • Eternal Family sign I made at a Relief Society Enrichment activity when I first moved in 4 years ago. (We have not had a super Saturday in FOREVER. Seriously, like 2 years. Who do I talk to about that anyway? 😉 )
  • Digital pic frame that is always there

Phew! Total cost: $10

There you are, $15 spent for my little touch of fall. What do you have sitting around that you can use?

P.S. Don’t forget to sign up for free Tipsy updates via RSS or email.

We have decided to truncate our feed to help protect against stolen content. I apologize for any inconvenience. Please love us anyway. 🙂

Feature Friday-Back To School Toddler Activities

August 21, 2009 By Michelle Barneck 3 Comments

Today’s Feature Friday is just a little different. Instead of featuring one blogger with tons of great ideas, we are featuring a bunch of bloggers with one or two of their good ideas. (Maybe it is because I was lazy unpacking from my lake trip and did not get the interview questions out, maybe not.)

Back to School is upon us and with the older kids going off to school you may be left with just one little one at home. They will sense the excitement (or dread) and may want to be a part of it. Here are some fun ideas for back to school activities for toddlers.

Color File Folder Games from Kiz Club (via ABC and 123) They have TONS of resources!

Alphabet Sewing Cards from Kids Sewing projects (via ABC and 123)-Print your own alphabet sewing cards to teach fine motor skills and letters at the same time.

children sewing cards and strings

Nature Bracelet from ABC an 123-Take a nature walk with a “sticky bracelet.” Wrap a length of masking tape, sticky-side out, to your child’s wrist like a bracelet. As you walk and collect earthy treasures, stick them to the bracelet to keep and display.

People on the Bus from Toddlertoddler.com-print out the bus and have them color it yellow. Then, let them choose pics of family members to put in the windows


Alphabet Bugs from Toddlertoddler.com-tape each letter to a body part or furniture item that starts with that letter and ask them to help get the bugs off. Each letter they take off you tell them the letter and the name of the item it was stuck to.

Free File Folder Games from File Folder Heaven-Games to teach size, rhyming and more.

Color Matching Cards from Homeschool Creations-Perfect for teaching the little ones their colors. I love vibrant pictures!

totally tots

I am excited to try these ideas with my little guy. I hope you are too!

P.S. Don’t forget to sign up for free Tipsy updates via RSS or email.

We have decided to truncate our feed to help protect against stolen content. I apologize for any inconvenience. Please love us anyway. 🙂

Easy Back to School Centerpiece

August 10, 2009 By Michelle Barneck 4 Comments

This Back to School Centerpiece was just the ticket to get our house in gear for fall on its way!

I love changing things around just a little for each season. I LOVE back to school even though I have no kids in school (my little guy is 20 months) and I have not been in school since I graduated from BYU in 2005. There is something about all those cheap office and art supplies that gets me giddy! Here are some quick little tips to get in gear without much effort or expense.

I am a big fan of the fill random vases with stuff method. This is SO EASY for back to school. We all have crayons, pencils, and other school supplies we can use. As an extra added bonus, this makes your decor usable for homework. I find that homework many times gets done near the centerpiece anyway.

I used apples, colored pencils and magnetic letters from my little guy’s leapfrog fridge phonics set. I put them on top of the fridge because they would be too big of a temptation for my little guy and he would be on the table constantly.

I also have a thing for lists: to do lists, grocery lists, menu lists. You name it, I love it! I like to update seasonally by changing the grocery list pad on my fridge. I buy them in the Target dollar section and change them every few months. Here’s my back to school list pad:

That’s all for now. I will be enjoying some sand, water, and sun at Bear Lake this week! So I’ve got to get to packing. Better make a list. 😉

P.S. Don’t forget to sign up for free Tipsy updates via RSS or email.

We have decided to truncate our feed to help protect against stolen content. I apologize for any inconvenience. Please love us anyway. 🙂
« Previous Page

  • Bloglovin
  • Facebook
  • Google+
  • Instagram
  • Pinterest
  • RSS
  • Twitter

Hi there! I'm Michelle. Mother of three little boys and one little princess. Welcome to A Little Tipsy, a place for exploring creativity and sharing inspiration.

Follow on Bloglovin


Visit Michelle Barneck {A Little Tipsy}'s profile on Pinterest.

Tutorials by Category


15 Family Reunion Games

Family Reunion Games Collage

15 Sprinkle Party Ideas

Sprinkle Birthday Party
Creative Commons License

© Copyright 2014 A Little Tipsy · Site Designed by The Fairy Blogmother · Web Hosting by RFE Hosting

This website uses cookies to improve your experience. We'll assume you're ok with this, but you can opt-out if you wish.Accept Read More
Privacy & Cookies Policy