A Little Tipsy

Creative Tips & Ideas

  • home
  • About Me
  • the tipsy top
  • press
  • projects
  • contact me
[print_thumbnail_slider]

Warm Chocolate Bread Pudding with Turtle Topping

November 15, 2013 By Michelle Barneck 2 Comments


Post sponsored by


We all have holiday events to attend. For some it may be a work party, others a wedding, but we like to look our best. For some this means dieting or sugar altogether. I say let yourself indulge in moderation, or even better, learn to make those treats with less calories and sugar! 


My husband is a lover of bread pudding. The only time he gets it was on our recent trip to Ireland and when we end up at the dreaded buffet. He has been working his tail off finishing his Master’s degree so I decided to surprise him with a little treat, warm chocolate bread pudding with turtle topping. The secret is, I used Truvia® Baking Blend with sugar which took away 19% of the calories and 70% of the sugar! Did I mention that besides three small servings for the rest of us he ate the whole pan?! I guess he couldn’t tell the difference! The best part is, it was sooo easy!


  • INGREDIENTS
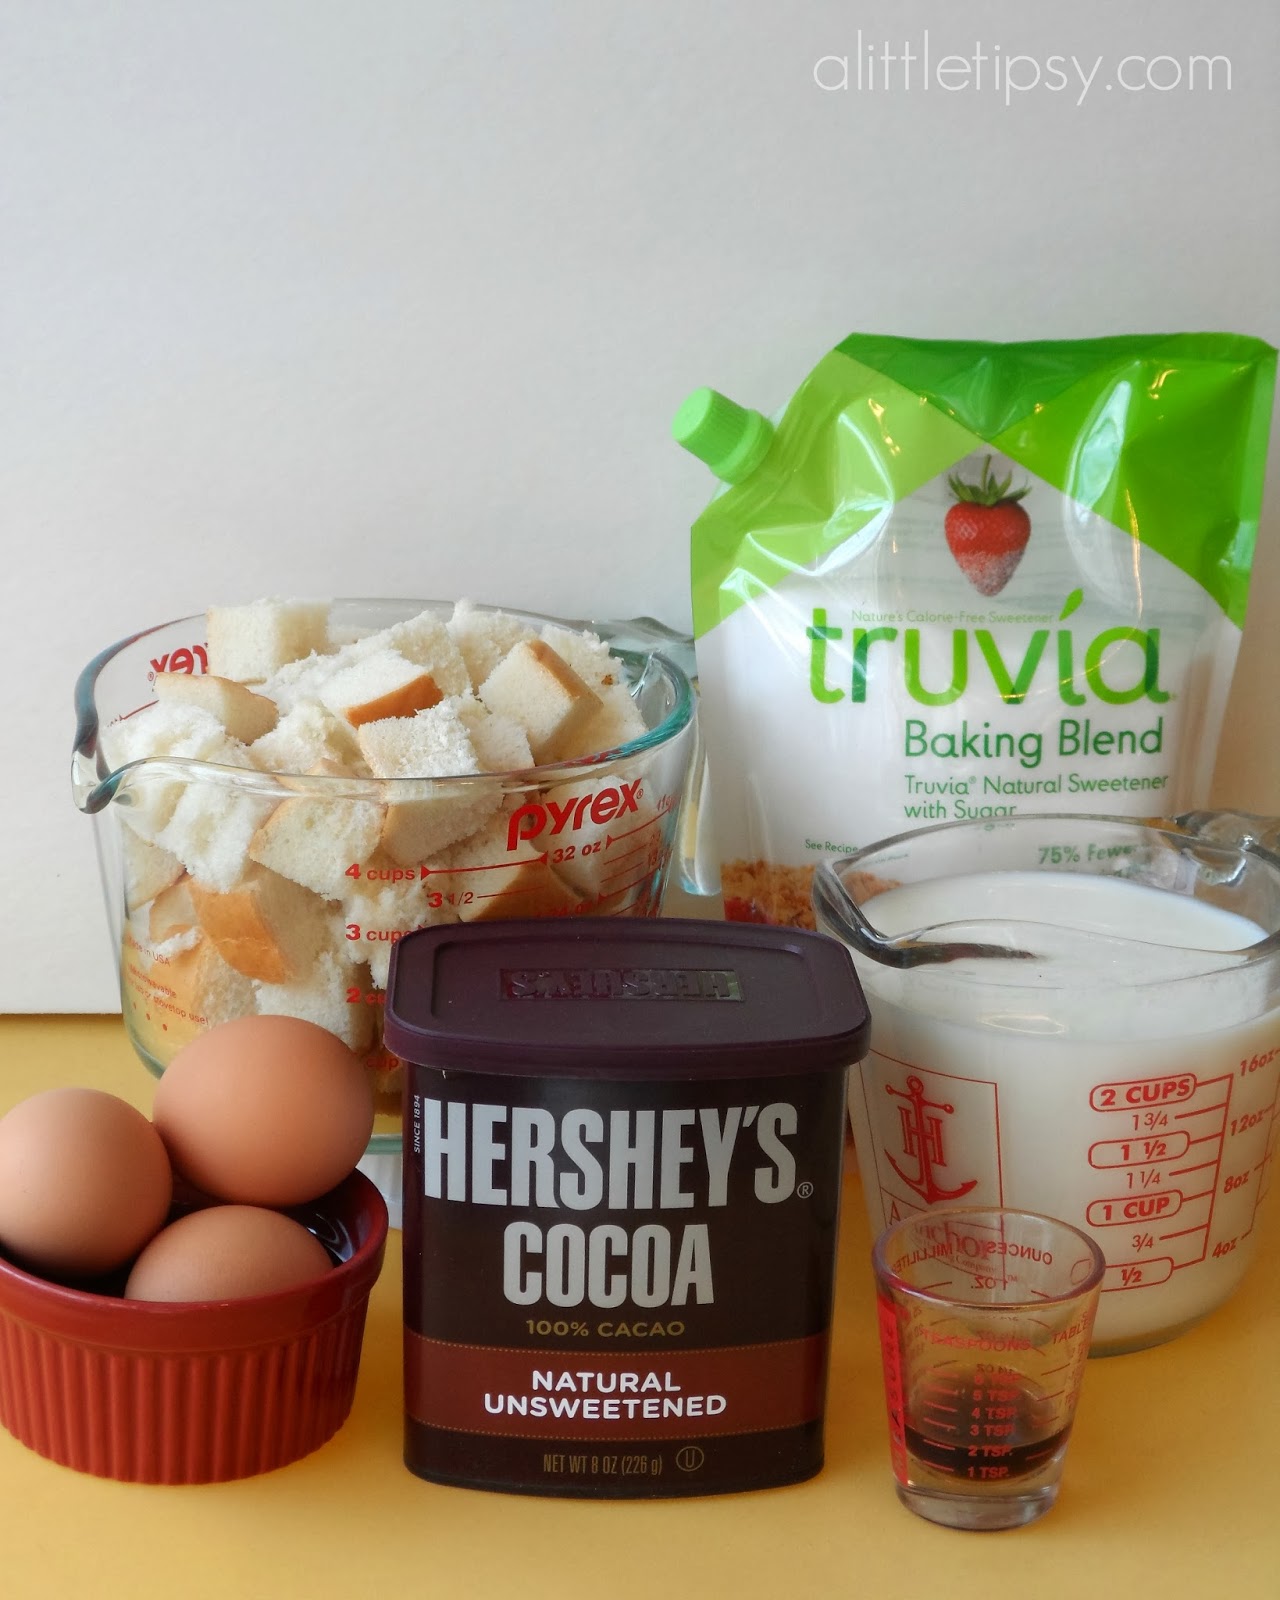
  • 21 ⁄ 2 cups skim milk
  • 1 ⁄ 3 cup Truvía® Baking Blend with sugar
  • 1 ⁄ 4 cup unsweetened cocoa
  • 2 tsp vanilla extract
  • 3 large eggs, lightly beaten
  • 1 large egg white
  • 5 cups (1-inch) cubed day-old French bread
  • Cooking spray
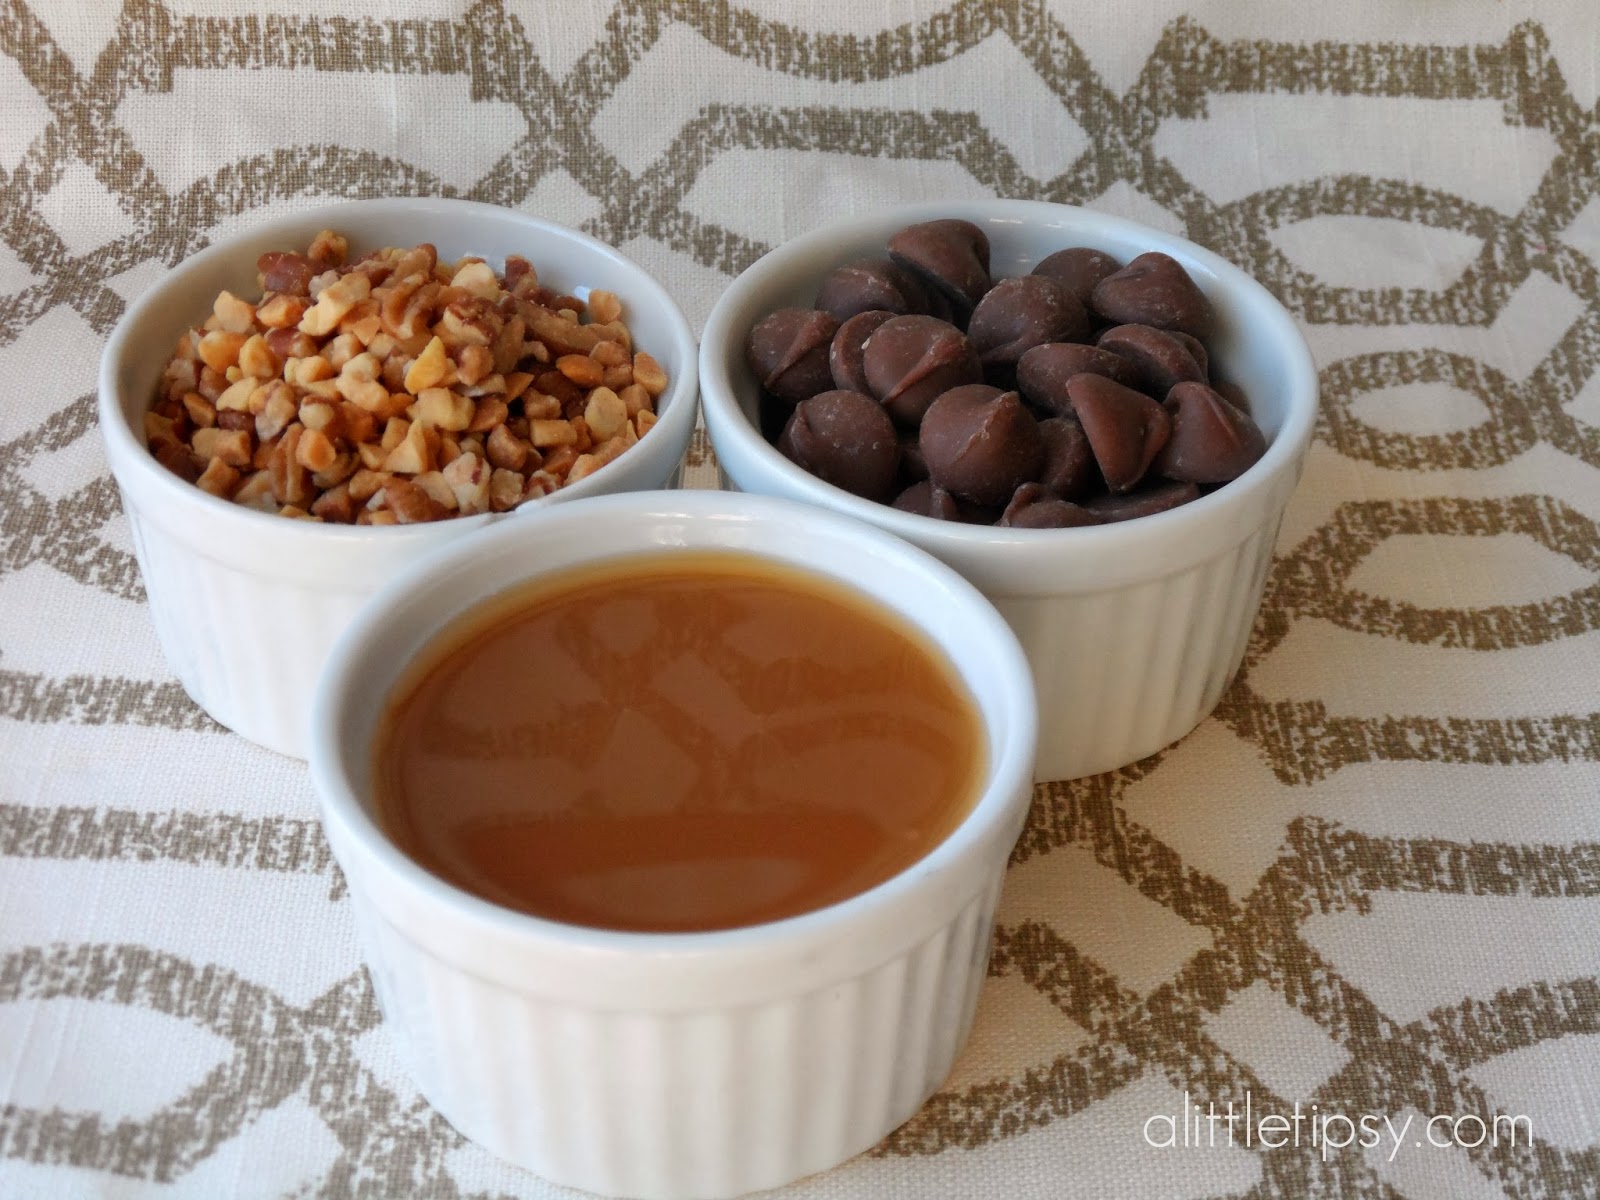
  • 1 ⁄ 4 cup caramel sundae syrup
  • 1 ⁄ 4 cup chopped pecans
  • 1 ⁄ 4 cup milk chocolate chips


DIRECTIONS

  • Preheat oven to 350° F.
  • Combine first 6 ingredients in a large bowl, stirring with a whisk. Add bread, pressing down with a spatula to soak. Spoon bread mixture into a 2-quart baking dish coated with cooking spray. Bake at 350° for 50 minutes. Drizzle with caramel syrup, and sprinkle with nuts. Bake an additional 5 minutes or until caramel syrup is bubbly.
  • Place chocolate chips in a small glass bowl or heavy-duty zip-top bag; microwave at high for 30 seconds or until melted. Drizzle over the bread pudding. Serve warm.
  • For more reduced calorie recipes, check out my Reduced Calorie Holiday Sweets pinterest board.

    Also, be sure to run over to the Truvia® brand Facebook page and enter their #HealthierHolidays Baking Sweepstakes for your chance to win a Healthier Holidays Baking Kit!

    Truvia® natural sweetener is a great tasting, zero-calorie sweetener made with the best tasting part of the stevia leaf. One packet provides the same sweetness as two teaspoons of sugar, and is great in coffee, tea, or even your morning grapefruit. The sweetener is available in 40-, 80- and 140-count boxes, and in a spoonable jar. Truvia® Baking Blend blends Truvia® natural sweetener and sugar to provide a sugar-like taste and texture for recipes, with 75% fewer calories than sugar. For more info, check out Truvia.com/recipes or our Facebook, Pinterest, Twitter, and YouTube channels.

    Disclosure: Compensation was provided by Cargill® via Glam Media. The opinions expressed herein are those of the author and are not indicative of the opinions or positions of Cargill®.

    We have decided to truncate our feed to help protect against stolen content. I apologize for any inconvenience. Please love us anyway. 🙂

    Fun Felt Christmas Gift Embellishments

    November 12, 2013 By Michelle Barneck 2 Comments

    Hi everyone! I’m Terra from mama says sew, and I’m going to be sharing a Christmas craft today.
    This is a really versatile project. You can use them to make bookmarks, which would be a fun addition if you’re gifting a book.
    They also make fun hair accessories. You can attach them to a clip or skinny elastic for a headband like I did here.
    They would also be fun attached to a tag for gifts or a fun little something extra in a Christmas card.
    They are pretty simple to put together. Here’s how.
    First, cut out your shapes. I have a die cut machine that I used to cut out the circles, and everything else I just free-handed.
    Add any embroidery you’d like to embellish them.
    Then put all your pieces together. I used a glue gun.
    To attach to elastic, you’ll need your felt circle, a smaller circle, and some skinny elastic.
    Glue the elastic on the back.
    Then add your felt circle to hide the messiness and to help keep the elastic in place.
    And there it is!
    These are the ones I made.
    —————————————————————-
    Thanks Terra! What a fun way to embellish gifts. I LOVE the bookmark idea!
    We have decided to truncate our feed to help protect against stolen content. I apologize for any inconvenience. Please love us anyway. 🙂

    Hi, I’m Dentophobic. And You Are? {$100 Giveaway}

    November 7, 2013 By Michelle Barneck 88 Comments

    Post sponsored by ARM & HAMMER.

    Ok, so I am probably not quite to the phobic state, but I do not like the dentist and I am in good company. It is estimated that 75% of US adults experience some degree of dental fear. Are you part of the in crowd? 

    So what do I do about it? I try to avoid visiting the dentist more than the obligatory twice per year. I go in, stare at that handsome man (over there, to there to the right. I couldn’t resist including a picture.) for about five minutes for my check up and vow to not have to visit again for another six months. 

    So naturally, I love products that can help keep my pearly whites, well, pearly and white. I recently discovered two products I am pretty fond of for such upkeep, ARM & HAMMER™ Sensitive toothpaste from the makers of Orajel™ and the Spinbrush: ProClean Sonic. Phew, kind of a mouthful right? (he he, punny.)


    But, in all seriousness, lets break it down to the nitty gritty of (and who knows, maybe TMI) why I like it.


    ARM & HAMMER™ Advance White™ Sensitive with Whitening

    Let’s start with the toothpaste. I noticed a difference immediately. When I was brushing, it seemed stronger and different than my normal toothpaste. I wasn’t sure I would like it. But like all big decisions, I slept on it. And guess what? I woke up to an amazing find. No yucky taste, no filminess, or cotton mouth. My mouth felt great and fresh. I couldn’t believe it so I asked my husband if he noticed a difference and he agreed. Wowsers! All that and it will help with my cold sensitivity and whitening too?! Sold!

    Get this, my husband just told me that he loves the toothpaste so much that he told all his co-workers about it today at stand up. Now that’s some dedication!

    My husband swears by a powered toothbrush. I have never been a big fan of non-manual toothbrushes. I hate the spinning heads. I always manage to pinch my cheeks with them while brushing. How? I don’t know…that’s another story.


    Arm & Hammer SpinBrush Powered Toothbrush, Pro Clean Sonic Brush, Soft - 1 ea

    When to what to my wandering eyes should appear but a powered toothbrush with no spinners to fear. The Spinbrush Pro Clean Sonic has a dynamic fluid action that pushes the toothpaste and water between teeth. Being a less than faithful flosser that was music to my ears. The moving bristles also help me avoid pressing to hard. I have a bad habit of breaking toothbrushes from pressing too hard. I’ve done it twice. So far I like it and the fact that it has bristles built to remind me in three months to change the head is a bonus. I have enough to think about.

    Now, I have something for you to think about.  What ARM & HAMMER Products would you like to try? What would you do with $100?


    We teamed up with ARM & HAMMER to give away a Seasonal Savings Gift Pack which includes:

    • 2-3 ARM & HAMMER products based on product availability. Featured products include: ARM & HAMMER™ Sensitive toothpaste, from the makers of Orajel™, Spinbrush: ProClean Sonic, Tooth Tunes™, ARM & HAMMER™ Ultra Power 4X Liquid Laundry Detergent, ARM &HAMMER™ Baking Soda, ARM & HAMMER™ Simply Saline™ Nasal Relief, ARM & HAMMER™ Double Duty Clumping Litter
    • $100 Visa Gift Card for purchasing more ARM & HAMMER products

    Who couldn’t use some extra cash this holiday season?

    Enter using the Rafflecopter form below.

    a Rafflecopter giveaway

    If you need a little help finding the products, click here to see where to buy.

    Disclosure: I received compensation for this post and found two new products I am loving!

    We have decided to truncate our feed to help protect against stolen content. I apologize for any inconvenience. Please love us anyway. 🙂

    Lavender Bubbles

    November 5, 2013 By Michelle Barneck Leave a Comment

    Hello there! I’m Kelly from Smart School House and it is always such a privilege to be here! Today I have a beautiful craft to share with you and your kids will love it too. That’s right, it’s beautiful and kids will love it. Introducing: DIY Lavender Bubbles!

    DIY Lavender Bubbles by Smart School House

    See the full tutorial…

    Now, I realize that the weather has cooled off a bit in some places (and it might even be snowing where you are). However, here on the coast of California, the weather is still lovely! So, in celebration of Halloween being over and the crisp skies outside, I decided to create something that was inspired by nature. Plus, you can’t eat it! Let’s be honest here, after all of that Halloween candy, doesn’t it sound nice to go outside and play? Exactly! DIY lavender bubbles are perfect to relax your kiddos while playing outdoors.
    I have a lot (a lot) of lavender growing! Here is a picture of the lavender in my front yard. This lavender has inspired me to make so many things on my blog!

    Lavender Driveway

     To make the DIY Lavender Bubbles, you only need a few simple ingredients:

    • A Bubble Container 
    • Pipe Cleaners 
    • Lavender Scented Dish Soap (I found mine at the dollar store!) 
    • Sugar 
    • Food Coloring 

    To make the Lavender Bubbles:

    Combine 4 cups of warm water with 1/2 cup of sugar. Once the sugar is completely dissolved, add 3/4 cup of the lavender dish soap Add 1 drop of blue food coloring and 3 drops of red food coloring Store in an air tight container.

    To make the DIY bubble wand:

    Create a circle near one end of the pipe cleaner and twist any extra around the stem of the pipe cleaner (so easy!).

    Have you ever made your own bubble solution? There are so many ways you can do it. Keep in mind that your dish soap might be a little different than mine and that’s ok! Simply add more or less as you see needed. The same goes with the food coloring! Some lavender dish soaps are more purple than others, so if you just add a little at first, it can’t go wrong! Have fun and happy fall!

    ———————————————————————
    Thanks Kelly! I adore the idea of a gift that can be both beautiful and so much fun!
    We have decided to truncate our feed to help protect against stolen content. I apologize for any inconvenience. Please love us anyway. 🙂
    « Previous Page
    Next Page »

    • Bloglovin
    • Facebook
    • Google+
    • Instagram
    • Pinterest
    • RSS
    • Twitter

    Hi there! I'm Michelle. Mother of three little boys and one little princess. Welcome to A Little Tipsy, a place for exploring creativity and sharing inspiration.

    Follow on Bloglovin


    Visit Michelle Barneck {A Little Tipsy}'s profile on Pinterest.

    Tutorials by Category


    15 Family Reunion Games

    Family Reunion Games Collage

    15 Sprinkle Party Ideas

    Sprinkle Birthday Party
    Creative Commons License

    © Copyright 2014 A Little Tipsy · Site Designed by The Fairy Blogmother · Web Hosting by RFE Hosting

    This website uses cookies to improve your experience. We'll assume you're ok with this, but you can opt-out if you wish.Accept Read More
    Privacy & Cookies Policy